007 SpringBoot的@EnableAutoConfiguration注解
一:原理
1.
首先Spring Boot项目中都会如下启动类:
@SpringBootApplication

public class Application {

    public static void main(String[] args) {

        SpringApplication.run(Application.class, args);

    }

}
其中,@SpringBootApplication中有三个重要的注解合一。
@Target(ElementType.TYPE)

@Retention(RetentionPolicy.RUNTIME)

@Documented

@Inherited

@SpringBootConfiguration

@EnableAutoConfiguration

@ComponentScan(excludeFilters = { @Filter(type = FilterType.CUSTOM, classes = TypeExcludeFilter.class),

        @Filter(type = FilterType.CUSTOM, classes = AutoConfigurationExcludeFilter.class) })

public @interface SpringBootApplication {
所以,来说说@EnableAutoConfiguration的作用。
 @Target(ElementType.TYPE)

 @Retention(RetentionPolicy.RUNTIME)

 @Documented

 @Import(EnableConfigurationPropertiesImportSelector.class)

 public @interface EnableConfigurationProperties {
2.作用
借助AutoConfigurationImportSelector,@EnableAutoConfiguration可以帮助SpringBoot应用将所有符合条件的@Configuration配置都加载到当前SpringBoot创建并使用的IoC容器。
借助于Spring框架原有的一个工具类:SpringFactoriesLoader的支持,@EnableAutoConfiguration可以智能的自动配置功效才得以大功告成!
3.进一步说明如何加载
在AutoConfigurationImportSelector类中可以看到通过 SpringFactoriesLoader.loadFactoryNames()把 spring-boot-autoconfigure.jar/META-INF/spring.factories中每一个xxxAutoConfiguration文件都加载到容器中。
spring.factories文件里每一个xxxAutoConfiguration文件一般都会有下面的条件注解:
@ConditionalOnClass : classpath中存在该类时起效
@ConditionalOnMissingClass : classpath中不存在该类时起效
@ConditionalOnBean : DI容器中存在该类型Bean时起效
@ConditionalOnMissingBean : DI容器中不存在该类型Bean时起效
@ConditionalOnSingleCandidate : DI容器中该类型Bean只有一个或@Primary的只有一个时起效
@ConditionalOnExpression : SpEL表达式结果为true时
@ConditionalOnProperty : 参数设置或者值一致时起效
@ConditionalOnResource : 指定的文件存在时起效
@ConditionalOnJndi : 指定的JNDI存在时起效
@ConditionalOnJava : 指定的Java版本存在时起效
@ConditionalOnWebApplication : Web应用环境下起效
@ConditionalOnNotWebApplication : 非Web应用环境下起效
二:示例
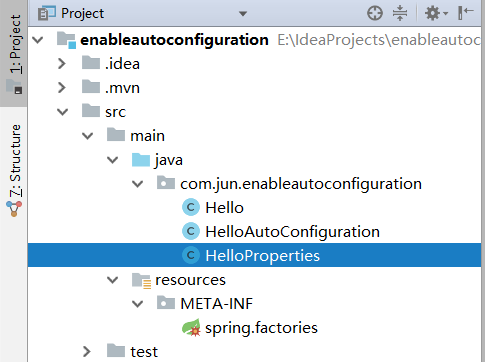
1.结构
2.说明
在加载的时候,会通过一些注解进行匹配,然后都通过了,@EnableConfiguration才可以加载。
同时,可以不写@SpringBootApplication注解了。
3.说明项目
一共两个。
第一个是加载合适的bean
第二个是使用。
三:项目一
1.pom文件
<?xml version="1.0" encoding="UTF-8"?>

<project xmlns="http://maven.apache.org/POM/4.0.0" xmlns:xsi="http://www.w3.org/2001/XMLSchema-instance"

    xsi:schemaLocation="http://maven.apache.org/POM/4.0.0 https://maven.apache.org/xsd/maven-4.0.0.xsd">

    <modelVersion>4.0.0</modelVersion>

    <parent>

        <groupId>org.springframework.boot</groupId>

        <artifactId>spring-boot-starter-parent</artifactId>

        <version>2.1.7.RELEASE</version>

        <relativePath/> <!-- lookup parent from repository -->

    </parent>

    <groupId>com.jun</groupId>

    <artifactId>enableautoconfiguration</artifactId>

    <version>0.0.1-SNAPSHOT</version>

    <name>enableautoconfiguration</name>

    <description>Demo project for Spring Boot</description>

    <properties>

        <java.version>1.8</java.version>

    </properties>

    <dependencies>

        <dependency>

            <groupId>org.springframework.boot</groupId>

            <artifactId>spring-boot-starter</artifactId>

        </dependency>

        <dependency>

            <groupId>org.springframework.boot</groupId>

            <artifactId>spring-boot-starter-test</artifactId>

            <scope>test</scope>

        </dependency>

        <dependency>

            <groupId>org.springframework.boot</groupId>

            <artifactId>spring-boot-autoconfigure</artifactId>

            <version>2.0.4.RELEASE</version>

        </dependency>

        <dependency>

            <groupId>org.springframework.boot</groupId>

            <artifactId>spring-boot-configuration-processor</artifactId>

            <version>2.0.4.RELEASE</version>

            <optional>true</optional>

        </dependency>

        <dependency>

            <groupId>org.springframework.boot</groupId>

            <artifactId>spring-boot-starter-web</artifactId>

        </dependency>

    </dependencies>

</project>
2.hello
<?xml version="1.0" encoding="UTF-8"?>

<project xmlns="http://maven.apache.org/POM/4.0.0" xmlns:xsi="http://www.w3.org/2001/XMLSchema-instance"

    xsi:schemaLocation="http://maven.apache.org/POM/4.0.0 https://maven.apache.org/xsd/maven-4.0.0.xsd">

    <modelVersion>4.0.0</modelVersion>

    <parent>

        <groupId>org.springframework.boot</groupId>

        <artifactId>spring-boot-starter-parent</artifactId>

        <version>2.1.7.RELEASE</version>

        <relativePath/> <!-- lookup parent from repository -->

    </parent>

    <groupId>com.jun</groupId>

    <artifactId>enableautoconfiguration</artifactId>

    <version>0.0.1-SNAPSHOT</version>

    <name>enableautoconfiguration</name>

    <description>Demo project for Spring Boot</description>

    <properties>

        <java.version>1.8</java.version>

    </properties>

    <dependencies>

        <dependency>

            <groupId>org.springframework.boot</groupId>

            <artifactId>spring-boot-starter</artifactId>

        </dependency>

        <dependency>

            <groupId>org.springframework.boot</groupId>

            <artifactId>spring-boot-starter-test</artifactId>

            <scope>test</scope>

        </dependency>

        <dependency>

            <groupId>org.springframework.boot</groupId>

            <artifactId>spring-boot-autoconfigure</artifactId>

            <version>2.0.4.RELEASE</version>

        </dependency>

        <dependency>

            <groupId>org.springframework.boot</groupId>

            <artifactId>spring-boot-configuration-processor</artifactId>

            <version>2.0.4.RELEASE</version>

            <optional>true</optional>

        </dependency>

        <dependency>

            <groupId>org.springframework.boot</groupId>

            <artifactId>spring-boot-starter-web</artifactId>

        </dependency>

    </dependencies>

</project>
3.helloproperties
package com.jun.enableautoconfiguration;

import org.springframework.boot.context.properties.ConfigurationProperties;

@ConfigurationProperties(prefix = "hello") //获取属性值

public class HelloProperties {

    private static final String MSG = "world";

    private String msg = MSG ;

    public String getMsg() {

        return msg;

    }

    public void setMsg(String msg) {

        this.msg = msg;

    }

}
4.helloautoconfiguration
 package com.jun.enableautoconfiguration;

 import org.springframework.beans.factory.annotation.Autowired;

 import org.springframework.boot.autoconfigure.condition.ConditionalOnClass;

 import org.springframework.boot.autoconfigure.condition.ConditionalOnMissingBean;

 import org.springframework.boot.autoconfigure.condition.ConditionalOnProperty;

 import org.springframework.boot.context.properties.EnableConfigurationProperties;

 import org.springframework.context.annotation.Bean;

 import org.springframework.context.annotation.Configuration;

 @Configuration        //为带有@ConfigurationProperties注解的Bean提供有效的支持。

                       // 这个注解可以提供一种方便的方式来将带有@ConfigurationProperties注解的类注入为Spring容器的Bean。

 @EnableConfigurationProperties(HelloProperties.class)       //开启属性注入,通过@autowired注入

 @ConditionalOnClass(Hello.class)           //判断这个类是否在classpath中存在,如果存在,才会实例化一个Bean

 @ConditionalOnProperty(prefix="hello", value="enabled", matchIfMissing = true)

 public class HelloAutoConfiguration {

     @Autowired

     private HelloProperties helloProperties;

     @Bean

     @ConditionalOnMissingBean(Hello.class)//容器中如果没有Hello这个类,那么自动配置这个Hello

     public Hello hello() {

         Hello hello = new Hello();

         hello.setMsg(helloProperties.getMsg());

         return hello;

     }

 }
5.spring.factories
org.springframework.boot.autoconfigure.EnableAutoConfiguration=com.jun.enableautoconfiguration.HelloAutoConfiguration
四:使用项目
1.application.properties
#可以不配置
hello.enabled=true

hello.msg=uuibiu

#以debug模式运行
debug=true
2.WenApplication
 package com.jun.web;

 import com.jun.enableautoconfiguration.Hello;

 import org.slf4j.Logger;

 import org.slf4j.LoggerFactory;

 import org.springframework.beans.factory.annotation.Autowired;

 import org.springframework.boot.SpringApplication;

 import org.springframework.boot.autoconfigure.EnableAutoConfiguration;

 import org.springframework.boot.autoconfigure.SpringBootApplication;

 import org.springframework.context.ConfigurableApplicationContext;

 import org.springframework.core.env.ConfigurableEnvironment;

 import org.springframework.web.bind.annotation.RequestMapping;

 import org.springframework.web.bind.annotation.RestController;

 @SpringBootApplication

 @EnableAutoConfiguration

 @RestController

 public class WebApplication {

     private static final Logger logger = LoggerFactory.getLogger(WebApplication.class);

     @Autowired

     private Hello hello;

     @RequestMapping("/")

     public String index() {

         return hello.sayHello();

     }

     public static void main(String[] args) {

         ConfigurableApplicationContext context = SpringApplication.run(WebApplication.class, args);

         ConfigurableEnvironment environment = context.getEnvironment();

         logger.info("hello.msg:{}",environment.getProperty("hello.msg"));

     }

 }
007 SpringBoot的@EnableAutoConfiguration注解的更多相关文章
- SpringBoot之@EnableAutoConfiguration注解
源地址:https://blog.csdn.net/zxc123e/article/details/80222967 虽然定义使用了多个Annotation进行了原信息标注,但实际上重要的只有三个An ...
- SpringBoot中@EnableAutoConfiguration注解用法收集
参考: http://blog.csdn.net/xiaoyu411502/article/details/52770723 https://docs.spring.io/spring-boot/do ...
- SpringBoot自动配置注解原理解析
1. SpringBoot启动主程序类: @SpringBootApplication public class DemoApplication { public static void main(S ...
- @EnableAutoConfiguration注解原理
前言 Spring Boot中引入了自动配置,让开发者利用起来更加的简便.快捷.比如内嵌的tomcat端口默认配置是8080,这些都属于Spring Boot自动配置的范畴,当然其自动配置相当多. s ...
- SpringBoot自动化配置之三:深入SpringBoot:自定义EnableAutoConfiguration
前言 上面几篇文章介绍了SpringFramework的一些原理,这里开始介绍一下SpringBoot,并通过自定义一些功能来介绍SpringBoot的原理.SpringBoot在SpringFram ...
- 【Spring Boot源码分析】@EnableAutoConfiguration注解(一)@AutoConfigurationImportSelector注解的处理
Java及Spring Boot新手,首次尝试源码分析,欢迎指正! 一.概述 @EnableAutoConfiguration注解是Spring Boot中配置自动装载的总开关.本文将从@Enable ...
- SpringBoot相关的注解
一.注解(annotations)列表 @SpringBootApplication:包含了@ComponentScan.@Configuration和@EnableAutoConfiguration ...
- EnableAutoConfiguration注解 Spring中@Import注解的作用和使用
EnableAutoConfiguration注解 http://www.51gjie.com/javaweb/1046.html springboot@EnableAutoConfiguration ...
- SpringBoot+Spring常用注解总结
为什么要写这篇文章? 最近看到网上有一篇关于 SpringBoot 常用注解的文章被转载的比较多,我看了文章内容之后属实觉得质量有点低,并且有点会误导没有太多实际使用经验的人(这些人又占据了大多数). ...
随机推荐
- java web添加spring jar 包
maven依赖: <properties> <spring.version>5.1.7.RELEASE</spring.version> </properti ...
- 四、Linux_用户切换
四.用户切换 # 切换用户的命令为: su username # 从普通用户切换到root用户,还可以使用命令: sudo su
- Codeforces E. Alyona and a tree(二分树上差分)
题目描述: Alyona and a tree time limit per test 2 seconds memory limit per test 256 megabytes input stan ...
- Java调用Kotlin程序深度解析
异常: 在之前我们已经学习在Kotlin中的所有异常都是运行期的,而不像Java分为运行期和非运行期,下面用代码来演示一下,先建一个Java的异常: 然后在Kotlin中来调用一下该Java中的方法 ...
- 使用批处理打包C#开发程序
最近项目接近尾声,测试比较频繁,每天需要发布多个版本 @echo off set zip=C:\Program Files\7-Zip\7z.exe set timestamp=%date:~6,4% ...
- Docker 基本操作(附 redis、nginx部署)
下载安装 Docker 也有一个月了.中间看过几次也没有深入的了解研究.就只是拉取了两个镜像简单的看了看. 昨天因一个项目中需要用到 Redis ,因为是 Windows 系统,看了下安装包比较老了有 ...
- 阿里云——扩展Linux系统盘
前言 地址|https://help.aliyun.com/document_detail/111738.html?spm=a2c4g.11186623.2.7.1d284c07SFRBaq#sect ...
- 性能:Receiver层面
创建多个接收器 多个端口启动多个receiver在其他Executor,接收多个端口数据,在吞吐量上提高其性能.代码上: import org.apache.spark.storage.Storage ...
- 1-开发共享版APP(接入指南)-APP说明
该APP的功能,类似于网上售卖的Wi-Fi/GPRS远程控制器 设备页面 用户页面 ...
- Codevs 3122 奶牛代理商 VIII(状压DP)
3122 奶牛代理商 VIII 时间限制: 3 s 空间限制: 256000 KB 题目等级 : 大师 Master 题目描述 Description 小徐是USACO中国区的奶牛代理商,专门出售质优 ...