使用 Microsoft.Extensions.DependencyInjection 进行依赖注入
没有
的日子,才是好日子~~~~~~~~~~
Using .NET Core 3.0 Dependency Injection and Service Provider with WPF
UPDATE: this article is based on a preview release of .NET Core 3.0. Please refer to Update on using HostBuilder, Dependency Injection and Service Provider with .NET Core 3.0 WPF applications for the latest one.
We all know that .NET Core provides built-in support for Dependency Injection. We typically use it in ASP.NET Core (starting form the ConfigureServices method in the Startup.cs file), but the feature isn’t limited to this framework. So, as .NET Core 3.0 supports also Windows Clients development, we can use it in our WPF and Windows Forms applications.
Let’s see how to do that, for example, in WPF using Visual Studio 2019. Suppose we want to create a service and we also have some application settings; we want to pass both of them to each window of our application via Dependency Injection.
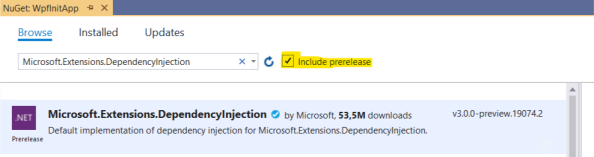
First of all, we must add the required NuGet packages to the project. Right click on the Solution Explorer, select the Manage NuGet Packages command and add the following packages (be sure to select the Include prerelease check):
- Microsoft.Extensions.DependencyInjection
- Microsoft.Extensions.Options.ConfigurationExtensions
- Microsoft.Extensions.Configuration.Json
Adding Dependency Injection support to a .NET Core 3.0 WPF application
These packages are necessary to enable Dependency Injection support (the first one) and to store and retrieve application settings in the classic appsettings.json file (the other ones). They will automatically get all the required dependencies.
Then, let’s add a file named appsettings.json to the root folder of the project. Set its Build Action property to Content and Copy to Output Directory to Copy if newer:
|
1
2
3
4
5
6
7
|
{ "AppSettings": { "StringSetting": "Value", "IntegerSetting": 42, "BooleanSetting": true }} |
All the prerequisites are met, so we can start writing our code. Let’s open the App.xaml file and remove the StartupUri property of the Application class. Then, we need to override the OnStartup method in App.xaml.cs:
|
1
2
3
4
5
6
7
8
9
10
11
12
13
14
15
16
17
18
19
20
21
22
23
24
25
26
27
28
29
30
|
public partial class App : Application{ public IServiceProvider ServiceProvider { get; private set; } public IConfiguration Configuration { get; private set; } protected override void OnStartup(StartupEventArgs e) { var builder = new ConfigurationBuilder() .SetBasePath(Directory.GetCurrentDirectory()) .AddJsonFile("appsettings.json", optional: false, reloadOnChange: true); Configuration = builder.Build(); var serviceCollection = new ServiceCollection(); ConfigureServices(serviceCollection); ServiceProvider = serviceCollection.BuildServiceProvider(); var mainWindow = ServiceProvider.GetRequiredService<MainWindow>(); mainWindow.Show(); } private void ConfigureServices(IServiceCollection services) { // ... services.AddTransient(typeof(MainWindow)); }} |
In this method we create the Service Provider and configure the IoC container in a similar way of ASP.NET Core. We only need a bit of initialization. First of all, at line 9-13 we create an IConfiguration object that allows to read settings from the appsettings.json file (line 11). Then, we create an instance of a ServiceCollection class that will hold our services. Finally we call the ConfigureServices method (as we have in ASP.NET Core).
Within the latter (lines 24-29), we register all the services used by the application in the exact same way of ASP. NET Core. We’ll complete this method in a moment, but for now let’s notice that we register also the MainWindow class (line 28). This is important because, in this way, the window itself becomes part of the Dependency Injection chain. It means that, after calling this method, at line 20-21 we can get it from the ServiceProvider and then show it. But, more important, it means that we can pass to the MainWindow constructor all the dependencies it needs, as we do for ASP.NET Core Controllers.
Even if the actual services aren’t yet registered, we can run the application and see that everything works as expected.
Now it’s time to complicate the things a bit. First of all, let’s create an AppSettings.cs file to hold configuration settings. This file will map the settings that we write in appsettings.json:
|
1
2
3
4
5
6
7
8
|
public class AppSettings{ public string StringSetting { get; set; } public int IntegerSetting { get; set; } public bool BooleanSetting { get; set; }} |
Then, create also a sample service with its interface:
|
1
2
3
4
5
6
7
8
9
|
public interface ISampleService{ string GetCurrentDate();}public class SampleService : ISampleService{ public string GetCurrentDate() => DateTime.Now.ToLongDateString();} |
Now we must register these services in the IoC Container, as usual:
|
1
2
3
4
5
6
7
8
9
|
private void ConfigureServices(IServiceCollection services){ services.Configure<AppSettings> (Configuration.GetSection(nameof(AppSettings))); services.AddScoped<ISampleService, SampleService>(); // ...} |
As said before, the MainWindow itself is in the IoC Container. So, when we get it from the Service Provider, it will automatically be injected with all required services, if any. So, we just need to modify its constructor:
|
1
2
3
4
5
6
7
8
9
10
11
12
13
14
15
16
|
public partial class MainWindow : Window{ private readonly ISampleService sampleService; private readonly AppSettings settings; public MainWindow(ISampleService sampleService, IOptions<AppSettings> settings) { InitializeComponent(); this.sampleService = sampleService; this.settings = settings.Value; } // ...} |
Running this code, we’ll obtain a result like the following:
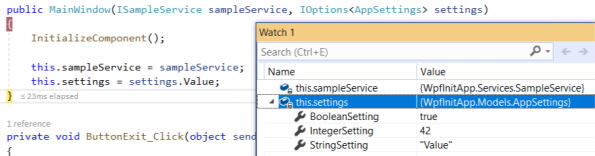
The .NET Core 3.0 WPF application with dependecies injected
原文地址:https://marcominerva.wordpress.com/2019/03/06/using-net-core-3-0-dependency-injection-and-service-provider-with-wpf/
参考:https://docs.microsoft.com/zh-cn/aspnet/core/fundamentals/dependency-injection?view=aspnetcore-3.0
使用 Microsoft.Extensions.DependencyInjection 进行依赖注入的更多相关文章
- Microsoft.Extensions.DependencyInjection中的Transient依赖注入关系,使用不当会造成内存泄漏
Microsoft.Extensions.DependencyInjection中(下面简称DI)的Transient依赖注入关系,表示每次DI获取一个全新的注入对象.但是使用Transient依赖注 ...
- DotNetCore跨平台~一起聊聊Microsoft.Extensions.DependencyInjection
写这篇文章的心情:激动 Microsoft.Extensions.DependencyInjection在github上同样是开源的,它在dotnetcore里被广泛的使用,比起之前的autofac, ...
- 解析 Microsoft.Extensions.DependencyInjection 2.x 版本实现
项目使用了 Microsoft.Extensions.DependencyInjection 2.x 版本,遇到第2次请求时非常高的内存占用情况,于是作了调查,本文对 3.0 版本仍然适用. 先说结论 ...
- 使用诊断工具观察 Microsoft.Extensions.DependencyInjection 2.x 版本的内存占用
目录 准备工作 大量接口与实现类的生成 elasticsearch+kibana+apm asp.net core 应用 请求与快照 Kibana 上的请求记录 请求耗时的分析 请求内存的分析 第2次 ...
- Microsoft.Extensions.DependencyInjection 之三:展开测试
目录 前文回顾 IServiceCallSite CallSiteFactory ServiceProviderEngine CompiledServiceProviderEngine Dynamic ...
- Microsoft.Extensions.DependencyInjection 之三:反射可以一战(附源代码)
目录 前文回顾 IServiceCallSite CallSiteFactory ServiceProviderEngine CompiledServiceProviderEngine Dynamic ...
- Microsoft.Extensions.DependencyInjection 之二:使用诊断工具观察内存占用
目录 准备工作 大量接口与实现类的生成 elasticsearch+kibana+apm asp.net core 应用 请求与快照 Kibana 上的请求记录 请求耗时的分析 请求内存的分析 第2次 ...
- Microsoft.Extensions.DependencyInjection 之一:解析实现
[TOC] 前言 项目使用了 Microsoft.Extensions.DependencyInjection 2.x 版本,遇到第2次请求时非常高的内存占用情况,于是作了调查,本文对 3.0 版本仍 ...
- MvvmLight + Microsoft.Extensions.DependencyInjection + WpfApp(.NetCore3.1)
git clone MvvmLight失败,破网络, 就没有直接修改源码的方式来使用了 Nuget安装MvvmLightLibsStd10 使用GalaSoft.MvvmLight.Command命名 ...
随机推荐
- tensorflow提示:No module named ''tensorflow.python.eager".
版权声明:本文为博主原创文章,遵循CC 4.0 BY-SA版权协议,转载请附上原文出处链接和本声明. 本文链接:https://blog.csdn.net/qq_27921205/articl ...
- sql 使用条件
group by 1.在属性中出现相同内容的时候可以使用 2.也可以用来排序desc asc 批量插入数据 INSERT into 表(属性)(select *from 表) INSERT int ...
- vue 指令中el 的 parentNode 为空的问题
在项目中,突然发现在用vue指令的时候,发现元素el的父元素parentNode变成了null. 代码: if (el.parentNode && !Vue.prototype.$_h ...
- Ansible-ansible命令
Ansible是用于执行"远程操作"的简单工具.该命令允许针对一组主机定义并运行单个任务剧本. 常用选项 说明 --ask-vault-pass 请求保险库密码 --become- ...
- MongoDB配置文件及添加用户
一.参数启动mongodb $ mongod --bind_ip=0.0.0.0 二.配置文件: mongod.conf # 后台运行 fork=true # 数据存储文件目录 dbpath=/roo ...
- 关于mybaits的注解@Param
一.含义 @param作为dao层的注解,为了解决多个参数时,参数类型不一致的问题. <select id="findEmpById" resultType="co ...
- Unity 渲染教程余下
可能来源于(英文):https://catlikecoding.com/unity/tutorials/ Unity渲染教程(一):矩阵 http://gad.qq.com/pro ...
- 爬取前程无忧网站上python的招聘信息。
本文获取的字段有为职位名称,公司名称,公司地点,薪资,发布时间 创建爬虫项目 scrapy startproject qianchengwuyou cd qianchengwuyou scrapy g ...
- Nginx与多版本Php配置
这次忍住没爆粗口,但真的,通过rpm包,yum安全的php-fpm,让我无言以对. 一个Php程序代码,到处测试,显示的菜单都OK,但独独在正式服务器的php-fpm下,少了很多菜单, 不知道是肿么回 ...
- python测试开发django-66.图片403forbidden
前言 用 django 开发 web 页面,在 HTML 页面上添加图片时,发现本地图片可以正常显示,但是添加一个互联网的图片,却不能正常显示. 本地 static 图片 先在本地 static 放一 ...