esp8266 + dht11 + 两路继电器 实现pc远程控制开关机温度监控.并配置zabbix监控
事因:翻了翻自己之前的硬件小箱子,几年前买的一些小东西,想用用起来.
正好我有些数据放在机器上,有时候需要机器启动,我使用完成后在断开. 其实网络唤醒也能做到,但是机器一直给电也不好,在说家里有小孩AQA
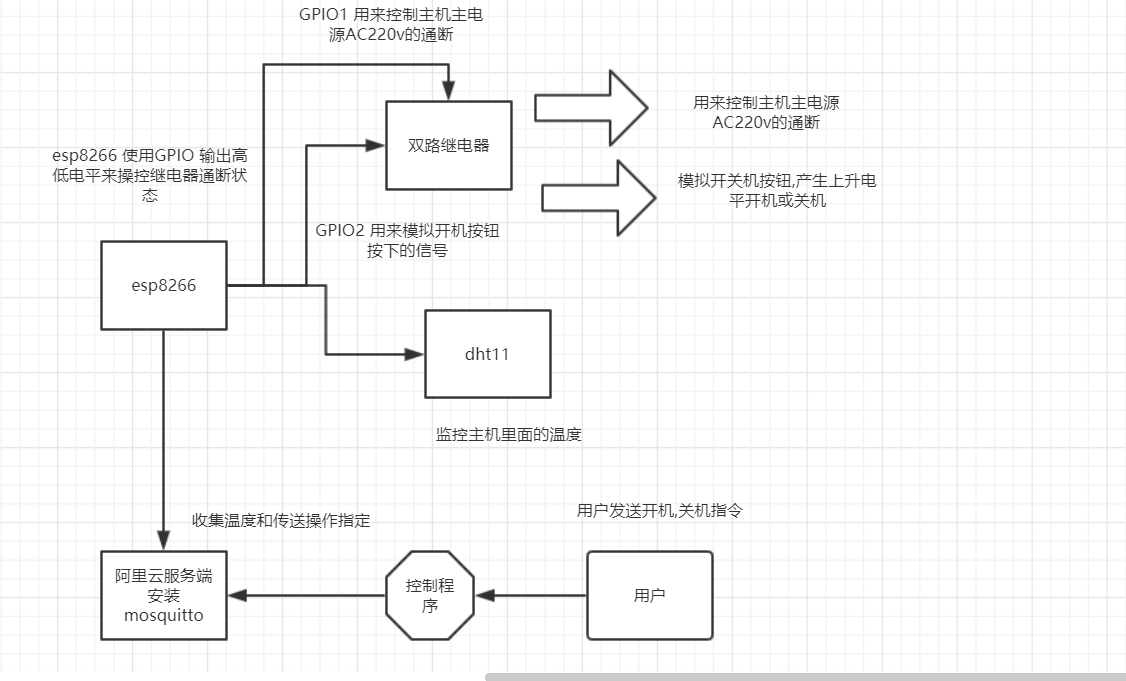
设计思路.
使用双路继电器的一路控制主机AC220V电源的通断.ps[可以用一个GPIO读取pc电源的12v/5v供电来判断pc电源是否被断开.]
使用双路继电器的另一路模拟主机开机按钮. 用来开机和关机
硬件列表
esp8266 1个
dht11 1个
双路继电器 1个
杜邦线若干
改造电源线1个
git仓库地址:[之后有空重新写下代码]
https://github.com/lvusyy/esp8266RemoteControlPC
https://www.processon.com/view/link/5d1ed046e4b0fdb331d3b98b
其它在之后有空在补充吧.
mqtt 安装请参考:
在阿里云上安装Mosquitto zhuanlan.zhihu.com/p/38040998
代码 [有若干逻辑bug,临时写的.]
//#define _TASK_SLEEP_ON_IDLE_RUN // Enable 1 ms SLEEP_IDLE powerdowns between tasks if no callback methods were invoked during the pass

//#define _TASK_TIMEOUT

#include <SimpleDHT.h>

#include <ESP8266WiFi.h>

#include <TaskScheduler.h>

#include "Adafruit_MQTT.h"

#include "Adafruit_MQTT_Client.h"

//**** dht init

const int pinDHT11 = 2;

SimpleDHT11 dht11(pinDHT11);

const int POWERPIN = 4;

const int OPENBTPIN = 5;

uint8_t poweroffTimeout=0;

/************************* WiFi Access Point *********************************/

#define WLAN_SSID       "HOME"

#define WLAN_PASS       "HOME++++"

/************************* Adafruit.io Setup *********************************/

#define AIO_SERVER      "ip"

#define AIO_SERVERPORT  1883                   // use 8883 for SSL

#define AIO_USERNAME    "user"

#define AIO_KEY         "pass"

/************ Global State (you don't need to change this!) ******************/

// Create an ESP8266 WiFiClient class to connect to the MQTT server.

WiFiClient client;

// or... use WiFiFlientSecure for SSL

//WiFiClientSecure client;

// Setup the MQTT client class by passing in the WiFi client and MQTT server and login details.

Adafruit_MQTT_Client mqtt(&client, AIO_SERVER, AIO_SERVERPORT, AIO_USERNAME, AIO_KEY);

/****************************** Feeds ***************************************/

// Setup a feed called 'photocell' for publishing.

// Notice MQTT paths for AIO follow the form: <username>/feeds/<feedname>

Adafruit_MQTT_Publish temperaturePS = Adafruit_MQTT_Publish(&mqtt, AIO_USERNAME "/feeds/temperature");

// Setup a feed called 'onoff' for subscribing to changes.

Adafruit_MQTT_Subscribe onoffbutton = Adafruit_MQTT_Subscribe(&mqtt, AIO_USERNAME "/feeds/poweronoff");

Adafruit_MQTT_Subscribe openbt = Adafruit_MQTT_Subscribe(&mqtt, AIO_USERNAME "/feeds/btonoff");

int get_temperature();

void pushTemperature();

void clickBtStop();

void set_powerOff();

//void t2disable();

// Task init

Scheduler runner;

Task t1(1000,TASK_FOREVER,&pushTemperature);

//Task t2(100,1,&clickBtStop,&runner,false,NULL,&set_powerOff);

/*************************** Sketch Code ************************************/

void clickBtStart(){

    set_powerOn();

    digitalWrite(OPENBTPIN,HIGH);

    delay(1300);

    digitalWrite(OPENBTPIN,LOW);

}

void clickBtStop(){

    digitalWrite(OPENBTPIN,HIGH);

//    delay(8000);

    delay(1000);

    digitalWrite(OPENBTPIN,LOW);

    poweroffTimeout=90;

//    delay(120000L);

//    set_powerOff();

//    delay(200);

//    digitalWrite(OPENBTPIN,HIGH);

//    delay(8000);

//    digitalWrite(OPENBTPIN,LOW);

}

void set_powerOn(){

    digitalWrite(POWERPIN,LOW);

    Serial.println("called set_powerOn ");

    poweroffTimeout=0;

}

void set_powerOff(){

    digitalWrite(POWERPIN,HIGH);

    Serial.println("called set_poweroff ");

    poweroffTimeout=0;

}

int get_temperature() {

  byte temperature = 0;

  byte humidity = 0;

  int err = SimpleDHTErrSuccess;

  if ((err = dht11.read(&temperature, &humidity, NULL)) != SimpleDHTErrSuccess) {

    Serial.print("Read DHT11 failed, err="); Serial.println(err);delay(1000);

    return 0;

  }

  Serial.print("Sample OK: ");

  Serial.print((int)temperature); Serial.print(" *C, ");

  Serial.print((int)humidity); Serial.println(" H");

  return (int)temperature;

}

void pushTemperature()

{

  uint8_t t=0;

  for (int i=0;i<10;i++){

    t=get_temperature();

    if(t<=0){

      t=0;

      }else {

        break;

        }

  }

  if (! temperaturePS.publish(t)) {

    Serial.println(F("Temperature publish Failed"));

  } else {

    Serial.println(F("Temperature publish OK!"));

  }

  if (poweroffTimeout>1){

    poweroffTimeout--;

    Serial.println((int)poweroffTimeout);

    }else if (poweroffTimeout==1){

      poweroffTimeout=0;

      set_powerOff();

    }

}

// Bug workaround for Arduino 1.6.6, it seems to need a function declaration

// for some reason (only affects ESP8266, likely an arduino-builder bug).

void MQTT_connect();

void setup() {

  pinMode(POWERPIN,OUTPUT);

  pinMode(OPENBTPIN,OUTPUT);

  Serial.begin(115200);

  delay(10);

  //digitalWrite(OPENBTPIN,HIGH);//init state

  Serial.println(F("Adafruit MQTT demo"));

  // Connect to WiFi access point.

  Serial.println(); Serial.println();

  Serial.print("Connecting to ");

  Serial.println(WLAN_SSID);

  WiFi.begin(WLAN_SSID, WLAN_PASS);

  while (WiFi.status() != WL_CONNECTED) {

    delay(500);

    Serial.print(".");

  }

  Serial.println();

  Serial.println("WiFi connected");

  Serial.println("IP address: "); Serial.println(WiFi.localIP());

  //task

  runner.init();

  delay(50);

  runner.addTask(t1);

//  runner.addTask(t2);

//  delay(100);

  // Setup MQTT subscription for onoff feed.

  mqtt.subscribe(&onoffbutton);

  mqtt.subscribe(&openbt);

  t1.enable();

}

void loop() {

  // Ensure the connection to the MQTT server is alive (this will make the first

  // connection and automatically reconnect when disconnected).  See the MQTT_connect

  // function definition further below.

  MQTT_connect();

  // this is our 'wait for incoming subscription packets' busy subloop

  // try to spend your time here

  Adafruit_MQTT_Subscribe *subscription;

  int onoffstatus=0;

  while ((subscription = mqtt.readSubscription(5000))) {

    if (subscription == &onoffbutton) {

      Serial.print(F("Got onoffbutton: "));

      onoffstatus=atoi((char *)onoffbutton.lastread);

      Serial.println(onoffstatus);

      if (onoffstatus >= 1){

          set_powerOn();

      }else {

          set_powerOff();

      }

    }else if (subscription == &openbt) {

      Serial.print(F("Got openbt: "));

      onoffstatus=0;

      onoffstatus=atoi((char *)openbt.lastread);

      Serial.println(onoffstatus);

      if (onoffstatus >= 1){

          clickBtStart();

      }else

      {

          clickBtStop();

//          t2.setTimeout(120 * TASK_SECOND);

//          t2.enable();

      }

    }

    delay(100);

  }

  // Now we can publish stuff!

  runner.execute();

  // ping the server to keep the mqtt connection alive

  // NOT required if you are publishing once every KEEPALIVE seconds

  /*

  if(! mqtt.ping()) {

    mqtt.disconnect();

  }

  */

}

// Function to connect and reconnect as necessary to the MQTT server.

// Should be called in the loop function and it will take care if connecting.

void MQTT_connect() {

  int8_t ret;

  // Stop if already connected.

  if (mqtt.connected()) {

    return;

  }

  Serial.print("Connecting to MQTT... ");

  uint8_t retries = 3;

  while ((ret = mqtt.connect()) != 0) { // connect will return 0 for connected

       Serial.println(mqtt.connectErrorString(ret));

       Serial.println("Retrying MQTT connection in 5 seconds...");

       mqtt.disconnect();

       delay(5000);  // wait 5 seconds

       retries--;

       if (retries == 0) {

         // basically die and wait for WDT to reset me

         while (1);

       }

  }

  Serial.println("MQTT Connected!");

}
arduino 模块
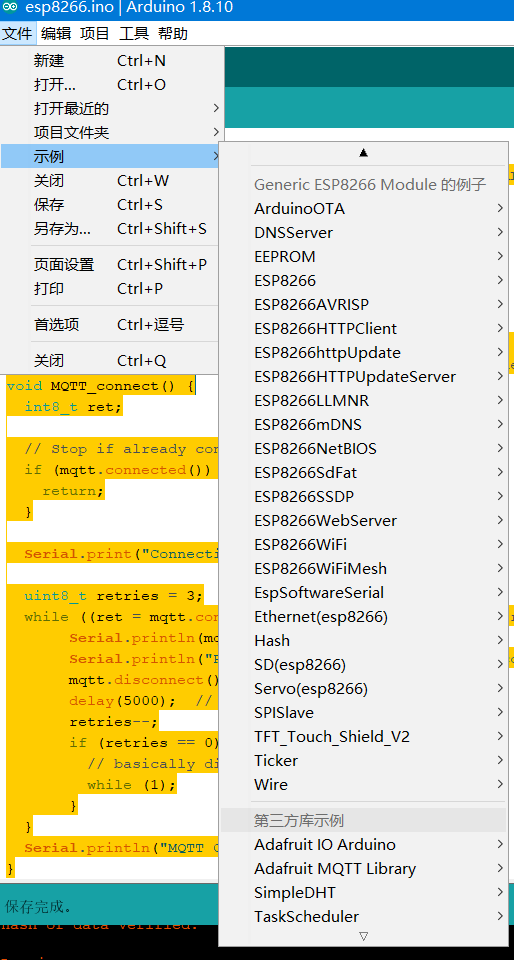
使用arduino有问题.请参考https://blog.csdn.net/solar_lan/article/category/9277412
python push 温度数据到zabbix中
要安装paho-mqtt模块
pip install paho-mqtt
import paho.mqtt.client as mqtt

import os

MQTTHOST = "xxx.com"

MQTTPORT = 1883

mqttClient = mqtt.Client()

mqttClient.username_pw_set('makeit', password='xxxx')

# 连接MQTT服务器

def on_mqtt_connect():

    mqttClient.connect(MQTTHOST, MQTTPORT, 60)

    mqttClient.loop_start()

# publish 消息

def on_publish(topic, payload, qos):

    mqttClient.publish(topic, payload, qos)

# 消息处理函数

def on_message_come(lient, userdata, msg):

    os.system('zabbix_sender -c "C:\Program Files\Zabbix Agent\zabbix_agentd.conf" -k hwtemp -o'+str(int(msg.payload)))

    #print(msg.topic + " " + ":" + str(msg.payload))

# subscribe 消息

def on_subscribe():

    mqttClient.subscribe("makeit/#", 1)

    mqttClient.on_message = on_message_come # 消息到来处理函数

def main():

    on_mqtt_connect()

    #on_publish("makeit/server", "Hello Python!", 1)

    on_subscribe()

    while True:

        pass

if __name__ == '__main__':

    main()
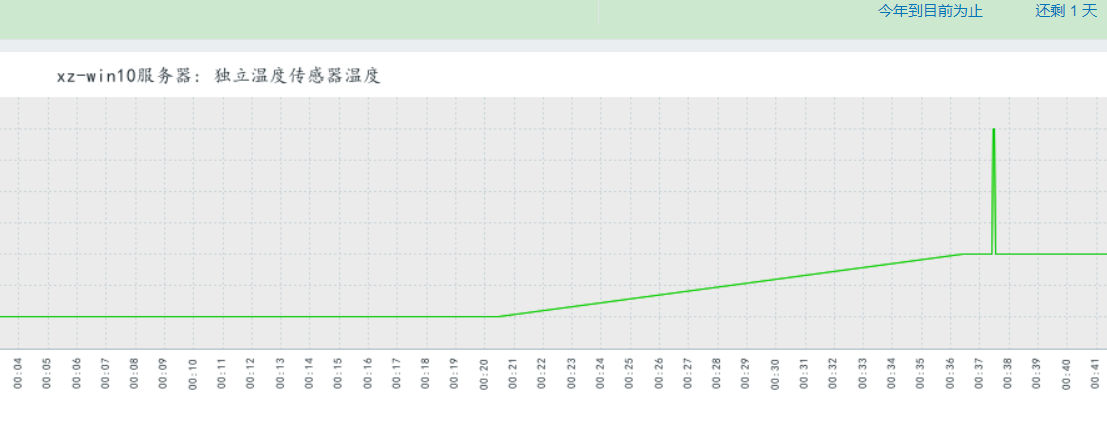
zabbix设置请参考
https://www.cnblogs.com/lovesKey/p/10882510.html
esp8266 + dht11 + 两路继电器 实现pc远程控制开关机温度监控.并配置zabbix监控的更多相关文章
- 【雕爷学编程】Arduino动手做(43)---单路继电器模块
37款传感器与模块的提法,在网络上广泛流传,其实Arduino能够兼容的传感器模块肯定是不止37种的.鉴于本人手头积累了一些传感器和模块,依照实践(动手试试)出真知的理念,以学习和交流为目的,这里准备 ...
- FPGA图像处理 两路sensor的色调不一致
怎么调?可以让两路sensor的色调一致.
- 0-20ma 0-5V,0-10V ,0-15V ,0-20V,0-30V模拟量(范围可以定制)多功能采集模块,支持1路继电器输出,2路Di输入,8路Ai输入,可电脑控制,支持485 modbus rtu协议。端口参数可以配置保存,支持定制修改。
多功能模拟量采集模块MRD-5017具有8 通道模拟量采集(支持0-20mA,0-5V,0-10V混合测量),2路DI,1路继电器输出,1路485接口(支持MODBUS RTU),能实现8路AI(12 ...
- STM32F207 两路ADC连续转换及GPIO模拟I2C给MT9V024初始化参数
1.为了更好的方便调试,串口必须要有的,主要打印一些信息,当前时钟.转换后的电压值和I2C读出的数据. 2.通过GPIO 模拟I2C对镁光的MT9V024进行参数初始化.之前用我以前公司SP0A19芯 ...
- STM32高级定时器TIM1产生两路互补的PWM波(带死区)
测试环境:Keil 5.20.0.0 STM32F103RBT6 固件库版本:STM32F10x_StdPeriph_Lib_V3.5.0(2011) 本文使用TIM1的通道1,通道2,产生两路1kh ...
- 基于STM32F767两路互补SPWM波(HAL库)
SPWM波指的是占空比呈正弦规律变化的PWM波,生成方式是在定时器中断中调整PWM波的占空比. 对于互补的两路SPWM波,一路为低电平 ‘0’ 时,另一路为高电平 ‘1’,即两路是互补的. 对于STM ...
- nRF51822 的两路 PWM 极性
忙了一阵这个PWM,玩着玩着终于发现了些规律.Nordic 也挺会坑爹的. nRF51822 是没有硬件 PWM 的,只能靠一系列难以理解的 PPI /GPIOTE/TIMER来实现,其实我想说,我醉 ...
- 125-FMC125-两路125Msps AD,两路160Msps DA FMC子卡模块
FMC125-两路125Msps AD,两路160Msps DA FMC子卡模块 1.板卡概述 该板卡可实现2路14bit 250Msps AD 和2路16bit 160MspsDA功能,FMC连接 ...
- stm32电机控制之控制两路直流电机
小车使用的电机是12v供电的直流电机,带编码器反馈,这样就可以采用闭环速度控制,这里电机使用PWM驱动,速度控制框图如下: 由以上框图可知,STM32通过定时器模块输出PWM波来控制两个直流电机的转动 ...
随机推荐
- springboot中常用的依赖
<?xml version="1.0" encoding="UTF-8"?> <project xmlns="http://mave ...
- 【转载】ASP.NET网站选购阿里云服务器的时候,阿里云账号个人认证以及企业认证有何不同
在采购阿里云产品,如阿里云云服务器.阿里云短信包.阿里云数据库MySql以及Sqlserver.阿里云对象存储OSS等云产品的时候,如果账号未进行实名认证,很多时候会要求实名认证操作,在实名认证时可选 ...
- vue-cli 3.0 安装
一.安装vue-cli 脚手架命令 npm install -g vue-cli 适用于vue-cli 2.0 npm install -g @vue/cli 适用于vue-cli 3.0 卸载命 ...
- ZYNQ block design警告:[BD 41-968] AXI interface port /axi_lite4 is not associated to any clock port. It may not work correctly.
前言 在Block design中引出AXI接口给外部,检查设计告警如下: [BD 41-968] AXI interface port /axi_lite4 is not associated to ...
- day33-python之多线程
1.多线程实例 # import threading # import time # # import threading import time class MyThread(threading.T ...
- Spring事务传播机制与隔离机制
详情查看 https://www.jianshu.com/p/249f2cd42692
- iview表单数字验证
sort: [ {required: true, message: '请填写栏目排序', trigger: 'blur'}, {type: 'number', message: '请输入数字', tr ...
- 三步操作gitHub汉化插件安装--谷歌浏览器
如果本文对你有用,请爱心点个赞,提高排名,帮助更多的人.谢谢大家!❤ 如果解决不了,可以在文末进群交流. 一个好用基于chrome的插件,用来汉化gitHub,大致效果图如下: 步骤一: 首先下载谷歌 ...
- 微信小程序 wxml 中使用 js函数
原文链接 1.在 utils 目录下 新建`filter.wxs` var filters = { toFix: function (value) { return value.toFixed(2) ...
- Schema学习【一】
XML Schema 是基于 XML 的 DTD 替代者. 什么是 XML Schema? XML Schema 的作用是定义 XML 文档的合法构建模块,类似 DTD. XML Schema: 定义 ...