
Texture 纹理贴图
基础贴图Shader:只有纹理
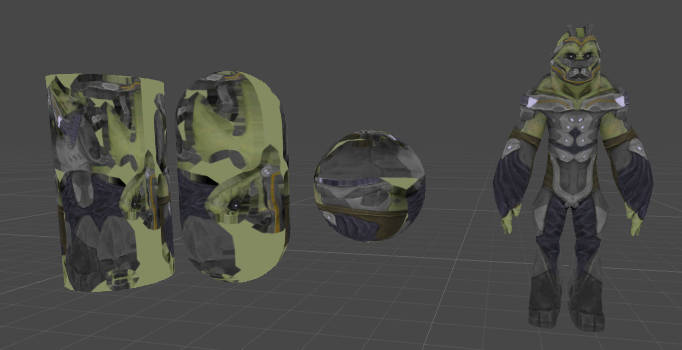
1. 在属性中声明纹理贴图: _MainTex ("Texture", 2D) = "white" {}
2. 在Pass中声明变量: sampler2D _MainTex; float4 _MainTex_ST; 这个是成对出现,_MainTex_ST 用与计算坐标偏移offset
3. 在Vertex Function函数中进行纹理坐标采样: o.tex = v.texcoord;
4. 在Fragment Function 函数中采样纹理,并输出: float4 tex = tex2D(_MainTex,i.tex.xy*_MainTex_ST.xy+_MainTex_ST.zw); return float4(tex);
源代码:
Shader "Unlit/Textures_Base"

{

    Properties

    {

        _MainTex ("Texture", 2D) = "white" {}

    }

    SubShader

    {

        Pass

        {

            CGPROGRAM

            #pragma vertex vert

            #pragma fragment frag

            #include "UnityCG.cginc"

            sampler2D _MainTex;

            float4 _MainTex_ST;

            //输入结构体

            struct vertexInput{

                float4 vertex:POSITION;

                float4 texcoord:TEXCOORD0;

            };

            //输出结构体

            struct vertexOutput{

                float4 pos:SV_POSITION;

                float4 tex:TEXCOORD0;

            };

            vertexOutput vert (vertexInput v)

            {

                vertexOutput o;

                o.pos = mul(UNITY_MATRIX_MVP, v.vertex);

                o.tex = v.texcoord;

                return o;

            }

            fixed4 frag (vertexOutput i) : COLOR

            {

                //Texture Map

                float4 tex  = tex2D(_MainTex,i.tex.xy*_MainTex_ST.xy+_MainTex_ST.zw);

                return float4(tex);

            }

            ENDCG

        }

    }

}
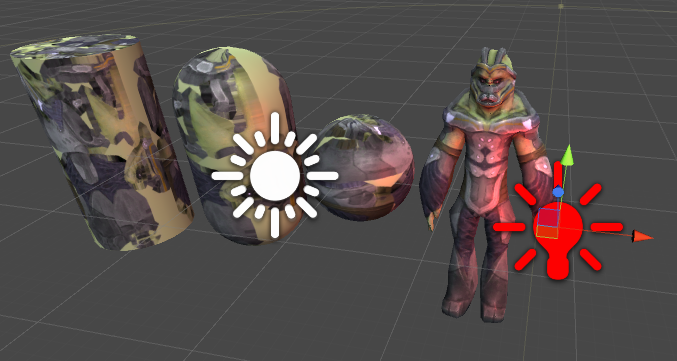
纹理(Texture)+高光(Specular)+边缘光(Rim)+漫反射(diffuse)+环境光(ambient)+多光源(Lighting)(1个平行光,1个点光源):
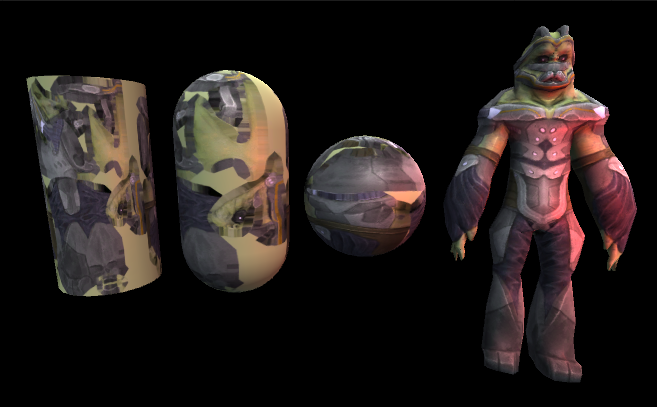
源代码:
Shader "JQM/Textures"

{

    Properties

    {

        _Color("Color", color) = (1.0,1.0,1.0,1.0)

        _MainTex ("Texture", 2D) = "white" {}

        _SpecColor("Specular Color", color) = (1.0,1.0,1.0,1.0)

        _Shininess("Shininess",float) =

        _RimColor("Rim Coloe Color", color) = (1.0,1.0,1.0,1.0)

        _RimPower("Rim Power",Range(0.1,10.0)) = 3.0

    }

    SubShader

    {

        Pass

        {

            Tags { "LightMode"="ForwardBase" }

            CGPROGRAM

            #pragma vertex vert

            #pragma fragment frag

            //#pragma exclude_renderers flash //给指定平台编译

            #include "UnityCG.cginc"

            //使用自定义变量

            sampler2D _MainTex;

            float4 _MainTex_ST;

            uniform float4 _Color;

            uniform float4 _SpecColor;

            uniform float4 _RimColor;

            uniform float _Shininess;

            uniform float _RimPower;

            //使用Unity定义的变量

            uniform float4 _LightColor0;

            //输入结构体

            struct vertexInput{

                float4 vertex:POSITION;

                float3 normal:NORMAL;

                float4 texcoord:TEXCOORD0;

            };

            //输出结构体

            struct vertexOutput{

                float4 pos:SV_POSITION;

                float4 tex:TEXCOORD0;

                float4 posWorld:TEXCOORD1;

                float3 normalDir:TEXCOORD2;

            };

            vertexOutput vert (vertexInput v)

            {

                vertexOutput o;

                o.posWorld = mul(_Object2World, v.vertex);

                o.normalDir =  normalize( mul(float4(v.normal,0.0),_World2Object).xyz);

                o.pos = mul(UNITY_MATRIX_MVP, v.vertex);

                o.tex = v.texcoord;

                return o;

            }

            fixed4 frag (vertexOutput i) : COLOR

            {

                float3 normalDirection = i.normalDir;

                float3 viewDirection = normalize(_WorldSpaceCameraPos.xyz- i.posWorld.xyz);

                float3 lightDirection;

                float atten;

                if(_WorldSpaceLightPos0.w==0.0)//平行光

                {

                    atten = 1.0;

                    lightDirection = normalize(_WorldSpaceLightPos0.xyz);

                }

                else

                {

                    float3 fragmentToLightSource = _WorldSpaceLightPos0.xyz -i.posWorld.xyz;

                    float distance = length(fragmentToLightSource);

                    atten  = 1.0/distance;

                    lightDirection = normalize(fragmentToLightSource);

                }

                //灯光

                float3 diffuseReflection = atten * _LightColor0.xyz *  saturate( dot(normalDirection,lightDirection));

                float3 specularReflection = atten * _LightColor0.xyz * _SpecColor.rgb*saturate( dot(normalDirection,lightDirection))*pow(saturate(dot(reflect(-lightDirection,normalDirection),viewDirection)),_Shininess);

                //Rim Light

                float rim= -dot(normalize(viewDirection),normalDirection);

                float3 rimLighting = atten * _LightColor0.xyz * _RimColor.rgb*saturate(dot(normalDirection,lightDirection))*pow(rim,_RimPower);

                float3 lightFinal = rimLighting + diffuseReflection+specularReflection+UNITY_LIGHTMODEL_AMBIENT.xyz;

                //Texture Map

                float4 tex  = tex2D(_MainTex,i.tex.xy*_MainTex_ST.xy+_MainTex_ST.zw);

                return float4(tex*lightFinal*_Color.xyz,1.0);

            }

            ENDCG

        }

        Pass

        {

            Tags { "LightMode"="ForwardAdd" }

            Blend One One

            CGPROGRAM

            #pragma vertex vert

            #pragma fragment frag

            //#pragma exclude_renderers flash //给指定平台编译

            #include "UnityCG.cginc"

            //使用自定义变量

            sampler2D _MainTex;

            float4 _MainTex_ST;

            uniform float4 _Color;

            uniform float4 _SpecColor;

            uniform float4 _RimColor;

            uniform float _Shininess;

            uniform float _RimPower;

            //使用Unity定义的变量

            uniform float4 _LightColor0;

            //输入结构体

            struct vertexInput{

                float4 vertex:POSITION;

                float3 normal:NORMAL;

                float4 texcoord:TEXCOORD0;

            };

            //输出结构体

            struct vertexOutput{

                float4 pos:SV_POSITION;

                float4 tex:TEXCOORD0;

                float4 posWorld:TEXCOORD1;

                float3 normalDir:TEXCOORD2;

            };

            vertexOutput vert (vertexInput v)

            {

                vertexOutput o;

                o.posWorld = mul(_Object2World, v.vertex);

                o.normalDir =  normalize( mul(float4(v.normal,0.0),_World2Object).xyz);

                o.pos = mul(UNITY_MATRIX_MVP, v.vertex);

                o.tex = v.texcoord;

                return o;

            }

            fixed4 frag (vertexOutput i) : COLOR

            {

                float3 normalDirection = i.normalDir;

                float3 viewDirection = normalize(_WorldSpaceCameraPos.xyz- i.posWorld.xyz);

                float3 lightDirection;

                float atten;

                if(_WorldSpaceLightPos0.w==0.0)//平行光

                {

                    atten = 1.0;

                    lightDirection = normalize(_WorldSpaceLightPos0.xyz);

                }

                else

                {

                    float3 fragmentToLightSource = _WorldSpaceLightPos0.xyz -i.posWorld.xyz;

                    float distance = length(fragmentToLightSource);

                    atten  = 1.0/distance;

                    lightDirection = normalize(fragmentToLightSource);

                }

                //灯光

                float3 diffuseReflection = atten * _LightColor0.xyz *  saturate( dot(normalDirection,lightDirection));

                float3 specularReflection = atten * _LightColor0.xyz * _SpecColor.rgb*saturate( dot(normalDirection,lightDirection))*pow(saturate(dot(reflect(-lightDirection,normalDirection),viewDirection)),_Shininess);

                //Rim Light

                float rim= -dot(normalize(viewDirection),normalDirection);

                float3 rimLighting = atten * _LightColor0.xyz * _RimColor.rgb*saturate(dot(normalDirection,lightDirection))*pow(rim,_RimPower);

                float3 lightFinal = rimLighting + diffuseReflection+specularReflection+UNITY_LIGHTMODEL_AMBIENT.xyz;

                //Texture Map

                float4 tex  = tex2D(_MainTex,i.tex.xy*_MainTex_ST.xy+_MainTex_ST.zw);

                return float4(tex*lightFinal*_Color.xyz,1.0);

            }

            ENDCG

        }

    }

}
Texture 纹理贴图的更多相关文章
- IOS 中openGL使用教程3(openGL ES 入门篇 | 纹理贴图(texture)使用)
在这篇文章中,我们将学习如何在openGL中使用纹理贴图. penGL中纹理可以分为1D,2D和3D纹理,我们在绑定纹理对象的时候需要指定纹理的种类.由于本文将以一张图片为例,因此我们为我们的纹理对象 ...
- android ndk调用OpenGL 实现纹理贴图Texture
android ndk调用OpenGL 实现纹理贴图Texture 时间 2014-06-25 05:24:39 CSDN博客 原文 http://blog.csdn.net/chrisfxs/a ...
- OpenGL入门1.4:纹理/贴图Texture
每一个小步骤的源码都放在了Github 的内容为插入注释,可以先跳过 前言 游戏玩家对Texture这个词应该不陌生,我们已经知道了怎么为每个顶点添加颜色来增加图形的细节,但,如果想让图形看起来更真实 ...
- [Unity] Shader(着色器)之纹理贴图
在Shader中,我们除了可以设定各种光线处理外,还可以增加纹理贴图. 使用 settexture 命令可以为着色器指定纹理. 示例代码: Shader "Sbin/ff2" { ...
- Unity3D ShaderLab压缩混合纹理贴图
Unity3D ShaderLab压缩混合纹理贴图 纹理可以用于存储大量的数据,我们可以把多个图像打包存储在单一的RGBA纹理上,然后通过着色器代码提取这些元素, 我们就可以使用每个图片的RGBA通道 ...
- OpenGL 纹理贴图
前一节实例代码中有个贴图操作. 今天就简单说明一下纹理贴图... 为了使用纹理贴图.我们首先需要启用纹理贴图功能. 我们可以在Renderer实现的onSurfaceCreated中定义启用: // ...
- Directx11学习笔记【十七】纹理贴图
本文由zhangbaochong原创,转载请注明出处http://www.cnblogs.com/zhangbaochong/p/5596180.html 在之前的例子中,我们实现了光照和材质使得场景 ...
- Android OpenGL ES 开发(九): OpenGL ES 纹理贴图
一.概念 一般说来,纹理是表示物体表面的一幅或几幅二维图形,也称纹理贴图(texture).当把纹理按照特定的方式映射到物体表面上的时候,能使物体看上去更加真实.当前流行的图形系统中,纹理绘制已经成为 ...
- WebGL学习之纹理贴图
为了使图形能获得接近于真实物体的材质效果,一般会使用贴图,贴图类型主要包括两种:漫反射贴图和镜面高光贴图.其中漫反射贴图可以同时实现漫反射光和环境光的效果. 实际效果请看demo:纹理贴图 2D纹理 ...
随机推荐
- 【杂谈】小记一个ios11的bug
前段时间,除了apple发布了新的硬件之外,同步还发布了新的操作系统,IOS11,当大家都将注意力聚焦在那个奇怪的刘海该如何适配的时候,笔者的项目在适配IOS11却出现了其他的问题. 众所周知,IOS ...
- 暑期训练狂刷系列——Hdu 1698 Just a Hook (线段树区间更新)
题目连接: http://acm.hdu.edu.cn/showproblem.php?pid=1698 题目大意: 有一个钩子有n条棍子组成,棍子有铜银金三种组成,价值分别为1,2,3.为了对付每场 ...
- SpringCloud开发学习总结(六)—— 结合注解的AOP示例
面向切面编程,通过预编译方式和运行期动态代理实现程序功能的统一维护的一种技术.AOP是OOP的延续,是软件开发中的一个热点,也是Spring框架中的一个重要内容,是函数式编程的一种衍生范型.利用AOP ...
- 211 Add and Search Word - Data structure design 添加与搜索单词 - 数据结构设计
设计一个支持以下两个操作的数据结构:void addWord(word)bool search(word)search(word) 可以搜索文字或正则表达式字符串,字符串只包含字母 . 或 a-z . ...
- Android基础夯实--重温动画(五)之属性动画 ObjectAnimator详解
只有一种真正的英雄主义 一.摘要 ObjectAnimator是ValueAnimator的子类,它和ValueAnimator一样,同样具有计算属性值的功能,但对比ValueAnimator,它会更 ...
- jsp 访问文件夹中的图片,tomcat配置虚拟目录
1.配置hosts文件 找到C:\Windows\System32\drivers\etc\hosts.txt 文件 添加127.0.0.1 www.image.com 在dos 命令中执行 pi ...
- 设计模式之一:strategy pattern
定义算法族,彼此之间可以替换.变化的方法抽出封装,不变的父类定义继承.多用组合少用继承. 代码示例先不贴了.
- html5开发移动混合App系列2-开发环境搭建(windows)
Java下载: http://www.oracle.com/technetwork/java/javase/downloads/index.html 环境变量: JAVA_HOME=C:\Progra ...
- Mysql:is not allowed to connect to this MySQL server [转]
原文链接http://www.blogjava.net/acooly/archive/2008/09/17/229368.html 如果你想连接你的mysql的时候发生这个错误:ERROR 1130: ...
- c Xcode has incompatible definitions in different translations units
解决方案: build > setting enable module 改为No