
自学 iOS - 三十天三十个 Swift 项目 第三天
做了这个小demo 之后 感觉OC 和swift 还是有很大的差别的 自己还是要去多看些swift的语法 用的不是很熟练
1.这个demo 的资源文件 我都是用原工程的
2.同样的自定义cell 的时候 用的是“SnapKit”这个库
3.其实这一个demo的主要就是自定义cell,思想和OC 是一样的 总感觉swift写的是那么的别扭,可能还是不熟悉语法吧,还是要多看多练
效果
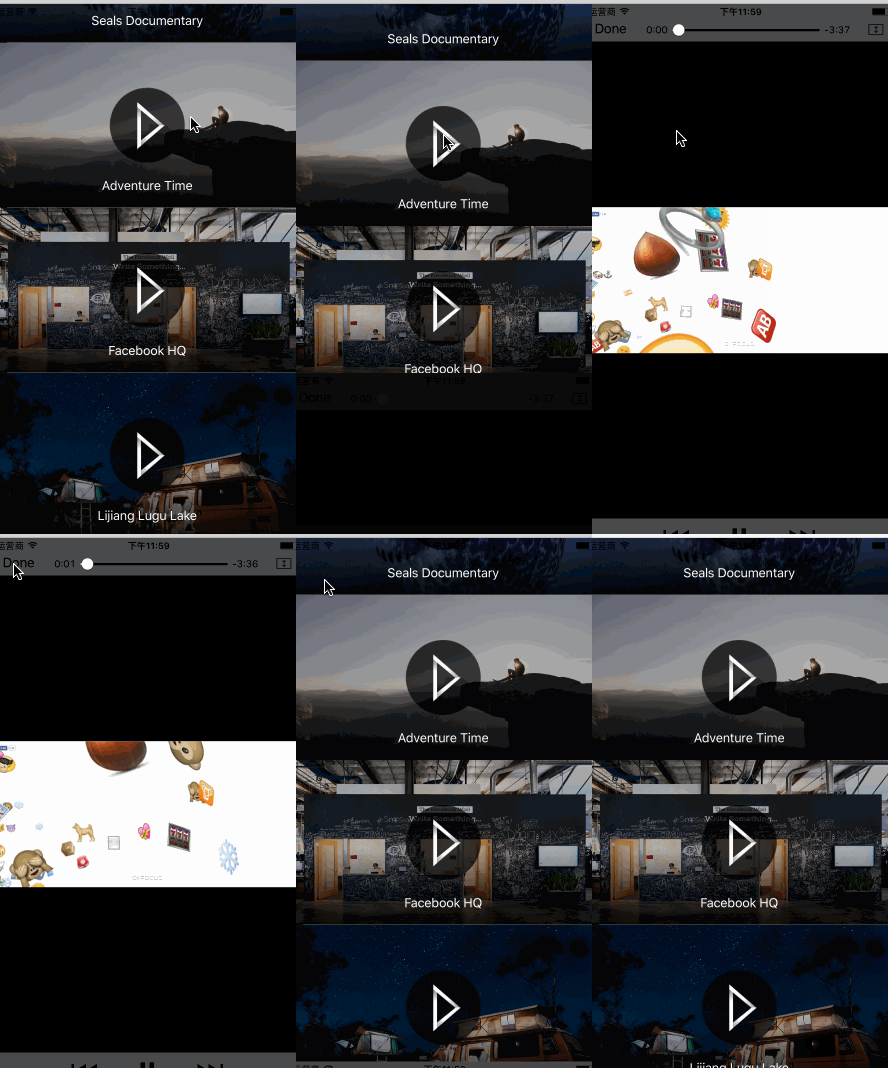
代码 自定义cell 的代码
import UIKit

import SnapKit

struct video {

    let image: String

    let title: String

    let source: String

}

class VideoViewCell: UITableViewCell {

    public var titleLabel:UILabel?

    public var picImageView:UIImageView?

    public var startImageView:UIImageView?

    override func awakeFromNib() {

        super.awakeFromNib()

    }

    required init?(coder aDecoder: NSCoder) {

        super.init(coder: aDecoder)

    }

    override init(style: UITableViewCellStyle, reuseIdentifier: String?) {

        super.init(style: style, reuseIdentifier: reuseIdentifier);

        self.setUpUI()

    }

    func setUpUI() {

        self.picImageView = UIImageView.init()

        self.addSubview(self.picImageView!)

        self.startImageView = UIImageView.init()

        startImageView?.image = UIImage.init(named: "playBtn")

        self.addSubview(self.startImageView!)

        self.titleLabel = UILabel.init()

        self.titleLabel?.textColor = UIColor.white;

        self.titleLabel?.textAlignment = .center

        self.addSubview(self.titleLabel!)

        self.picImageView?.snp.makeConstraints { (make) in

            make.top.equalTo(self).offset()

            make.left.equalTo(self).offset()

            make.width.equalTo(SCREEN_WIDTH)

            make.height.equalTo(self)

        }

        self.startImageView?.snp.makeConstraints({ (make) in

            make.center.equalTo(self.snp.center)

            make.width.equalTo()

            make.height.equalTo()

        })

        self.titleLabel?.snp.makeConstraints({ (make) in

            make.top.equalTo((self.startImageView?.snp.bottom)!).offset()

            make.width.equalTo(SCREEN_WIDTH)

            make.height.equalTo()

        })

    }

    override func setSelected(_ selected: Bool, animated: Bool) {

        super.setSelected(selected, animated: animated)

        // Configure the view for the selected state

    }

}
控制器的代码
import UIKit

import AVKit

import AVFoundation

let SCREEN_WIDTH = UIScreen.main.bounds.size.width

let SCREEN_HEIGHT = UIScreen.main.bounds.size.height

class ViewController : UIViewController, UITableViewDataSource,UITableViewDelegate {

    lazy var tableView = UITableView()

    let array:Array<Any> = []

    var data = [

        video(image: "videoScreenshot01", title: "Introduce 3DS Mario", source: "Youtube - 06:32"),

        video(image: "videoScreenshot02", title: "Emoji Among Us", source: "Vimeo - 3:34"),

        video(image: "videoScreenshot03", title: "Seals Documentary", source: "Vine - 00:06"),

        video(image: "videoScreenshot04", title: "Adventure Time", source: "Youtube - 02:39"),

        video(image: "videoScreenshot05", title: "Facebook HQ", source: "Facebook - 10:20"),

        video(image: "videoScreenshot06", title: "Lijiang Lugu Lake", source: "Allen - 20:30")

    ]

    override func viewDidLoad() {

        super.viewDidLoad()

        self.tableView = UITableView(frame: CGRect(x: , y: , width: SCREEN_WIDTH, height: SCREEN_HEIGHT), style: .plain)

        self.tableView.dataSource = self

        self.tableView.delegate = self

        self.tableView.rowHeight = ;

        self.view.addSubview(tableView)

    }

    func tableView(_ tableView: UITableView, numberOfRowsInSection section: Int) -> Int {

        return data.count

    }

    func tableView(_ tableView: UITableView, cellForRowAt indexPath: IndexPath) -> UITableViewCell {

        let customeIdntifier = "videoCell"

        var cell = tableView.dequeueReusableCell(withIdentifier: customeIdntifier) as? VideoViewCell

        if cell == nil {

            cell = VideoViewCell.init(style: UITableViewCellStyle.default, reuseIdentifier: customeIdntifier)

        }

        let video = data[indexPath.row]

        cell?.titleLabel?.text = video.title

        cell?.picImageView?.image = UIImage.init(named: video.image)

        return cell!

    }

    func tableView(_ tableView: UITableView, didSelectRowAt indexPath: IndexPath) {

        let playViewContoller = AVPlayerViewController()

        var playerView = AVPlayer()

        let path = Bundle.main.path(forResource: "emoji zone", ofType: "mp4")

        playerView = AVPlayer(url: URL(fileURLWithPath: path!))

        playViewContoller.player = playerView

        self.present(playViewContoller, animated: true) {

            playViewContoller.player?.play()

        }

    }

    override func didReceiveMemoryWarning() {

        super.didReceiveMemoryWarning()

        // Dispose of any resources that can be recreated.

    }

}
自学 iOS - 三十天三十个 Swift 项目 第三天的更多相关文章
- 自学 iOS – 三十天三十个 Swift 项目
自学 iOS – 三十天三十个 Swift 项目 github源码地址:https://github.com/allenwong/30DaysofSwift
- 自学 iOS - 三十天三十个 Swift 项目 第一天
最近公司项目不是很忙,偶然间看到编程语言排行榜,看到swift 已经排到前10了,然OC排名也越来越后了,感觉要上车了,虽然现在项目都是用OC写的,但是swift是一种趋势.在网上看到"自学 ...
- 自学 iOS - 三十天三十个 Swift 项目 第二天
继续做仿造着别人的第二个 1.首先下载 一些字体 网上搜索 "造字工房" 2.把下载的相应字体文件放到工程之中,就Ok了 不多说 效果如下 可以下面这个方法 检索项目里面所有的字体 ...
- swift项目第三天:手写代码搭建主框架
一:先配置环境:自定义Log输出(DEBUG 和 release模式),并屏蔽后台多余的打印信息 1:屏蔽后台多余的打印信息:如果写了OS_ACTIVITY_MODE = disable 还是不行.把 ...
- 【Android Studio安装部署系列】三十四、将Eclipse项目导入到Android Studio中
版权声明:本文为HaiyuKing原创文章,转载请注明出处! 概述 我采用的是笨方法:新创建Android Studio项目,然后将Eclipse项目中的目录一一复制到Android Studio项目 ...
- 第三十二章 System V信号量(三)
n哲学家进餐问题描述有五个哲学家,他们的生活方式是交替地进行思考和进餐,n哲学家们共用一张圆桌,分别坐在周围的五张椅子上,在圆桌上有五个碗和五支筷子,n平时哲学家进行思考,饥饿时便试图取其左.右最靠近 ...
- 机器学习实战基础(三十六):随机森林 (三)之 RandomForestClassifier 之 重要属性和接口
重要属性和接口 至此,我们已经讲完了所有随机森林中的重要参数,为大家复习了一下决策树的参数,并通过n_estimators,random_state,boostrap和oob_score这四个参数帮助 ...
- iOS开发之Todo List for Swift项目
一直从事Windows Phone开发,但对iOS开发一直有所好奇,于是在MBP到手之际,顺手安装了Xcode.移动互联网开发的相似性,使得我能快速地了解和认识了iOS的开发框架体系,在看完了Appl ...
- FreeSql (三十)读写分离
FreeSql 支持数据库读写分离,本功能是客户端的读写分离行为,数据库服务器该怎么配置仍然那样配置,不受本功能影响,为了方便描术后面讲到的[读写分离]都是指客户端的功能支持. 各种数据库的读写方案不 ...
随机推荐
- MongoDB 操作手冊CRUD 更新 update
改动记录 概述 MongoDB提供了update()方法用于更新记录. 这种方法接受下面參数: 一个更新条件的JSON对象用于匹配记录,一个更新操作JSON对象用于声明更新操作,和一个选项JS ...
- jquery全选,取消全选
近期项目又用到了这个全选和取消全选的操作. 曾经总是自己写纯JS.如今既然知道怎么写了.那怎样用JQ写得更简洁呢.这样也能学到新的东西.假设乎百度一下果然发现了好东东.感谢OSC的iuhoay. 代码 ...
- [概念理解] UML类建模
Class Diagram Figure 4.30 Elements of the class diagram 关联,多重性: 聚合aggregation. In class diagrams, as ...
- HDU 1015 Safecracker(第一次用了搜索去遍历超时,第二次用for循环能够了,思路一样的)
Safecracker Time Limit : 2000/1000ms (Java/Other) Memory Limit : 65536/32768K (Java/Other) Total S ...
- oracle的日期蛋
一切都是扯鸡巴蛋. 在网上查oracle的日期函数用法,得到一大堆语法,林林总总,都是扯鸡巴蛋,没能解决我的问题. 其实,我想写这么一条语句:查找某个日期(不含时分秒)产生或有关的记录.咋写? SQL ...
- mysql 查看编码方式
一. 查看数据库的字符集 show variables like 'character\_set\_%'; 输出: +--------------------------+--------+ | Va ...
- java定时器2-spring实现
spring定时器(基于xml) spring定时器(基于注解) quartz定时器 1.使用基于xml配置的spring定时器 首先编写定时任务类Mytask public class Mytask ...
- HDU1114 Piggy-Bank —— DP 完全背包
题目链接:http://acm.split.hdu.edu.cn/showproblem.php?pid=1114 Piggy-Bank Time Limit: 2000/1000 MS (Java/ ...
- BZOJ:2819 NIM(树链剖分||DFS序 &&NIM博弈)
著名游戏设计师vfleaking,最近迷上了Nim.普通的Nim游戏为:两个人进行游戏,N堆石子,每回合可以取其中某一堆的任意多个,可以取完,但不可以不取.谁不能取谁输.这个游戏是有必胜策略的.于是v ...
- [noip模拟赛]午餐
https://www.zybuluo.com/ysner/note/1325779 题面 一共有\(n\)个人,林先森知道开始时只有\(1\)号会毒瘤算法.林先森了解到很多人一起吃过 午餐;具体地, ...