
CentOS 7搭建KVM在线管理面板WebVirtMgr
系统版本:CentOS 7.4
WebVirtMgr版本:master分支的20180720版本,下载链接(链接:https://pan.baidu.com/s/1kl060hPHDGbwJUR_iMFb3Q 密码:iozj)
用到的目录:/data/service/nginx,/data/service/nginx_vhost/,/data/service/webvirtmgr
安装成功并成功运行的标志位:/var/log/supervisor/supervisord.log,/var/log/supervisor/webvirtmgr-console.log这两个日志文件会自动生成。
说明:其实网上流传了很多安装的版本,基本都非常乱,要不是这里加一句没用的,就是那里根本不用这么复杂的配置,记住,一切的安装配置以官方文档为准,并且官方这么少的配置都能成功时,自己更应该注意有没有配置错误等问题。
注意:整篇文章未改动过官方的过多配置,如果你运行不起来,那么90%都出在权限以及权限组上!下面安装的步骤都是使用root账号。
一、准备工作
0、准备操作:
##关闭selinux

# sed -i 's/SELINUX=enforcing/SELINUX=disabled/g' /etc/selinux/config   #修改配置文件则永久生效,但是必须要重启系统。

##生效命令

# setenforce 0
1、设置目录并安装nginx
git clone http://github.com/easonjim/centos-shell.git

cd centos-shell/directory

sh init-directory.sh

cd ../../

cd centos-shell/nginx

sh install-nginx_1.14.0.sh
cd ../../
2、安装kvm(这一步不要求按照这个,只需要安装成功即可)
cd centos-shell/kvm

sh install-kvm_centos_7.sh
参考:https://www.cnblogs.com/EasonJim/p/9150733.html
3、安装WebVirtMgr依赖
yum install epel-release
wget -O /etc/yum.repos.d/epel.repo http://mirrors.aliyun.com/repo/epel-7.repo

# 这一步的epel源是关键,如果安装不成功,那么下面的依赖也会安装不成功

yum -y install git python-pip libvirt-python libxml2-python python-websockify supervisor nginx

yum -y install gcc python-devel

pip install numpy
4、正式安装WebVirtMgr并配置超级登录用户
cd /data/service
git clone git://github.com/retspen/webvirtmgr.git

cd webvirtmgr

pip install -r requirements.txt

./manage.py syncdb

./manage.py collectstatic
说明:如果上面的版本不能安装,那么建议下载离线版本,随着时间的推移,不保证会不会改变。
配置超级用户,信息类似如下:
You just installed Django's auth system, which means you don't have any superusers defined.

Would you like to create one now? (yes/no): yes (Put: yes)

Username (Leave blank to use 'admin'): admin (Put: your username or login)

E-mail address: username@domain.local (Put: your email)

Password: xxxxxx (Put: your password)

Password (again): xxxxxx (Put: confirm password)

Superuser created successfully.
如果想再增加多一个超级用户,可以再执行如下命令:
./manage.py createsuperuser
配置信息类似如上所示。
5、设置nginx
vi /data/service/nginx_vhost/webvirtmgr.conf
server {

    listen 8001;

    server_name $hostname;

    access_log /data/weblog/nginx/webvirtmgr_access_log;

    location /static/ {

        root /data/service/webvirtmgr/webvirtmgr;

        expires max;

    }

    location / {

        proxy_pass http://127.0.0.1:8000;

        proxy_set_header X-Real-IP $remote_addr;

        proxy_set_header X-Forwarded-for $proxy_add_x_forwarded_for;

        proxy_set_header Host $host:$server_port;

        proxy_set_header X-Forwarded-Proto $scheme;

        proxy_connect_timeout 600;

        proxy_read_timeout 600;

        proxy_send_timeout 600;

        client_max_body_size 1024M;

    }

}
service nginx restart
6、配置supervisord服务
设置权限
chown -R nginx:nginx /data/service/webvirtmgr
其实是在supervisord服务增加webvirtmgr进程的启动,依赖这个服务而已。
# 开机自启

systemctl enable supervisord
增加进程启动配置
vi /etc/supervisord.d/webvirtmgr.ini
[program:webvirtmgr]

command=/usr/bin/python /data/service/webvirtmgr/manage.py run_gunicorn -c /data/service/webvirtmgr/conf/gunicorn.conf.py

directory=/data/service/webvirtmgr

autostart=true

autorestart=true

logfile=/var/log/supervisor/webvirtmgr.log

log_stderr=true

user=nginx

[program:webvirtmgr-console]

command=/usr/bin/python /data/service/webvirtmgr/console/webvirtmgr-console

directory=/data/service/webvirtmgr

autostart=true

autorestart=true

stdout_logfile=/var/log/supervisor/webvirtmgr-console.log

redirect_stderr=true

user=nginx
重启服务
service supervisord restart
7、权限设置(重点),也是设置Local登录的一种方式
增加权限组
groupadd libvirtd
增加用户到权限组
usermod -a -G libvirtd root

usermod -a -G libvirtd nginx
设置kvm服务libvirtd启动权限
vi /etc/libvirt/libvirtd.conf

增加权限启动配置
vi /etc/polkit-1/localauthority/50-local.d/50-org.libvirtd-group-access.pkla
[libvirtd group Management Access]

Identity=unix-group:libvirtd

Action=org.libvirt.unix.manage

ResultAny=yes

ResultInactive=yes

ResultActive=yes
最后重启服务
service libvirtd restart
service supervisord start
上面的权限检查:
①、确定是否已libvirtd组启动licvirtd服务
ls -l /var/run/libvirt/libvirt-sock

srwxrwx--- 1 root libvirtd 0 févr. 12 16:03 /var/run/libvirt/libvirt-sock
②、确定WebVirtMgr启动的用户
ps -ef | grep run_gunicorn | awk 'NR==1{ print $1 }'

nginx
③、确定用户已经加入到libvirtd组
groups root
libvirtd

groups nginx
libvirtd
8、配置到这里基本全部配置完成,可以直接使用Local添加运行
登录http://x.x.x.x:8001
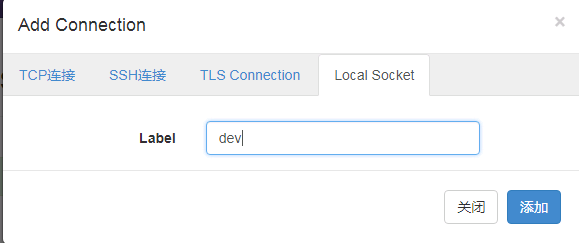
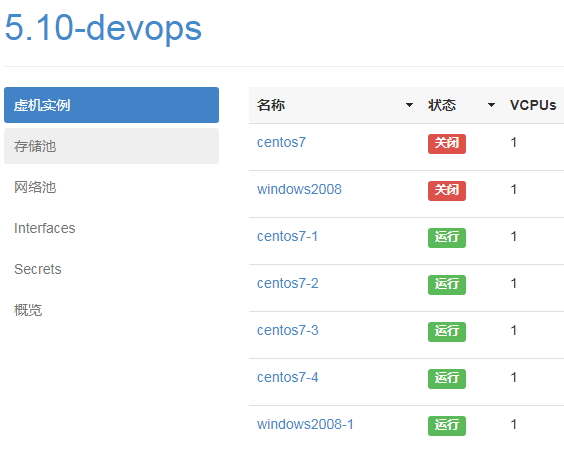
放心,如果按照以上配置绝对可以运行的起来,已经测试了100+台。
参考:
https://github.com/retspen/webvirtmgr/wiki/Install-WebVirtMgr(官方配置文档)
CentOS 7搭建KVM在线管理面板WebVirtMgr的更多相关文章
- CentOS 7搭建KVM在线管理面板WebVirtMgr之使用SSH授权登录
环境:CentOS 7.4 1.创建SSH私钥和ssh配置选项(在安装了WebVirtMgr的系统上): # 切换到nginx用户su - nginx -s /bin/bash # 生产ssh密钥 s ...
- 快速搭建 kvm web 管理工具 WebVirtMgr
作者:SRE运维博客 博客地址: https://www.cnsre.cn/ 文章地址:https://www.cnsre.cn/posts/211117937177/ 相关话题:https://ww ...
- kvm虚拟化管理平台WebVirtMgr部署-完整记录(3)
继下面三篇文章完成了kvm虚拟化管理平台webvirtmgr环境的部署安装:kvm虚拟化管理平台WebVirtMgr部署-虚拟化环境安装-完整记录(0)kvm虚拟化管理平台WebVirtMgr部署-完 ...
- kvm虚拟化管理平台WebVirtMgr部署-完整记录(2)
继上一篇kvm虚拟化管理平台WebVirtMgr部署-完整记录(1),接下来说说WebVirtMgr的日常配置:添加宿主机,创建虚机,磁盘扩容,快照等具体操作记录如下: 一.配置宿主机1.登录WebV ...
- kvm虚拟化管理平台WebVirtMgr部署-完整记录(1)
公司机房有一台2U的服务器(64G内存,32核),由于近期新增业务比较多,测试机也要新增,服务器资源十分有限.所以打算在这台2U服务器上部署kvm虚拟化,虚出多台VM出来,以应对新的测试需求.当KVM ...
- KVM虚拟化管理平台WebVirtMgr部署及使用
KVM虚拟化管理平台WebVirtMgr部署及使用 需求: 公司机房有一台2U的服务器(64G内存,32核),由于近期新增业务比较多,测试机也要新增,服务器资源十分有限.所以打算在这台2U服务器上 ...
- KVM web管理工具——WebVirtMgr(一)
WebVirtMgr 介绍 WebVirtMgr采用几乎纯Python开发,其前端是基于Python的Django,后端是基于Libvirt的Python接口,将日常kvm的管理操作变的更加的 ...
- KVM Web管理平台 WebVirtMgr
WebVirtMgr介绍 WebVirtMgr是一个KVM管理平台,让kvm管理变得更为可视化,对中小型kvm应用场景带来了更多方便.WebVirtMgr采用几乎纯Python开发,其前端是基于Pyt ...
- centos7.2 kvm虚拟化管理平台WebVirtMgr部署
在服务器上部署kvm虚拟化,虚出多台VM出来,以应对新的测试需求.当KVM宿主机越来越多,需要对宿主机的状态进行调控,决定采用WebVirtMgr作为kvm虚拟化的web管理工具,图形化的WEB,让人 ...
随机推荐
- [整理]CSS3 滤镜
1.灰度 兼容 http://www.526net.com/blog/qianduan/226.html http://james.padolsey.com/demos/grayscale/grays ...
- codeforces 235 div2 B. Sereja and Contests
Sereja is a coder and he likes to take part in Codesorfes rounds. However, Uzhland doesn't have good ...
- TrID文件类型识别linux版
读取文件头根据特征码进行文件类型匹配. 官方:http://mark0.net/soft-trid-e.html windows版本小工具:FileAnalysis 以下是linux版本 wget h ...
- 「Android 开发」入门笔记
「Android 开发」入门笔记(界面编程篇) ------每日摘要------ DAY-1: 学习笔记: Android应用结构分析 界面编程与视图(View)组件 布局管理器 问题整理: Andr ...
- python3操作数据库 借助pycharm快速连接并操作mysql数据库
1.https://blog.csdn.net/qiushi_1990/article/details/78041299
- 【逆向知识】裸函数(Naked函数)
1 说明 指定裸函数编写的函数,编译器生成不带任何多余代码. 利用此功能,可以使用内联汇编程序代码编写自己的 prolog/epilog 代码序列. 裸函数对于编写虚拟设备驱动程序特别有用. 2 练习 ...
- linux磁盘空间查看inode
服务器一般是要求长期连续运行的,自动执行任务生成的各种文件及日志,可能使空间占满,从而造成业务故障,所以要定时清理. 一般来说,Linux空间占满有如两种情况: 1.空间被占满了 用df -k 可以看 ...
- async异步注解和aspect切面注解等注解的原理
在我们使用spring框架的过程中,在很多时候我们会使用@async注解来异步执行某一些方法,提高系统的执行效率.今天我们来探讨下spring是如何完成这个功能的. 1.spring 在扫描bean的 ...
- 用Java检测远程主机是否能被连接
有人推荐使用java的Runtime.exec()方法来直接调用系统的Ping命令.也有人完成了纯Java实现Ping的程序,使用的是Java的NIO包(native io, 高效IO包).我个人认为 ...
- Ubuntu环境下TensorBoard 可视化 不显示数据问题 No scalar data was found...(作者亲测有效)(转)
TensorBoard:Tensorflow自带的可视化工具.利用TensorBoard进行图表可视化时遇到了图表不显示的问题. 环境:Ubuntu系统 运行代码,得到TensorFlow的事件文件l ...