利用ssm框架做一个客户管理系统
1. 需求分析

(1)初始化查询条件下拉列表

(2)展示客户列表,并且可以根据查询条件过滤查询结果,并且实现分页处理。
(3)修改客户信息:

1)点击客户列表中的“修改”按钮弹出客户信息修改对话框,并初始化客户信息;
2)点击“保存修改”按钮将修改后的结果保存到数据库中。
(4)删除客户
点击客户列表中的删除按钮,提示“警告信息”:
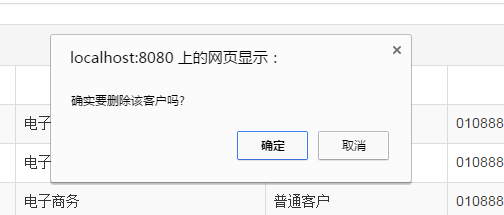
点击确定后删除用户信息,并刷新页面。
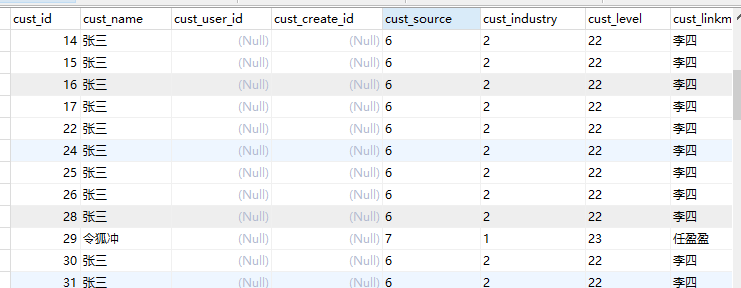
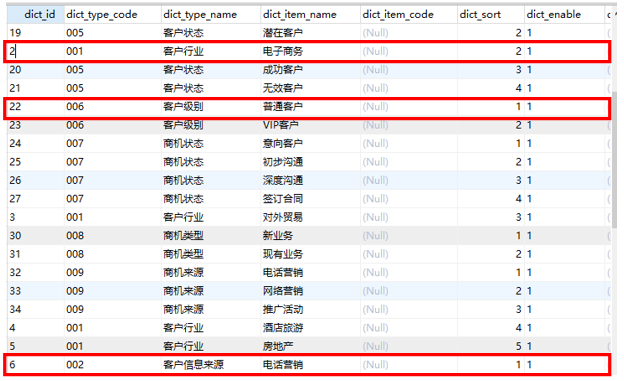
2. 数据库表

客户表customer:
字典查询表base_dict:
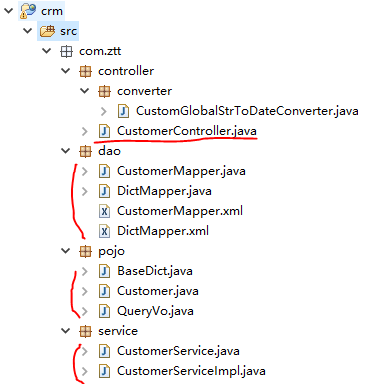
3. 工程搭建(SSM整合)
(1)Dao层
pojo和映射文件以及接口手动编写
SqlMapConfig.xml : mybatis核心配置文件
ApplicationContext-dao.xml 整合后spring在dao层的配置:数据源、会话工厂、扫描Mapper
(2)service层
事务 ApplicationContext-trans.xml@Service注解扫描 ApplicationContext-service.xml
(3)controller层
SpringMvc.xml :注解扫描:扫描@Controller注解
注解驱动:替我们显示的配置了最新版的处理器映射器和处理器适配器
视图解析器:显示的配置是为了在controller中不用每个方法都写页面的全路径
(4)web.xml
springMvc前端控制器配置
spring监听
java类结构:
Springmvc、spring、mybatis框架整合:
所有配置文件放在一个config文件夹内,注意config要建成源文件夹(右键src --> new --> Source Folder),这样就可以直接用 classpath:指向要访问的这几个文件(因为源文件夹最后都会被加到classes目录里)。
(1)SqlMapConfig.xml :(不写内容)
<?xml version="1.0" encoding="UTF-8" ?>

<!DOCTYPE configuration

PUBLIC "-//mybatis.org//DTD Config 3.0//EN"

"http://mybatis.org/dtd/mybatis-3-config.dtd">

<configuration>

</configuration>
(2)ApplicationContext-dao.xml :整合后spring在dao层的配置:数据源、会话工厂、扫描Mapper
  <!-- 加载配置文件 -->

    <context:property-placeholder location="classpath:db.properties" />

    <!-- 数据库连接池 -->

    <bean id="dataSource" class="com.alibaba.druid.pool.DruidDataSource"

        destroy-method="close">

        <property name="driverClassName" value="${jdbc.driver}" />

        <property name="url" value="${jdbc.url}" />

        <property name="username" value="${jdbc.username}" />

        <property name="password" value="${jdbc.password}" />

    </bean>

    <!-- mapper配置 -->

    <!-- 让spring管理sqlsessionfactory 使用mybatis和spring整合包中的 -->

    <bean id="sqlSessionFactory" class="org.mybatis.spring.SqlSessionFactoryBean">

        <!-- 数据库连接池 -->

        <property name="dataSource" ref="dataSource" />

        <!-- 加载mybatis的全局配置文件 -->

        <property name="configLocation" value="classpath:SqlMapConfig.xml" />

    </bean>

    <!-- 配置Mapper扫描器 -->

    <bean class="org.mybatis.spring.mapper.MapperScannerConfigurer">

        <property name="basePackage" value="com.ztt.dao"/>

    </bean>
(3)ApplicationContext-service.xml :配置@Service注解扫描
  <!-- @Service扫描 -->

    <context:component-scan base-package="com.ztt.service"></context:component-scan>
(4)ApplicationContext-trans.xml :配置事务
  <!-- 事务管理器 -->

    <bean id="transactionManager"

        class="org.springframework.jdbc.datasource.DataSourceTransactionManager">

        <!-- 数据源 -->

        <property name="dataSource" ref="dataSource" />

    </bean>

    <!-- 通知 -->

    <tx:advice id="txAdvice" transaction-manager="transactionManager">

        <tx:attributes>

            <!-- 传播行为 -->

            <tx:method name="save*" propagation="REQUIRED" />

            <tx:method name="insert*" propagation="REQUIRED" />

            <tx:method name="delete*" propagation="REQUIRED" />

            <tx:method name="update*" propagation="REQUIRED" />

            <tx:method name="find*" propagation="SUPPORTS" read-only="true" />

            <tx:method name="get*" propagation="SUPPORTS" read-only="true" />

        </tx:attributes>

    </tx:advice>

    <!-- 切面 -->

    <aop:config>

        <aop:advisor advice-ref="txAdvice"

            pointcut="execution(* com.ztt.service.*.*(..))" />

    </aop:config>
【注】ApplicationContext-dao.xml 、ApplicationContext-service.xml、ApplicationContext-trans.xml也可以写到一个ApplicationContext.xml中。
(5)SpringMvc.xml:(MyBatis的配置文件),配置@Controller注解扫描、注解驱动(处理映射器和处理适配器)、视图解析器。
  <!-- @Controller注解扫描 -->

    <context:component-scan base-package="cn.ztt.controller"></context:component-scan>

    <!-- 注解驱动: 替我们显示的配置了最新版的注解的处理器映射器和处理器适配器 -->

    <mvc:annotation-driven conversion-service="conversionService"></mvc:annotation-driven>

    <!-- 配置视图解析器

    作用:在controller中指定页面路径的时候就不用写页面的完整路径名称了,可以直接写页面去掉扩展名的名称

    -->

    <bean class="org.springframework.web.servlet.view.InternalResourceViewResolver">

        <!-- 真正的页面路径 =  前缀 + 去掉后缀名的页面名称 + 后缀 -->

        <!-- 前缀 -->

        <property name="prefix" value="/WEB-INF/jsp/"></property>

        <!-- 后缀 -->

        <property name="suffix" value=".jsp"></property>

    </bean>


    <!-- 配置自定义转换器      注意: 一定要将自定义的转换器配置到注解驱动上 -->

    <bean id="conversionService"

        class="org.springframework.format.support.FormattingConversionServiceFactoryBean">

        <property name="converters">

            <set>

                <!-- 指定自定义转换器的全路径名称    CustomerGlobalStrToDataConverter是我们自己写的一个类,实现日期转换-->

                <bean class="com.ztt.controller.converter.CustomGlobalStrToDateConverter"/>

            </set>

        </property>

    </bean>
(6)Web.xml:配置spring监听、springmvc前端控制器(拦截所有.action文件)、Post请求乱码
   <!-- 加载spring容器 -->

    <context-param>

        <param-name>contextConfigLocation</param-name>

        <param-value>classpath:ApplicationContext-*.xml</param-value>

    </context-param>
  <!-- Spring监听器 -->
  <listener>

        <listener-class>org.springframework.web.context.ContextLoaderListener</listener-class>

    </listener>

  <!-- springmvc前端控制器 -->

  <servlet>

      <servlet-name>springMvc</servlet-name>

      <servlet-class>org.springframework.web.servlet.DispatcherServlet</servlet-class>

      <init-param>

          <param-name>contextConfigLocation</param-name>

          <param-value>classpath:SpringMvc.xml</param-value>

      </init-param>

      <!-- 在tomcat启动的时候就加载这个servlet -->

      <load-on-startup>1</load-on-startup>

  </servlet>

  <servlet-mapping>

      <servlet-name>springMvc</servlet-name>

      <!--

      *.action    代表拦截后缀名为.action结尾的

      /             拦截所有但是不包括.jsp

      /*             拦截所有包括.jsp

       -->

      <url-pattern>*.action</url-pattern>

  </servlet-mapping>

  <!-- 配置Post请求乱码 -->

  <filter>

        <filter-name>CharacterEncodingFilter</filter-name>

        <filter-class>org.springframework.web.filter.CharacterEncodingFilter</filter-class>

        <init-param>

            <param-name>encoding</param-name>

            <param-value>utf-8</param-value>

        </init-param>

    </filter>

    <filter-mapping>

        <filter-name>CharacterEncodingFilter</filter-name>

        <url-pattern>/*</url-pattern>

    </filter-mapping>
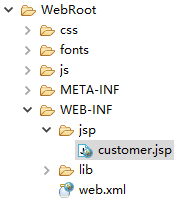
(7)加入jsp:
4. 实现1:查询条件初始化

- 客户来源、所属行业、客户级别分别对象表base_dict中的 dict_type_code=002、001、006
实际操作中我们不要传入这些模糊数字,可以建一个properties资源文件,然后将这些数字与所代表的含义通过 键-值映射 存储。
建立resource.properties资源文件:
customer.dict.source=

customer.dict.industry=

customer.dict.level=
然后在 SpringMvc中引入该文件:
   <!-- 引入字典资源文件 -->

    <context:property-placeholder location="classpath:resource.properties"/>
由controller层调用service层,service层调用dao层,dao层来操作数据库 。下面由DAO->service->controler我们来编写代码:
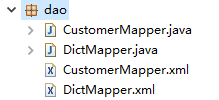
(1)DAO层
cn.ztt.dao包下 :(一个表对应一个mapper,我们用customer、base_dict这两个表,所以建2个mapper)
1)DictMapper.xml 编写数据库查询:
<?xml version="1.0" encoding="UTF-8" ?>

<!DOCTYPE mapper PUBLIC "-//mybatis.org//DTD Mapper 3.0//EN" "http://mybatis.org/dtd/mybatis-3-mapper.dtd" >

<mapper namespace="com.ztt.dao.DictMapper">

    <select id="findDictByCode" parameterType="String" resultType="com.ztt.pojo.BaseDict">

        select * from base_dict b where b.dict_enable=1 and b.dict_type_code=#{code} order by b.dict_sort

    </select>

</mapper>
2)DictMapper接口 上定义 findDictByCode 方法
public interface DictMapper {

    public List<BaseDict> findDictByCode(String code);

}
(2)service层

3)在service层实现 findDictByCode 方法:
先在CustomerService(接口)上编写 findDictByCode 方法
public interface CustomerService {

    public List<BaseDict> findDictByCode(String code);

}
然后在 CustomerServiceImpl 实现类上实现该方法。注意类上要加@Service注解:
@Service

public class CustomerServiceImpl implements CustomerService {

    //因为下面要调用DAO的方法,所以把DAO层的DictMapper传进来

@Autowired

private DictMapper dictMapper;

    @Override

    public List<BaseDict> findDictByCode(String code) {

        List<BaseDict> list = dictMapper.findDictByCode(code);

        return list;

    }

}
(3)Controller层
4)在 CustomerController.java类上调用service层的方法实现:
@Controller

@RequestMapping("/customer")

public class CustomerController {

    @Autowired

    private CustomerService customerService;

    //读取resource.properties中的键并设置名称

    @Value("${customer.dict.source}")

    private String source;

    @Value("${customer.dict.industry}")

    private String industry;

    @Value("${customer.dict.level}")

    private String level;

    //接收QueryVo对象是为了数据回显,接收Model是为了向页面传入参数

    @RequestMapping("/list")

    public String list(QueryVo vo, Model model) throws Exception {

        //客户来源

        List<BaseDict> sourceList = customerService.findDictByCode(source);

        //客户行业

        List<BaseDict> industryList = customerService.findDictByCode(industry);

        //客户级别

        List<BaseDict> levelList = customerService.findDictByCode(level);

        //发送的是get请求,这里要处理get请求乱码,没有解决!

        /*if(vo.getCustName() != null){

            vo.setCustName(new String(vo.getCustName().getBytes("iso8859-1"),"utf-8"));

        }*/

        //将信息响应给页面, 页面上分别使用${fromType}、${industryType}、${levelType}接收

        //高级查询下拉列表数据

        model.addAttribute("fromType", sourceList);

        model.addAttribute("industryType", industryList);

        model.addAttribute("levelType", levelList);

        //QueryVo中封装了custName、custSource、custIndustry、custLevel这几个属性

        //高级查询选中数据回显

        model.addAttribute("custName", vo.getCustName());

        model.addAttribute("custSource", vo.getCustSource());

        model.addAttribute("custIndustry", vo.getCustIndustry());

        model.addAttribute("custLevel", vo.getCustLevel());

     return "customer";

    }

}
上面采用 vo.setCustName(new String(vo.getCustName().getBytes("iso8859-1"),"utf-8")); 的方法没有解决乱码问题:
在输入中文后中文变成了问号:
后来选了另一种方式解决:直接修改tomcat的编码方式:在conf文件夹下的server.xml 文件里指定编码格式为UTF-8
<Connector port="8275" protocol="HTTP/1.1" connectionTimeout="20000" maxHttpHeaderSize ="10240" redirectPort="8443"URIEncoding="UTF-8"/>

5. 实现2:展示客户列表,并且可以根据查询条件过滤查询结果,并且实现分页处理
首先看下 QueryVo类 :
public class QueryVo {

    private String custName;    //客户名称

    private String custSource;  //客户来源

    private String custIndustry;//客户行业

    private String custLevel;   //客户级别

    //分页属性

    private Integer page = 1;   //当前第几页,默认是第1页

    private Integer start;      //这一页从第几个记录开始

    private Integer size = 10;  //一页有几条记录,默认10条

        set/get.......

}
在得到查询条件后,我们传入QueryVo对象进行客户列表查询。
(1)DAO层
1)CustomerMapper.xml 编写数据库查询 :
根据QueryVo对象编写 findCustomerByVo(查询客户列表)、findCustomerByVoCount(查询客户数):
<?xml version="1.0" encoding="UTF-8" ?>

<!DOCTYPE mapper PUBLIC "-//mybatis.org//DTD Mapper 3.0//EN" "http://mybatis.org/dtd/mybatis-3-mapper.dtd" >

<mapper namespace="com.ztt.dao.CustomerMapper">

    <sql id="customer_where">

        <where>

            <if test="custName != null and custName != ''">

                and a.cust_name like '%${custName}%'

            </if>

            <if test="custSource != null and custSource != ''">

                and a.cust_source=#{custSource}

            </if>

            <if test="custIndustry != null and custIndustry != ''">

                and a.cust_industry=#{custIndustry}

            </if>

            <if test="custLevel != null and custLevel != ''">

                and a.cust_level=#{custLevel}

            </if>

        </where>

    </sql>

    <select id="findCustomerByVo" parameterType="com.ztt.pojo.QueryVo" resultType="com.ztt.pojo.Customer">

        select a.cust_id,a.cust_name, b.dict_item_name cust_source, c.dict_item_name cust_industry,

            d.dict_item_name cust_level,a.cust_phone,a.cust_mobile, a.cust_linkman, a.cust_zipcode,

            a.cust_address, a.cust_createtime

        from customer a

        left join base_dict b on a.cust_source = b.dict_id

        left join base_dict c on a.cust_industry = c.dict_id

        left join base_dict d on a.cust_level = d.dict_id

        <include refid="customer_where"></include>

        limit #{start}, #{size}

    </select>

    <select id="findCustomerByVoCount" parameterType="com.ztt.pojo.QueryVo" resultType="int">

        select count(*)

        from customer a

        left join base_dict b on a.cust_source = b.dict_id

        left join base_dict c on a.cust_industry = c.dict_id

        left join base_dict d on a.cust_level = d.dict_id

        <include refid="customer_where"></include>

    </select>

</mapper>
2) DictMapper类 上定义 findCustomerByVo、findCustomerByVoCount方法:
public interface CustomerMapper {

    //查询客户列表

    public List<Customer> findCustomerByVo(QueryVo vo);

    //查询客户人数

    public Integer findCustomerByVoCount(QueryVo vo);

}
(2)Service层
3)在service层实现 findCustomerByVo、findCustomerByVoCount方法:
先在CustomerService(接口)上编写 findCustomerByVo、findCustomerByVoCount 方法
    public List<Customer> findCustomerByVo(QueryVo vo);

    public Integer findCustomerByVoCount(QueryVo vo);
然后在 CustomerServiceImpl 实现类上实现这两个方法:
@Service

public class CustomerServiceImpl implements CustomerService {

    @Autowired

    private DictMapper dictMapper;

    @Autowired

    private CustomerMapper customerMapper;

    @Override

    public List<BaseDict> findDictByCode(String code) {

        List<BaseDict> list = dictMapper.findDictByCode(code);

        return list;

    }

    @Override

    public List<Customer> findCustomerByVo(QueryVo vo) {

        List<Customer> list = customerMapper.findCustomerByVo(vo);

        return list;

    }

    @Override

    public Integer findCustomerByVoCount(QueryVo vo) {

        Integer count = customerMapper.findCustomerByVoCount(vo);

        return count;

    }

}
(3)Controller层
4)在 CustomerController.java类上调用service层的方法实现:
@Controller

@RequestMapping("/customer")

public class CustomerController {

    @Autowired

    private CustomerService customerService;

    //读取resource.properties中的键并设置名称

    @Value("${customer.dict.source}")

    private String source;

    @Value("${customer.dict.industry}")

    private String industry;

    @Value("${customer.dict.level}")

    private String level;

    //接收QueryVo对象是为了数据回显,接收Model是为了向页面传入参数

    @RequestMapping("/list")

    public String list(QueryVo vo, Model model) throws Exception {

        //客户来源

        List<BaseDict> sourceList = customerService.findDictByCode(source);

        //客户行业

        List<BaseDict> industryList = customerService.findDictByCode(industry);

        //客户级别

        List<BaseDict> levelList = customerService.findDictByCode(level);

        //默认当前页为1

        if(vo.getPage() == null){

        vo.setPage(1);

     }

     //设置查询的起始记录条数

        vo.setStart((vo.getPage() - 1) * vo.getSize());

     //查询数据列表和数据总数

        List<Customer> resultList = customerService.findCustomerByVo(vo);

      Integer count = customerService.findCustomerByVoCount(vo);

     //page是我们自己写的封装分页的类,将查询结果封装到该类中

        Page<Customer> page = new Page<Customer>();

     page.setTotal(count);      //数据总数

        page.setSize(vo.getSize());//每页显示条数

        page.setPage(vo.getPage());//当前页数

        page.setRows(resultList);  //数据列表

     //将查询结果返回给页面

        model.addAttribute("page", page);


     //将信息响应给页面, 页面上分别使用${fromType}、${industryType}、${levelType}接收

        //高级查询下拉列表数据

        model.addAttribute("fromType", sourceList);

        model.addAttribute("industryType", industryList);

        model.addAttribute("levelType", levelList);

        //QueryVo中封装了custName、custSource、custIndustry、custLevel这几个属性

        //高级查询选中数据回显

        model.addAttribute("custName", vo.getCustName());

        model.addAttribute("custSource", vo.getCustSource());

        model.addAttribute("custIndustry", vo.getCustIndustry());

        model.addAttribute("custLevel",vo.getCustLevel());


     return "customer";

    }

}
效果:

6.实现3:修改客户信息
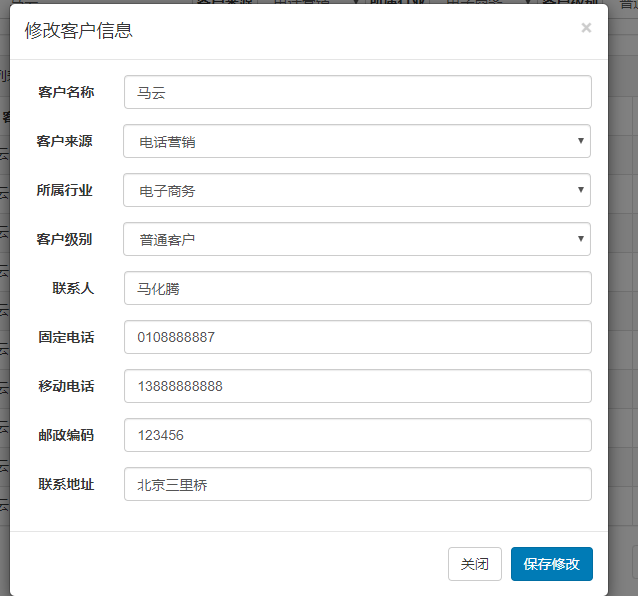
6.1 点击客户列表中的“修改”按钮弹出客户信息修改对话框,并初始化客户信息:
思路:一点击修改就提交controller,交给controller一个id(这条记录的id),然后根据这条记录的id查询这条记录的详细信息,把数据返回回来。
(1)DAO层:
在 CustomerMapper.xml 编写 根据id查询用户信息的sql语句:
  <select id="findCustomerById" parameterType="long" resultType="com.ztt.pojo.Customer">

        select * from customer where cust_id=#{id}

    </select>
在CustomerMapper.java 接口编写 findCustomerById 方法:
  //根据id查询客户信息

    public Customer findCustomerById(Long id);
(2)Service层:
先在CustomerService(接口)上编写 findCustomerBId 方法:
public Customer findCustomerById(Long id);
然后在CustomerServiceImpl 实现类上实现这个方法:
    @Autowired

    private CustomerMapper customerMapper;

    @Override

    public Customer findCustomerById(Long id) {

        Customer customer = customerMapper.findCustomerById(id);

        return customer;

    }
(3)Controller层:
    @Autowired

    private CustomerService customerService;

    @RequestMapping("/detail")

    @ResponseBody  //将Java类自动转为json数据

    public Customer detail(Long id) throws Exception{

        Customer customer = customerService.findCustomerById(id);

        return customer;

    }
customer.jsp相对应的:
。。。。。。
<a href="#" 。。。。。。 onclick="editCustomer(${row.cust_id})">修改</a>
。。。。。。
<script type="text/javascript">

        function editCustomer(id) {

            $.ajax({

                type:"get",

                url:"<%=basePath%>customer/detail.action",

                data:{"id":id},

                success:function(data) {

                    $("#edit_cust_id").val(data.cust_id);

                    $("#edit_customerName").val(data.cust_name);

                    $("#edit_customerFrom").val(data.cust_source)

                    $("#edit_custIndustry").val(data.cust_industry)

                    $("#edit_custLevel").val(data.cust_level)

                    $("#edit_linkMan").val(data.cust_linkman);

                    $("#edit_phone").val(data.cust_phone);

                    $("#edit_mobile").val(data.cust_mobile);

                    $("#edit_zipcode").val(data.cust_zipcode);

                    $("#edit_address").val(data.cust_address);

                }

            });

        }
</script>
效果:点击修改后弹出客户信息修改对话框,并初始化了客户信息:
6.2 点击“保存修改”按钮将修改后的结果保存到数据库中。
(1)DAO层:
在 CustomerMapper.xml 编写 修改 的sql语句:
  <update id="updateCustomerById" parameterType="com.ztt.pojo.Customer">

        update customer

        <!-- set标签作用:第一可以自动添加set关键字, 第二可以去掉最后一个更新的逗号 -->

        <set>

            <if test="cust_name != null and  cust_name != ''">

                cust_name=#{cust_name} ,

            </if>

            <if test="cust_source != null and cust_source  != ''">

                cust_source=#{cust_source},

            </if>

            <if test="cust_industry != null and  cust_industry != ''">

                cust_industry=#{cust_industry},

            </if>

            <if test="cust_level != null and  cust_level != ''">

                cust_level=#{cust_level},

            </if>

            <if test="cust_linkman != null and  cust_linkman != ''">

                cust_linkman=#{cust_linkman},

            </if>

            <if test=" cust_phone != null and  cust_phone != ''">

                cust_phone=#{cust_phone},

            </if>

            <if test="cust_mobile != null and cust_mobile  != ''">

                cust_mobile=#{cust_mobile},

            </if>

            <if test="cust_zipcode != null and  cust_zipcode != ''">

                cust_zipcode=#{cust_zipcode},

            </if>

            <if test="cust_address != null and   cust_address!= ''">

                cust_address=#{cust_address},

            </if>

        </set>

        where cust_id=#{cust_id}

    </update>
在CustomerMapper.java 接口编写 updateCustomerById 方法:
    //修改客户信息

    public void updateCustomerById(Customer customer);
(2)Service层:
先在CustomerService(接口)上编写 updateCustomerById 方法
public void updateCustomerById(Customer customer);
然后在CustomerServiceImpl 实现类上实现这个方法:
    @Autowired

    private CustomerMapper customerMapper;

    @Override

    public void updateCustomerById(Customer customer) {

        customerMapper.updateCustomerById(customer);

    }
(3)Controller层:
    @Autowired

    private CustomerService customerService;

    @RequestMapping("/update")

    public String update(Customer customer) throws Exception{

        customerService.updateCustomerById(customer);

      //前端是ajax的请求,这边返回响应response,把“customer”当成一个页面,页面的所有内容当成字符串返回回去

        return "customer";

    }
customer.jsp相对应的:
。。。。。。
<button type="button" class="btn btn-primary" onclick="updateCustomer()">保存修改</button>

。。。。。。

<script type="text/javascript">

        function updateCustomer() {

            $.post("<%=basePath%>customer/update.action",$("#edit_customer_form").serialize(),function(data){

                alert("客户信息更新成功!");

                window.location.reload();//页面重载

            });

        }

</script>
7. 实现3:删除客户

思路:和修改类似,提交到 controller 的是所选记录的 id
(1)DAO层:
在 CustomerMapper.xml 编写 删除用户信息 的sql语句
  <delete id="deleteCustomerById" parameterType="long">

        delete from customer where cust_id=#{id}

    </delete>
在CustomerMapper.java 接口编写deleteCustomerById方法:
  //删除用户信息

    public void deleteCustomerById(Long id);
(2)Service层:
先在CustomerService(接口)上编写 deleteCustomerById 方法:
public void deleteCustomerById(Long id);
然后在CustomerServiceImpl 实现类上实现这个方法:
  @Autowired

    private CustomerMapper customerMapper;

    @Override

    public void deleteCustomerById(Long id) {

        customerMapper.deleteCustomerById(id);

    }
(3)Controller层:
  @Autowired

    private CustomerService customerService;

    @RequestMapping("/delete")

    public String delete(Long id) throws Exception{

        customerService.deleteCustomerById(id);

        return "customer";

    }
customer.jsp相对应的:
。。。。。。

<a href="#" class="btn btn-danger btn-xs" onclick="deleteCustomer(${row.cust_id})">删除</a>

。。。。。。

<script type="text/javascript">

    function deleteCustomer(id) {

            if(confirm('确实要删除该客户吗?')) {

                $.post("<%=basePath%>customer/delete.action",{"id":id},function(data){

                    alert("客户删除更新成功!");

                    window.location.reload();

                });

            }

        }

</script>
利用ssm框架做一个客户管理系统的更多相关文章
- 利用jquery+iframe做一个ajax上传效果
以下是自学it网--中级班上课笔记 网址:www.zixue.it html页面 <!DOCTYPE html PUBLIC "-//W3C//DTD XHTML 1.0 Strict ...
- 使用Maven+ssm框架搭建一个web项目
1,前期准备:Eclipse(Mars.2 Release (4.5.2)).jdk1.7.tomcat7.maven3.2.1 2.使用eclipse中的maven新建一个web项目 点击next: ...
- Struts2框架01【如果使用struts框架】【利用struts框架写一个 hello world】
1 什么是Struts2框架 基于MVC设计模式的web应用框架 Struts2框架是一个轻量级的MVC流程框架 轻量级是指程序的代码不是很多,运行时占用的资源不是很多,MVC流程框架就是说它是支持分 ...
- spring boot 简介(基于SSM框架的一个升级版本吧)
Spring Boot是由Pivotal团队提供的全新框架,其设计目的是用来简化新Spring应用的初始搭建以及开发过程.该框架使用了特定的方式来进行配置,从而使开发人员不再需要定义样板化的配置.通过 ...
- c#利用三层架构做一个简单的登录窗体
就个人而言,三层架构有点难理解,不知道该如何下手,各层与各层之间怎么调用 最近一直在研究三层架构,经过网上学习与多方打听写一下自己的心得.有不足之处,可以评论和私聊探讨 言归正传: 三层架构(3-ti ...
- 基于thinkphp5框架做一个可以区别开发、测试、生产三种环境的配置加载
在日常的开发测试中我们经常会遇到本地开发和测试或者线上配置参数不同的场景,必要你要是使用一个三方的支付,它的本地测试和线上的key值或者账号存在不同.最基本的做法是本地用测试参数,提交到测试的时候再改 ...
- 利用random模块做一个抢红包功能
我们都知道random模块是一个生成随机数的模块,用它来做抢红包的功能很合适. 抢红包,抢到的金额是随机的,但怎么让每个人抢到的随机金额公平合理呢 比如:我想发一个100元的红包让10个人抢,我可以把 ...
- 利用python+tkinter做一个简单的智能电视遥控器
要通过python实现遥控器功能分两步: 第一步:开发图形化界面,以暴风TV的遥控器按钮为例 第二步:使PC端给电视发送相应指令(此步骤需要打开电视的adb开关) 现在就开始第一步操作实现遥控器功能, ...
- python小练习,利用dict,做一个简单的登录。
'''利用字典实现登录'''users=[{'username':'jerry','pwd':'123456'},{'username':'tom','pwd':'1'}] def login(use ...
随机推荐
- Android Studio代码编译通过但是提示停止运行
这种问题也许有很多可能,但是我遇到过一种,下面分享给大家希望问题会得到解决 检查你的布局文件中图片的位置 如果图片名前有“(v24)”的删掉 重新插入图片到这个目录 然后就可以正常运行了
- zepto快速入门教程
* zepto* 特点:1.体积8kb2.针对移动端的框架3.语法同jquery大部分一样,都是$为核心函数4.目前功能完善的框架体积最小的左右* 同jquery相似的语法核心:$--作为函数使用参数 ...
- PHP时间操作
PHP中对日期进行处理常用的几个函数如下: date(format,timestamp): 把时间戳格式化为更易读的日期和时间 format : 必需,规定输出日期字符串的格式 timestamp : ...
- html5学习之路_007
CSS概述 CSS指层叠样式表 CSS样式表极大地提高了工作效率 CSS基础语法 selector { property:value } 例:hi {color:red; font-size:14px ...
- [工具推荐]005.Axure RP Pro 7.0模拟C#TAB控件
有一次,主管安排我写一个项目的原型,但是项目中涉及到了Tab控件,在Axure中的控件中找了一番,没有找着Tab控件.那么我们只能换种法子来实现它了,我们用到了Dynamic Panel来模拟. 1. ...
- 域渗透分析工具BloodHound
简介:BloodHound是一款将域内信息可视化的单页的web应用程序,是一款在域内进行信息收集的免费工具: Kali中直接命令安装即可 apt-get install bloodhound 打开lo ...
- Rocket - diplomacy - resolveStar
https://mp.weixin.qq.com/s/W1cS9sgwLFjOOm86d05NIA 介绍各类型节点如何确定星型绑定所包含的连接数. 1. 定义 resoveSta ...
- Java实现 蓝桥杯VIP 算法训练 成绩的等级输出
输入一个百分制的成绩t后,按下式输出它的等级.等级为:90100为A,8089为B,7079为C,6069为D,0~59为E. 样例输入 98 样例输出 A import java.util.Scan ...
- Java实现蓝桥杯模拟约数的个数
问题描述 1200000有多少个约数(只计算正约数). 答案提交 这是一道结果填空的题,你只需要算出结果后提交即可.本题的结果为一个整数,在提交答案时只填写这个整数,填写多余的内容将无法得分. pac ...
- Java实现 蓝桥杯VIP 算法提高 插入排序
算法提高 插入排序 时间限制:1.0s 内存限制:256.0MB 插入排序 问题描述 排序,顾名思义,是将若干个元素按其大小关系排出一个顺序.形式化描述如下:有n个元素a[1],a[2],-,a[ ...