jquery 实现图片上传,并在前端显示出来
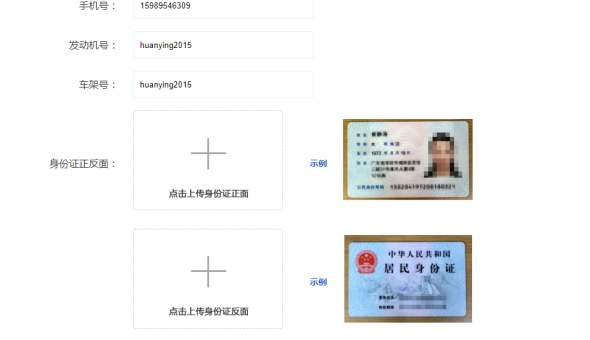
目前遇到一个图片上上传的需求,突然发现,原来之前都没有做过此种类型的需求,以下是需求样式:
看到需求后之所以有点懵,是因为我接触到的文件上传,一般都是按钮类型的,例如以下这种:
深呼吸,好好想一下,整理整理思路:
1.需要有一个虚线框,这里为一个div元素
2.再有一个十字框(和文字说明一起,可以集成组合为一张图片),这里可以可以为一个img元素,这样:当没有上传图片时,显示默认图片,当上传了,显示上传的图片
3.要实现点击能够上传,需要有一个 input 元素:首先input元素不能显示出来,初步想了一下,有两种实现方法,一种是使用 label标签 加input元素(label 标签关联input,input影藏,label设置为与div 同样大小),另一种是使用input单标签,设置它的z-index层级在最上层,然后设置为行块元素即与div一般大小,然后设置input的 opacity 为0,即透明状态;
4.需要可以删除图片,那就在div里再加一个span 元素,点击span元素时,删除图片
得到以下html:
<div class="chuans">
<img src="__INDEX__/img/ins/chuanzhenm.png" alt="" data-imgsrc="__INDEX__/img/ins/chuanzhenm.png">
<input class="uploadImg file1" type="file" name="file1" >
<span class="delx Hui-iconfont"></span>
</div>
全部html如下:
<!DOCTYPE html>
<html lang="zh">
<head>
<meta charset="UTF-8">
<meta name="viewport" content="width=device-width, initial-scale=1.0">
<meta http-equiv="X-UA-Compatible" content="ie=edge">
<link rel="stylesheet" href="__INDEX__/css/header2.css">
<link rel="stylesheet" href="__INDEX__/css/1.0.8/iconfont.css">
<link rel="stylesheet" href="__INDEX__/css/ins/insinfo.css">
<script src="__INDEX__/js/common/jquery-1.7.2.min.js"></script>
<script src="__INDEX__/js/layer.js"></script>
<script src="__INDEX__/js/ins/insinfo.js"></script>
<title></title> </head>
<body>
{include file="common/header1"}
<div class="insbox">
<h3 class="institle"><span class="isnnei">提交商业投保资料</span> </h3>
<div class="nelist">
<ul class="inul yilei clearfix">
<div class="toleft"><span class="nming maohaos toyilei">手机号</span></div>
<div class="toright"><input type="text" class="xiangton shoujihao" name="shoujihao"></div>
</ul>
<ul class="inul yilei clearfix">
<div class="toleft"><span class="nming maohaos toyilei">发动机号</span></div>
<div class="toright"><input type="text" class="xiangton fadongjihao" name="fadongjihao"></div>
</ul>
<ul class="inul yilei clearfix">
<div class="toleft"><span class="nming maohaos toyilei">车架号</span></div>
<div class="toright"><input type="text" class="xiangton chejiahao" name="chejiahao"></div>
</ul>
<ul class="inul erlei clearfix">
<div class="toleft"><span class="nming maohaos toerlei">身份证正反面</span></div>
<div class="toright clearfix">
<div class="chuans"> <img src="__INDEX__/img/ins/chuanzhenm.png" alt="" data-imgsrc="__INDEX__/img/ins/chuanzhenm.png">
<input class="uploadImg file1" type="file" name="file1" >
<span class="delx Hui-iconfont"></span>
</div>
<div class="shangshili clearfix">
<div class="shuom">示例</div>
<div class="shulitu">
<img src="__INDEX__/img/ins/shilizhen.png" alt="" data-imgsrc="__INDEX__/img/ins/shilizhen.png">
</div>
</div>
</div>
</ul>
<ul class="inul erlei clearfix">
<div class="toleft"><span class="nming "></span></div>
<div class="toright clearfix">
<div class="chuans"> <img src="__INDEX__/img/ins/chuanfanmian.png" data-imgsrc="__INDEX__/img/ins/chuanfanmian.png" alt="">
<input class="uploadImg file2" type="file" name="file2" >
<span class="delx Hui-iconfont"></span>
</div>
<div class="shangshili clearfix">
<div class="shuom">示例</div>
<div class="shulitu">
<img src="__INDEX__/img/ins/shilifan.png " alt="">
</div>
</div>
</div>
</ul>
<ul class="inul erlei clearfix">
<div class="toleft"><span class="nming maohaos toerlei">自拍照</span></div>
<div class="toright clearfix">
<div class="chuans"> <img src="__INDEX__/img/ins/dianchuan.png" data-imgsrc="__INDEX__/img/ins/dianchuan.png" alt="">
<input class="uploadImg file3" type="file" name="file3" >
<span class="delx Hui-iconfont"></span>
</div>
<div class="shangshili clearfix">
<div class="shuom"><span class="kanshili"><span class="chsa Hui-iconfont"></span>查看示例</span></div>
<div class="shulitu"></div>
</div>
</div>
</ul> </div> <div class="btns">
<span class="tibtn">确定</span>
</div>
</div>
<script>
var otijiourl = "{:url('insorder/submitInsInfo')}";
</script>
</body>
</html>
根据以上的规则设置css样式:
 .insbox{

     width:1200px;

     position:relative;

     margin:0 auto;

     border:1px solid #333;

     color:#333;

     border-radius: 20px;

     margin-bottom:150px;

 }

 .inul {

     min-height:44px;

     margin:20px 0;

 }

 ul.inul>div{

     float:left;

 }

 h3.institle{

     background:#333;

     color:#fff;

     text-align: center;

     height:78px;

     border-top-left-radius:20px;

     border-top-right-radius:20px;

     position:relative;

     width:100%;

     display:flex;

     align-items: center;

     justify-content:center;

 }

 .isnnei{

     background:url(../../img/ins/card.png)no-repeat 0 center;

     background-size: 50px auto;

 }

 h3.institle span{

     padding-left: 58px;

     font-size: 22px;

     letter-spacing: 3px;

     font-weight: normal;

 }

 .toleft{

     width:25%;

     text-align: right;

 }

 .toright{

     width:75%;

 }

 input.xiangton{

     border:1px solid #eee;

     border-radius: 3px;

     width:290px;

     height:42px;

     text-indent: 10px;

 }

 .toyilei{

     line-height:44px;

 }

 span.nming {

     margin-right:40px;

     position:relative;

 }

 .maohaos::after{

     content:":";

     display:inline;

     position:absolute;

     right:;

     right:-10px;

 }

 .erlei{

     height:172px;

     line-height:172px;

 }

 div.toright>div{

     float:left;

 }

 div.chuans{

     position:relative;

     width:240px;

     height:160px;

     border-radius: 3px;

     border:1px dashed #ccc;

     margin-right: 44px;

     overflow: hidden;

 }

 div.chuans img{

     position:absolute;

     max-width:238px;

     left:;

     right:;

     top:;

     bottom:;

     margin:auto;

 }

 div.shangshili>div{

     float:left;

 }

 div.shangshili {

     height:160px;

     position:relative;

 }

 div.shuom{

     margin-right:10px;

 }

 div.shulitu{

     width:242px;

     height:100%;

     position:relative;

 }

 div.shulitu img{

     position:absolute;

     max-width:240px;

     left:;right:;

     top:;bottom:;

     margin:auto;

 }

 div.btns{

     margin-top:180px;

     margin-bottom:40px;

     position:relative;

     text-align: center;

 }

 span.tibtn{

     padding:8px 30px;

     background:#333;

     border-radius: 5px;

     color:#fff;

 }

 div.chuans{

     line-height:30px;

 }

 input.uploadImg{

     display: inline-block;

     width: 100%;

     height: 100%;

     opacity:;

     z-index:;

 }

 span.delx {

     position:absolute;

     top:5px;

     right:5px;

     z-index:;

     font-size: 30px;

     float:right;

     display:none;

     border-radius: 50%;

 }

 span.delx:hover{

     background:#333;

     color:#fff;

     cursor:pointer;

 }

 div.shuom span.chsa {

     color:#e5000c;

     margin-right:10px;

     font-size: 20px;

     font-weight: normal;

 }

 div.shuom{

     color:#1f5fc3;

     font-size: 14px;

     font-weight: bold;

 }
得到如下的样式:

下面开始写js:
首先需要判断上传的图片格式,如果不是jpeg,jpg,png,bmp,则提示图片上传格式错误,需重新上传;如果格式正确,那就或者上传图片的地址,把当前div 下 img 的src 设置为此图片地址,即可达到显示图片的目的
 $("body").on("change","div.chuans input.uploadImg",function(){

         var reads = new FileReader();

         var f = $(this).get(0).files[0];

         var rep = /jpeg|png|gif|bmp/ig;

         var gstyle = f.type.split("/")[1];

         if(rep.test(gstyle)){

             reads.readAsDataURL(f);

             var that = this;

             reads.onload = function(e) {

                 $(that).parent().find("img").attr("src",this.result)

             };

         }else{

             layer.msg("图片格式不正确,请上传 jpeg|png|gif|bmp 格式的图片")

         }

     });
以下是删除图片:
 $("body").on("click","span.delx",function(){

         var odatasrc = $(this).parents(".chuans").find("img").data("imgsrc");

         var osrc =  $(this).parents(".chuans").find("img").attr("src");

         $(this).parents(".chuans").find("img").attr("src",odatasrc);

         $(this).hide();

         $(this).parents(".chuans").find("input").val("");

 });
图片上传时,这里突然遇到一个报错:

这个错误找了好久,都没有发现是哪里出了问题,代码是这样的:
 $.ajax({

                 type:"post",

                 url:otijiourl,

                 data:odata,

                 dataType: 'json', //返回值类型 一般设置为json

                 success:function(res){

                     console.log(res);

                 },error:function(){

                     console.log("后台处理错误");

                 }

             })
看了半天,也没有发现是哪里错了
最后百度了一下,发现别人也遇到了这样的问题,原因是使用 jquery ajax 发送请求的时候,会默认把data中的数据进行序列化。只要不进行序列化,就可以了。如果不进行序列化,需要增加一个参数:processData,设置为 false
变更之后的ajax 请求代码如下:
 $.ajax({

         type:"post",

         url:otijiourl,

         data:odata,

         dataType: 'json', //返回值类型 一般设置为json

         processData: false,  // jQuery不要去处理发送的数据

         success:function(res){

             console.log(res);

         },error:function(){

             console.log("后台处理错误");

         }

     })
改完之后就ok 了
全部js 代码如下:大功告成
 $(function(){

     $("body").on("change","div.chuans input.uploadImg",function(){

         var reads = new FileReader();

         var f = $(this).get(0).files[0];

         var rep = /jpeg|png|gif|bmp/ig;

         var gstyle = f.type.split("/")[1];

         if(rep.test(gstyle)){

             reads.readAsDataURL(f);

             var that = this;

             reads.onload = function(e) {

                 $(that).parent().find("img").attr("src",this.result)

             };

         }else{

             layer.msg("图片格式不正确,请上传 jpeg|png|gif|bmp 格式的图片")

         }

     });

     $("body").on("mouseenter","div.chuans",function(){

         var odatasrc = $(this).find("img").data("imgsrc");

         var osrc =  $(this).find("img").attr("src");

         if(osrc.indexOf(odatasrc)==-1){

             $(this).find("span.delx").show();

         }

     });

     $("body").on("mouseleave","div.chuans",function(){

         $(this).find("span.delx").hide();

     });

     $("body").on("click","span.delx",function(){

         var odatasrc = $(this).parents(".chuans").find("img").data("imgsrc");

         var osrc =  $(this).parents(".chuans").find("img").attr("src");

         $(this).parents(".chuans").find("img").attr("src",odatasrc);

         $(this).hide();

         $(this).parents(".chuans").find("input").val("");

     });

     $("body").on("click","span.tibtn",function(){

         var odata = getchuancan();

         console.log(odata);

         if(jiancecanshu()){

             $.ajax({

                 type:"post",

                 url:otijiourl,

                 data:odata,

                 dataType: 'json', //返回值类型 一般设置为json

                 // contentType: "application/x-www-form-urlencoded; charset=utf-8",

                 processData: false,  // jQuery不要去处理发送的数据

                 success:function(res){

                     console.log(res);

                 },error:function(){

                     console.log("后台处理错误");

                 }

             })

         }

     });

     function getchuancan(){

         var formData = new FormData();

         var ojson = {};

         ojson.oshouji =$.trim( $("input.shoujihao").val());

         ojson.ofdji = $("input.fadongjihao").val();

         ojson.ochjiah = $("input.chejiahao").val();

         // ojson.ozhenm = $("input.file1").get(0).files[0];

         // ojson.opfanm = $("input.file2").get(0).files[0];

         // ojson.oshilm = $("input.file3").get(0).files[0];

         ojson.ozhenm = document.querySelector("input.file1").files[0];

         ojson.opfanm = document.querySelector("input.file2").files[0];

         ojson.oshilm = document.querySelector("input.file3").files[0];

         formData.append('oshouji', ojson.oshouji);

         formData.append('ofdji', ojson.ofdji);

         formData.append('ochjiah', ojson.ochjiah);

         formData.append('ozhenm', ojson.ozhenm);

         formData.append('opfanm', ojson.opfanm);

         formData.append('oshilm', ojson.oshilm);

         return ojson;

         return formData;

     }

     function jiancecanshu(){

         var oshouji = $.trim($("input.shoujihao").val());

         var ofdji = $("input.fadongjihao").val();

         var ochjiah = $("input.chejiahao").val();

         var ozhenm = $("input.file1").val();

         var opfanm = $("input.file2").val();

         var oshilm = $("input.file3").val();

         var ocan = 100;

         var canarr = [0,1,2,3,4,5,6];

         if(oshouji.length==0){

             ocan=0;

         }else if(ofdji.length==0){

             ocan=1;

         }else if(ochjiah.length==0){

             ocan=2;

         }else if(ozhenm.length==0){

             ocan=3;

         }else if(opfanm.length==0){

             ocan=4;

         }else if(oshilm.length==0){

             ocan=5;

         }else if(!isPhone(oshouji)){

             ocan=6;

         }

         var arr=[

             "手机号为空,请输入手机号",

             "发动机号为空,请输入发动机号",

             "车架号为空,请输入车架号",

             "身份证正面照为空,请输入身份证正面照",

             "身份证反面照为空,请输入身份证反面照",

             "自拍照为空,请输入自拍照",

             "手机号输入错误,请输入正确的手机号"

         ];

         if(canarr.indexOf(ocan)!=-1){

             console.log("ocan:  "+ocan);

             console.log(arr);

             layer.msg(arr[ocan]);

             return false;

         }else{

             return true;

         }

     }

     //检测手机号码

     function isPhone(phone) {

         if (phone == null || phone == '') {

             // layer.msg('请填写手机号码');

             return false;

         }

         //验证号码

         var phoneReg = /(^1[3|4|5|7|8|9]\d{9}$)|(^09\d{8}$)/ig;

         if (!phoneReg.test(phone)) {

             // layer.msg('请填写正确的手机号码');

             return false;

         } else {

             return true;

         }

     };

 })
得到的图片上传如下:

备注:之所以一开始有点懵,是因为对需求没有明确分析,认真分析之后,会发现其实都是些比较简单而且容易的功能。认真分析之后,才能把东西做出来
jquery 实现图片上传,并在前端显示出来的更多相关文章
- Jquery自定义图片上传插件
1 概述 编写后台网站程序大多数用到文件上传,可是传统的文件上传控件不是外观不够优雅,就是性能不太好看,翻阅众多文件上传控件的文章,发现可以这样去定义一个文件上传控件,实现的文件上传的效果图如下: 2 ...
- jquery实现图片上传前本地预览
<!DOCTYPE html><html><head lang="en"> <meta charset="UTF-8" ...
- jquery之图片上传
<%@ page language="java" contentType="text/html; charset=UTF-8" pageEncoding= ...
- jQuery plugins 图片上传
http://plugins.jquery.com/ 用到一下插件: magnific popup 看大图 jQuery File Upload 多文件上传 jQuery Rotate 图片旋转 gi ...
- ThinkPHP5与JQuery实现图片上传和预览效果
内容正文 这篇文章主要为大家详细介绍了thinkphp上传图片功能,和jquery预览图片效果,具有一定的参考价值,感兴趣的小伙伴们可以参考一下 先上效果图: html和js代码如下: <!DO ...
- 基于jquery实现图片上传本地预览功能
一.原理 分为两步: 当上传图片的input被触发并选择本地图片之后获取要上传的图片这个对象的URL(对象URL),把对象URL赋值给事先写好的img标签的src属性即可把图片显示出来.在这里,我们需 ...
- JQuery实现 图片上传
用到的文件,我都已经打包好了,自行下载: https://files.cnblogs.com/files/lguow/lib.rar 核心代码如下: <input type="hidd ...
- jquery实现图片上传前本地预览功能
HTML <img id="pic" src="" > <input id="upload" name="fil ...
- jquery实现图片上传前的预览
html代码 <div id="uploadPreview"></div> <input id="uploadImage" typ ...
随机推荐
- Zookeeper详解-安装(四)
ZooKeeper服务器是用Java创建的,它在JVM上运行.你需要使用JDK 6或更高版本. 步骤1:验证Java安装 相信你已经在系统上安装了Java环境.现在只需使用以下命令验证它. $ jav ...
- VB程序逆向常用的函数
本文转载!!! 原文地址:http://www.cnblogs.com/bbdxf/p/3780187.html 1) 数据类型转换: a) __vbaI2Str 将一个字符串转为8 位(1个字 ...
- PATB 1004 成绩排名 (20)
1004. 成绩排名 (20) 时间限制 400 ms 内存限制 65536 kB 代码长度限制 8000 B 判题程序 Standard 作者 CHEN, Yue 读入n名学生的姓名.学号.成绩,分 ...
- 深入理解Java类加载
本文目的: 深入理解Java类加载机制; 理解各个类加载器特别是线程上下文加载器; Java虚拟机类加载机制 虚拟机把描述类的数据从 Class 文件加载到内存,并对数据进行校验.转换解析和初始化,最 ...
- Smobiler控件的使用:ListView的数据绑定及实现多选
环境 SmobilerDesigner 4.7 Visual Studio 2010以上 正文 listview绑定数据 打开Visual Studio ,新建一个SmobilerApplicatio ...
- 如何将 qsys 子模块设置为参数可调的方式给另外的qsys 调用
Intel FPGA Quartus 软件中的 Qsys工具 也就是 Platform Designer 系统集成工具,可以 图形化界面操作 使用系统自带ip,自定义ip 系统自动生成 ip 间的连接 ...
- 005-python-字典操作
1. 字典 dict 用{}来表示 键值对数据 {key:value} 唯一性 键 都必须是可哈希的 不可变的数据类型就可以当做字典中的键 值 没有任何限制 dic = {'name':'alex', ...
- POJ 1485:Fast Food(dp)&& 面试题
题目链接 题意 给出 n 个餐厅,m 个停车场,现在要将 n 个餐厅中的 m 个变成停车场,使得每个餐厅到最近的停车场的距离之和最短,输出哪个餐厅变成停车场和它服务哪些餐厅,还有最短距离之和. 思路 ...
- 【搜索引擎】 PostgreSQL 10 实时全文检索和分词、相似搜索、模糊匹配实现类似Google搜索自动提示
需求分析 要通过PostgreSQL实现类似Google搜索自动提示的功能,例如要实现一个查询海量数据中的商品名字,每次输入就提示用户各种相关搜索选项,例如淘宝.京东等电商查询 思路 这个功能可以用 ...
- 微信小程序支付以及微信退款开发
最近公司项目急着测试,需要开发微信小程序+微信支付+微信退款,本着这几天的一些研究,决定记录一下开发的过程. 本着知识分享的原则,希望对大家有所帮助. 本篇针对的是微信小程序的支付开发,如果有对微信公 ...