
HyperLedger Fabric 1.4 生产环境动态添加组织及节点
1.1 操作概述
在“kafka生产环境部署”和“生产环境使用ca生成msp和tls”两篇文章的搭建的环境基础上,实现组织及节点的动态添加功能。
1.2 网络拓扑
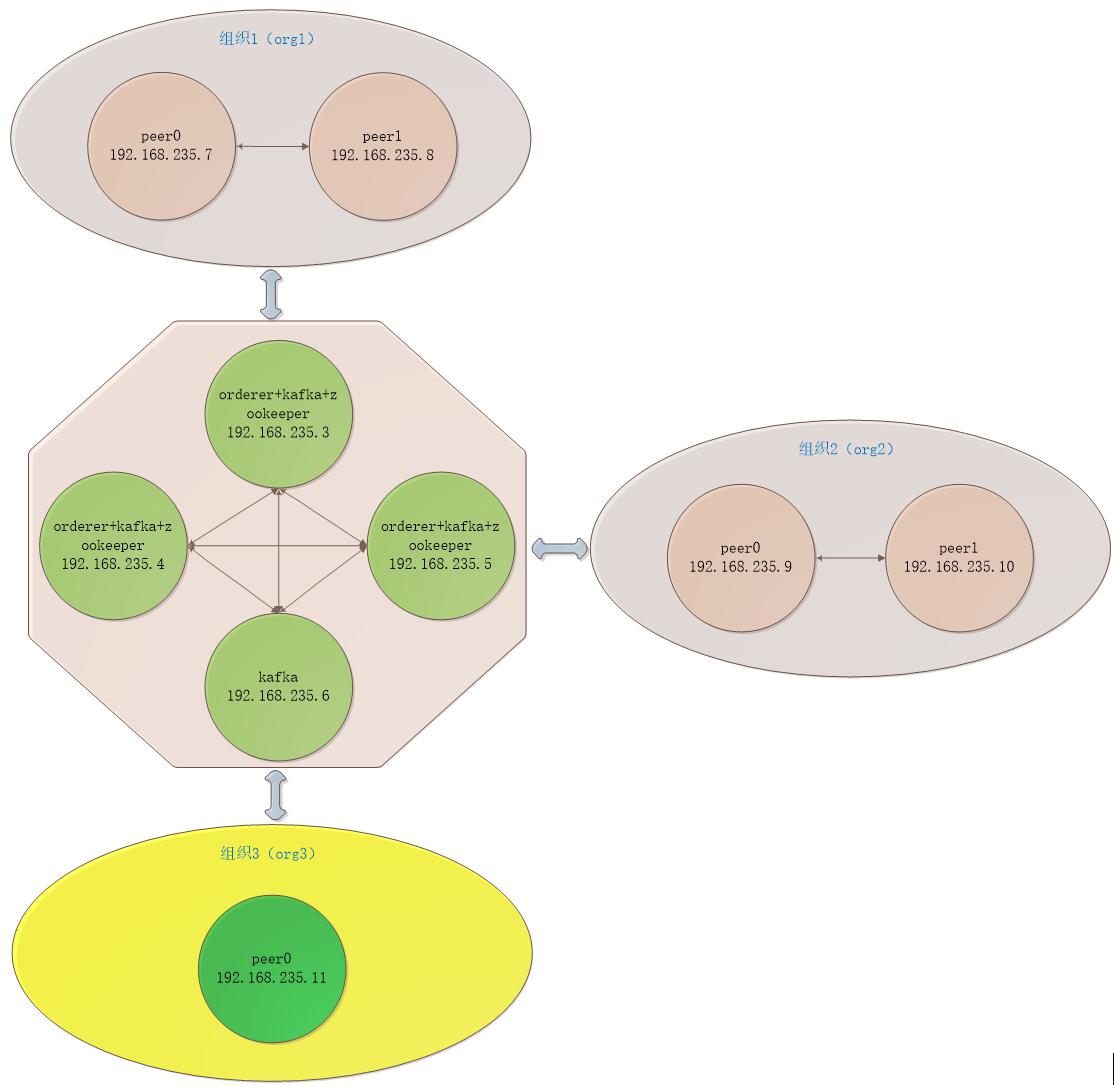
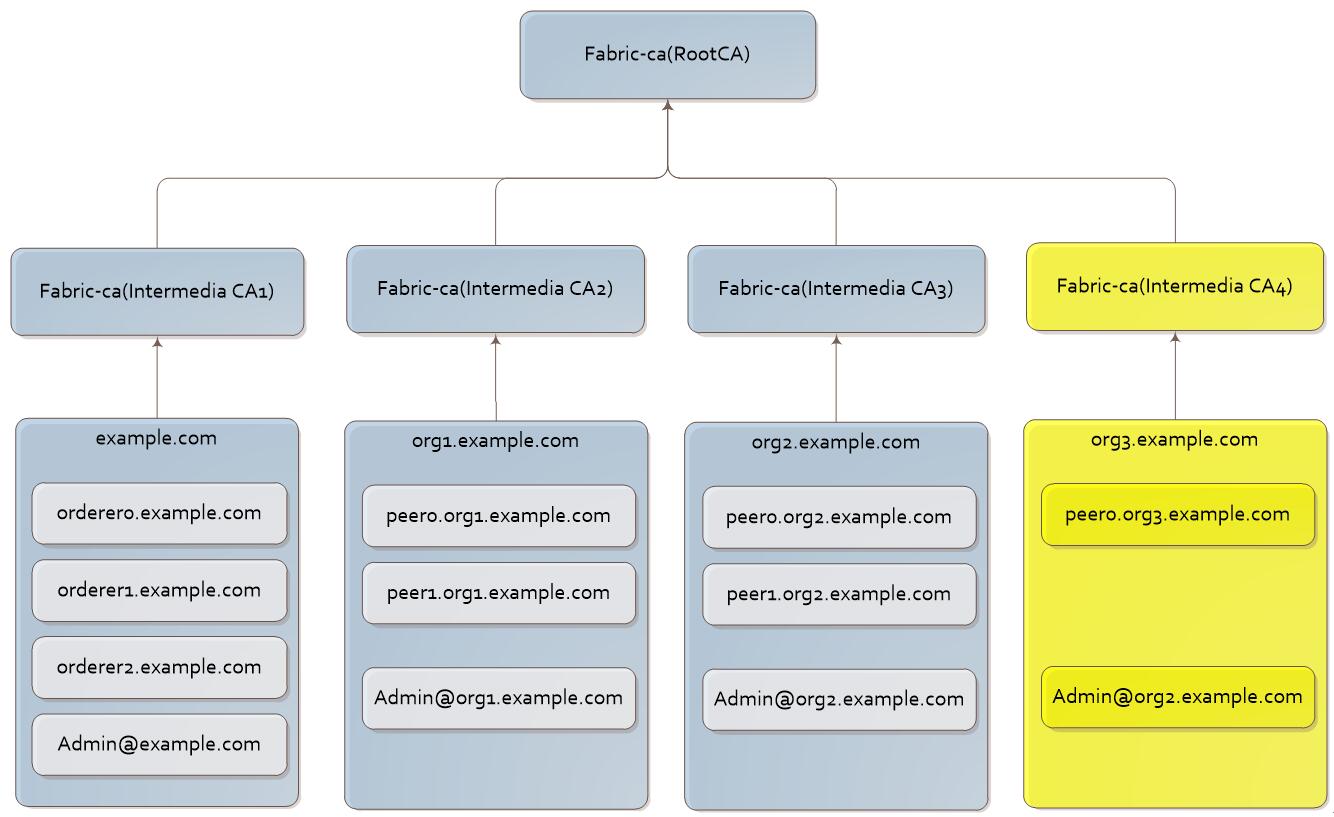
1.3 新组织配置
1.3.1 生成新组织证书
切换到192.168.235.6服务器上进行CA服务启动及生成证书操作。
1. CA服务启动
1) IntermediaCA4启动
① 初始化CA服务
# fabric-ca-server init -b admin4:adminpw4 -u http://admin:adminpw@localhost:7054 --home ./intermediaca4

# vi ./intermediaca4/fabric-ca-server-config.yaml

修改

version: 1.4.

port:
② 启动CA服务
【命令行启动】

# fabric-ca-server start -b admin4:adminpw4 -u http://admin:adminpw@localhost:7054 --home ./intermediaca4 --cfg.affiliations.allowremove --cfg.identities.allowremove

【docker启动】

拷贝文件docker-intermediaca4.yml到ca-server目录

# docker-compose -f docker-intermediaca4.yaml up -d
2) IntermediaCAtls4启动
1) 初始化CA服务
# fabric-ca-server init -b admin4:adminpw4 -u http://admin:adminpw@localhost:7054 --home ./intermediacatls4

# vi ./intermediacatls4/fabric-ca-server-config.yaml

修改

version: 1.4.

port:
2) 启动CA服务
【命令行启动】

# fabric-ca-server start -b admin4:adminpw4 -u http://admin:adminpw@localhost:7054 --home ./intermediacatls4 --cfg.affiliations.allowremove --cfg.identities.allowremove

【docker启动】

拷贝文件docker-intermediaca4.yml到ca-server目录

# docker-compose -f docker-intermediacatls4.yaml up -d
2. IntermediaCA4生成证书
1) 生成org3.example.com的msp
① 登记org3.example.com
# fabric-ca-client enroll --csr.cn=org3.example.com --csr.hosts=['org3.example.com'] -M ./crypto-config/peerOrganizations/org3.example.com/msp -u http://admin4:adminpw4@localhost:7058 --home ./fabric-ca-client

# vi ./fabric-ca-client/crypto-config/peerOrganizations/org3.example.com/msp/config.yaml

输入:

NodeOUs:

Enable: true

ClientOUIdentifier:

Certificate: intermediatecerts/localhost-.pem

OrganizationalUnitIdentifier: client

PeerOUIdentifier:

Certificate: intermediatecerts/localhost-.pem

OrganizationalUnitIdentifier: peer
② 添加联盟成员
# fabric-ca-client affiliation list -M ./crypto-config/peerOrganizations/org3.example.com/msp -u http://admin4:adminpw4@localhost:7058 --home ./fabric-ca-client

# fabric-ca-client affiliation remove --force org1 -M ./crypto-config/peerOrganizations/org3.example.com/msp -u http://admin4:adminpw4@localhost:7058 --home ./fabric-ca-client

# fabric-ca-client affiliation remove --force org3 -M ./crypto-config/peerOrganizations/org3.example.com/msp -u http://admin4:adminpw4@localhost:7058 --home ./fabric-ca-client

# fabric-ca-client affiliation add com -M ./crypto-config/peerOrganizations/org3.example.com/msp -u http://admin4:adminpw4@localhost:7058 --home ./fabric-ca-client

# fabric-ca-client affiliation add com.example -M ./crypto-config/peerOrganizations/org3.example.com/msp -u http://admin4:adminpw4@localhost:7058 --home ./fabric-ca-client

# fabric-ca-client affiliation add com.example.org3 -M ./crypto-config/peerOrganizations/org3.example.com/msp -u http://admin4:adminpw4@localhost:7058 --home ./fabric-ca-client
2) 生成Admin@example.com的msp
1) 注册Admin@example.com
# fabric-ca-client register --id.name Admin@org3.example.com --id.type client --id.affiliation "com.example.org3" --id.attrs '"hf.Registrar.Roles=client,orderer,peer,user","hf.Registrar.DelegateRoles=client,orderer,peer,user",hf.Registrar.Attributes=*,hf.GenCRL=true,hf.Revoker=true,hf.AffiliationMgr=true,hf.IntermediateCA=true,role=admin:ecert' --id.secret= --csr.cn=org3.example.com --csr.hosts=['org3.example.com'] -M ./crypto-config/peerOrganizations/org3.example.com/msp -u http://admin4:adminpw4@localhost:7058 --home ./fabric-ca-client
2) 登记Admin@example.com
# fabric-ca-client enroll -u http://Admin@org3.example.com:123456@localhost:7058 --csr.cn=org3.example.com --csr.hosts=['org3.example.com'] -M ./crypto-config/peerOrganizations/org3.example.com/users/Admin@org3.example.com/msp --home ./fabric-ca-client
3) 生成msp
# mkdir ./fabric-ca-client/crypto-config/peerOrganizations/org3.example.com/users/Admin@org3.example.com/msp/admincerts

# cp ./fabric-ca-client/crypto-config/peerOrganizations/org3.example.com/users/Admin@org3.example.com/msp/signcerts/cert.pem ./fabric-ca-client/crypto-config/peerOrganizations/org3.example.com/users/Admin@org3.example.com/msp/admincerts

# mkdir ./fabric-ca-client/crypto-config/peerOrganizations/org3.example.com/msp/admincerts

# cp ./fabric-ca-client/crypto-config/peerOrganizations/org3.example.com/users/Admin@org3.example.com/msp/signcerts/cert.pem ./fabric-ca-client/crypto-config/peerOrganizations/org3.example.com/msp/admincerts
3) 生成peer0.org3.example.com的msp
1) 注册peer0.org3.example.com
# fabric-ca-client register --id.name peer0.org3.example.com --id.type peer --id.affiliation "com.example.org3" --id.attrs '"role=peer",ecert=true' --id.secret= --csr.cn=peer0.org3.example.com --csr.hosts=['peer0.org3.example.com'] -M ./crypto-config/peerOrganizations/org3.example.com/msp -u http://admin4:adminpw4@localhost:7058 --home ./fabric-ca-client
2) 登记peer0.org3.example.com
# fabric-ca-client enroll -u http://peer0.org3.example.com:123456@localhost:7058 --csr.cn=peer0.org3.example.com --csr.hosts=['peer0.org3.example.com'] -M ./crypto-config/peerOrganizations/org3.example.com/peers/peer0.org3.example.com/msp --home ./fabric-ca-client
3) 生成msp
# mkdir ./fabric-ca-client/crypto-config/peerOrganizations/org3.example.com/peers/peer0.org3.example.com/msp/admincerts

# cp ./fabric-ca-client/crypto-config/peerOrganizations/org3.example.com/users/Admin@org3.example.com/msp/signcerts/cert.pem ./fabric-ca-client/crypto-config/peerOrganizations/org3.example.com/peers/peer0.org3.example.com/msp/admincerts
3. IntermediaCAtls4生成证书
1) 生成org3.example.com的tls
① 登记org3.example.com
# fabric-ca-client enroll --csr.cn=org3.example.com --csr.hosts=['org3.example.com'] -M ./crypto-config/peerOrganizations/org3.example.com/tlstmp -u http://admin4:adminpw4@localhost:8057 --home ./fabric-ca-client
② 添加联盟成员
# fabric-ca-client affiliation list -M ./crypto-config/peerOrganizations/org3.example.com/tlstmp -u http://admin4:adminpw4@localhost:8057 --home ./fabric-ca-client

# fabric-ca-client affiliation remove --force org1 -M ./crypto-config/peerOrganizations/org3.example.com/tlstmp -u http://admin4:adminpw4@localhost:8057 --home ./fabric-ca-client

# fabric-ca-client affiliation remove --force org3 -M ./crypto-config/peerOrganizations/org3.example.com/tlstmp -u http://admin4:adminpw4@localhost:8057 --home ./fabric-ca-client

# fabric-ca-client affiliation add com -M ./crypto-config/peerOrganizations/org3.example.com/tlstmp -u http://admin4:adminpw4@localhost:8057 --home ./fabric-ca-client

# fabric-ca-client affiliation add com.example -M ./crypto-config/peerOrganizations/org3.example.com/tlstmp -u http://admin4:adminpw4@localhost:8057 --home ./fabric-ca-client

# fabric-ca-client affiliation add com.example.org3 -M ./crypto-config/peerOrganizations/org3.example.com/tlstmp -u http://admin4:adminpw4@localhost:8057 --home ./fabric-ca-client
2) 生成Admin@example.com的tls
1) 注册Admin@example.com
# fabric-ca-client register --id.name Admin@org3.example.com --id.type client --id.affiliation "com.example.org3" --id.attrs '"hf.Registrar.Roles=client,orderer,peer,user","hf.Registrar.DelegateRoles=client,orderer,peer,user",hf.Registrar.Attributes=*,hf.GenCRL=true,hf.Revoker=true,hf.AffiliationMgr=true,hf.IntermediateCA=true,role=admin:ecert' --id.secret= --csr.cn=org3.example.com --csr.hosts=['org3.example.com'] -M ./crypto-config/peerOrganizations/org3.example.com/tlstmp -u http://admin4:adminpw4@localhost:8057 --home ./fabric-ca-client
2) 登记Admin@example.com
# fabric-ca-client enroll -d --enrollment.profile tls -u http://Admin@org3.example.com:123456@localhost:8057 --csr.cn=org3.example.com --csr.hosts=['org3.example.com'] -M ./crypto-config/peerOrganizations/org3.example.com/users/Admin@org3.example.com/tlstmp --home ./fabric-ca-client
1) 生成tls
# mkdir ./fabric-ca-client/crypto-config/peerOrganizations/org3.example.com/users/Admin@org3.example.com/tls

# cp ./intermediacatls4/ca-chain.pem ./fabric-ca-client/crypto-config/peerOrganizations/org3.example.com/users/Admin@org3.example.com/tls/ca.crt

# cp ./fabric-ca-client/crypto-config/peerOrganizations/org3.example.com/users/Admin@org3.example.com/tlstmp/signcerts/cert.pem ./fabric-ca-client/crypto-config/peerOrganizations/org3.example.com/users/Admin@org3.example.com/tls/client.crt

# cp ./fabric-ca-client/crypto-config/peerOrganizations/org3.example.com/users/Admin@org3.example.com/tlstmp/keystore/xxxxxxx_sk ./fabric-ca-client/crypto-config/peerOrganizations/org3.example.com/users/Admin@org3.example.com/tls/client.key

# rm -rf ./fabric-ca-client/crypto-config/peerOrganizations/org3.example.com/users/Admin@org3.example.com/tlstmp
3) 生成peer0.org3.example.com的tls
1) 注册peer0.org3.example.com
# fabric-ca-client register --id.name peer0.org3.example.com --id.type peer --id.affiliation "com.example.org3" --id.attrs '"role=peer",ecert=true' --id.secret= --csr.cn=peer0.org3.example.com --csr.hosts=['peer0.org3.example.com'] -M ./crypto-config/peerOrganizations/org3.example.com/tlstmp -u http://admin4:adminpw4@localhost:8057 --home ./fabric-ca-client
2) 登记peer0.org3.example.com
# fabric-ca-client enroll -d --enrollment.profile tls -u http://peer0.org3.example.com:123456@localhost:8057 --csr.cn=peer0.org3.example.com --csr.hosts=['peer0.org3.example.com'] -M ./crypto-config/peerOrganizations/org3.example.com/peers/peer0.org3.example.com/tlstmp --home ./fabric-ca-client
3) 生成tls
# mkdir ./fabric-ca-client/crypto-config/peerOrganizations/org3.example.com/peers/peer0.org3.example.com/tls

# cp ./intermediacatls4/ca-chain.pem ./fabric-ca-client/crypto-config/peerOrganizations/org3.example.com/peers/peer0.org3.example.com/tls/ca.crt

# cp ./fabric-ca-client/crypto-config/peerOrganizations/org3.example.com/peers/peer0.org3.example.com/tlstmp/signcerts/cert.pem ./fabric-ca-client/crypto-config/peerOrganizations/org3.example.com/peers/peer0.org3.example.com/tls/server.crt

# cp ./fabric-ca-client/crypto-config/peerOrganizations/org3.example.com/peers/peer0.org3.example.com/tlstmp/keystore/xxxxxxx_sk ./fabric-ca-client/crypto-config/peerOrganizations/org3.example.com/peers/peer0.org3.example.com/tls/server.key

# rm -rf ./fabric-ca-client/crypto-config/peerOrganizations/org3.example.com/peers/peer0.org3.example.com/tlstmp
1.3.2 生成新组织配置
切换到192.168.235.7服务器下进行操作。
1. 证书生成的org3.example.com目录拷贝到/crypto-config/peerOrganizations目录下。
2. 在configtx.yaml配置文件中加上org3组织信息,并拷贝到kafkapeer目录下。
3. 将org3的配置以 json 格式输出
# cd $GOPATH/src/github.com/hyperledger/fabric/kafkapeer

# docker-compose -f docker-compose-peer.yaml up -d

# ./bin/configtxgen -printOrg Org3MSP -profile ./configtx.yaml > ./channel-artifacts/org3.json
4. 安装jq工具
jq 是 Linux 下命令行处理 JSON 的工具,可以对 JSON 进行过滤、格式化、修改等等操作
# yum install epel-release

# yum install jq
5. 获取当前 channel 的配置
# docker exec -it cli bash

# ORDERER_CA=/opt/gopath/src/github.com/hyperledger/fabric/peer/crypto/ordererOrganizations/example.com/orderers/orderer0.example.com/msp/tlsintermediatecerts/tls-localhost-.pem

# peer channel fetch config config_block.pb -o orderer0.example.com: -c mychannel --tls --cafile $ORDERER_CA

# exit

# docker cp xxxxxxxx:/opt/gopath/src/github.com/hyperledger/fabric/peer/config_block.pb /opt/gopath/src/github.com/hyperledger/fabric/kafkapeer
6. 修改原配置文件,新增 org3 配置
# ./bin/configtxlator proto_decode --input config_block.pb --type common.Block | jq .data.data[].payload.data.config > config.json
7. 修改 config.json,新增 org3
# jq -s '.[0] * {"channel_group":{"groups":{"Application":{"groups": {"Org3MSP":.[1]}}}}}' config.json ./channel-artifacts/org3.json > modified_config.json
8. 将 config.json 和 modified_config.json 转为 protobuf 格式
# ./bin/configtxlator proto_encode --input config.json --type common.Config > original_config.pb

# ./bin/configtxlator proto_encode --input modified_config.json --type common.Config > modified_config.pb
9. 根据 config.pb 和 modified_config.pb 计算出 org3_update.pb
# ./bin/configtxlator compute_update --channel_id mychannel --original original_config.pb --updated modified_config.pb > config_update.pb
10. 解码 config_update.pb 为 json,然后用 jq 修改,然后在编码为 protobuf 格式,最终输出 org3_update_in_envelope.pb
# ./bin/configtxlator proto_decode --input config_update.pb --type common.ConfigUpdate > config_update.json

# echo '{"payload":{"header":{"channel_header":{"channel_id":"mychannel", "type":2}},"data":{"config_update":'$(cat config_update.json)'}}}' | jq . > config_update_in_envelope.json

# ./bin/configtxlator proto_encode --input config_update_in_envelope.json --type common.Envelope > org3_update_in_envelope.pb

# docker cp /opt/gopath/src/github.com/hyperledger/fabric/kafkapeer/org3_update_in_envelope.pb xxxxxxxx:/opt/gopath/src/github.com/hyperledger/fabric/peer/
1.3.3 提交新组织配置
1. 为 Org3 新配置签名
# docker exec -it cli bash

# CORE_PEER_LOCALMSPID="Org1MSP"

# CORE_PEER_TLS_ROOTCERT_FILE=/opt/gopath/src/github.com/hyperledger/fabric/peer/crypto/peerOrganizations/org1.example.com/peers/peer0.org1.example.com/tls/ca.crt

# CORE_PEER_MSPCONFIGPATH=/opt/gopath/src/github.com/hyperledger/fabric/peer/crypto/peerOrganizations/org1.example.com/users/Admin@org1.example.com/msp

# CORE_PEER_ADDRESS=peer0.org1.example.com:

# peer channel signconfigtx -f org3_update_in_envelope.pb

# CORE_PEER_LOCALMSPID="Org2MSP"

# CORE_PEER_TLS_ROOTCERT_FILE=/opt/gopath/src/github.com/hyperledger/fabric/peer/crypto/peerOrganizations/org2.example.com/peers/peer0.org2.example.com/tls/ca.crt

# CORE_PEER_MSPCONFIGPATH=/opt/gopath/src/github.com/hyperledger/fabric/peer/crypto/peerOrganizations/org2.example.com/users/Admin@org2.example.com/msp

# CORE_PEER_ADDRESS=peer0.org2.example.com:

# peer channel signconfigtx -f org3_update_in_envelope.pb
2. 提交签名后的配置交易至 orderer
# ORDERER_CA=/opt/gopath/src/github.com/hyperledger/fabric/peer/crypto/ordererOrganizations/example.com/orderers/orderer0.example.com/msp/tlsintermediatecerts/tls-localhost-.pem

# peer channel update -f org3_update_in_envelope.pb -c mychannel -o orderer0.example.com: --tls --cafile $ORDERER_CA
1.4 新组织启动
切换到192.168.235.11服务器上操作。
1. 配置docker-compose-peer.yaml文件,拷贝到kafkapeer目录下。
2. 服务器(192.168.235.11)启动
# cd $GOPATH/src/github.com/hyperledger/fabric/kafkapeer

# docker-compose -f docker-compose-peer.yaml up -d
3. 获取当前 channel 的配置
# docker exec -it cli bash

# ORDERER_CA=/opt/gopath/src/github.com/hyperledger/fabric/peer/crypto/ordererOrganizations/example.com/orderers/orderer0.example.com/msp/tlsintermediatecerts/tls-localhost-.pem

# peer channel fetch  mychannel.block -o orderer0.example.com: -c mychannel --tls --cafile $ORDERER_CA
4. 将 Org 所有 Peer 加入 channel
# peer channel join -b mychannel.block
5. 升级chaincode和背书策略
# peer chaincode install -n mycc -p github.com/hyperledger/fabric/kafkapeer/chaincode/go/example02/ -v 2.0
6. 为 Org1 的 peer0升级chaincode到2.0
切换到192.168.235.7服务器上
# peer chaincode install -n mycc -p github.com/hyperledger/fabric/kafkapeer/chaincode/go/example02/ -v 2.0

# ORDERER_CA=/opt/gopath/src/github.com/hyperledger/fabric/peer/crypto/ordererOrganizations/example.com/orderers/orderer0.example.com/msp/tlsintermediatecerts/tls-localhost-.pem

# peer chaincode upgrade -o orderer0.example.com: --tls --cafile $ORDERER_CA -C mychannel -n mycc -v 2.0 -c '{"Args":["init","a","200","b","400"]}' -P "OR ('Org1MSP.peer','Org2MSP.peer','Org3MSP.peer')"
7. 为 Org2 的 peer0升级chaincode到2.0
切换到192.168.235.9服务器上
# peer chaincode install -n mycc -p github.com/hyperledger/fabric/kafkapeer/chaincode/go/example02/ -v 2.0
1.5 新组织验证
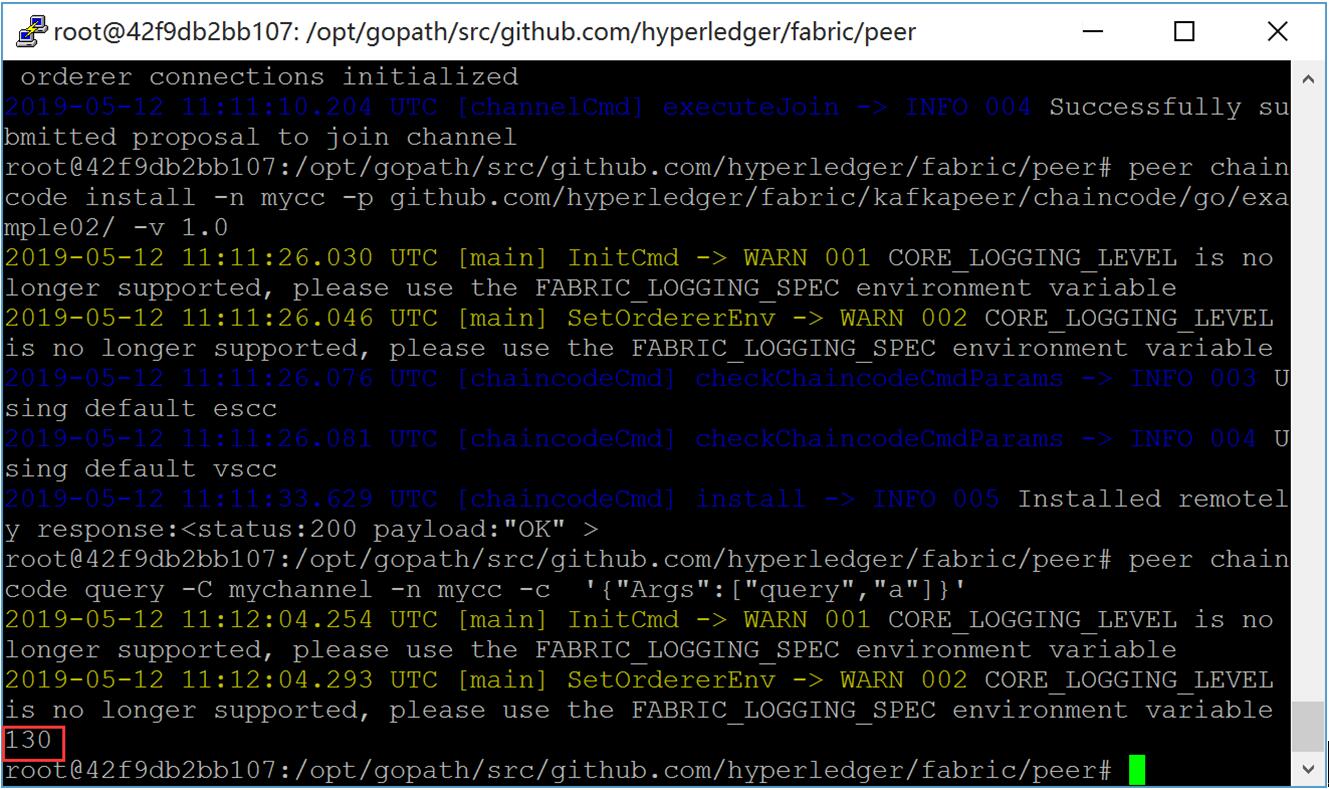
切换到192.168.235.11服务上,在Peer上查询a值。
1) Peer上查询a,显示130
# peer chaincode query -C mychannel -n mycc -c '{"Args":["query","a"]}'
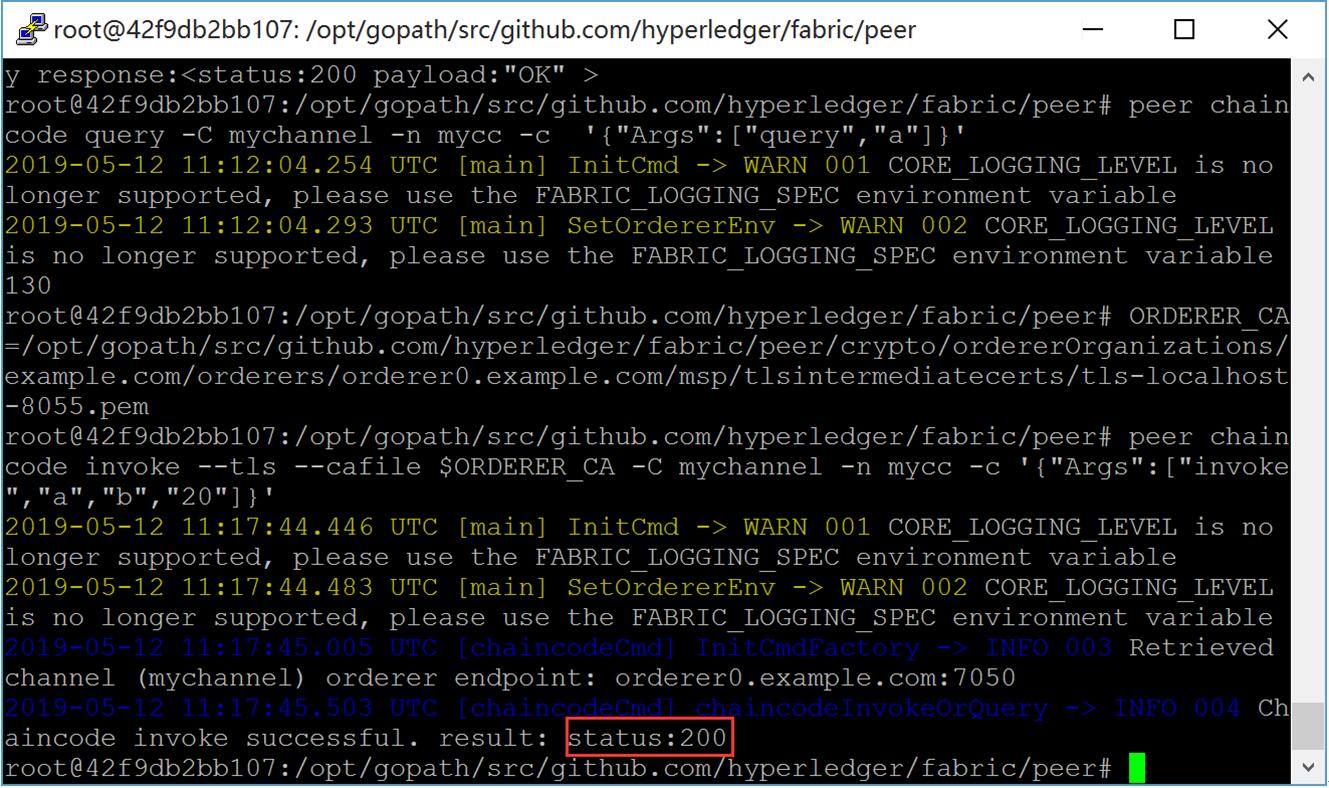
2) Peer上进行a向b转20交易
# ORDERER_CA=/opt/gopath/src/github.com/hyperledger/fabric/peer/crypto/ordererOrganizations/example.com/orderers/orderer0.example.com/msp/tlsintermediatecerts/tls-localhost-.pem

# peer chaincode invoke --tls --cafile $ORDERER_CA -C mychannel -n mycc -c '{"Args":["invoke","a","b","20"]}'
3) Peer上查询b,显示110
# peer chaincode query -C mychannel -n mycc -c '{"Args":["query","a"]}'

网易云课堂视频在线教学,地址:https://study.163.com/course/introduction/1209401942.htm
HyperLedger Fabric 1.4 生产环境动态添加组织及节点的更多相关文章
- Centos7 HyperLedger Fabric 1.4 生产环境部署
Kafka生产环境部署案例采用三个排序(orderer)服务.四个kafka.三个zookeeper和四个节点(peer)组成,共准备八台服务器,每台服务器对应的服务如下所示: kafka案例网络拓扑 ...
- HyperLedger Fabric 1.4 生产环境使用ca生成msp和tls(12)
在上一章:Fabric kafka生产环境部署的基础上部署Fabric CA,使用Fabric CA进行生成公私钥和证书等文件,全部替换cryptogen工具,包括生成TLS相关的私钥和证书等文件. ...
- 菜鸟系列Fabric——Fabric 动态添加组织(7)
Fabric 网络动态添加组织 1.环境准备 如果存在fabric网络环境可不执行,若不存在可以安装下列进行准备 下载fabric-sample,fabric https://github.com/h ...
- adoop集群动态添加和删除节点
hadoop集群动态添加和删除节点说明 上篇博客我已经安装了Hadoop集群(hadoop集群的安装步骤和配置),现在写这个博客我将在之前的基础上进行节点的添加的删除. 首先将启动四台机器(一主三从) ...
- 关于jQuery获取不到动态添加的元素节点的问题
遇到问题: 当我获取 $("#art-list")页面元素后去在后面追加标签的时候(append),在下面用 $(selector) 获取刚刚添加的标签,发现怎么都获取不到. 问题 ...
- 【干货干货】hyperledger fabric 之动态添加组织/修改配置 (Fabric-java-sdk) 下
我们接着上一节来讲: 在熟悉动态增加组织或修改配置的步骤后,我们就可以使用java的api来完成动态增加组织或修改配置了: 废话不多说,直接上干货: 1,预制条件 org3的证书以及组织3的MSP详情 ...
- HyperLedger Fabric 1.4 基础环境搭建(7)
学习了前面几章理论知识后,本章开始介绍实践操作,先介绍Fabric基础环境搭建,采用的操作系统为Centos 7 64位,依次介绍Docker安装.Docker-Compose安装.GO语言环境安装. ...
- 区块链 Hyperledger Fabric v1.0.0 环境搭建
前言:最近项目涉及到超级账本,在有些理论知识的基础上,需要整一套环境来. 这是一个特别要注意的事情,笔者之前按照网络上推荐,大部分都是推荐ubuntu系统的,于是下载Ubuntu系统(16.04.5和 ...
- 基于Debian搭建Hyperledger Fabric 2.4开发环境及运行简单案例
相关实验源码已上传:https://github.com/wefantasy/FabricLearn 前言 在基于truffle框架实现以太坊公开拍卖智能合约中我们已经实现了以太坊智能合约的编写及部署 ...
随机推荐
- 移动端viewport模版
<!DOCTYPE html> <html> <head> <meta charset="utf-8"> <meta cont ...
- centos7 防火墙屏蔽IP
1.屏蔽指定IP:124.115.0.199 iptables -I INPUT -s 124.115.0.199 -j DROP 2.屏蔽IP段: iptables -I INPUT -s 61.3 ...
- mac如何开启两个vmware虚拟机
转载链接:https://blog.csdn.net/aifore/article/details/87833088
- Linux配置SSH和Xshell连接服务器
>>>>>Ubuntu安装和配置ssh教程 SSH分为客户端 openssh-client 和服务器 openssh-server,可以利用以下命令确认电脑 上是否安装了 ...
- 2019-10-30:渗透测试,基础学习,mssql堆叠内联注入,mongodb基础语法
使用xp_cmdshell需要堆叠注入,http://192.168.190.148/less-1.asp?id=1';EXEC sp_configure 'show advanced options ...
- 新闻实时分析系统-Flume数据采集准备
Flume是Cloudera提供的一个高可用的,高可靠的,分布式的海量日志采集.聚合和传输的系统,Flume支持在日志系统中定制各类数据发送方,用于收集数据:同时,Flume提供对数据进行简单处理,并 ...
- Java并发之synchronized关键字和Lock接口
欢迎点赞阅读,一同学习交流,有疑问请留言 . GitHub上也有开源 JavaHouse,欢迎star 引用 当开发过程中,我们遇到并发问题.怎么解决? 一种解决方式,简单粗暴:上锁.将千军万马都给拦 ...
- Java中的集合(Set,List,Map)
******************collections类总结*************************** JAVA集合主要分为三种类型: Set(集) List(列表) ...
- mysql的事物,外键,与常用引擎
### part1 时间类型 date YYYY-MM-DD 年月日 (出现日期) time HH:MM:SS 时分秒 (竞赛时间) year YYYY 年份值 (红酒年份 82年矿泉水) datet ...
- 附012.Kubeadm部署高可用Kubernetes
一 kubeadm介绍 1.1 概述 参考<附003.Kubeadm部署Kubernetes>. 1.2 kubeadm功能 参考<附003.Kubeadm部署Kubernetes& ...