.Net Core 商城微服务项目系列(一):使用IdentityServer4构建基础登录验证
这里第一次搭建,所以IdentityServer端比较简单,后期再进行完善。
1.新建API项目MI.Service.Identity,NuGet引用IdentityServer4,添加类InMemoryConfiguration用于配置api和客户端资源:
public class InMemoryConfiguration

    {

        public static IConfiguration Configuration { get; set; }

        /// <summary>

        /// Define which APIs will use this IdentityServer

        /// </summary>

        /// <returns></returns>

        public static IEnumerable<ApiResource> GetApiResources()

        {

            return new[]

            {

                new ApiResource("MI.Service", "MI.Service"),

            };

        }

        /// <summary>

        /// Define which Apps will use thie IdentityServer

        /// </summary>

        /// <returns></returns>

        public static IEnumerable<Client> GetClients()

        {

            return new[]

            {

                new Client

                {

                    ClientId = "MI.Web",

                    ClientSecrets = new [] { new Secret("miwebsecret".Sha256()) },

                    AllowedGrantTypes = GrantTypes.ClientCredentials,

                    AllowedScopes = new [] { "MI.Service" }

                }

            };

        }

        public static IEnumerable<IdentityResource> GetIdentityResources()

        {

            return new List<IdentityResource>

            {

                new IdentityResources.OpenId(),

                new IdentityResources.Profile(),

            };

        }

        /// <summary>

        /// Define which uses will use this IdentityServer

        /// </summary>

        /// <returns></returns>

        public static IEnumerable<TestUser> GetUsers()

        {

            return new[]

            {

                new TestUser

                {

                    SubjectId = "",

                    Username = "admin",

                    Password = "admin"

                },

                new TestUser

                {

                    SubjectId = "",

                    Username = "wei",

                    Password = ""

                },

                new TestUser

                {

                    SubjectId = "",

                    Username = "test",

                    Password = ""

                }

            };

        }

    }
简单介绍一下,既然是微服务项目,比如有需要的API,ApiResource即我们要使用的API资源,这里我用“MI.Service”,后面的API项目也需要和这里配置的相同。当前也可以每一个API项目都新建一个ApiResource的名称。
Client是发起调用发,比如我们的Web系统会调用API,那Web系统就是一个Client,也可以理解为一个角色,Client Id是角色标识,这个也需要在发起调用方那边配置,ClientSecrets是私钥,这里使用最简单的自带私钥,AllowedScopes是当前这个Client可以访问的ApiResource。
TestUser是IdentityServer自带的测试用户类,用户使用用户名和密码的方式登录使用。
然后需要在Startup中添加IdentityServer配置:
在ConfigureServices方法中添加如下:
services.AddIdentityServer()

           .AddDeveloperSigningCredential()

           .AddTestUsers(InMemoryConfiguration.GetUsers().ToList())

           .AddInMemoryClients(InMemoryConfiguration.GetClients())

           .AddInMemoryApiResources(InMemoryConfiguration.GetApiResources());
这里我们使用的均是内存级别的配置,在实际项目里建议改为数据库中读取。
然后在Configure方法中启用IdentityServer:
public void Configure(IApplicationBuilder app, IHostingEnvironment env)

        {

            if (env.IsDevelopment())

            {

                app.UseDeveloperExceptionPage();

            }

            app.UseIdentityServer();

            app.UseStaticFiles();

            app.UseMvcWithDefaultRoute();

        }
到此IdentityServer验证端配置完毕。
2.新建API项目MI.Service.Account,NuGet引用 IdentityServer4.AccessTokenValidation。
在Startup的ConfigureServices方法中进行IdentityServer4配置:
 services.AddAuthentication(Configuration["Identity:Scheme"])  //

            .AddIdentityServerAuthentication(options =>

            {

                options.RequireHttpsMetadata = false; // for dev env

                options.Authority = $"http://{Configuration["Identity:IP"]}:{Configuration["Identity:Port"]}";  //IdnetityServer项目IP和端口

                options.ApiName = Configuration["Service:Name"]; // match with configuration in IdentityServer  //当前API项目的ApiResource的名称 即我们上个项目的“MI.Service”

            });
在Configure中启用验证:
        public void Configure(IApplicationBuilder app, IHostingEnvironment env)

        {

            if (env.IsDevelopment())

            {

                app.UseDeveloperExceptionPage();

            }

            else

            {

                app.UseHsts();

            }

            app.UseAuthentication();  //启用验证

            app.UseMvcWithDefaultRoute();

        }
我们整理用的是appsettings.json的配置,配置如下:
{

  "Service": {

    "Name": "MI.Service",

    "Port": "",

    "DocName": "Account Service",

    "Version": "v1",

    "Title": "Account Service API",

    "Description": "CAS Client Service API provide some API to help you get client information from CAS"

    //"XmlFile": "Manulife.DNC.MSAD.IdentityServer4Test.ApiService01.xml"

  },

  "Identity": {

    "IP": "localhost",

    "Port": "",

    "Scheme": "Bearer"

  }

}
我们的IdentityServer项目运行在7000端口,当前API项目运行在70001端口,大家可以根据需要自行配置。
在当前API项目新增控制器MiUserController,并新增一个测试方法和一个登陆方法:
[EnableCors("AllowCors")]

    [Authorize]  //这里添加验证标签

    public class MiUserController : Controller

    {
        //实体上下文类

        public MIContext _context;

        public MiUserController(MIContext _context)

        {

            this._context = _context;

        }

        //这个方法用来进行测试

        public IActionResult Index()

        {

            return Json("Successful");

        }

        public async Task<SSOLoginResponse> SSOLogin(SSOLoginRequest request)

        {

            SSOLoginResponse response = new SSOLoginResponse();

            try

            {

                if (!string.IsNullOrEmpty(request.UserName) && !string.IsNullOrEmpty(request.Password))

                {

                    var user = _context.UserEntities.FirstOrDefault(a => a.CustomerPhone.Equals(request.UserName));

                    if (user == null)

                    {

                        response.Successful = false;

                        response.Message = "用户名或密码错误!";

                        return response;

                    }

                    if (user.CustomerPwd == request.Password)

                    {

                        //将用户名存储硬盘cookie 30分钟 作用域为整个网站

                        HttpContext.Response.Cookies.Append("MIUserName", user.CustomerPhone, new Microsoft.AspNetCore.Http.CookieOptions

                        {

                            Expires = DateTime.Now.AddMinutes(),

                            Path = "/",

                        });

                        return response;

                    }

                }

                response.Successful = false;

                response.Message = "用户名密码不能为空!";

            }

            catch (Exception ex)

            {

                response.Successful = false;

                response.Message = ex.Message;

            }

            return response;

        }

}
现在配置完成,我们现在PostMan中测试一下请求IdentityServer项目获取Token,下面请求参数分别是我们之前配置的:
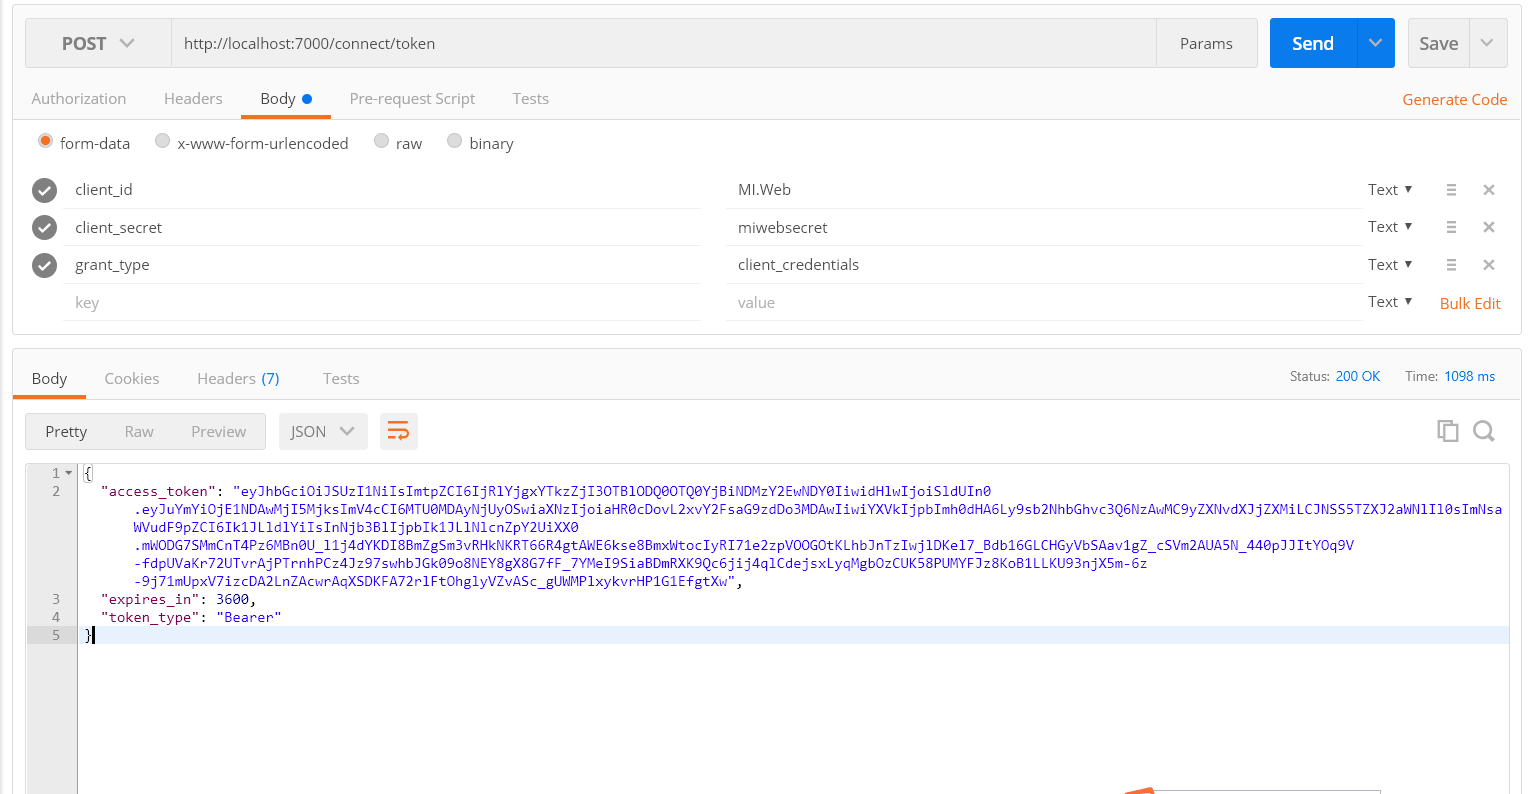
不出意外我们能够获取到对应的Token。
拿到Token后我们可以使用它来请求API项目:MI.Service.Account:
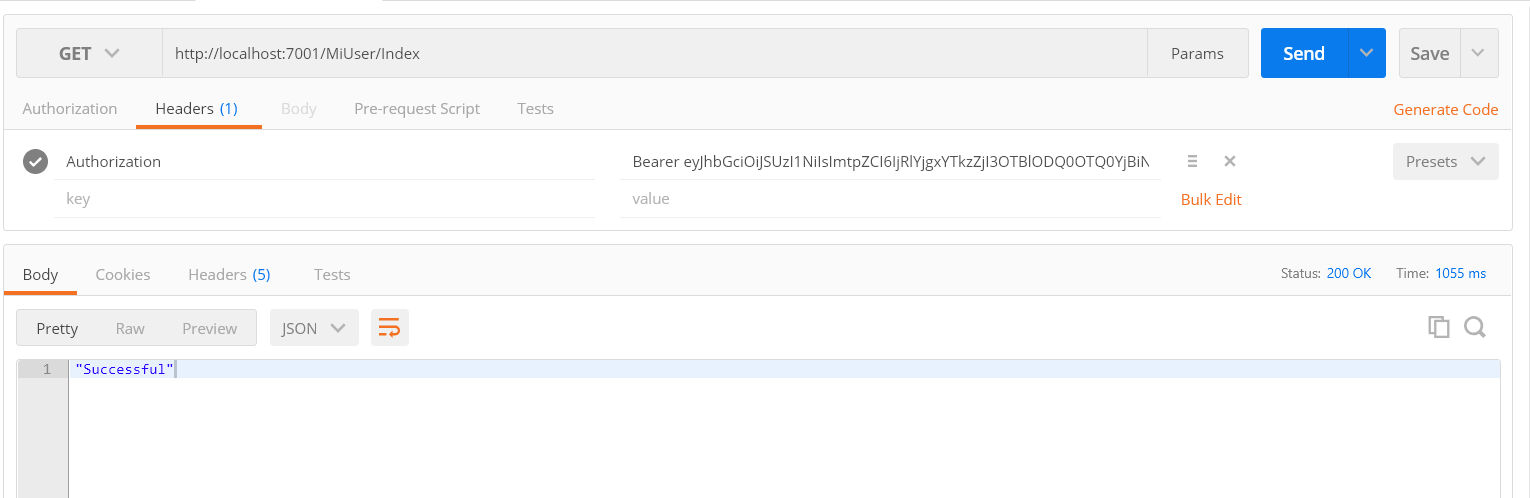
Token前我们必须要有Bearer这个,我们之前在API项目的appsettings.json中也加过这个配置,如果一切正常我们能够获取当测试方法Index返回的“Successful”。
3.新建Web项目MI.Web,毕竟这些API项目需要有调用方,要么是Web端,要么是移动端,既然是商城就要有一个Web端界面。
通过Nuget添加 IdentityModel。

在Web项目的Startup.cs的ConfigureServices方法中注册缓存使用,我们获取的Token需要存储在缓存中重复使用:
        public void ConfigureServices(IServiceCollection services)

        {

            services.AddMvc();

            services.AddMemoryCache(); //注册缓存

        }
public void Configure(IApplicationBuilder app, IHostingEnvironment env)

        {

            if (env.IsDevelopment())

            {

                app.UseBrowserLink();

                app.UseDeveloperExceptionPage();

            }

            app.UseStaticFiles();

            app.UseMvcWithDefaultRoute(); //添加默认的MVC请求路由

        }
在Web项目的appsettings.json中配置对应的API项目地址:
{

  "Logging": {

    "IncludeScopes": false,

    "LogLevel": {

      "Default": "Warning"

    }

  },

  "ServiceAddress": {

    "Service.Identity": "http://localhost:7000/",

    "Service.Account": "http://localhost:7001/"

  },

  "MehtodName": {

    "Account.MiUser.SSOLogin": "MiUser/SSOLogin", //登录

    "Identity.Connect.Token": "connect/token"  //获取token

  }

}
接下来我们需要在Web中获取Token就需要有一个公用的方法,我在ApiHelper中添加了一个方法如下,这里使用了IdentityModel提供的方法来获取Token:
        //获取Token

        public static async Task<string> GetToken()

        {

            string token = null;

            if (cache.TryGetValue<string>("Token", out token))

            {

                return token;

            }

            try

            {

                //DiscoveryClient类:IdentityModel提供给我们通过基础地址(如:http://localhost:5000)就可以访问令牌服务端;

                //当然可以根据上面的restful api里面的url自行构建;上面就是通过基础地址,获取一个TokenClient;(对应restful的url:token_endpoint   "http://localhost:5000/connect/token")

                //RequestClientCredentialsAsync方法:请求令牌;

                //获取令牌后,就可以通过构建http请求访问API接口;这里使用HttpClient构建请求,获取内容;

                var dico = await DiscoveryClient.GetAsync("http://localhost:7000");

                var tokenClient = new TokenClient(dico.TokenEndpoint, "MI.Web", "miwebsecret");

                var tokenResponse = await tokenClient.RequestClientCredentialsAsync("MI.Service");

                if (tokenResponse.IsError)

                {

                    throw new Exception(tokenResponse.Error);

                }

                token = tokenResponse.AccessToken;

                cache.Set<string>("Token", token, TimeSpan.FromSeconds(tokenResponse.ExpiresIn));

            }

            catch (Exception ex)

            {

                throw new Exception(ex.Message);

            }

            return token;

        }
有了获取令牌的方法还需要有一个请求API的POST帮助方法,如下:(大家可以根据自己的习惯替换,重点是要加入Token)
private static MemoryCache cache = new MemoryCache(new MemoryCacheOptions());

        /// <summary>

        /// HttpClient实现Post请求

        /// </summary>

        public static async Task<T> PostAsync<T>(string url, Dictionary<string, string> dic)

        {

            //设置HttpClientHandler的AutomaticDecompression

            var handler = new HttpClientHandler() { AutomaticDecompression = DecompressionMethods.GZip };

            //创建HttpClient(注意传入HttpClientHandler)

            using (var http = new HttpClient(handler))

            {

                //添加Token

             var token = await GetToken();

             http.SetBearerToken(token);

             //使用FormUrlEncodedContent做HttpContent

                var content = new FormUrlEncodedContent(dic);

                //await异步等待回应

                var response = await http.PostAsync(url, content);

                //确保HTTP成功状态值

                response.EnsureSuccessStatusCode();

                //await异步读取最后的JSON(注意此时gzip已经被自动解压缩了,因为上面的AutomaticDecompression = DecompressionMethods.GZip)

                string Result = await response.Content.ReadAsStringAsync();

                var Item = JsonConvert.DeserializeObject<T>(Result);

                return Item;

            }

        }
有了这些之后我们新建一个登陆控制器 LoginController,新建登陆方法:
        public async Task<JsonResult> UserLogin(string UserName, string UserPwd)

        {

            string url = $"{configuration["ServiceAddress:Service.Account"]}{configuration["MehtodName:Account.MiUser.SSOLogin"]}";

            var dictionary = new Dictionary<string, string>();

            dictionary.Add("UserName", UserName);

            dictionary.Add("Password", MD5Helper.Get_MD5(UserPwd));

            SSOLoginResponse response = null;

            try

            {

                response = await ApiHelper.PostAsync<SSOLoginResponse>(url, dictionary);

            }

            catch(Exception ex)

            {

                return Json(ex.Message);

            }

            if(response.Successful)

            {

                return Json("ok");

            }

            return Json(response.Message);

        }
然后将三个项目分别发布在IIS中,访问Web登陆页面:
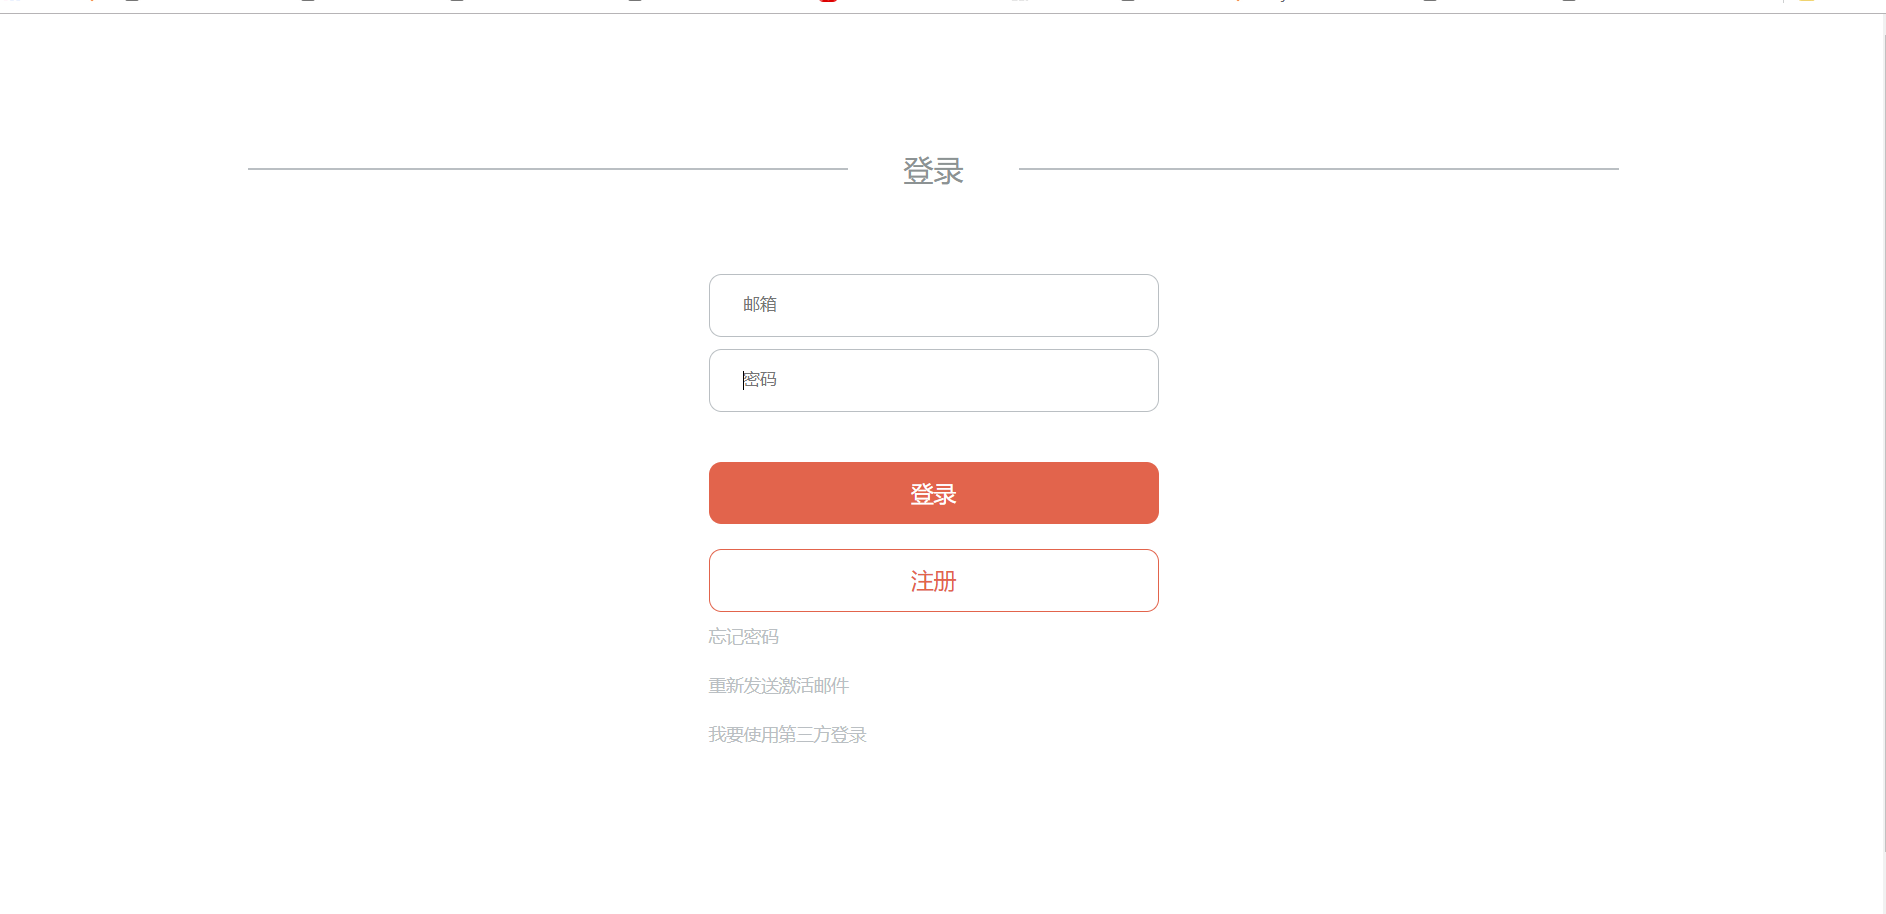
输入用户密码登陆测试,这里我们会请求MI.Service.Account这个API项目的登陆方法:

登陆成功即说明通过了验证,下一步将加入Ocelot,结合IdentityServer4实现网关转发请求并验证。
.Net Core 商城微服务项目系列(一):使用IdentityServer4构建基础登录验证的更多相关文章
- .Net Core 商城微服务项目系列(十四):分布式部署携程Apollo构建配置中心
一.开场白 在系统设计里我们有很多配置希望独立于系统之外,而又能够被系统实时读取.但是在传统的系统设计里,配置信息通常是耦合在系统内的,比如.net里通常会放在App.config或者web.conf ...
- .Net Core 商城微服务项目系列(六):搭建自己的Nuget包服务器
当我们使用微服务架构之后,紧接而来的问题便是服务之间的程序集引用问题,可能没接触过的同学不太理解这句话,都已经微服务化了为什么还要互相引用程序集,当然可以不引用.但是我们会有这样一种情况,我们的每个接 ...
- .Net Core 商城微服务项目系列(七):使用消息队列(RabbitMQ)实现服务异步通信
RabbitMQ是什么,怎么使用我就不介绍了,大家可以到园子里搜一下教程.本篇的重点在于实现服务与服务之间的异步通信. 首先说一下为什么要使用消息队列来实现服务通信:1.提高接口并发能力. 2.保证 ...
- .Net Core 商城微服务项目系列(十二):使用k8s部署商城服务
一.简介 本篇我们将会把商城的服务部署到k8s中,同时变化的还有以下两个地方: 1.不再使用Consul做服务的注册和发现,转而使用k8s-dns来实现. 2.不再使用Ocelot作为业务网关,使用T ...
- .Net Core 商城微服务项目系列(五):使用Polly处理服务错误
项目进行微服务化之后,随之而来的问题就是服务调用过程中发生错误.超时等问题的时候我们该怎么处理,比如因为网络的瞬时问题导致服务超时,这在我本人所在公司的项目里是很常见的问题,当发生请求超时问题的时候, ...
- .Net Core 商城微服务项目系列(八):购物车
最近加班有点多,一周五天,四天加班到11点+,心很累.原因是我当前在的这个组比较特殊,相当于业务的架构组,要为其它的开发组提供服务和监控.所以最近更新的也少,不过这个元旦三天假应该会更新三篇. 这篇是 ...
- .Net Core 商城微服务项目系列(十三):搭建Log4net+ELK+Kafka日志框架
之前是使用NLog直接将日志发送到了ELK,本篇将会使用Docker搭建ELK和kafka,同时替换NLog为Log4net. 一.搭建kafka 1.拉取镜像 //下载zookeeper docke ...
- .Net Core 商城微服务项目系列(十):使用SkyWalking构建调用链监控(2019-02-13 13:25)
SkyWalking的安装和简单使用已经在前面一篇介绍过了,本篇我们将在商城中添加SkyWalking构建调用链监控. 顺带一下怎么把ES设置为Windows服务,cd到ES的bin文件夹,运行ela ...
- .Net Core 商城微服务项目系列(十五): 构建定时任务调度和消息队列管理系统
一.系统描述 嗨,好久不见各位老哥,最近有点懒,技术博客写的太少了,因为最近在写小说,写的顺利的话说不定就转行了,哈哈哈哈哈哈哈哈哈. 今天要介绍的是基于.Net Core的定时任务调度和消息队列管理 ...
随机推荐
- 转载-lambda sort
原文:https://blog.csdn.net/qq_27127145/article/details/83930498 版权声明:本文为博主原创文章,转载请附上博文链接! import com.g ...
- CentOS7安装mysql8.0.12
一.配置yum源 下载mysql源安装包 在MySQL官网中下载YUM源rpm安装包:http://dev.mysql.com/downloads/repo/yum/ 复制下载链接:https://d ...
- 【Linux命令】lsmod命令
lsmod(list modules)命令 lsmod命令用来显示已被内核加载的模块的状态 1)语法:lsmod 2)功能: lsmod命令可以美观地显示/prco/module中的内容,这些内容是被 ...
- Badboy - variable setter
参考: http://leafwf.blog.51cto.com/872759/1117646 http://www.51testing.com/html/00/130600-1367743.html ...
- HDU2896病毒入侵AC_自动机
#include <iostream> #include <cstdio> #include <cstring> #include <algorithm> ...
- essential C++中的一些疑问记录
关于书中P87下列代码中,less<int>的使用,我目前的理解是 less<int> 是一个类型,& it 是对外部参数的引用.但是为何要加上引用,另外 调用该函数时 ...
- 洛谷 P1666 前缀单词 题解
题意:给n个单词,如果单词a为单词b的前缀则a,b不能共存,问能共存的集合数(包括空集) 一道dp题,排序后判断,f[i][j]表示i和j是否能共存,f[i][j]=1表示能共存,初始化dp[i]=1 ...
- 一文读懂 Android TouchEvent 事件分发、拦截、处理过程
什么是事件?事件是用户触摸手机屏幕,引起的一系列TouchEvent,包括ACTION_DOWN.ACTION_MOVE.ACTION_UP.ACTION_CANCEL等,这些action组合后变成点 ...
- CCPC-Wannafly Camp #2 (部分题解)
L: New Game! 题目描述: Eagle Jump公司正在开发一款新的游戏.泷本一二三作为其员工,获得了提前试玩的机会.现在她正在试图通过一个迷宫. 这个迷宫有一些特点.为了方便描述,我们对这 ...
- java多线程之创建线程的4种方式及Future
Java使用Thread类代表线程,所有的线程对象都必须是Thread类或其子类的实例.Java可以用四种方式来创建线程: 继承Thread创建线程 实现Runnable接口创建线程 实现callab ...