SSM整合学习 四
事务管理
一:初步理解
理解事务之前,先讲一个你日常生活中最常干的事:取钱。
比如你去ATM机取1000块钱,大体有两个步骤:首先输入密码金额,银行卡扣掉1000元钱;然后ATM出1000元钱。这两个步骤必须是要么都执行要么都不执行。如果银行卡扣除了1000块但是ATM出钱失败的话,你将会损失1000元;如果银行卡扣钱失败但是ATM却出了1000块,那么银行将损失1000元。所以,如果一个步骤成功另一个步骤失败对双方都不是好事,如果不管哪一个步骤失败了以后,整个取钱过程都能回滚,也就是完全取消所有操作的话,这对双方都是极好的。
事务就是用来解决类似问题的。事务是一系列的动作,它们综合在一起才是一个完整的工作单元,这些动作必须全部完成,如果有一个失败的话,那么事务就会回滚到最开始的状态,仿佛什么都没发生过一样。
在企业级应用程序开发中,事务管理必不可少的技术,用来确保数据的完整性和一致性。
事务有四个特性:ACID
- 原子性(Atomicity):事务是一个原子操作,由一系列动作组成。事务的原子性确保动作要么全部完成,要么完全不起作用。
- 一致性(Consistency):一旦事务完成(不管成功还是失败),系统必须确保它所建模的业务处于一致的状态,而不会是部分完成部分失败。在现实中的数据不应该被破坏。
- 隔离性(Isolation):可能有许多事务会同时处理相同的数据,因此每个事务都应该与其他事务隔离开来,防止数据损坏。
- 持久性(Durability):一旦事务完成,无论发生什么系统错误,它的结果都不应该受到影响,这样就能从任何系统崩溃中恢复过来。通常情况下,事务的结果被写到持久化存储器中。
Spring事务管理包含两种情况,编程式事务、声明式事务。而声明式事务又包括基于注解@Transactional和tx+aop的方式。编程式事务管理使用TransactionTemplate或者PlatformTransactionManager。 编程式事务需要手动在代码中处理事务,项目中使用的较少,也不推荐使用,因为它直接耦合代码,这里就不多介绍了,本文主要讲解申明式事务
二:申明式事务
注解@Transactional
我们将之前的项目改造,在Spring配置文件applicationContext.xml中屏蔽AOP及TX部分
<?xml version="1.0" encoding="UTF-8"?>
<beans xmlns="http://www.springframework.org/schema/beans"
       xmlns:xsi="http://www.w3.org/2001/XMLSchema-instance"
       xmlns:context="http://www.springframework.org/schema/context"
       xmlns:tx="http://www.springframework.org/schema/tx"
       xmlns:aop="http://www.springframework.org/schema/aop"
       xsi:schemaLocation="http://www.springframework.org/schema/beans
       http://www.springframework.org/schema/beans/spring-beans.xsd
        http://www.springframework.org/schema/tx http://www.springframework.org/schema/tx/spring-tx.xsd
       http://www.springframework.org/schema/aop https://www.springframework.org/schema/aop/spring-aop.xsd
       http://www.springframework.org/schema/context
       http://www.springframework.org/schema/context/spring-context-3.0.xsd">

    <!--加载上下文注解配置-->
    <context:annotation-config/>
    <context:property-placeholder location="classpath:Resources/db.properties"/>
    <context:component-scan base-package="com.founderit">
        <context:exclude-filter type="annotation" expression="org.springframework.stereotype.Controller"/>
    </context:component-scan>
    <aop:aspectj-autoproxy/>

    <!--DBCP数据库连接池-->
    <bean id="dataSource"
          class="org.apache.commons.dbcp2.BasicDataSource"
          destroy-method="close" >
        <property name="driverClassName" value="${DRIVERCLASS}"/>
        <property name="url" value="${URL}"/>
        <property name="username" value="${USERNAME}"/>
        <property name="password" value="${PASSWORD}"/>
        <!--maxActive: 最大连接数量-->
        <property name="maxTotal" value="150"/>
        <!--minIdle: 最小空闲连接-->
        <property name="minIdle" value="5"/>
        <!--maxIdle: 最大空闲连接-->
        <property name="maxIdle" value="20"/>
        <!--initialSize: 初始化连接-->
        <property name="initialSize" value="30"/>
        <!--removeAbandonedTimeout: 超时时间(以秒数为单位)-->
        <property name="removeAbandonedTimeout" value="10"/>
    </bean>

    <!-- spring和MyBatis完美整合 -->
    <bean id="sqlSessionFactory" class="org.mybatis.spring.SqlSessionFactoryBean">
        <property name="dataSource" ref="dataSource"/>
        <!-- 自动扫描mapping.xml文件 -->
        <property name="mapperLocations" value="classpath:com/founderit/mapper/*.xml"></property>
    </bean>

    <!-- DAO接口所在包名,Spring会自动查找其下的类 -->
    <bean class="org.mybatis.spring.mapper.MapperScannerConfigurer">
        <property name="basePackage" value="com.founderit.dao"/>
        <property name="sqlSessionFactoryBeanName" value="sqlSessionFactory"></property>
    </bean>

    <!--事务管理部分-->
    <bean id="transactionManager"
          class="org.springframework.jdbc.datasource.DataSourceTransactionManager">
        <property name="dataSource" ref="dataSource" />
    </bean>
    <tx:annotation-driven transaction-manager="transactionManager" proxy-target-class="true" />

<!--    <tx:advice id="txAdvice" transaction-manager="transactionManager">-->
<!--        <tx:attributes>-->
<!--            <tx:method name="save*" propagation="REQUIRED" />-->
<!--            <tx:method name="insert*" propagation="REQUIRED" />-->
<!--            <tx:method name="add*" propagation="REQUIRED" />-->
<!--            <tx:method name="create*" propagation="REQUIRED" />-->
<!--            <tx:method name="delete*" propagation="REQUIRED" />-->
<!--            <tx:method name="update*" propagation="REQUIRED" />-->
<!--            <tx:method name="find*" propagation="SUPPORTS" read-only="true" />-->
<!--            <tx:method name="select*" propagation="SUPPORTS" read-only="true" />-->
<!--            <tx:method name="get*" propagation="SUPPORTS" read-only="true" />-->
<!--        </tx:attributes>-->
<!--    </tx:advice>-->

<!--    <aop:config>-->
<!--        <aop:pointcut id="iccardTerm" expression="execution(* com.founderit.service.*.*(..))" />-->
<!--        <aop:advisor pointcut-ref="iccardTerm" advice-ref="txAdvice" />-->
<!--    </aop:config>-->

</beans>
在Service层类上加@Transactional注解,并在catch错误中手动回滚事务
@Transactional
@Override
public int insertObject(Object obj) {
    int result=0;
    try {
        for (int i=0;i<4;i++) {
            Student student=new Student();
            student.setName("wll");
            student.setAge(1);
            student.setId(100+i);
            result=userDao.insertObject(student);
        }
    }catch (Exception e){
        TransactionAspectSupport.currentTransactionStatus().setRollbackOnly();
    }
    return result;
}
测试
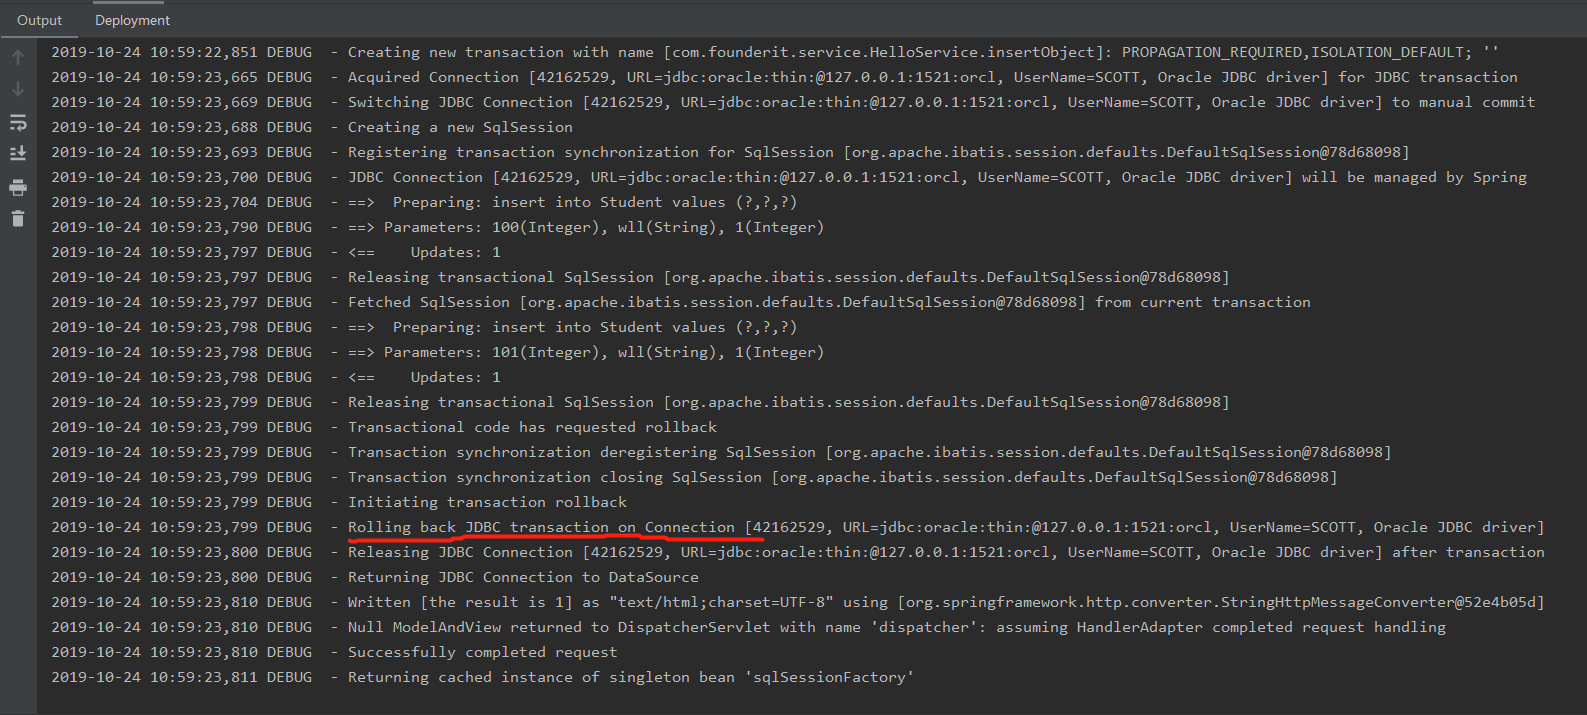
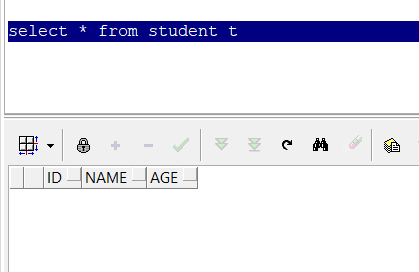
项目中将插入四条记录,我们在插入第三条时手动报错,如果没有事务,前二条正常的记录将插入成功,运行tomcat,发起hello请求
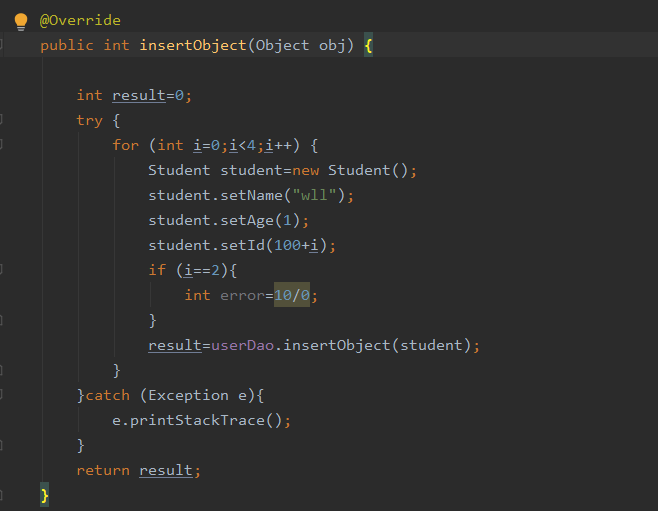
@Transactional
@Override
public int insertObject(Object obj) {
int result=0;
try {
for (int i=0;i<4;i++) {
Student student=new Student();
student.setName("wll");
student.setAge(1);
student.setId(100+i);
if (i==2){
int error=10/0;
}
result=userDao.insertObject(student);
}
}catch (Exception e){
TransactionAspectSupport.currentTransactionStatus().setRollbackOnly();
}
return result;
}
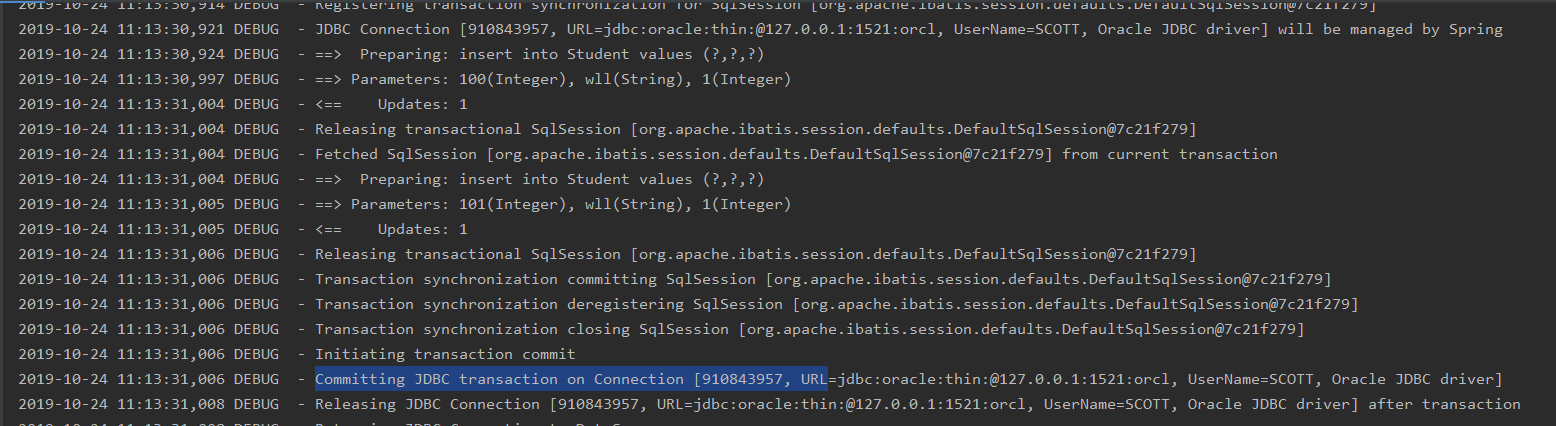
执行日志如下,可以看到前二条记录正确执行,但是插入第三条时报错,事务进行了回滚,导致一条也没有插入成功
基于tx+aop
在Spring配置文件applicationContext.xml中加上AOP及TX部分
<?xml version="1.0" encoding="UTF-8"?>
<beans xmlns="http://www.springframework.org/schema/beans"
       xmlns:xsi="http://www.w3.org/2001/XMLSchema-instance"
       xmlns:context="http://www.springframework.org/schema/context"
       xmlns:tx="http://www.springframework.org/schema/tx"
       xmlns:aop="http://www.springframework.org/schema/aop"
       xsi:schemaLocation="http://www.springframework.org/schema/beans
       http://www.springframework.org/schema/beans/spring-beans.xsd
        http://www.springframework.org/schema/tx http://www.springframework.org/schema/tx/spring-tx.xsd
       http://www.springframework.org/schema/aop https://www.springframework.org/schema/aop/spring-aop.xsd
       http://www.springframework.org/schema/context
       http://www.springframework.org/schema/context/spring-context-3.0.xsd">

    <!--加载上下文注解配置-->
    <context:annotation-config/>
    <context:property-placeholder location="classpath:Resources/db.properties"/>
    <context:component-scan base-package="com.founderit">
        <context:exclude-filter type="annotation" expression="org.springframework.stereotype.Controller"/>
    </context:component-scan>
    <aop:aspectj-autoproxy/>

    <!--DBCP数据库连接池-->
    <bean id="dataSource"
          class="org.apache.commons.dbcp2.BasicDataSource"
          destroy-method="close" >
        <property name="driverClassName" value="${DRIVERCLASS}"/>
        <property name="url" value="${URL}"/>
        <property name="username" value="${USERNAME}"/>
        <property name="password" value="${PASSWORD}"/>
        <!--maxActive: 最大连接数量-->
        <property name="maxTotal" value="150"/>
        <!--minIdle: 最小空闲连接-->
        <property name="minIdle" value="5"/>
        <!--maxIdle: 最大空闲连接-->
        <property name="maxIdle" value="20"/>
        <!--initialSize: 初始化连接-->
        <property name="initialSize" value="30"/>
        <!--removeAbandonedTimeout: 超时时间(以秒数为单位)-->
        <property name="removeAbandonedTimeout" value="10"/>
    </bean>

    <!-- spring和MyBatis完美整合 -->
    <bean id="sqlSessionFactory" class="org.mybatis.spring.SqlSessionFactoryBean">
        <property name="dataSource" ref="dataSource"/>
        <!-- 自动扫描mapping.xml文件 -->
        <property name="mapperLocations" value="classpath:com/founderit/mapper/*.xml"></property>
    </bean>

    <!-- DAO接口所在包名,Spring会自动查找其下的类 -->
    <bean class="org.mybatis.spring.mapper.MapperScannerConfigurer">
        <property name="basePackage" value="com.founderit.dao"/>
        <property name="sqlSessionFactoryBeanName" value="sqlSessionFactory"></property>
    </bean>

    <!--事务管理部分-->
    <bean id="transactionManager"
          class="org.springframework.jdbc.datasource.DataSourceTransactionManager">
        <property name="dataSource" ref="dataSource" />
    </bean>
    <tx:annotation-driven transaction-manager="transactionManager" proxy-target-class="true" />

    <tx:advice id="txAdvice" transaction-manager="transactionManager">
        <tx:attributes>
            <tx:method name="save*" propagation="REQUIRED" />
            <tx:method name="insert*" propagation="REQUIRED" />
            <tx:method name="add*" propagation="REQUIRED" />
            <tx:method name="create*" propagation="REQUIRED" />
            <tx:method name="delete*" propagation="REQUIRED" />
            <tx:method name="update*" propagation="REQUIRED" />
            <tx:method name="find*" propagation="SUPPORTS" read-only="true" />
            <tx:method name="select*" propagation="SUPPORTS" read-only="true" />
            <tx:method name="get*" propagation="SUPPORTS" read-only="true" />
        </tx:attributes>
    </tx:advice>

    <aop:config>
        <aop:pointcut id="iccardTerm" expression="execution(* com.founderit.service.*.*(..))" />
        <aop:advisor pointcut-ref="iccardTerm" advice-ref="txAdvice" />
    </aop:config>

</beans>
service层
@Override
public int insertObject(Object obj) {
    int result=0;
        for (int i=0;i<4;i++) {
            Student student=new Student();
            student.setName("wll");
            student.setAge(1);
            student.setId(100+i);
            result=userDao.insertObject(student);
        }
    return result;
}
测试
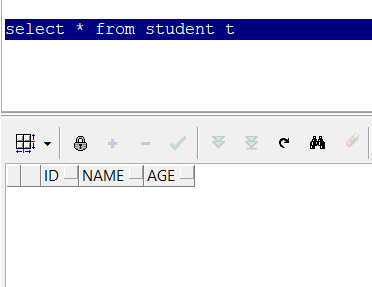
项目中将插入四条记录,我们在插入第三条时手动报错,如果没有事务,前二条正常的记录将插入成功,运行tomcat,发起hello请求
@Override
public int insertObject(Object obj) {
    int result=0;
        for (int i=0;i<4;i++) {
            Student student=new Student();
            student.setName("wll");
            student.setAge(1);
            student.setId(100+i);
            if (i==2){
                int error=10/0;
            }
            result=userDao.insertObject(student);
        }
    return result;
}
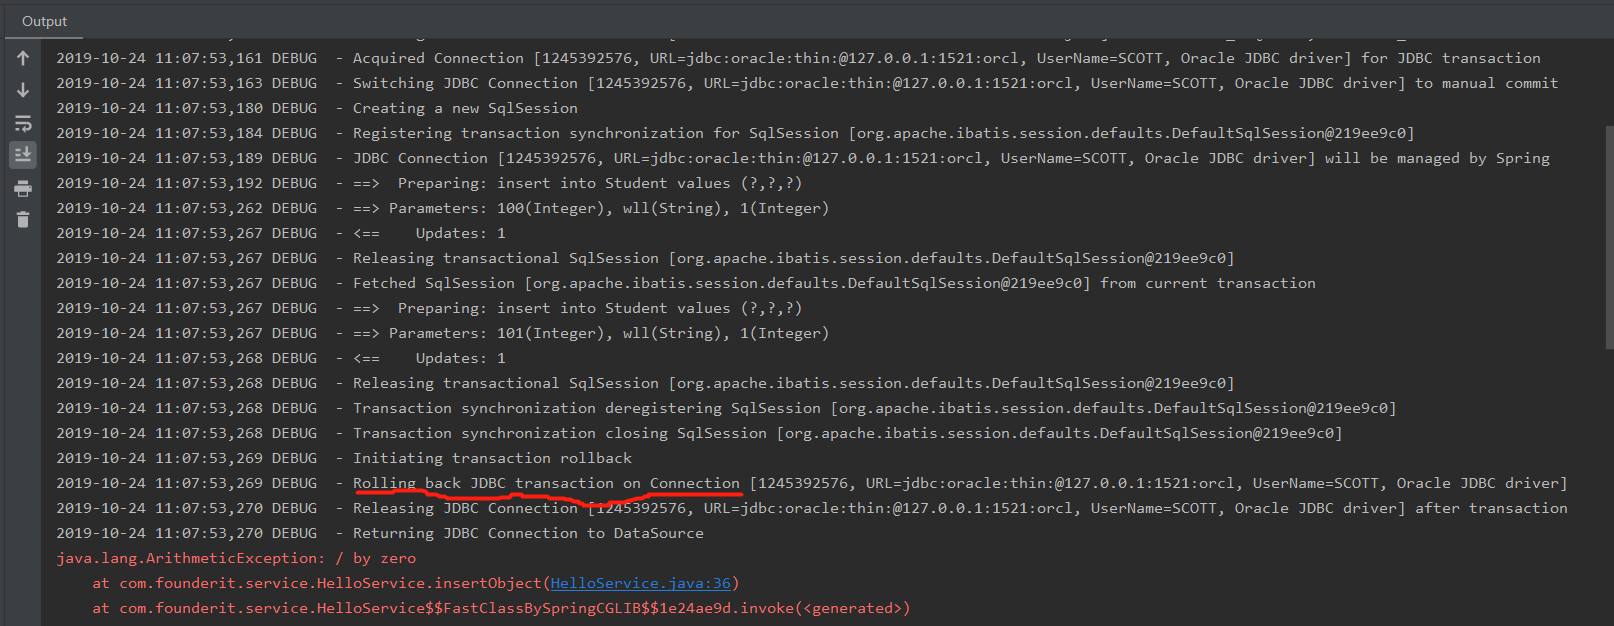
需要注意的是spring aop被拦截的方法需显式抛出异常,并不能经任何处理,这样aop代理才能捕获到方法的异常,才能进行回滚,默认情况下aop只捕获runtimeException的异常
如service层做了异常处理,事务不会回滚,我们将service层做了try/catch处理,再次测试发现事务并没有回滚而是正常提交了
解决方案:
service层处理事务,那么service中的方法中不做异常捕获(推荐),或者在catch语句中最后增加throw new RuntimeException()语句,以便让aop捕获异常再去回滚,并且在service上层(controller)要继续捕获这个异常并处理
SSM整合学习 四的更多相关文章
- SSM整合(四)-整合后配置文件汇总
1.新建Maven项目创建pom.xml pom.xml内容如下 <project xmlns="http://maven.apache.org/POM/4.0.0" xml ...
- SSM整合学习 三
三:整合Mybatis 完整的项目如下 一:下载所需的jar包 <!--日志--><dependency> <groupId>log4j</groupId&g ...
- SSM整合学习笔记
对学习Spring+Spring MVC+Mybatis过程中出现的问题解决办法汇总 出现的问题 1.pom.xml报错 右键项目->maven->update project 因此每次更 ...
- SSM整合学习 二
二:与Spring MVC整合 一:添加Spring MVC Framework 右键项目名称,点击Add Framework Support 选择Spring-Spring MVC框架 选择Down ...
- SSM整合学习 一
一:新建maven项目 File--New Project选择maven项目下的maven-archetype-webapp,输入GroupId.Artifactld,选择maven信息,新建mave ...
- (转)SpringMVC学习(四)——Spring、MyBatis和SpringMVC的整合
http://blog.csdn.net/yerenyuan_pku/article/details/72231763 之前我整合了Spring和MyBatis这两个框架,不会的可以看我的文章MyBa ...
- Spring Boot 项目学习 (四) Spring Boot整合Swagger2自动生成API文档
0 引言 在做服务端开发的时候,难免会涉及到API 接口文档的编写,可以经历过手写API 文档的过程,就会发现,一个自动生成API文档可以提高多少的效率. 以下列举几个手写API 文档的痛点: 文档需 ...
- 零基础学习java------39---------json格式交互,Restful(不懂),静态资源映射,SSM整合(ssm整合思想,application.xml文件详解(声明式事务管理),)
一. json格式交互(知道) 1 . 回顾ajax基本语法 $.ajax({ url:"", // 请求的后台路径 data:{"":"" ...
- Spring框架学习笔记(4)——SSM整合以及创建Maven自定义模版
Spring+Spring MVC+MyBatis+Maven SSM整合的核心还是Spring+MyBatis的整合,回顾一下MyBatis操作数据库流程,我们是使用一个SQLSessionFact ...
随机推荐
- jdk和Tomcat版本之间的关系,jdk尽量要比tomcat低才行
注:本文来源于:6860 <jdk和Tomcat版本之间的关系,jdk尽量要比tomcat低才行> 用的tomcat是低版本的,但是用的jdk却是高版本的,用Servlet做的项目运行都没 ...
- 洛谷 P2040 打开所有的灯 题解
这个题写其他题解的dalao们已经解释了 一个灯最多开一次(如果实在不知道为什么看评论区) 这个题一共就9个灯嘛,对吧 递归好想不好写(对于我这种蒟蒻) 所以我写了一个所有题解中最暴力的 直接枚举9个 ...
- 第4组 Alpha冲刺(1/4)
队名:斗地组 组长博客:地址 作业博客:Alpha冲刺(1/4) 各组员情况 林涛(组长) 过去两天完成了哪些任务: 1.安排好各个组员的任务 2.收集各个组员的进度 3.写页面 4.写博客 展示Gi ...
- saltstack自动化运维工具搭建个人笔记
至于为什么选择saltstack,因为Puppet.Chef基于Ruby开发,而ansible.saltstack基于python开发,便于后期二次,良好的可移植性. 又,ansible基于SSH协议 ...
- WDM驱动改可手动加卸载的NT驱动
WDM驱动改可手动加卸载的NT驱动 测试工具:osrloader 把一个WDM类型的驱动改成可动态加载/卸载,需要做以下2个修改: 1. 把SOURCES文件夹中的DRIVERTYPE=WDM去掉 2 ...
- poi导出word表格
代码如下: package com.ksource.pwlp.util; import java.io.FileOutputStream; import java.math.BigInteger; i ...
- Curiosity-Driven Learning through Next State Prediction
Curiosity-Driven Learning through Next State Prediction 2019-10-19 20:43:17 This paper is from: http ...
- 微信小程序支付接口之Django后台
本文链接:https://blog.csdn.net/qq_41860162/article/details/89098694Python3-django-微信小程序支付接口调用工具类生成一系列微信官 ...
- Android相关视频
Android架构师 层次分析 –从顶层到底层 洞察其原理https://www.bilibili.com/video/av59066641?t=132安卓/Android 逆向破解系统班 第2期 全 ...
- vs2015 项目调试出现未能加载文件或程序集“Antlr3.Runtime”或它的某一个依赖项。找到的程序集清单定义与程序集引用不匹配。 (异常来自 HRESULT:0x80131040)
今天在调试项目不知道怎么了,突然就报未能加载文件或程序集“Antlr3.Runtime”或它的某一个依赖项.找到的程序集清单定义与程序集引用不匹配. (异常来自 HRESULT:0x80131040) ...