Python3.7.9+Locust1.4.3版本性能测试工具案例分享
一、Locust工具介绍
1.概述
Locust是一款易于使用的分布式负载测试工具,完全基于事件,使用python开发,即一个locust节点也可以在一个进程中支持数千并发用户,不使用回调,通过gevent使用轻量级过程(即在自己的进程内运行)。
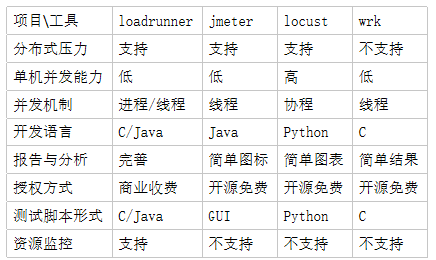
2.常见性能测试工具比较
3.环境搭建
源码安装:下载源码https://github.com/locustio/locust,进入文件夹执行安装命令:python setup.py install
pip安装:pip install locust
二、Locust常用类和方法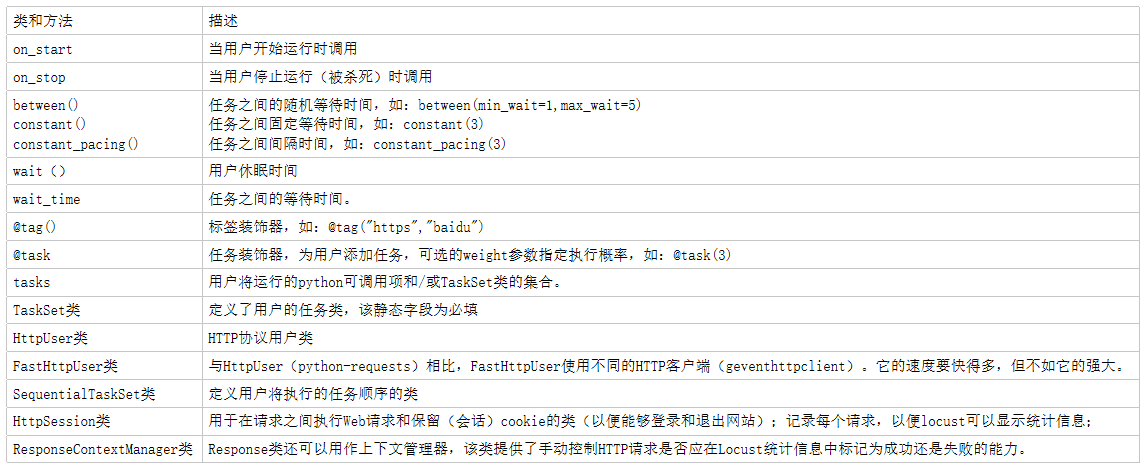
三、Locust常用参
四、案例
1.参数化
# -*- coding: utf-8 -*-

import os,random

from locust import  TaskSet, task,HttpUser, between

#任务类

class Testlocust(TaskSet):

    def on_start(self):

        self.login_headers={'x-client-id': 'xxxxxx'}          #头文件

        self.data=[

            {

                "account_name": "登录账号1",

                "user_name": "登录账号1",

                "hashed_password": "登录密码1"

            },

            {

                "account_name": "登录账号2",

                "user_name": "登录账号2",

                "hashed_password": "登录密码2"

            },

            {

                "account_name": "登录账号3",

                "user_name": "登录账号3",

                "hashed_password": "登录密码3"

            }

        ]                                               #登录账号密码

        print("------on start------")

    @task()

    def userlogin(self):

        r = self.client.post(url='/v1/auth/users/login', headers=self.login_headers,

                             json=random.choice(self.data),name='登录',verify=False)          #使用choice方法参数化随机登录

        assert r.status_code == 200 and r.json()['status']==0                                #登录断言

    def on_stop(self):

        print("------on stop------")

#用户类

class WebsiteUser(HttpUser):                        #locust1.0版本以前是HttpLocust

    tasks = [Testlocust]                            #locust1.0版本以前是task_set=Testlocust

    host = 'https://xxxxxx'                         #被测主机地址

    wait_time = between(min_wait=1,max_wait=5)      #任务之间的等待时间

if __name__ == "__main__":

    os.system("locust -f locust_XX.py")             #执行locust脚本
2.关联
# -*- coding: utf-8 -*-

import os,requests

from locust import  TaskSet, task,HttpUser, between

#任务类

class Testlocust(TaskSet):

    def on_start(self):

        print("------on start------")

        access_token = self.userlogin()                                         #返回登录token

        self.headers = {}                                                       #定义headers

        self.headers['x-api-key'] = 'fZkQSHC1dp2s0tL21EMtaNX3UjF7P6L9'          #添加headers值

        self.headers['Authorization'] = 'Bearer ' + access_token

        self.headers['x-key-hash'] = '1607675936446;abcdefg;bca1ef2b5835e454a15929f7ce9cb5d7ebaf580377624019002'

        self.headers['Content-Type'] = 'application/json'

        self.params = {"name": "CDR", "page": "1", "size": "10", "series": "CDR80"}    #查询接口参数

    def userlogin(self):                                                        #登录方法

        login_url = 'https://xxxxxx/v1/auth/users/login'                        #登录url

        data = {

            "account_name": "账号1",

            "user_name": "账号1",

            "hashed_password": "密码1"

        }                                                                       #登录账号密码

        login_headers = {'x-client-id': '46bf882df2959ea2'}

        r = requests.request('POST', url=login_url, headers=login_headers, json=data)  #登录

        return r.json()['access_token']                                         #返回登录token

    @task()

    def search(self):                                                                   #查询设备信息

        r = self.client.get(url='/v1/assets/device/search', headers=self.headers,

                             params=self.params, name='查询', verify=False)              #查询

        assert r.status_code == 200 and r.json()['code'] == 0                           #结果断言

#用户类

class WebsiteUser(HttpUser):                        #locust1.0版本以前是HttpLocust

    tasks = [Testlocust]                            #locust1.0版本以前是task_set=Testlocust

    host = 'https://xxxxxx.com'                     #被测主机地址

    wait_time = between(min_wait=1,max_wait=5)      #任务之间的等待时间

if __name__ == "__main__":

    os.system("locust -f locust_XX.py")             #执行参数
Python3.7.9+Locust1.4.3版本性能测试工具案例分享的更多相关文章
- windows10(64位)Anaconda3+Python3.6搭建Tensorflow(cpu版本)及keras
转自:windows10(64位)Anaconda3+Python3.6搭建Tensorflow(cpu版本)及keras 1.本来电脑安装的是anaconda3 5.3.1,但安装的python版本 ...
- [linux]centos7.4上升级python2版本到python3.6.5 【安装双版本,默认python3】
版本声明 centos7.4 前言:linux上的python默认是版本2的,之前学django项目用的是3的版本 所以得升级下版本~ 1.下载python3.6.5 cd /usr/local/ w ...
- 性能测试工具Locust的使用
一.写在前面 官网:https://www.locust.io/ 官方使用文档:https://docs.locust.io/en/latest/ 大并发量测试时,建议在linux系统下进行. 二.L ...
- 性能测试工具Locust的介绍和使用
内容来自网络 https://www.w3xue.com/exp/article/20191/16707.html https://blog.csdn.net/qq_36255988/article/ ...
- Locust 性能测试工具安装使用说明
1. 介绍 它是一个开源性能测试工具.使用 Python 代码来定义用户行为.用它可以模拟百万计的并发用户访问你的系统. 性能工具对比 LoadRunner 是非常有名的商业性能测试工具,功能 ...
- 性能测试工具 wrk 安装与使用
介绍 今天给大家介绍一款开源的性能测试工具 wrk,简单易用,没有Load Runner那么复杂,他和 apache benchmark(ab)同属于性能测试工具,但是比 ab 功能更加强大,并且可以 ...
- 性能测试工具Locust
An open source load testing tool. 一个开源性能测试工具. define user behaviour with python code, and swarm your ...
- 给CentOS6.3 + PHP5.3 安装PHP性能测试工具 XHProf-0.9.2
一.什么是XHProf XHProf官网:http://pecl.php.net/package/xhprof XHProf是一个分层PHP性能分析工具.它报告函数级别的请求次数和各种指标,包括 阻塞 ...
- Ceph性能测试工具和方法。
0. 测试环境 同 Ceph 的基本操作和常见故障排除方法 一文中的测试环境. 1. 测试准备 1.1 磁盘读写性能 1.1.1 单个 OSD 磁盘写性能,大概 165MB/s. root@ceph1 ...
随机推荐
- 不要把file,process或者super权限授予管理员以外的账号
file权限的主要作用是通过select ....into outfile 写到服务器上具有写权限的目录下,作为文本格式存放,具有权限的目录也就是启动mysql时的用户权限目录.(没有理解) 可以将有 ...
- AgileConfig - RESTful API 介绍
AgileConfig AgileConfig是一个基于.net core开发的轻量级配置中心. AgileConfig秉承轻量化的特点,部署简单.配置简单.使用简单.学习简单,它只提取了必要的一些功 ...
- js reduce数组转对象
借鉴:https://juejin.im/post/5cfcaa7ae51d45109b01b161#comment这位大佬的处理方法很妙,但是我一眼看过去没有明白,细细琢磨了下,终于明白了 1 co ...
- linux系统图形化管理工具
webmin是一个非常好的图形化管理工具,提供了系统管理员对于linux系统的运维效率.对于那些记不住命令,新入门的新手真的是一个很好的工具呀,上图吧. 这是系统管理的首页,可以看到,CPU,内存.虚 ...
- 好你个C语言,原来还有这么多副面孔!
C语言可以这样比喻,是一门非常强大的内功心法,学会它可以做到一法通万法.这也是它至今不衰的原因.说了这么多C语言的优点,现在来说说它的缺点.C语言最大的优点也是它最大的缺点,拥有强大的力量时应时刻保持 ...
- 动态sql语句、逆向工程(generator)、分页助手(pagehelper)
1.动态sql语句 if if where 配合使用 <select id="selectByWhere" resultType="com.alibaba.wlq. ...
- apscheduler(定时任务) 基于redis持久化配置操作
apscheduler(定时任务) 基于redis持久化配置操作 安装模块 pip install apscheduler 导入模块配置 ## 配置redis模块 from apscheduler.j ...
- Py编程方法,尾递归优化,map函数,filter函数,reduce函数
函数式编程 1.面向过程 把大的问题分解成流程,按照流程来编写过程 2.面向函数 面向函数编程=编程语言定义的函数+数学意义上的函数先弄出数学意义上的方程式,再用编程方法编写这个数学方程式注意面向函数 ...
- Linux定时任务crontab通俗易懂简单扼要地解析
1.安装crontab 在配置好yum源的情况下,直接执行如下命令即可: yum install crontab 2.查看当前环境上已经有的定时任务有哪些? 执行如下命令即可 crontab -l 如 ...
- 解决 browser-sync start --server --files 文件不能同步的问题!
解决 browser-sync start --server --files 文件不能同步的问题! 请看我的源命令: browser-sync start --server --file 'test2 ...