centos7下面 es7.5 搭建
centos6 搭建 参考
https://www.cnblogs.com/php-linux/p/8758788.html
搭建linux虚拟机
https://www.cnblogs.com/php-linux/p/5262077.html
E:\>cd vbox

E:\vbox>cd es

E:\vbox\es>vagrant box add es centos7.base.vbox

==> box: Box file was not detected as metadata. Adding it directly...

==> box: Adding box 'es' (v0) for provider:

    box: Unpacking necessary files from: file://E:/vbox/es/centos7.base.vbox

    box:

==> box: Successfully added box 'es' (v0) for 'virtualbox'!

E:\vbox\es>vagrant init es

A `Vagrantfile` has been placed in this directory. You are now

ready to `vagrant up` your first virtual environment! Please read

the comments in the Vagrantfile as well as documentation on

`vagrantup.com` for more information on using Vagrant.

编辑Vagratnfile

Vagrant.configure("2") do |config|

	config.vm.network "forwarded_port", guest: 22, host: 2222, id: "ssh", disabled: "true"

	config.vm.network "forwarded_port", guest: 22, host: 5510

    config.vm.box = "lnmp"

    config.vm.network "private_network", ip: "192.168.55.10"

    config.vm.synced_folder "e:/www", "/www"

    config.vm.provider "virtualbox" do |v|

    v.memory = 2048

    v.cpus = 2

    end

end

启动

E:\vbox\es>vagrant up

==> vagrant: A new version of Vagrant is available: 2.2.9 (installed version: 2.2.6)!

==> vagrant: To upgrade visit: https://www.vagrantup.com/downloads.html

Bringing machine 'default' up with 'virtualbox' provider...

==> default: Importing base box 'es'...

==> default: Matching MAC address for NAT networking...

==> default: Setting the name of the VM: es_default_1593735236199_15492

==> default: Clearing any previously set network interfaces...

==> default: Preparing network interfaces based on configuration...

    default: Adapter 1: nat

    default: Adapter 2: hostonly

==> default: Forwarding ports...

    default: 22 (guest) => 2222 (host) (adapter 1)

    default: 29324 (guest) => 29324 (host) (adapter 1)

==> default: Booting VM...

==> default: Waiting for machine to boot. This may take a few minutes...

    default: SSH address: 127.0.0.1:2222

    default: SSH username: vagrant

    default: SSH auth method: private key

==> default: Machine booted and ready!

[default] GuestAdditions 6.0.14 running --- OK.

==> default: Checking for guest additions in VM...

==> default: Configuring and enabling network interfaces...

==> default: Mounting shared folders...

    default: /www => E:/www

    default: /vagrant => E:/vbox/es

==> default: Starting notify-forwarder ...

    default: Notify-forwarder: guest listening for file change notifications on 0.0.0.0:29324.

==> default: Notify-forwarder: Unsupported host operating system

vagrant ssh

修改root密码
sudo passwd root
1 安装jdk
具体看 http://www.cnblogs.com/php-linux/p/8757783.html
2 下载 elasticsearch7.2
链接:https://pan.baidu.com/s/10Y8bBlHNEgLMMBQwMOiKCg
提取码:gvwc
后面基本和ceontos6安装一样 ,除了 会报错 说是要求java11 上面安装的是java8 解决方法 https://www.cnblogs.com/php-linux/p/13228710.html
3 解压
unzip elasticsearch-6.2.3.zip
4 移动
mv elasticsearch-6.2.3 /usr/local/es
5 启动
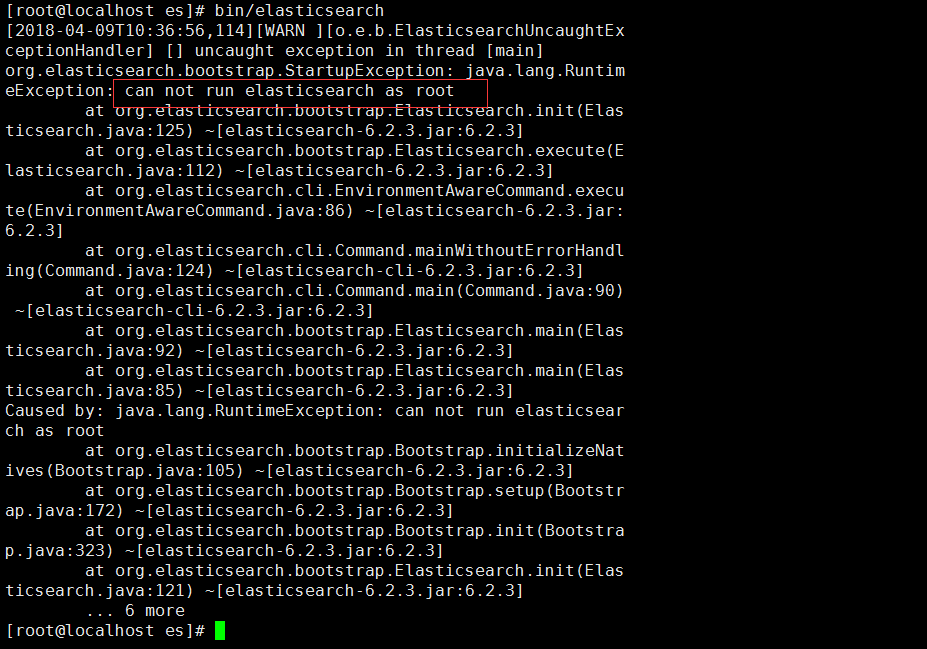
提示不能以root用户执行
useradd es
passwd es

为es用户添加sudo权限
visudo

找到root 复制后改为es

再次启动

估计是权限问题
sudo chmod 777 -R /usr/local/es
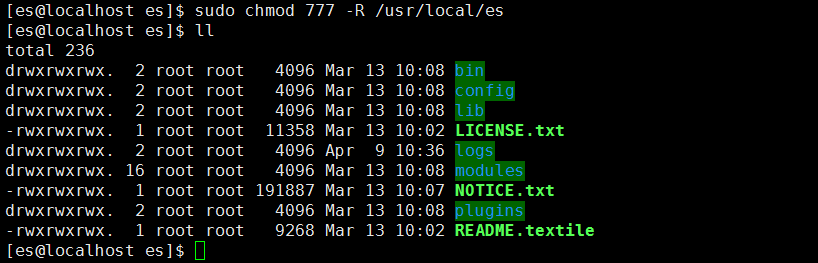
再启动

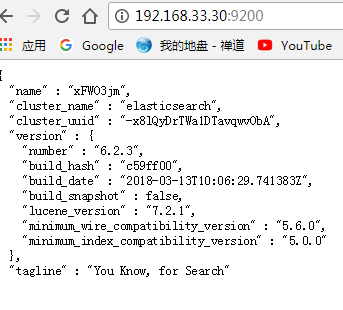
访问 http
查看ip地址
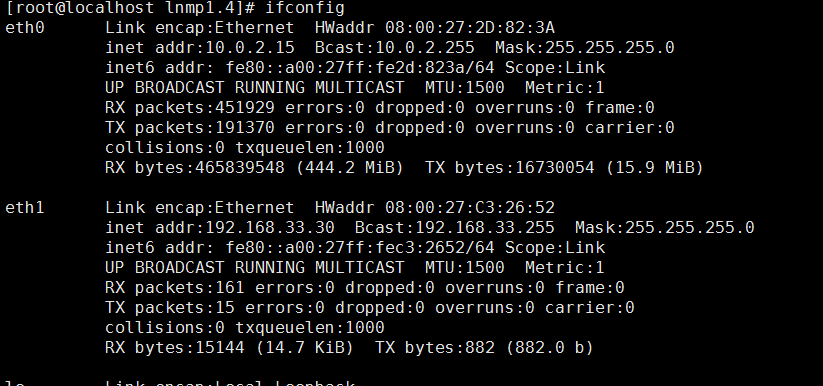
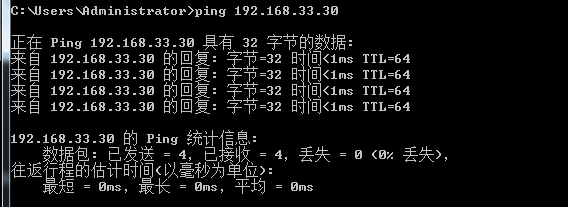
访问
http://192.168.33.30:9200/
提示无法访问
vim /usr/local/es/config/elasticsearch.yml
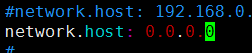
再次重启

[1]: max file descriptors [65535] for elasticsearch process is too low, increase to at least [65536]
解决:切换到root用户,编辑limits.conf 添加类似如下内容
vi /etc/security/limits.conf
添加如下内容:
* soft nofile 65536
* hard nofile 131072
* soft nproc 2048
* hard nproc 4096
[2]: max number of threads [1024] for user [es] is too low, increase to at least [4096]
解决:切换到root用户,进入limits.d目录下修改配置文件。
vi /etc/security/limits.d/90-nproc.conf
修改如下内容:
* soft nproc 1024
#修改为
* soft nproc 4096
[3]: max virtual memory areas vm.max_map_count [65530] is too low, increase to at least [262144]
解决:切换到root用户修改配置sysctl.conf
vi /etc/sysctl.conf
添加下面配置:
vm.max_map_count=655360
并执行命令:
sysctl -p
[4]: system call filters failed to install; check the logs and fix your configuration or disable system call filters at your own risk
问题原因:因为Centos6不支持SecComp,而ES5.2.1默认bootstrap.system_call_filter为true进行检测,所以导致检测失败,失败后直接导致ES不能启动。详见 :https://github.com/elastic/elasticsearch/issues/22899
解决方法:在elasticsearch.yml中配置bootstrap.system_call_filter为false,注意要在Memory下面:
bootstrap.memory_lock: false
bootstrap.system_call_filter: false
重启es 异常
ERROR: [1] bootstrap checks failed
[1]: the default discovery settings are unsuitable for production use; at least one of [discovery.seed_hosts, discovery.seed_providers, cluster.initial_master_nodes] must be configured
修改
elasticsearch.yml
取消注释保留一个节点
cluster.initial_master_nodes: ["node-1"]
这个的话,这里的node-1是上面一个默认的记得打开就可以了
最终终于启动了

访问ip
centos7下面 es7.5 搭建的更多相关文章
- centos7+nginx+rtmp+ffmpeg搭建流媒体服务器(保存流目录与http目录不要随意配置,否则有权限问题)
搭建nginx-http-flv-module升级代替rtmp模块,详情:https://github.com/winshining/nginx-http-flv-module/blob/master ...
- centos7下git服务器端搭建
git的安装: yum 源仓库里的 Git 版本更新不及时,最新版本的 Git 是 1.8.3.1,但是官方最新版本已经到了 2.9.2.想要安装最新版本的的 Git,只能下载源码进行安装. 1. 查 ...
- centos7下git服务器端搭建(转)
git的安装: yum 源仓库里的 Git 版本更新不及时,最新版本的 Git 是 1.8.3.1,但是官方最新版本已经到了 2.9.2.想要安装最新版本的的 Git,只能下载源码进行安装. 1. 查 ...
- centos7.3使用squid搭建代理服务器
centos7.3使用squid搭建代理服务器 1 安装 yum install squid 2 编辑 vi /etc/squid/squid.conf 3 设置 最底部增加 如下http_acces ...
- centos7.6_x86_64使用Squid搭建代理服务器让windows上网
centos7.6_x86_64使用Squid搭建代理服务器让windows上网 windows机器很多站点访问受限,可以在没有限制外网的机器上面搭建代理服务器,其它电脑可以配置代理通过这台不受限制的 ...
- 【MIT6.828】centos7下使用Qemu搭建xv6运行环境
title:[MIT6.828]centos7下使用Qemu搭建xv6运行环境 date: "2020-05-05" [MIT6.828]centos7下搭建xv6运行环境 1. ...
- Centos7 Samba共享服务搭建
Centos7 Samba共享服务搭建 1.安装启动和端口 ---------------------------------------------------------------------- ...
- CentOS7利用yum缓存搭建本地源
CentOS7利用yum缓存搭建本地源 环境说明 [root@localhost ~]# cat /etc/redhat-release CentOS Linux release 7.6.1810 ( ...
- centos7+cdh5.10.0搭建
一.选择环境: 1.说明 本次部署使用台机器,3台用于搭建CDH集群,1台为内部源.内部源机器是可以连接公网的,可以提前部署好内部源,本次部署涉及到的服务器的hosts配置如下: 192.168.10 ...
随机推荐
- 论文:Show, Attend and Tell: Neural Image Caption Generation with Visual Attention-阅读总结
Show, Attend and Tell: Neural Image Caption Generation with Visual Attention-阅读总结 笔记不能简单的抄写文中的内容,得有自 ...
- es创建普通索引以及各种查询
创建索引 创建普通索引: PUT /my_index { "settings": { "index": { "number_of_shards&quo ...
- 关于java基础_方法的学习
方法: 方法就是把一堆需要反复执行的代码封装起来,如果项目需要调用这段代码时,直接调用方法名即可 方法相当于榨汁机, 材料:水果 产出物:果汁 参数(材料):进入方法的数据 返回值(产出物):就是方法 ...
- zookeeper源码之服务端
zookeeper服务端主要包括一下几个模块: 1.启动模块. 2.核心执行模块 3.数据管理模块. 启动模块 读取配置文件,启动程序.详见:zookeeper源码之服务端启动模块. 核心执行 ...
- 关于数学公式Markdown
打开写博客(这都打不开就...) 再打开"选项". 选"启用数学公式支持"对(以后有用嘻嘻) 在默认编辑器里有Markdown选对. 然后就可以 \[\sum\ ...
- luogu 3376 最小费用最大流 模板
类似EK算法,只是将bfs改成spfa,求最小花费. 为什么可以呢,加入1-3-7是一条路,求出一个流量为40,那么40*f[1]+40*f[2]+40*f[3],f[1]是第一条路的单位费用,f[2 ...
- 注解&反射
什么是注解 Annotation是从JDK5.0开始引入的新技术 Annotation的作用: 不是程序本身,可以对程序作出解释.(这一点和注释(comment)没什么区别) > 可以被其他程序 ...
- Kafka控制器事件处理全流程分析
前言 大家好,我是 yes. 这是Kafka源码分析第四篇文章,今天来说说 Kafka控制器,即 Kafka Controller. 源码类的文章在手机上看其实效果很差,这篇文章我分为两部分,第一部分 ...
- Python-IndexError: list index out of range
Error:IndexError: list index out of range Where? 对Python中有序序列进行按索引取值的时候,出现这个异常 Why? 对于有序序列: 字符串 str ...
- Python-开发规范-遵循PEP8规范
Python中空白 1. 4个空格表示缩进,用4个空格代替一个TAB 2. 不再逗号.分号.冒号前加空格,应该在其后加空格 3. 关系运行符.数学运算符.逻辑运算符.赋值运算符 前后都加一个空格 4. ...