
Web API 2 入门——使用Web API与ASP.NET Web窗体(谷歌翻译)
作者:Mike Wasson
虽然ASP.NET Web API与ASP.NET MVC打包在一起,但很容易将Web API添加到传统的ASP.NET Web窗体应用程序中。本教程将引导您完成步骤。
概观
要在Web窗体应用程序中使用Web API,有两个主要步骤:
- 添加从ApiController类派生的Web API控制器。
- 向Application_Start方法添加路由表。
创建Web窗体项目
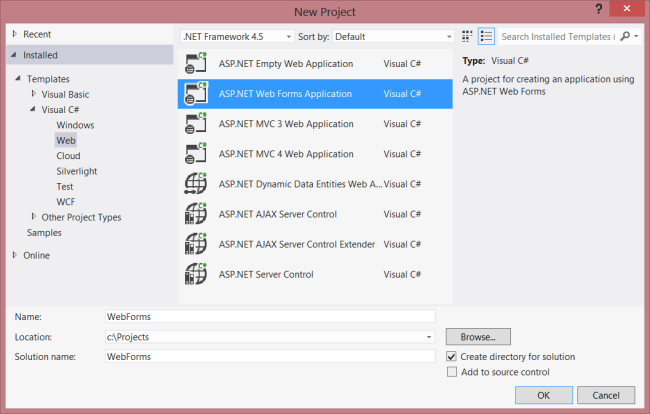
启动Visual Studio并从“ 开始”页面选择“ 新建项目 ” 。或者,从文件菜单中选择新建,然后选择项目。
在“ 模板”窗格中,选择“ 已安装的模板”并展开Visual C#节点。在Visual C#下,选择Web。在项目模板列表中,选择ASP.NET Web窗体应用程序。输入项目的名称,然后单击确定。
创建模型和控制器
本教程使用与入门教程相同的模型和控制器类。
首先,添加一个模型类。在解决方案资源管理器中,右键单击项目并选择添加类。命名产品类,并添加以下实现:
public class Product

{

    public int Id { get; set; }

    public string Name { get; set; }

    public decimal Price { get; set; }

    public string Category { get; set; }

}
接下来,将Web API控制器添加到项目中。控制器是处理Web API HTTP请求的对象。
在解决方案资源管理器中,右键单击项目。选择添加新项目。
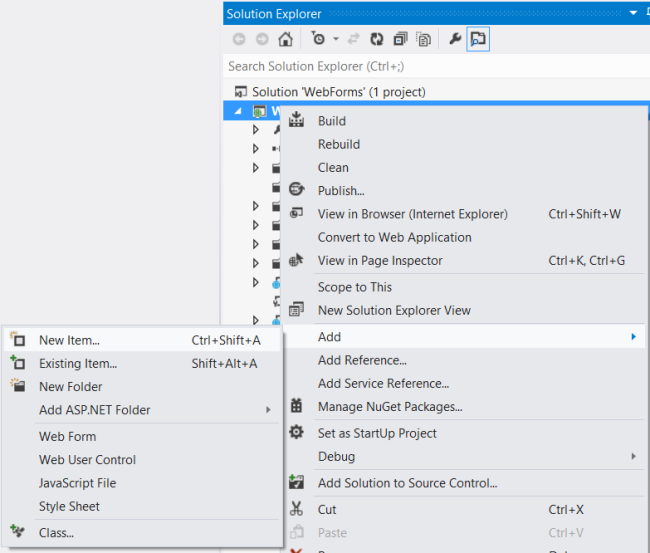
在已安装的模板下,展开Visual C#并选择Web。然后,从模板列表中选择Web API Controller Class。命名控制器“ProductsController”,然后单击添加。
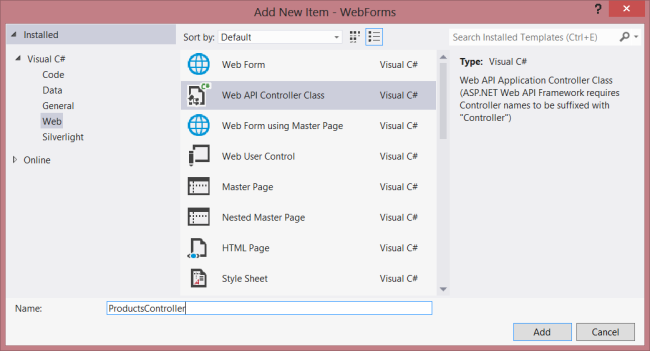
“ 添加新项目”向导将创建一个名为ProductsController.cs的文件。删除向导包含的方法并添加以下方法:
namespace WebForms

{

    using System;

    using System.Collections.Generic;

    using System.Linq;

    using System.Net;

    using System.Net.Http;

    using System.Web.Http;

    public class ProductsController : ApiController

    {

        Product[] products = new Product[]

        {

            new Product { Id = 1, Name = "Tomato Soup", Category = "Groceries", Price = 1 },

            new Product { Id = 2, Name = "Yo-yo", Category = "Toys", Price = 3.75M },

            new Product { Id = 3, Name = "Hammer", Category = "Hardware", Price = 16.99M }

        };

        public IEnumerable<Product> GetAllProducts()

        {

            return products;

        }

        public Product GetProductById(int id)

        {

            var product = products.FirstOrDefault((p) => p.Id == id);

            if (product == null)

            {

                throw new HttpResponseException(HttpStatusCode.NotFound);

            }

            return product;

        }

        public IEnumerable<Product> GetProductsByCategory(string category)

        {

            return products.Where(

                (p) => string.Equals(p.Category, category,

                    StringComparison.OrdinalIgnoreCase));

        }

    }

}
有关此控制器中的代码的更多信息,请参阅入门教程。
添加路由信息
接下来,我们将添加一个URI路由,以便将“/ api / products /”形式的URI路由到控制器。
在解决方案资源管理器中,双击Global.asax以打开代码隐藏文件Global.asax.cs。添加以下using语句。
using System.Web.Http;
然后将以下代码添加到Application_Start方法中:
RouteTable.Routes.MapHttpRoute(

    name: "DefaultApi",

    routeTemplate: "api/{controller}/{id}",

    defaults: new { id = System.Web.Http.RouteParameter.Optional }

);
有关路由表的更多信息,请参阅ASP.NET Web API中的路由。
添加客户端AJAX
这就是创建一个客户端可以访问的Web API所需要的。现在我们来添加一个使用jQuery调用API的HTML页面。
打开文件Default.aspx。更换主内容部分中的样板文本,如图所示:
<%@ Page Title="Home Page" Language="C#" MasterPageFile="~/Site.Master"

    AutoEventWireup="true" CodeBehind="Default.aspx.cs" Inherits="WebForms._Default" %>

<asp:Content ID="HeaderContent" runat="server" ContentPlaceHolderID="HeadContent">

</asp:Content>

<asp:Content ID="BodyContent" runat="server" ContentPlaceHolderID="MainContent">

    <h2>Products</h2>

    <table>

    <thead>

        <tr><th>Name</th><th>Price</th></tr>

    </thead>

    <tbody id="products">

    </tbody>

    </table>

</asp:Content>
接下来,在该HeaderContent部分中添加对jQuery源文件的引用:
<asp:Content ID="HeaderContent" runat="server" ContentPlaceHolderID="HeadContent">

    <script src="Scripts/jquery-1.7.1.min.js" type="text/javascript"></script>

</asp:Content>
注意:您可以通过将解决方案资源管理器中的文件拖放到代码编辑器窗口中来轻松添加脚本引用。
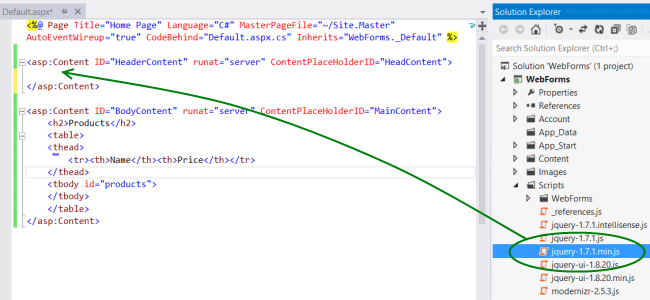
在jQuery脚本标记下面添加以下脚本块:
<script type="text/javascript">

    function getProducts() {

        $.getJSON("api/products",

            function (data) {

                $('#products').empty(); // Clear the table body.

                // Loop through the list of products.

                $.each(data, function (key, val) {

                    // Add a table row for the product.

                    var row = '<td>' + val.Name + '</td><td>' + val.Price + '</td>';

                    $('<tr/>', { text: row })  // Append the name.

                        .appendTo($('#products'));

                });

            });

        }

        $(document).ready(getProducts);

</script>
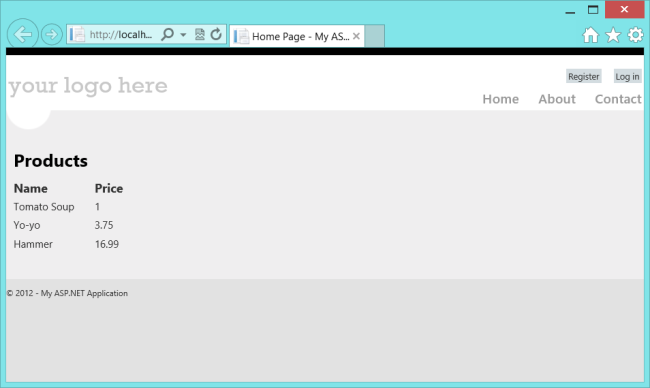
当文档加载时,此脚本会向“api / products”发出AJAX请求。该请求返回JSON格式的产品列表。该脚本将产品信息添加到HTML表中。
运行应用程序时,应该如下所示:
Web API 2 入门——使用Web API与ASP.NET Web窗体(谷歌翻译)的更多相关文章
- 【ASP.NET Web API教程】1.1 第一个ASP.NET Web API
Your First ASP.NET Web API (C#)第一个ASP.NET Web API(C#) By Mike Wasson|January 21, 2012作者:Mike Wasson ...
- Asp.Net Core 实现谷歌翻译ApI 免费版
由于谷歌翻译官方API是付费版本,本着免费和开源的精神.分享一下用 Net Core 实现谷歌翻译API的代码. 项目引用的Nuget 包: ChakraCore.NET Newtonsoft.Jso ...
- ASP.Net Web API 输出缓存 转载 -- Output caching in ASP.NET Web API
一.Nuget安装相关dll Web API 2 : Install-Package Strathweb.CacheOutput.WebApi2 Web API 1 : Install-Package ...
- ASP.NET Web API系列教程目录
ASP.NET Web API系列教程目录 Introduction:What's This New Web API?引子:新的Web API是什么? Chapter 1: Getting Start ...
- Swagger 生成 ASP.NET Web API
使用 Swagger 生成 ASP.NET Web API 在线帮助测试文档 原文:ASP.NET Web API Help Pages using Swagger作者:Shayne Boyer翻译: ...
- ASP.NET Web API系列教程(目录)(转)
注:微软随ASP.NET MVC 4一起还发布了一个框架,叫做ASP.NET Web API.这是一个用来在.NET平台上建立HTTP服务的Web API框架,是微软的又一项令人振奋的技术.目前,国内 ...
- [转]ASP.NET Web API系列教程(目录)
本文转自:http://www.cnblogs.com/r01cn/archive/2012/11/11/2765432.html 注:微软随ASP.NET MVC 4一起还发布了一个框架,叫做ASP ...
- 杂项:ASP.NET Web API
ylbtech-杂项:ASP.NET Web API ASP.NET Web API 是一种框架,用于轻松构建可以访问多种客户端(包括浏览器和移动设备)的 HTTP 服务. ASP.NET Web A ...
- ASP.NET Web API 管道模型
ASP.NET Web API 管道模型 前言 ASP.NET Web API是一个独立的框架,也有着自己的一套消息处理管道,不管是在WebHost宿主环境还是在SelfHost宿主环境请求和响应都是 ...
- ASP.NET Web API 路由对象介绍
ASP.NET Web API 路由对象介绍 前言 在ASP.NET.ASP.NET MVC和ASP.NET Web API这些框架中都会发现有路由的身影,它们的原理都差不多,只不过在不同的环境下作了 ...
随机推荐
- Linux 时间日期类、搜索查找类、 压缩和解压类指令
l 时间日期类 date指令-显示当前日期 基本语法 1) date (功能描述:显示当前时间) 2) date +%Y (功能描述:显示当前年份) 3) date +%m (功能描述:显示当前月份) ...
- 004-C3P0连接池工具类模板
package ${enclosing_package}; import java.sql.Connection; import java.sql.ResultSet; import java.sql ...
- android中The connection to adb is down,问题和解决
android中The connection to adb is down,问题和解决 自己总结的在android中常会出现的不好解决的问题和方法(其中第三个方法经过了四天的折磨.....哎) 1 ...
- jdk 自动化脚本
添加没有登录权限 需要理解linux用户,首先登陆的是root用户,拥有所有的权限,但是该权限太大,一般都会分配其他用户使用,并且在部署程序时,需要分配一个没有登录权限的用户,这样改程序不能随意被修改 ...
- 通过管道传输快速将MySQL的数据导入Redis
通过管道传输pipe将MySQL数据批量导入Redis 自Redis 2.6以上版本起,Redis支持快速大批量导入数据,即官网的Redis Mass Insertion,即Pipe传输, ...
- Mybatis缓存(一)
1.什么是缓存 Mybatis提供缓存,用于减轻数据压力,提高数据库性能. 2.Mybatis缓存分类 Mybatis的缓存分为一级缓存和二级缓存. Mybatis的一级缓存 1.一级缓存的范围 1 ...
- Linux中让普通用户拥有超级用户的权限
问题 假设用户名为:ali 如果用户名没有超级用户权限,当输入 sudo + 命令 时, 系统提示: ali is not in the sudoers file. This incident wi ...
- 如何在不接入微信API的情况下自定义分享内容(图片、链接、标题)
方法如下: 1.设置分享title:动态改变document.title值即可: document.title = 'test' 2.设置分享图片:在页面隐藏一张尺寸大于290*290的图(图片需要容 ...
- 【关于eclipse的一些自己常用的插件】
代码自动走查: sonarlnt:
- PHP代码语法验证插件:SublimeLinter
1.调出控制台 Ctrl+Shift+P,输入 install package,Enter