Step by Step: Connecting to Dynamics 365 using a C# Console App
Step by Step: Connecting to Dynamics 365 using a C# Console App
If you’re new to Microsoft Dynamics 365 development you may be wondering how to connect to it via a .Net C# console application or would like to set up a Visual Studio project to get started with the Dynamics 365 SDK.
In this post I’ll take you through setting up the Visual Studio project, adding the Dynamics 365 SDK references, connecting to Dynamics 365 and running a basic query to validate.
Setting up a new Visual Studio 2017 Project with Dynamics 365 SDK References
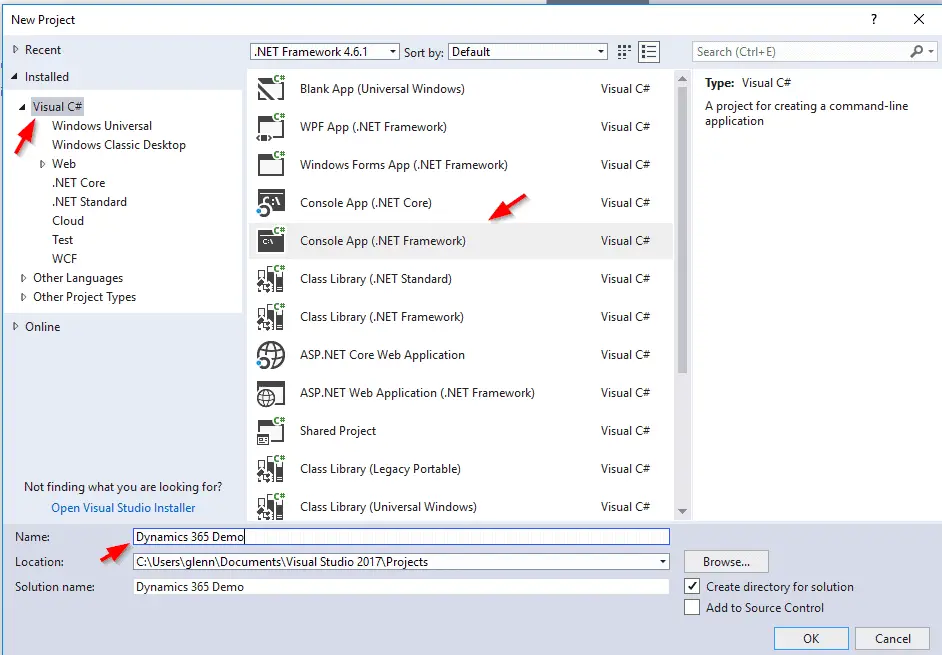
- Open Visual Studio 2017 and select File | New | Project
- Click on Visual C# and select Console App (.Net Framework)
- Enter a project name within the Name field and click Ok
The next step is to add the Dynamics 365 SDK references to the project and this is quite easy now it’s managed via NuGet.
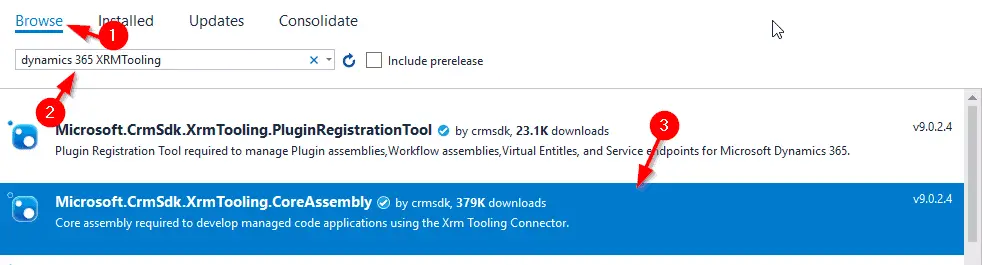
- Select Tools | NuGet Package Manager | Manage NuGet Packages for Solution
- This screen defaults to showing the installed packages, click Browse
- In the Search textbox type: Dynamics 365 XRMTooling and select Microsoft.CrmSdk.XrmTooling.CoreAssembly
- Select the Project in the right-hand side window and click Install
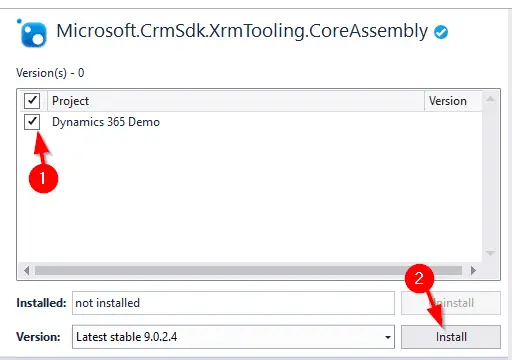
- If prompted by a “Preview Changes” dialog box, click Ok
- Click I Accept when prompted by the License Acceptance dialog
- We need to add one more package, search for Microsoft.CrmSdk.CoreAssemblies under the browse tab and follow the same process to add it to the project too.
Alternatively, this same process can be done from the Nuget command line by:
- Navigate to Tools | Nuget Package Manager | Package Manager Console
- Within the package manager console copy and paste the following command:
|
1
2
|
Install-Package Microsoft.CrmSdk.XrmTooling.CoreAssembly -Version 9.0.2.4
Install-Package Microsoft.CrmSdk.CoreAssemblies -Version 9.0.2.4
|
Note that as of this post, the latest version is 9.0.2.4, to get the latest version check here.
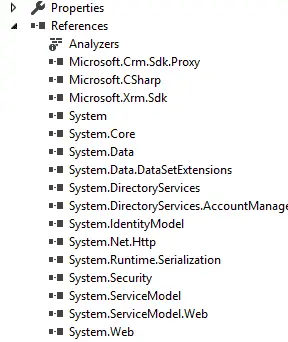
The process above has added all the SDK DLL’s we need within the project References, so there’s no messing around to manually add them.
Now that’s done, we are ready to start coding!
Cutting the Code
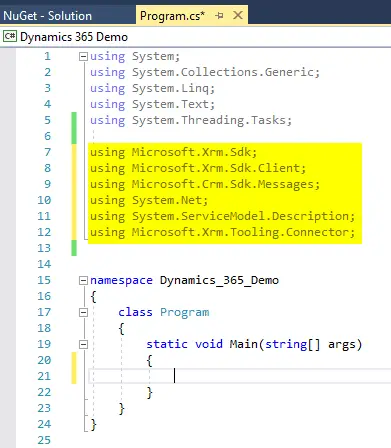
- Add the following namespaces to the top of Program.cs:
|
1
2
3
4
5
6
|
using Microsoft.Xrm.Sdk;
using Microsoft.Xrm.Sdk.Client;
using Microsoft.Crm.Sdk.Messages;
using System.Net;
using System.ServiceModel.Description;
using Microsoft.Xrm.Tooling.Connector;
|
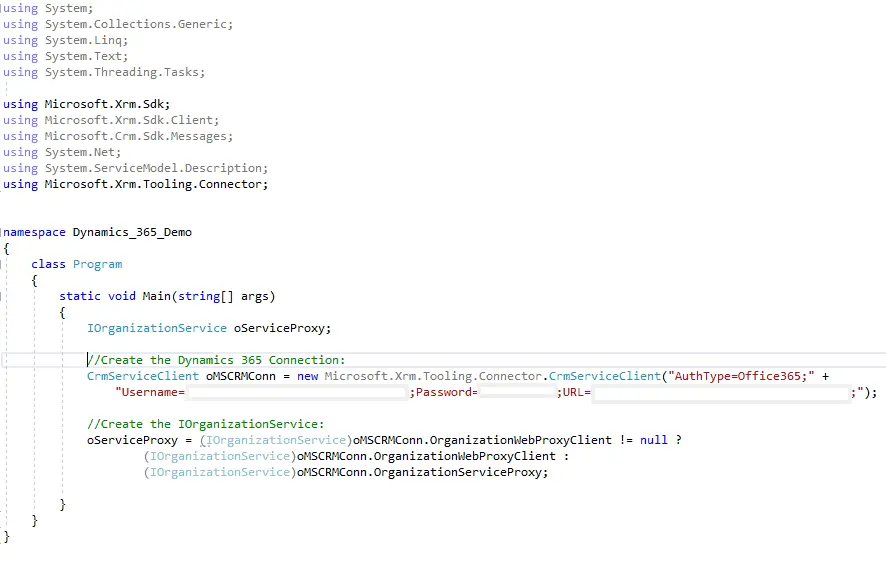
- Next comes the connection code and the aim is to create an IOrganizationService object which connects to Dynamics365 via a client connection and provides pragmatic access to Dynamics 365. Copy and paste the following code into the Main method:
|
1
2
3
4
5
6
7
|
IOrganizationService oServiceProxy;
//Create the Dynamics 365 Connection:
CrmServiceClient oMSCRMConn = new Microsoft.Xrm.Tooling.Connector.CrmServiceClient("AuthType=Office365;Username=<USERNAME>;Password=<PASSWORD>;URL=<URL>;");
//Create the IOrganizationService:
oServiceProxy = (IOrganizationService)oMSCRMConn.OrganizationWebProxyClient != null ? (IOrganizationService)oMSCRMConn.OrganizationWebProxyClient : (IOrganizationService)oMSCRMConn.OrganizationServiceProxy;
|
Within the CrmServiceClient string replace the following variables in your code:
- <USERNAME> = the Dynamics username e.g. someone@DYN365Demo.onmicrosoft.com
- <PASSWORD> = the user password
- <URL> = the Dynamics 365 instance URL. This is this is the same URL that would be used to access it from a web browser (minus the page “/main.aspx#####”) e.g.:
https://DYN365Demo.crm6.dynamics.com
- Add the following code underneath to check the connection by attempting to retrieve the current user ID:
|
1
2
3
4
5
6
7
8
9
10
11
12
13
14
|
if (oServiceProxy != null)
{
//Get the current user ID:
Guid userid = ((WhoAmIResponse)oServiceProxy.Execute(new WhoAmIRequest())).UserId;
if (userid != Guid.Empty)
{
Console.WriteLine("Connection Successful!");
}
}
else
{
Console.WriteLine("Connection failed...");
}
|
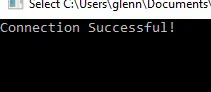
And you’re done. Click the Start button to run the program and if the connection details are correct you should see “Connection Successful!”:
To keep the example above simple I’ve left out proper error handling, but for the sake of completeness I’ve included the full code below with a try / catch and some additional outputs to the console to show where it’s at:
|
1
2
3
4
5
6
7
8
9
10
11
12
13
14
15
16
17
18
19
20
21
22
23
24
25
26
27
28
29
30
31
32
33
34
35
36
37
38
39
40
41
42
43
44
45
46
47
48
49
50
51
52
53
54
55
56
57
58
59
|
using System;
using System.Collections.Generic;
using System.Linq;
using System.Text;
using System.Threading.Tasks;
using Microsoft.Xrm.Sdk;
using Microsoft.Xrm.Sdk.Client;
using Microsoft.Crm.Sdk.Messages;
using System.Net;
using System.ServiceModel.Description;
using Microsoft.Xrm.Tooling.Connector;
namespace Dynamics_365_Demo
{
class Program
{
static void Main(string[] args)
{
IOrganizationService oServiceProxy;
try
{
Console.WriteLine("Setting up Dynamics 365 connection");
//Create the Dynamics 365 Connection:
CrmServiceClient oMSCRMConn = new Microsoft.Xrm.Tooling.Connector.CrmServiceClient("AuthType=Office365;Username=<USERNAME>;Password=<PASSWORD>;URL=<URL>;");
//Create the IOrganizationService:
oServiceProxy = (IOrganizationService)oMSCRMConn.OrganizationWebProxyClient != null ?
(IOrganizationService)oMSCRMConn.OrganizationWebProxyClient :
(IOrganizationService)oMSCRMConn.OrganizationServiceProxy;
Console.WriteLine("Validating Connection");
if (oServiceProxy != null)
{
//Get the current user ID:
Guid userid = ((WhoAmIResponse)oServiceProxy.Execute(new WhoAmIRequest())).UserId;
if (userid != Guid.Empty)
{
Console.WriteLine("Connection Successful!");
}
}
else
{
Console.WriteLine("Connection failed...");
}
}
catch (Exception ex)
{
Console.WriteLine("Error - " + ex.ToString());
}
Console.ReadKey();
}
}
}
|
Feel free to leave any questions in the comments section below.
Step by Step: Connecting to Dynamics 365 using a C# Console App的更多相关文章
- Dynamics 365 Online-使用Azure Logic App 与 Dynamics 365 集成
什么是Logic App? Azure Logic App 是微软发布的集成平台的产品,有助于生成,计划和自动完成工作流形式的流程,适合跨企业或组织集成,数据,系统和服务.与此同时,Logic App ...
- Step by step Dynamics CRM 2011升级到Dynamics CRM 2013
原创地址:http://www.cnblogs.com/jfzhu/p/4018153.html 转载请注明出处 (一)检查Customizations 从2011升级到2013有一些legacy f ...
- Step by Step 创建一个新的Dynamics CRM Organization
原创地址:http://www.cnblogs.com/jfzhu/p/4012833.html 转载请注明出处 前面演示过如何安装Dynamics CRM 2013,参见<Step by st ...
- Step by step Dynamics CRM 2013安装
原创地址:http://www.cnblogs.com/jfzhu/p/4008391.html 转载请注明出处 SQL Server可以与CRM装在同一台计算机上,也可安装在不同的计算机上.演示 ...
- Step by Step 开发dynamics CRM
这里是作为开发贴的总结. 现在plugin和workflow系列已经终结. 希望这些教程能给想入坑的小伙伴一些帮忙. CRM中文教材不多, 我会不断努力为大家提供更优质的教程. Plugin 开发系列 ...
- Monthly update for Dynamics 365 for Operation
日期 标题, 类别 版本 描述 2017/8/22 Dyn 365 Fin and Ops, Ent ed July 2017 Plat Update 10 Category: Download ...
- Dynamics 365中自定义工作流活动获取的上下文分析及注意事项
关注本人微信和易信公众号: 微软动态CRM专家罗勇 ,回复244或者20170306可方便获取本文,同时可以在第一间得到我发布的最新的博文信息,follow me!我的网站是 www.luoyong. ...
- Dynamics 365 Online-Microsoft Flow
自December 2016 update for Dynamics 365 (online)之后的Online版本,Dynamics 365有了个新Feature:Microsoft Flow Co ...
- Dynamics 365—脚本
Xrm.Page.getAttribute() 转控件:controls.get(0) 取赋值:getValue(),setValue() 是否改动:getIsDirty() 表单载入时的值:getI ...
- Dynamics 365 Online-Virtual Entities
转载来源https://blogs.technet.microsoft.com/lystavlen/2017/09/08/virtual-entities/,使用当前Dynamics 365环境,亲测 ...
随机推荐
- msyql查询各部门性别人数,如果某个部门没有男生或女生则用0代替
根据部门或者班级查询男女各多少人,可以直接使用: select org_code as orgCode, sex, count(*) as totalCount from blade_student ...
- RestTemplate 连接池最大链接数
原文链接:https://www.cnblogs.com/x-x-736880382/p/11591906.html 以前我们项目都是基于Apache HttpClient 连接池进行web 接口调用 ...
- JMeter压测基础(二)——Mysql数据库
JMeter压测基础(二)Mysql数据库 环境准备 mysql驱动 JMeter jdbc配置 JMeter jdbc请求 1.下载mysql驱动:mysql-connector-java.jar ...
- spring cloud 配置文件加密解密
1.底包 <dependency> <groupId>org.springframework.security</groupId> <artifact ...
- 肖sir__ 代码题 ___华为od练习
www.online1987.com 这个网站,有概率看到机考原题,后续内招,这个网站做到了原题
- vue监听video标签播放暂停,中间按钮替换 controls控制台
先搞个原生的video标签进来 <video ref="movie" class="video" src="static/movie.mp4&q ...
- 移动端及pc端适配
1.rem搭配CSS预处理器使用 这里我就用vue+less来简单操作一下,具体可以封装到底层,这里暂且演示一下原理. 这里推荐一下使用我的自制脚手架 (songyao-cli) 来快速生成一个vue ...
- 3Com-OfficeConnect-Wireless-11宽带路由器默认口令
网络空间资产搜索: app="3Com-OfficeConnect-Wireless-11g-Cable/DSL-Router" 找到环境 账户密码 admin/a***n End ...
- spring-security-oauth2-authorization-server
旧依赖的移除 长久以来,使用Spring Security整合oauth2,都是使用Spring Security Oauth2这个系列的包: <dependency> <group ...
- 4、word—截图的试卷背景为黑色,如何去掉呢?
1.[图片格式]->[校正]->[锐化50%] 2.[图片格式]->[校正]->[亮度/对比度]选择一个适合自己的