
centos6.6编译安装lnmp系列之PHP
简介:
环境:虚拟机+centos6.6
在百度云盘里面我分享的安装软件包,包含LNMP系列软件。
http://pan.baidu.com/s/1gdvnimv
1、安装前配置:
关闭selinux(原因我不知道,反正我在安装很多软件时候都做这个设置)
Vi /etc/selinux/config
把默认的都‘#’注销了,然后添加一条SELINUX=disabled
我把 下载好的软件包存放在 /usr/local目录下,所以读者如果在参考文档时候和自己的存放目录不一致时候请按自己的存放目录进行修改
运行yum库:
yum install -y apr* autoconf automake bison bzip2 bzip2* cloog-ppl compat* cpp curl curl-devel fontconfig fontconfig-devel freetype freetype* freetype-devel gcc gcc-c++ gtk+-devel gd gettext gettext-devel glibc kernel kernel-headers keyutils keyutils-libs-devel krb5-devel libcom_err-devel libpng libpng* libpng-devel libjpeg* libsepol-devel libselinux-devel libstdc++-devel libtool* libgomp libxml2 libxml2-devel libXpm* libX* libtiff libtiff* make mpfr ncurses* ntp openssl nasm nasm* openssl-devel patch pcre-devel perl php-common php-gd policycoreutils ppl telnet t1lib t1lib* wget zlib-devel
安装部分:
1、安装yasm
cd /usr/local/src
tar zxvf yasm-1.3.0.tar.gz
cd yasm-1.3.0
./configure
make
make install
2、安装libmcrypt
cd /usr/local/src
tar zxvf libmcrypt-2.5.8.tar.gz
cd libmcrypt-2.5.8
./configure
make
make install
3、安装libvpx
cd /usr/local/src
tar xvf libvpx-v1.3.0.tar.bz2
cd libvpx-v1.3.0
./configure --prefix=/usr/local/libvpx-v1.1.0 --enable-shared --enable-vp9
make
make install
4、安装tiff
cd /usr/local/src
tar zxvf tiff-4.0.3.tar.gz
cd tiff-4.0.3
./configure --prefix=/usr/local/tiff-4.0.3--enable-shared
make
make install
5、安装libpng
cd /usr/local/src
tar xvf libpng-1.5.6tar.gz
cd libpng-1.5.6
./configure --prefix=/usr/local/libpng-1.5.6 --enable-shared
make
make install
6、安装freetype
cd /usr/local/src
tar zxvf freetype-2.5.4.tar.gz
cd freetype-2.5.4
./configure --prefix=/usr/local/freetype-2.5.4 --enable-shared
make #编译
make install #安装
7、安装jpeg
cd /usr/local/src
tar zxvf jpegsrc.v9a.tar.gz
cd jpeg-9a
./configure --prefix=/usr/local/jpeg-9a --enable-shared
make #编译
make install #安装
8、安装libgd
cd /usr/local/src
tar zxvf libgd-2.1.1.tar.gz #解压
cd libgd-2.1.1 #进入目录
./configure --prefix=/usr/local/libgd-2.1.1 --enable-shared --with-jpeg=/usr/local/jpeg-9a --with-png=/usr/local/libpng-1.5.6 --with-freetype=/usr/local/freetype-2.5.4 --with-fontconfig=/usr/local/freetype-2.5.4--with-xpm=/usr/ --with-tiff=/usr/local/tiff-4.0.3 --with-vpx=/usr/local/libvpx-v1.1.0 #配置
make #编译
make install #安装
9、安装t1lib
cd /usr/local/src
tar zxvf t1lib-5.1.2.tar.gz
cd t1lib-5.1.2
./configure --prefix=/usr/local/t1lib-5.1.2 --enable-shared
make without_doc
make install
10、安装php
注意:如果系统是64位,请执行以下两条命令,否则安装php会出错(32位系统不需要执行)
\cp -frp /usr/lib64/libltdl.so* /usr/lib/
\cp -frp /usr/lib64/libXpm.so* /usr/lib/
cd /usr/local/src
tar -zvxf php-5.6.3.tar.gz
cd php-5.6.3
export LD_LIBRARY_PATH=/usr/local/libgd-2.1.1/lib
./configure --prefix=/usr/local/php-5.6.3--with-config-file-path=/usr/local/php-5.6.3/etc --with-mysql=/usr/local/mysql --with-mysqli=/usr/local/mysql/bin/mysql_config --with-mysql-sock=/tmp/mysql.sock --with-pdo-mysql=/usr/local/mysql --with-gd --with-png-dir=/usr/local/libpng-1.5.6--with-jpeg-dir=/usr/local/jpeg-9a --with-freetype-dir=/usr/local/freetype-2.5.4 --with-xpm-dir=/usr/ --with-vpx-dir=/usr/local/libvpx-v1.1.0/ --with-zlib-dir=/usr/local/zlib-1.2.8 --with-t1lib=/usr/local/t1lib-5.1.2 --with-iconv --enable-libxml --enable-xml --enable-bcmath --enable-shmop --enable-sysvsem --enable-inline-optimization --enable-opcache --enable-mbregex --enable-fpm --enable-mbstring --enable-ftp --enable-gd-native-ttf --with-openssl --enable-pcntl --enable-sockets --with-xmlrpc --enable-zip --enable-soap --without-pear --with-gettext --enable-session --with-mcrypt --with-curl --enable-ctype #配置
make #编译
make install #安装
cp php.ini-production /etc/php.ini #复制php配置文件到安装目录
rm -rf /etc/php.ini #删除系统自带配置文件
ln -s /usr/local/php-5.6.3 /etc/php.ini /etc/php.ini #添加软链接到 /etc目录
cp /usr/local/php-5.6.3/sapi/fpm /usr/local/php-5.6.3/etc/php-fpm.conf #拷贝模板文件为php-fpm配置文件
ln -s /usr/local/php-5.6.3 /etc/php-fpm.conf /etc/php-fpm.conf #添加软连接到 /etc目录
vi /usr/local/php-5.6.3/etc/php-fpm.conf #编辑
user = www #设置php-fpm运行账号为www
group = www #设置php-fpm运行组为www
pid = run/php-fpm.pid #取消前面的分号
:wq! #保存退出
设置 php-fpm开机启动
cp /usr/local/php-5.6.3/sapi/fpm/init.d.php-fpm /etc/rc.d/init.d/php-fpm #拷贝php-fpm到启动目录
chmod +x /etc/rc.d/init.d/php-fpm #添加执行权限
chkconfig php-fpm on #设置开机启动
vi /usr/local/php/etc/php.ini #编辑配置文件
找到:;date.timezone =
修改为:date.timezone = PRC #设置时区
找到:short_open_tag = Off
修改为:short_open_tag = ON #支持php短标签
找到opcache.enable=0
修改为opcache.enable=1 #php支持opcode缓存
找到:;opcache.enable_cli=1 #php支持opcode缓存
修改为:opcache.enable_cli=0
在最后一行添加:zend_extension=opcache.so #开启opcode缓存功能
:wq! #保存退出
*************配置Nginx支持PHP**************
vi /usr/local/nginx/conf/nginx.conf #配置修改
user www www; #首行user去掉注释,修改Nginx运行组为www www;必须与/usr/local/php/etc/php-fpm.conf中的user,group配置相同,否则php运行出错
index index.html index.htm index.php; #添加index.php
# pass the PHP scripts to FastCGI server listening on 127.0.0.1:9000
#
location ~ \.php$ {
root html;
fastcgi_pass 127.0.0.1:9000;
fastcgi_index index.php;
fastcgi_param SCRIPT_FILENAME $document_root$fastcgi_script_name;
include fastcgi_params;
}
#取消FastCGI server部分location的注释,注意fastcgi_param行的参数,改为$document_root$fastcgi_script_name,或者使用绝对路径
/etc/init.d/nginx restart #重启nginx
service php-fpm start #启动php-fpm
cd /usr/local/nginx/html/ #进入nginx默认网站根目录
rm -rf /usr/local/nginx/html/* #删除默认测试页
vi index.php #新建index.php文件
<?php
phpinfo();
?>
:wq! #保存退出
chown www.www /usr/local/nginx/html/ -R #设置目录所有者
chmod 700 /usr/local/nginx/html/ -R #设置目录权限
*****如果显示授权失败的提示,直接进入绝对目录里面赋予777权限*****
测试:
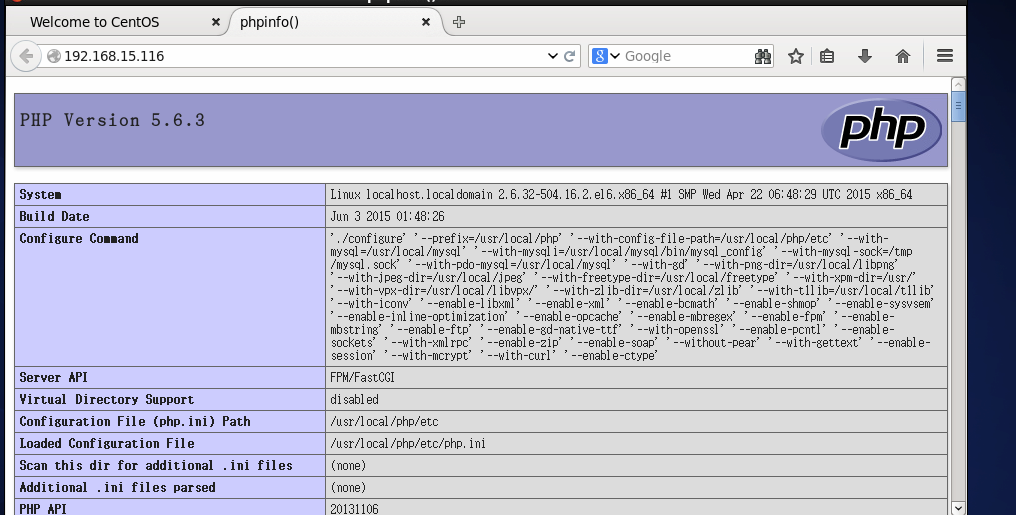
本文参考系统运维改版
centos6.6编译安装lnmp系列之PHP的更多相关文章
- centos6.6编译安装lnmp系列之mysql
简介: 环境:虚拟机+centos6.6 Mysql版本:5.6.21 Mysql下载地址:http://cdn.mysql.com/archives/mysql-5.6/mysql-5.6.21.t ...
- centos6.6编译安装lnmp系列之nginx
简介: 环境:虚拟机+centos6.6 Cmake下载地址:http://www.cmake.org/files/v3.0/cmake-3.0.2.tar.gz Nginx 下载地址: http:/ ...
- centos6.8 编译安装lnmp php7.2 mysql5.6 nginx1.1.4
编译操作参考版,没有每一步详细操作,慎入 关闭selinux和防火墙 service iptables stop chkconfig iptables off vi /etc/selinux/conf ...
- CentOS6.8 编译安装LNMP
思路:根据Linux系统以及公司网站系统的信息,选择合适的安装包进行安装 一.查看系统信息 # uname -a # 查看内核/操作系统/CPU信息 # /etc/issue # 查看操作系统版本 # ...
- CentOS6.5 编译安装lnmp环境
参考:http://54im.com/tag/libmcrypt http://www.educity.cn/linux/1240338.html 设置防火墙,并开启3306 80端口:vi /etc ...
- 阿里云centos6.5实践编译安装LNMP架构web环境
LNMP 代表的就是:Linux系统下Nginx+MySQL+PHP这种网站服务器架构. 本次测试需求: **实践centos6.5编译安装 LNMP生产环境 架构 web生产环境 使用 ngx_pa ...
- CentOS6.3编译安装Nginx1.4.7 + MySQL5.5.25a + PHP5.3.28
[准备工作] #在编译安装lnmp之前,首先先卸载已存在的rpm包. rpm -e httpd rpm -e mysql rpm -e php yum -y remove httpd yum -y r ...
- centos下编译安装lnmp
centos下编译安装lnmp 本文以centos为背景在其中编译安装nginx搭建lnmp环境. 编译安装nginx时,需要事先安装 开发包组"Development Tools" ...
- CentOS6.3编译安装Memcached
要用到如下源码包: /usr/local/src/memcached/libevent-2.0.21-stable.tar.gz /usr/local/src/memcached/memcached- ...
随机推荐
- FileIOUtils.java
package com.vcredit.ddcash.batch.util; import com.vcredit.ddcash.batch.autoAdvance.AutoAdvanceTask;i ...
- Bootstrap 固定定位(Affix)
来自:慕课网 http://www.imooc.com/code/5396 Affix 效果常见的有以下三种: ☑ 顶部固定 ☑ 侧边栏固定 ☑ 底部固定 固定定位--声明式触发固定定位 Affix ...
- 【iCore3 双核心板_FPGA】实验十四:FSMC总线通信实验——独立地址模式
实验指导书及代码包下载: http://pan.baidu.com/s/1kVJBxJ5 iCore3 购买链接: https://item.taobao.com/item.htm?id=524229 ...
- Codevs 1022 覆盖
时间限制: 1 s 空间限制: 128000 KB 题目等级 : 大师 Master 题目描述 Description 有一个N×M的单位方格中,其中有些方格是水塘,其他方格是陆地.如果要用1×2的矩 ...
- Maven-008-Nexus 私服部署发布报错 Failed to deploy artifacts: Failed to transfer file: ... Return code is: 4XX, ReasonPhrase: ... 解决方案
我在部署构件至 maven nexus 私服时,有时会出现 Failed to deploy artifacts: Failed to transfer file: ... Return code i ...
- C# mvc中为Controller或Action添加定制特性实现登录验证
在本文开始前,先简单讲两个知识点: 1.每个action执行前都会先执行OnActionExecuting方法: 2.FCL提供了多种方式来检测特性的存在,比如IsDefined.GetCustomA ...
- ASP.NET 5
docs.asp.net installing on windows Choosing the Right .NET For You on the Server DotNetCore: DotNetC ...
- RDIFramework.NET 中多表关联查询分页实例
RDIFramework.NET 中多表关联查询分页实例 RDIFramework.NET,基于.NET的快速信息化系统开发.整合框架,给用户和开发者最佳的.Net框架部署方案.该框架以SOA范式作为 ...
- MVC EF 执行SQL语句
最近悟出来一个道理,在这儿分享给大家:学历代表你的过去,能力代表你的现在,学习代表你的将来. 十年河东十年河西,莫欺少年穷 学无止境,精益求精 闲着没事,看了一篇关于LINQ和SQL对比的文章,网友们 ...
- navicat------------利用navicat查看两个数据库之间的差异