
flask中自定义日志类
一:项目架构
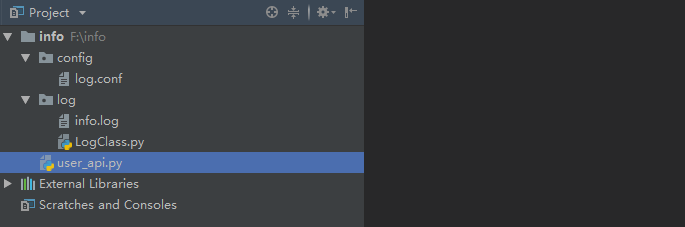
二:自定义日志类
1. 建立log.conf的配置文件
log.conf
[log]

LOG_PATH = /log/

LOG_NAME = info.log
2. 定义日志类
LogClass.py
import logging

from logging import handlers

class Mylogger(object):

    def __init__(self,log_path,log_name):

        # 1.指明日志记录到哪个文件 "F:/xxx/xx" + "info.log"

        logfile = log_path + log_name

        # 2.配置日志操作器

        handler = handlers.RotatingFileHandler(logfile, maxBytes=1024 * 1024, backupCount=5, encoding='utf-8')

        # 3.设置日志格式

        fmt = "%(levelname)s-%(asctime)s-%(module)s-%(lineno)d-%(message)s"

        # 4. 配置格式实例

        formatter = logging.Formatter(fmt)

        # 5.操作器加载格式实例

        handler.setFormatter(formatter)

        # 6.创建logger实例

        self.logger = logging.getLogger()

        # 7.给实例增加日志操作器

        self.logger.addHandler(handler)

        # 8.给实例增加日志输出登记

        self.logger.setLevel(logging.DEBUG)

  # 设置方法返回looger实例

    def get_logger(self):

        return self.logger
三:视图中使用logger日志
user_api.py
from flask import Flask,request,jsonify

from flask_cors import CORS

from log.LogClass import Mylogger

import os

import configparser

app = Flask(__name__)

CORS(app,supports_credentials=True)

# 1.获取根目录

root_path = os.path.split(os.path.realpath(__file__))[0]

# 2. 设置日志解析实例

cf = configparser.ConfigParser()

# 3.读取日志文件

cf.read(root_path+"/config/log.conf")

# 4. 创建自定义日志类的实例对象

logger = Mylogger(root_path + cf.get("log","LOG_PATH"),cf.get("log","LOG_NAME")).get_logger()

@app.route("/index",methods=["POST","GET"])

def demo():

    try:

        print(1/0)

    except Exception as e:

        logger.error(e)

if __name__ == '__main__':

    app.run(debug=True)
运行程序后 访问 127.0.0.1:5000/index,在log文件夹里面增加了info.log文件
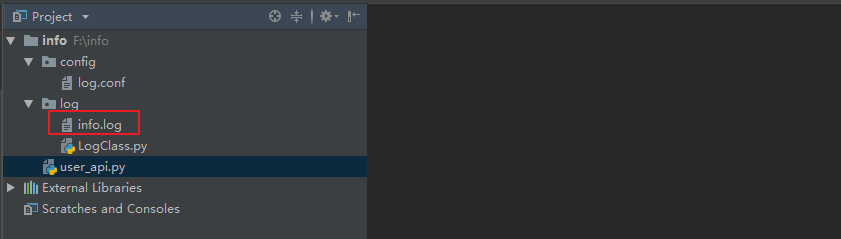
查看info.log
INFO-2019-12-10 14:36:22,124-_internal-122- * Restarting with stat

WARNING-2019-12-10 14:36:22,590-_internal-122- * Debugger is active!

INFO-2019-12-10 14:36:22,594-_internal-122- * Debugger PIN: 259-203-506

INFO-2019-12-10 14:36:22,602-_internal-122- * Running on http://127.0.0.1:5000/ (Press CTRL+C to quit)

ERROR-2019-12-10 14:36:25,475-user_api-23-division by zero

INFO-2019-12-10 14:36:25,480-_internal-122-127.0.0.1 - - [10/Dec/2019 14:36:25] "GET /index HTTP/1.1" 500 -

INFO-2019-12-10 14:36:25,497-_internal-122-127.0.0.1 - - [10/Dec/2019 14:36:25] "GET /index?__debugger__=yes&cmd=resource&f=style.css HTTP/1.1" 200 -

INFO-2019-12-10 14:36:25,498-_internal-122-127.0.0.1 - - [10/Dec/2019 14:36:25] "GET /index?__debugger__=yes&cmd=resource&f=debugger.js HTTP/1.1" 200 -

INFO-2019-12-10 14:36:25,498-_internal-122-127.0.0.1 - - [10/Dec/2019 14:36:25] "GET /index?__debugger__=yes&cmd=resource&f=jquery.js HTTP/1.1" 200 -

INFO-2019-12-10 14:36:25,537-_internal-122-127.0.0.1 - - [10/Dec/2019 14:36:25] "GET /index?__debugger__=yes&cmd=resource&f=ubuntu.ttf HTTP/1.1" 200 -

INFO-2019-12-10 14:36:25,581-_internal-122-127.0.0.1 - - [10/Dec/2019 14:36:25] "GET /index?__debugger__=yes&cmd=resource&f=console.png HTTP/1.1" 200 -

INFO-2019-12-10 14:36:25,626-_internal-122-127.0.0.1 - - [10/Dec/2019 14:36:25] "GET /index?__debugger__=yes&cmd=resource&f=console.png HTTP/1.1" 200 -
将LogClass.py中 self.logger.setLevel(logging.DEBUG) 改为 self.logger.setLevel(logging.ERROR),然后运行程序,查看info.log
INFO-2019-12-10 14:40:12,643-_internal-122- * Detected change in 'F:\\info\\log\\LogClass.py', reloading

INFO-2019-12-10 14:40:12,673-_internal-122- * Restarting with stat

WARNING-2019-12-10 14:40:13,135-_internal-122- * Debugger is active!

INFO-2019-12-10 14:40:13,139-_internal-122- * Debugger PIN: 259-203-506

INFO-2019-12-10 14:40:13,147-_internal-122- * Running on http://127.0.0.1:5000/ (Press CTRL+C to quit)

ERROR-2019-12-10 14:40:17,367-user_api-23-division by zero

INFO-2019-12-10 14:40:17,372-_internal-122-127.0.0.1 - - [10/Dec/2019 14:40:17] "GET /index HTTP/1.1" 500 -

INFO-2019-12-10 14:40:17,388-_internal-122-127.0.0.1 - - [10/Dec/2019 14:40:17] "GET /index?__debugger__=yes&cmd=resource&f=style.css HTTP/1.1" 200 -

INFO-2019-12-10 14:40:17,389-_internal-122-127.0.0.1 - - [10/Dec/2019 14:40:17] "GET /index?__debugger__=yes&cmd=resource&f=jquery.js HTTP/1.1" 200 -

INFO-2019-12-10 14:40:17,389-_internal-122-127.0.0.1 - - [10/Dec/2019 14:40:17] "GET /index?__debugger__=yes&cmd=resource&f=debugger.js HTTP/1.1" 200 -

INFO-2019-12-10 14:40:17,427-_internal-122-127.0.0.1 - - [10/Dec/2019 14:40:17] "GET /index?__debugger__=yes&cmd=resource&f=ubuntu.ttf HTTP/1.1" 200 -

INFO-2019-12-10 14:40:17,466-_internal-122-127.0.0.1 - - [10/Dec/2019 14:40:17] "GET /index?__debugger__=yes&cmd=resource&f=console.png HTTP/1.1" 200 -

INFO-2019-12-10 14:40:17,511-_internal-122-127.0.0.1 - - [10/Dec/2019 14:40:17] "GET /index?__debugger__=yes&cmd=resource&f=console.png HTTP/1.1" 200 -
# 具体原因 TODO
flask中自定义日志类的更多相关文章
- Python3自定义日志类教程
一.说明 Python3的logging功能是比较丰富的支持不同层次的日志输出,但或是我们想在日志前输出时间.或是我们想要将日志输入到文件,我们还是想要自定义日志类. 之前自己也尝试写过但感觉文档太乱 ...
- Flask之自定义模型类
4.3自定义模型类 定义模型 模型表示程序使用的数据实体,在Flask-SQLAlchemy中,模型一般是Python类,继承自db.Model,db是SQLAlchemy类的实例,代表程序使用的数据 ...
- 关于MapReduce中自定义分区类(四)
MapTask类 在MapTask类中找到run函数 if(useNewApi){ runNewMapper(job, splitMetaInfo, umbilical, reporter ...
- 关于MapReduce中自定义分组类(三)
Job类 /** * Define the comparator that controls which keys are grouped together * for a single ...
- python3.4中自定义数组类(即重写数组类)
'''自定义数组类,实现数组中数字之间的四则运算,内积运算,大小比较,数组元素访问修改及成员测试等功能''' class MyArray: '''保证输入值为数字元素(整型,浮点型,复数)''' de ...
- shell脚本中自定义日志记录到文件
自定义日志函数和前期变量 # adirname - return absolute dirname of given file adirname() { odir=`pwd`; cd `dirname ...
- 如何自定义Flask中的响应类
http://codingpy.com/article/customizing-the-flask-response-class/
- Python3自定义日志类 mylog
#encoding=utf-8 import os, sysimport datetimeimport time class Mylog(object): # 根文件夹 root_dir = s ...
- 关于MapReduce中自定义Combine类(一)
MRJobConfig public static fina COMBINE_CLASS_ATTR 属性COMBINE_CLASS_ATTR = "mapreduce.j ...
随机推荐
- jpa多表leftjoin 查询,自定义返回结果
sql代码 自定义返回结果 package com.cdp.ecosaas.coredb.uua.sync.vo; import java.io.Serializable; public class ...
- yum安装Apache2.4
一.系统环境 系统版本为centos6.5最小化安装 # cat /etc/centos-release CentOS release 6.5 (Final) 查看系统自带yum库Apache版本 # ...
- Hibernate一级缓冲
Hibernate的一级缓冲 什么是缓冲 缓冲概念: 数据存在数据库中,数据库本身就是一个文件系统,使用流的方式操作文件,但是文件中有很多的内容,用流的操作得效率就低. 解决办法: 把数据存在内存中, ...
- bzoj3929 Discrete Logging 大步小步算法
#include<cstdio> #include<algorithm> #include<cmath> #include<map> using nam ...
- 爬虫三之beautifulsoup
基本使用 from bs4 import BeautifulSoup soup = BeautifulSoup(html#,'lxml','xml','html5lib') soup.prettify ...
- note.js使用express创建项目的步骤以及ip和端口配置
1.安装express npm install -g express 2.创建项目 express -e 项目名称 3.打开cmd进入项目目录安装依赖 npm install 4.打开配置文件./bi ...
- netcore 使用redis session 分布式共享
首先准备redis服务器(docker 和redis3.0内置的哨兵进行高可用设置) 网站配置Redis作为存储session的介质(配置文件这些略).然后可以了解一下MachineKey这个东西.( ...
- 安装mysql5.6-centOs7
安装mysql mysql,下载地址:https://dev.mysql.com/downloads/mysql/ 安装参考链接:https://segmentfault.com/a/11900000 ...
- urllib库认证,代理,cookie
认证,代理,cookie 1from urllib.request import HTTPBasicAuthHandler, HTTPPasswordMgrWithDefaultRealm, buil ...
- 《剑指offer》面试题27 二叉搜索树与双向链表 Java版
(将BST改成排序的双向链表.) 我的方法一:根据BST的性质,如果我们中序遍历BST,将会得到一个从小到大排序的序列.如果我们将包含这些数字的节点连接起来,就形成了一个链表,形成双向链表也很简单.关 ...