Kvm--03 kvm克隆,桥接网络,热添加
1.Kvm克隆
1). 完整克隆
[root@gjy /opt]# virsh shutdown centos7        #只有关机状态才能克隆

Domain centos7 is being shutdown

[root@gjy /opt]# virsh list --all

Id Name State

----------------------------------------------------

- centos6 shut off

- centos7 shut off

--auto-clone     #从原始客户机配置中自动生成克隆名称和存储路径。

-o                #原始客户机名称;必须为关闭或者暂停状态。

[root@gjy /opt]# virt-clone --auto-clone -o centos7 -n centos7-v1

Allocating 'centos72-clone.qcow2' | 10 GB 00:01:01

Clone 'centos7-v1' created successfully.

[root@gjy /opt]# virsh list --all

Id Name State

----------------------------------------------------

- centos6 shut off

- centos7 shut off

- centos7-v1 shut off        #克隆主机名称

[root@gjy /opt]# ll

total 11851148

-rw-r--r-- 1 qemu qemu 3916431360 2019-07-22 22:03 CentOS-6.8-x86_64-bin-DVD1.iso

-rw------- 1 root root 1468268544 2019-08-30 21:07 centos7-clone.qcow2     #克隆机的镜像文件

-rw-r--r-- 1 root root 1752956928 2019-08-30 21:05 centos7.qcow2

-rw-r--r-- 1 root root 11534336 2019-08-30 21:05 centos7-add01.qcow2

-rw-r--r-- 1 qemu qemu 4588568576 2019-07-22 17:58 CentOS-7-x86_64-DVD-1810.iso

[root@gjy /opt]# ll /etc/libvirt/qemu/

total 20

drwxr-xr-x 2 root root 6 2019-07-23 10:28 autostart

-rw------- 1 root root 3906 2019-07-22 22:11 centos6.xml

-rw------- 1 root root 4377 2019-08-30 21:06 centos7-v1.xml        #克隆机的配置文件

-rw------- 1 root root 4365 2019-07-23 16:23 centos7.xml

drwx------ 3 root root 42 2019-07-22 17:03 networks
2). 链接克隆
Kvm手动克隆虚拟机:
1:创建基于链接克隆的虚拟磁盘文件
1:创建基于链接克隆的虚拟磁盘文件

    qemu-img create -f qcow2 -b old_disk new_disk

2:备份centos7的虚拟机配置文件,另存为centos7-v2

3:修改centos7-v2的虚拟机配置文件

    a:<name>centos7-v2</name>

    b:删除uuid

    c:删除mac address

    d:修改虚拟机磁盘路径

4:导入centos7-v2

5:检查是否正常启动

6:编写自动化脚本
自动化脚本
[root@kvm01 opt]# vim link_clone.sh

#!/bin/bash

Old_name=$1

New_name=$2

#1.关闭宿主机

virsh  shutdown  $Old_name &>/dev/null

sleep 3

#2.导出宿主机配置信息

virsh  dumpxml	$Old_name > /opt/${New_name}.xml

#3.创建基于宿主机的磁盘文件

qemu-img create  -f  qcow2 -b /opt/${Old_name}.qcow2   /opt/${New_name}.qcow2 &>/dev/null

#4.编辑配置文件

sed  -i   "s#$Old_name#$New_name#g"   /opt/${New_name}.xml

sed  -i  '/uuid/d'  /opt/${New_name}.xml

sed  -i  '/mac address/d'  /opt/${New_name}.xml

#5.导入配置

virsh  define  /opt/${New_name}.xml  &>/dev/null

#6.启动测试

virsh  start  $New_name  &>/dev/null

#7.console登录

virsh  console $New_name
链接克隆方法二:
步骤:

#1.创建磁盘文件

[root@gjy /opt]# qemu-img create -f qcow2 -b centos7.qcow2 centos07.qcow2

#2.从磁盘启动创建

[root@gjy /opt]# virt-install --virt-type kvm --os-type=linux --os-variant rhel7 --name centos07 --memory 1024 --vcpus 1 --disk /opt/centos07.qcow2 --boot hd --network network=default --graphics vnc,listen=0.0.0.0 --noautoconsole
2.kvm虚拟机的桥接网络
创建一个桥接网络,执行命令
[root@gjy ~]# virsh iface-bridge eth0 br0

Created bridge br0 with attached device eth0

Bridge interface br0 started

[root@gjy ~]# cat /etc/sysconfig/network-scripts/ifcfg-br0

DEVICE="br0"

ONBOOT="yes"

TYPE="Bridge"

BOOTPROTO="none"

IPADDR="10.0.0.100"

NETMASK="255.255.255.0"

GATEWAY="10.0.0.254"

IPV6INIT="yes"

IPV6_AUTOCONF="yes"

DHCPV6C="no"

STP="on"

DELAY="0"

[root@gjy ~]# cat /etc/sysconfig/network-scripts/ifcfg-eth0

DEVICE=eth0

ONBOOT=yes

BRIDGE="br0"

#查看DNS

[root@kvm01 opt]# cat /etc/resolv.conf

# Generated by NetworkManager

nameserver 223.5.5.5

nameserver 223.6.6.6

#查看桥接网络信息

[root@gjy ~]# brctl show

bridge name    bridge id        STP enabled    interfaces

br0        8000.000c2990428b    yes        eth0

virbr0        8000.5254007cc337    yes        virbr0-nic
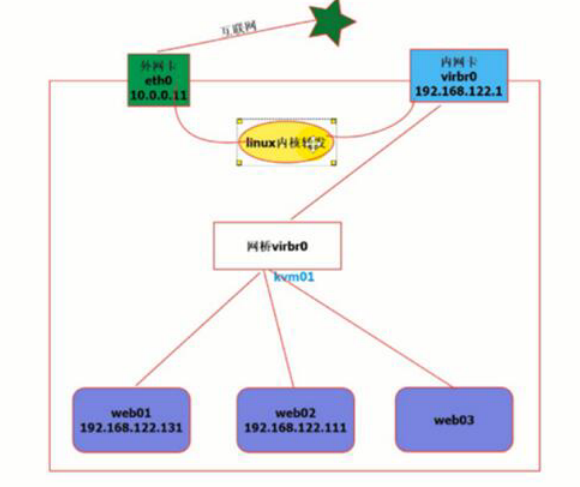
NAT模式
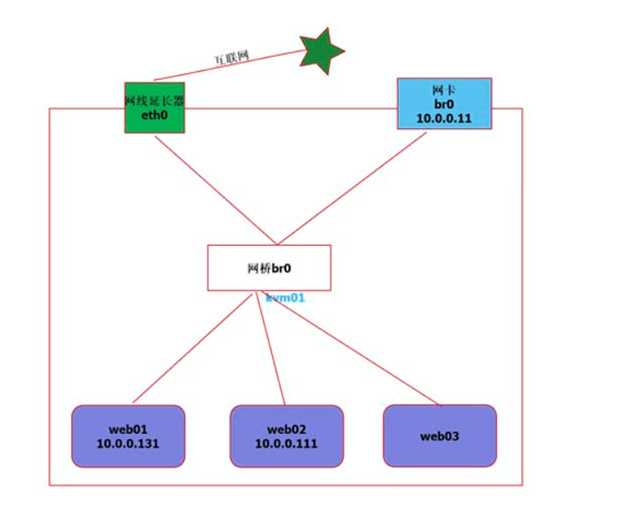
桥接模式上网原理
#关闭主机centos7

[root@gjy ~]# virsh shutdown centos7

Domain centos7 is being shutdown

[root@gjy ~]# virsh list --all

Id Name State

----------------------------------------------------

- centos6 shut off

- centos7 shut off

- centos7-v1 shut off

#修改配置文件

[root@gjy ~]# virsh edit centos7

74 <interface type='bridge'>        #类型修改为bridge

75 <mac address='52:54:00:59:9d:20'/>

76 <source bridge='br0'/>        #类型和名称

77 <model type='virtio'/>

78 <address type='pci' domain='0x0000' bus='0x00' slot='0x03' function='0x0'/>

79 </interface>

#启动主机

[root@gjy ~]# virsh start centos7

Domain centos7 started

[root@gjy ~]# virsh list --all

Id Name State

----------------------------------------------------

2 centos7 running

- centos6 shut off

- centos7-v1 shut off

#连接修改网卡信息

[root@gjy ~]# virsh console centos7

[root@centos7 ~]# cat /etc/sysconfig/network-scripts/ifcfg-eth0

TYPE="Ethernet"

BOOTPROTO="none"

NAME="eth0"

DEVICE="eth0"

ONBOOT="yes"

IPADDR="10.0.0.101"

NETMASK="255.255.255.0"

GATEWAY="10.0.0.254"

DNS1="223.5.5.5"

#重启网络

[root@centos7 ~]# systemctl restart network

[root@centos7 ~]# systemctl stop NetworkManager

[root@centos7 ~]# systemctl disable NetworkManager

#测试上网

[root@centos7 ~]# ping baidu.com

PING baidu.com (39.156.69.79) 56(84) bytes of data.

64 bytes from 39.156.69.79 (39.156.69.79): icmp_seq=1 ttl=128 time=29.5 ms

64 bytes from 39.156.69.79 (39.156.69.79): icmp_seq=2 ttl=128 time=30.5 ms

#本地直接连接kvm虚拟机

[C:\~]$ ssh root@10.0.0.101

Connecting to 10.0.0.101:22...

Connection established.

To escape to local shell, press 'Ctrl+Alt+]'.

Last failed login: Fri Aug 30 23:46:16 CST 2019 from 10.0.0.1 on ssh:notty

There was 1 failed login attempt since the last successful login.

Last login: Fri Aug 30 23:26:26 2019

[root@centos7 ~]#
3.在线热添加网卡,cpu
1). 热添加网卡
[root@kvm01 opt]# virsh

#添加网卡查看帮助

virsh # attach-interface --help

virsh # attach-interface  centos7 --type bridge --source br0

Interface attached successfully

#剥离网卡查看帮助

virsh # detach-interface  --help

#查看mac地址

virsh # domiflist  centos7

Interface  Type       Source     Model       MAC

-------------------------------------------------------

vnet1      bridge     br0        virtio      52:54:00:2a:28:7e

vnet2      bridge     br0        rtl8139     52:54:00:12:8f:f1

#查看有几块硬盘

virsh # domblklist  centos7

Target     Source

------------------------------------------------

vda        /opt/centos7.qcow2

hda        -

#去掉网卡

virsh # detach-interface  web02 --type bridge --mac  52:54:00:48:9a:ab

Interface detached successfully
查看网络接口:

添加virtio类型
#临时添加

virsh # attach-interface  web02 --type bridge --source br0 --model virtio

Interface attached successfully

virsh # domiflist web02

Interface  Type       Source     Model       MAC

-------------------------------------------------------

vnet0      bridge     br0        rtl8139     52:54:00:6f:13:34

vnet3      bridge     br0        rtl8139     52:54:00:97:7f:5f

vnet4      bridge     br0        virtio      52:54:00:87:22

#永久添加

virsh # attach-interface  web02 --type bridge --source br0 --model virtio --config

Interface attached successfully
2). 热添加内存
#查看帮助

[root@kvm01 opt]# virt-install  --help|grep mem

  --memory MEMORY       Configure guest memory allocation. Ex:

                        --memory 1024 (in MiB)

                        --memory 512,maxmemory=1024

#kvm虚拟机在线热添加内存

[root@kvm01 opt]# virt-install --virt-type kvm --os-type=linux --os-variant rhel7 --name web05 --memory 512,maxmemory=4048 --vcpus 1 --disk /opt/web03.qcow2 --boot hd --network bridge=br0  --graphics vnc,listen=0.0.0.0 --noautoconsole

Starting install...

Domain creation completed.

[root@kvm01 opt]# virsh list --all

 Id    Name                           State

----------------------------------------------------

 23    web05                          running

 -     w                              shut off

[root@kvm01 opt]# virsh vncdisplay web05

:2
ssh连接

#查看帮助

virsh # setmem --help

#临时热添加内存(--live可加可不加)

virsh # setmem web05 2048M --live

#永久增大内存(热添加内存到配置文件中,但不能超过指定的最大内存)

virsh # setmem web05 2048M --config
3). 热添加cpu参数
[root@kvm01 opt]# virt-install --help|grep cpu

                        --vcpus 5,maxvcpus=10,cpuset=1-4,6,8

#kvm虚拟机在线热添加cpu

[root@kvm01 opt]# virt-install --virt-type kvm --os-type=linux --os-variant rhel7 --name web05 --memory 512,maxmemory=4048 --vcpus 1,maxvcpus=10  --disk /opt/web03.qcow2 --boot hd --network bridge=br0  --graphics vnc,listen=0.0.0.0 --noautoconsole

Starting install...

Domain creation completed.
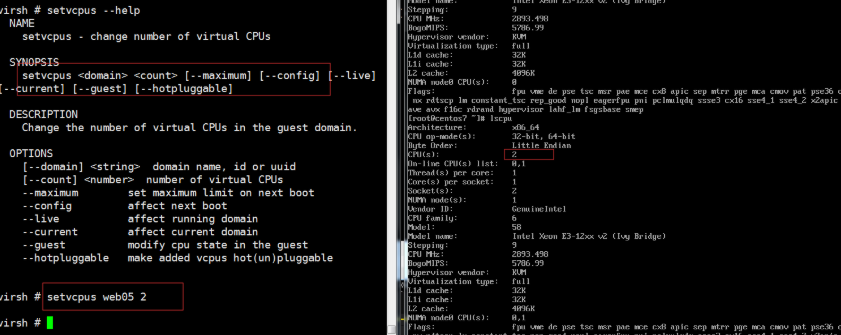
查看cpu核数
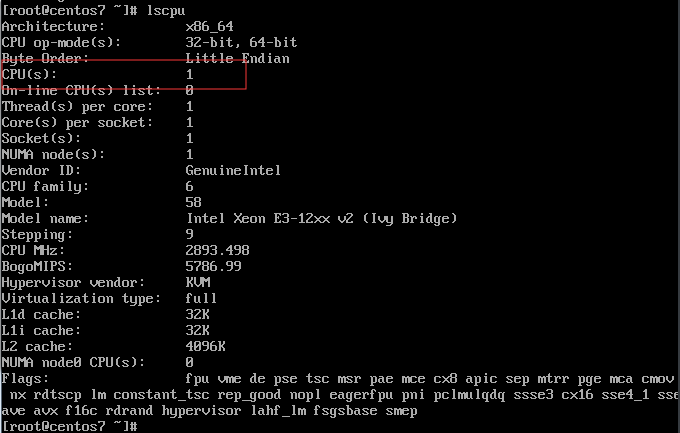
#查看官方帮助

virsh # setvcpus --help

    setvcpus <domain> <count> [--maximum] [--config] [--live] [--current] [--guest] [--hotpluggable]

#热添加cpu核数(但不能超过指定核数)

virsh # setvcpus web05 2
对比查看vnc
#关机

[root@kvm01 opt]# virsh destroy web05

Domain web05 destroyed

#删除

[root@kvm01 opt]# virsh undefine web05

Domain web05 has been undefined

[root@kvm01 opt]# virt-install --virt-type kvm --os-type=linux --os-variant rhel7 --name web05 --memory 512,maxmemory=4048 --vcpus 1,maxvcpus=10  --disk /opt/web03.qcow2 --boot hd --network bridge=br0  --graphics vnc,listen=0.0.0.0 --noautoconsole

Starting install...

Domain creation completed.

#备份配置文件

[root@kvm01 opt]# virsh dumpxml web05 > /tmp/web05.xml

#对比配置文件

[root@kvm01 opt]# vimdiff web03.xml  /tmp/web05.xml
对比配置文件,查看cpu
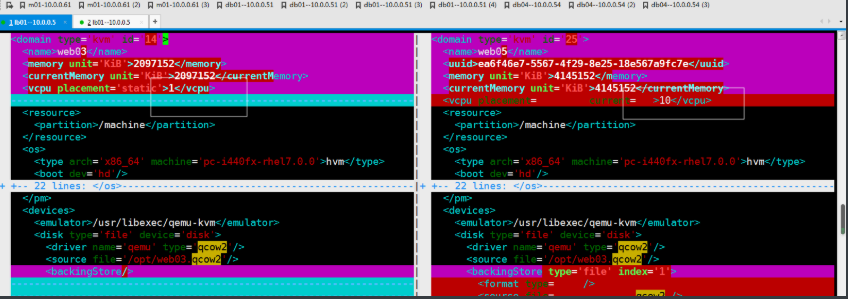
注意:单台资源最大添加,不能超过宿主机
Kvm--03 kvm克隆,桥接网络,热添加的更多相关文章
- Kvm 简介 安装 使用 桥接网络
KVM 全称是 基于内核的虚拟机(Kernel-based Virtual Machine),它是一个 Linux 的一个内核模块,该内核模块使得 Linux 变成了一个 Hypervisor: 它由 ...
- KVM虚拟机安装及桥接网络配置
1.查看CPU是否支持intel或AMD的虚拟技术 cat /proc/cpuinfo | grep -E "vmx|svm" --color --vmx intel的CPU sv ...
- kvm上已安装的虚拟机修改为桥接网络
kvm上安装的虚拟机默认使用的nat网络格式,现在已经调整kvm主机为桥接方式了,但是已经安装的虚拟机还是nat方式,所以需要修改一下 让KVM虚拟主机使用桥接网络br0 修改虚拟机的配置文件,默认存 ...
- KVM/QEMU桥接网络设置及kvm资料
KVM/QEMU桥接网络设置 配置kvm的网络有2种方法.其一,默认方式为用户模式网络(Usermode Networking),数据包由NAT方式通过主机的接口进行传送.其二,使用桥接方式(Brid ...
- kvm热添加和热迁移
a.热添加磁盘 1.创建磁盘 qemu-img create -f qcow2 web01-add01.qcow2 5G 2.附加磁盘设备 virsh attach-disk web01 /opt/w ...
- KVM -> 虚拟机在线热添加技术_04
热添加技术 1.KVM在线热添加硬盘
- KVM热添加技术
1.KVM热添加的种类 硬盘.网卡.内存.cpu 2.KVM热添加硬盘 1.在宿主机上创建硬盘 qemu-img create -f qcow2 /opt/web02_add01.qcow2 10G ...
- KVM桥接网络
1.什么是桥接网络 桥接网络:是指直接连接物理网络 桥接与NAT的区别:NAT是通过共享主机ip的方式进行上网,在你本地局域网内,别人是无法看到的:而桥接网络,是虚拟机通过dhcp的方式获取一个ip地 ...
- 【转】libvirt kvm 虚拟机上网 – Bridge桥接
libvirt kvm 虚拟机上网 – Bridge桥接 2013 年 7 月 3 日 / 东东东 / 暂无评论 目录 [hide] 1 Bridge桥接原理 2 在host机器配置桥接网络 2.1 ...
随机推荐
- [luogu]P1133 教主的花园[DP]
[luogu]P1133 教主的花园 ——!x^n+y^n=z^n 题目描述 教主有着一个环形的花园,他想在花园周围均匀地种上n棵树,但是教主花园的土壤很特别,每个位置适合种的树都不一样,一些树可能会 ...
- char* 和 cha[]
char* s1 = "hello";//字符串常量 s是一个保存了字符串首地址的指针变量,同时也是字符串的名字,s的内容是第一个字符的地址,当s指向常量字符串时候,内容不能改变( ...
- 循序渐进实现仿QQ界面(三):界面调色与控件自绘
本篇讲述如何进行界面调色.界面调色一般有两种方法,调色板和HSL色彩变换.调色板局限于256色,这里不采用,因此用HSL色彩变换实现.首先要了解一下什么是HSL色彩空间,完整且详尽的知识请到维基百科去 ...
- 51nod1600 Simple KMP
题目描述 对于一个字符串|S|,我们定义fail[i],表示最大的x使得S[1..x]=S[i-x+1..i],满足(x<i) 显然对于一个字符串,如果我们将每个0<=i<=|S|看 ...
- wl
<!DOCTYPE html> <html lang="en"> <head> <meta http-equiv="Conten ...
- 解决Docker容器 iptables问题---docker: Error response from daemon: driver failed programming external connectivity on endpoint quizzical_thompson
一.问题现象 最近在研究Docker容器日志管理时,启动容器出现iptables相关报错,具体问题如下 运行容器 [root@node-11 ~]# docker run -d -p 24224:24 ...
- Java Xms Xmx
堆设置 -Xms 是指程序启动时初始内存大小(此值可以设置成与-Xmx相同,以避免每次GC完成后 JVM 内存重新分配). -Xmx 指程序运行时最大可用内存大小,程序运行中内存大于这个值会 OutO ...
- random——伪随机数生成模块
random——伪随机数生成模块 转自:https://blog.csdn.net/zhtysw/article/details/79978197 该模块包含构造伪随机数生成器的多个方法.对于整数,伪 ...
- Jenkins+Gitlab+自动化测试配置持续集成
Jenkins安装在win7上 GitLab安装在docker上 需求:本地提交自动化测试代码在gitlab上后,jenkins自动构建,拉下新提交的自动化代码,并且运行 参考的链接: https:/ ...
- 从有状态应用(Session)到无状态应用(JWT),以及 SSO 和 OAuth2
不管用哪种方式认证用户,都可能被中间人攻击窃取 SessionID 或 Token,从而发生 CSRF 攻击.解决方式就是全站 HTTPS.现在 Let's Encrypt 已经支持免费的通配符 HT ...