World Wind Java开发之三 显示状态栏信息(转)
http://blog.csdn.net/giser_whu/article/details/40920315
先来看下本篇博客索要达到的效果:
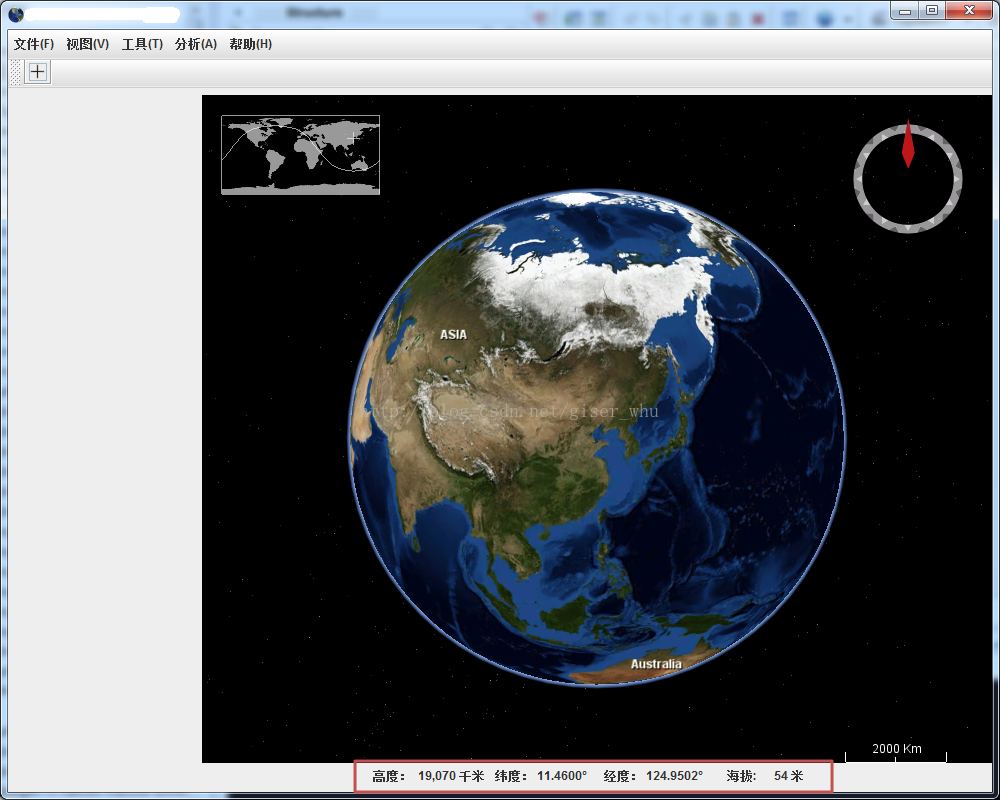
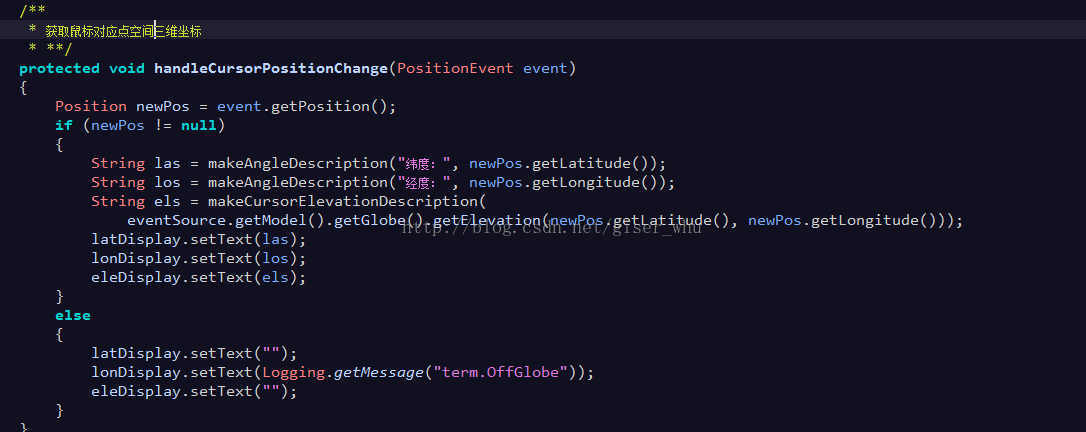
找到源码下的gov.nasa.worldwind.util下的StatusBar.java文件,可以看到状态栏显示的信息主要包括视点高度以及对应空间点三维坐标以及是否使用网络等信息。在后续的开发中采用离线模式,因此不需要联网,也不显示网络状态信息。代码依次如下面几幅图所示:


修改完源代码后,将源代码文件导出为jar包,在我们的工程下引用即可。后面如果需要修改源代码,都按这种方式操作;具体操作步骤如下:
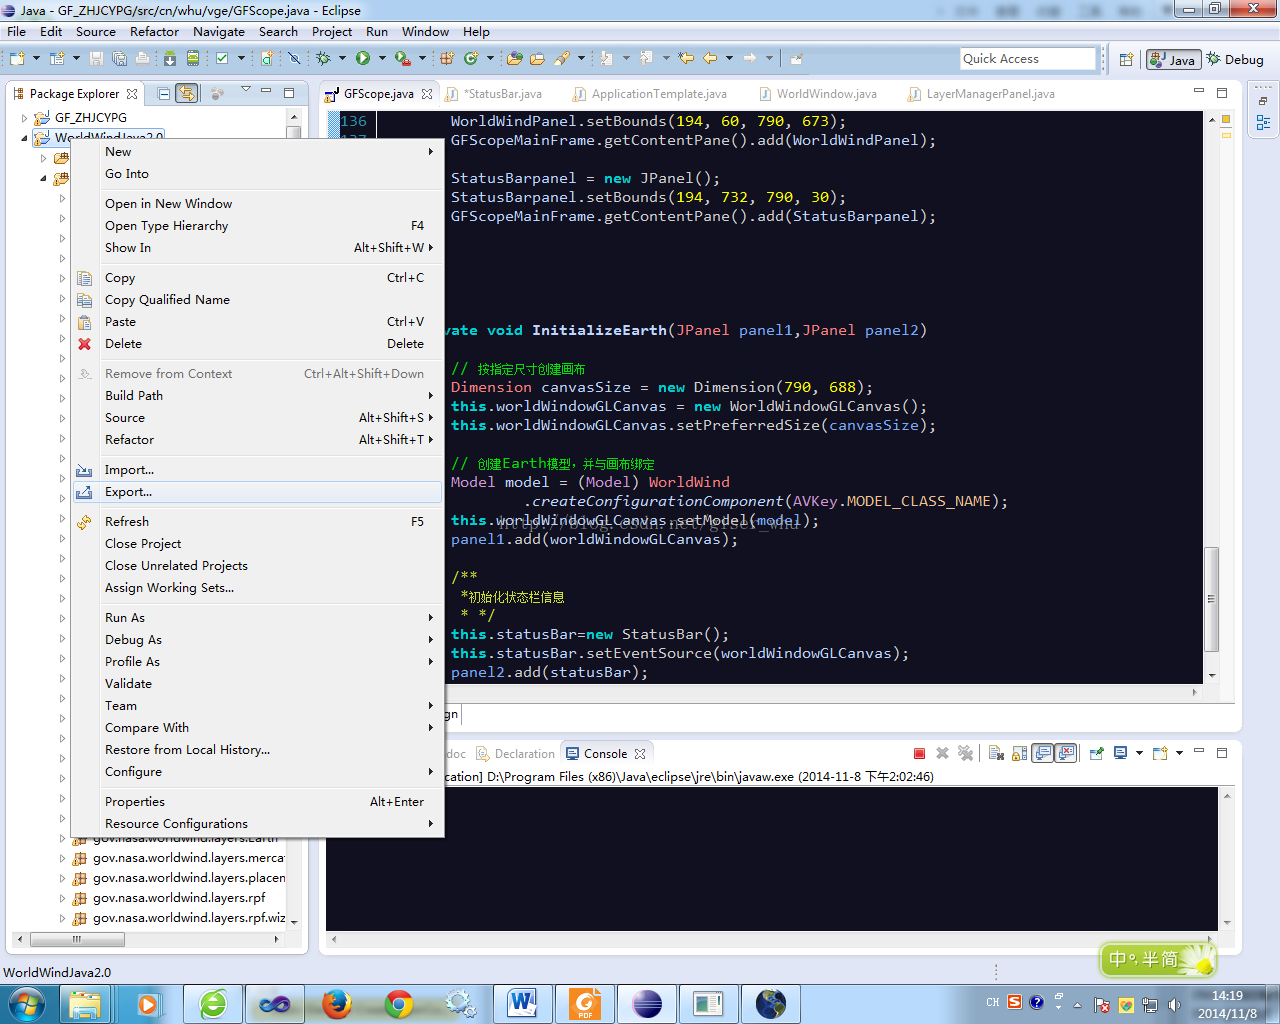


需要说明的是导出的时候可以只勾选src文件夹也可以默认。导出后将worldWind2.0.jar文件拷贝到我们的工程目录下,添加应用即可。下面是所有源码:
- package cn.whu.vge;
- import gov.nasa.worldwind.Model;
- import gov.nasa.worldwind.WorldWind;
- import gov.nasa.worldwind.WorldWindow;
- import gov.nasa.worldwind.avlist.AVKey;
- import gov.nasa.worldwind.awt.WorldWindowGLCanvas;
- import gov.nasa.worldwind.util.StatusBar;
- import java.awt.Dimension;
- import java.awt.EventQueue;
- import java.awt.Toolkit;
- import javax.swing.ImageIcon;
- import javax.swing.JButton;
- import javax.swing.JFrame;
- import javax.swing.JMenu;
- import javax.swing.JMenuBar;
- import javax.swing.JPanel;
- import javax.swing.JToolBar;
- /**
- * @author Administrator
- *
- */
- public class GFScope
- {
- private JFrame GFScopeMainFrame; // 主窗体
- private WorldWindowGLCanvas worldWindowGLCanvas; // 声明WWJ画布
- private JPanel WorldWindPanel; //三维视图面板
- private JPanel Layerpanel; //图层管理面板
- private JPanel StatusBarpanel; //状态栏面板
- private StatusBar statusBar; //状态栏
- // private WorldWindow wwd;
- /**
- * Launch the application.
- */
- public static void main(String[] args)
- {
- EventQueue.invokeLater(new Runnable()
- {
- public void run()
- {
- try
- {
- GFScope window = new GFScope();
- window.GFScopeMainFrame.setVisible(true);
- window.GFScopeMainFrame.setTitle("XXXXX子系统");
- WorldWind.setOfflineMode(true); // 设置离线运行模式
- }
- catch (Exception e)
- {
- e.printStackTrace();
- }
- }
- });
- }
- /**
- * Create the application.
- */
- public GFScope()
- {
- initialize();
- InitializeEarth(WorldWindPanel,StatusBarpanel);
- }
- /**
- * Initialize the contents of the frame.
- */
- /**
- *
- */
- private void initialize()
- {
- // 主窗体
- GFScopeMainFrame = new JFrame();
- GFScopeMainFrame.setIconImage(Toolkit.getDefaultToolkit().getImage(
- GFScope.class.getResource("/images/32x32-icon-earth.png")));
- GFScopeMainFrame.setBounds(100, 100, 1000, 800);
- GFScopeMainFrame.setDefaultCloseOperation(JFrame.EXIT_ON_CLOSE);
- GFScopeMainFrame.getContentPane().setLayout(null);
- /**
- * 菜单项
- */
- JMenuBar menuBar = new JMenuBar();
- menuBar.setBounds(0, 0, 984, 30);
- GFScopeMainFrame.getContentPane().add(menuBar);
- JMenu mnf = new JMenu("\u6587\u4EF6(F)");
- menuBar.add(mnf);
- JMenu mnv = new JMenu("\u89C6\u56FE(V)");
- menuBar.add(mnv);
- JMenu mnNewMenu = new JMenu("\u5DE5\u5177(T)");
- menuBar.add(mnNewMenu);
- JMenu mnNewMenu_1 = new JMenu("\u5206\u6790(A)");
- menuBar.add(mnNewMenu_1);
- JMenu mnh = new JMenu("\u5E2E\u52A9(H)");
- menuBar.add(mnh);
- /**
- * 工具条
- */
- JToolBar toolBar = new JToolBar();
- toolBar.setBounds(0, 28, 984, 30);
- GFScopeMainFrame.getContentPane().add(toolBar);
- JButton btnNewButton = new JButton("");
- btnNewButton.setIcon(new ImageIcon(GFScope.class
- .getResource("/newt/data/cross-grey-alpha-16x16.png")));
- toolBar.add(btnNewButton);
- /**
- * 面板(图层面板、三维视图面板)
- *
- * @author
- */
- Layerpanel = new JPanel();
- Layerpanel.setBounds(0, 60, 194, 702);
- GFScopeMainFrame.getContentPane().add(Layerpanel);
- WorldWindPanel = new JPanel();
- WorldWindPanel.setBounds(194, 60, 790, 673);
- GFScopeMainFrame.getContentPane().add(WorldWindPanel);
- StatusBarpanel = new JPanel();
- StatusBarpanel.setBounds(194, 732, 790, 30);
- GFScopeMainFrame.getContentPane().add(StatusBarpanel);
- }
- private void InitializeEarth(JPanel panel1,JPanel panel2)
- {
- // 按指定尺寸创建画布
- Dimension canvasSize = new Dimension(790, 688);
- this.worldWindowGLCanvas = new WorldWindowGLCanvas();
- this.worldWindowGLCanvas.setPreferredSize(canvasSize);
- // 创建Earth模型,并与画布绑定
- Model model = (Model) WorldWind
- .createConfigurationComponent(AVKey.MODEL_CLASS_NAME);
- this.worldWindowGLCanvas.setModel(model);
- panel1.add(worldWindowGLCanvas);
- /**
- *初始化状态栏信息
- * */
- this.statusBar=new StatusBar();
- this.statusBar.setEventSource(worldWindowGLCanvas);
- panel2.add(statusBar);
- }
- }
欢迎大家留言交流!
World Wind Java开发之三 显示状态栏信息(转)的更多相关文章
- World Wind Java开发之三 显示状态栏信息
先来看下本篇博客索要达到的效果: 找到源代码下的gov.nasa.worldwind.util下的StatusBar.java文件,能够看到状态栏显示的信息主要包含视点高度以及相应空间点三维坐标以及是 ...
- World Wind Java开发之一(转)
http://blog.csdn.net/giser_whu/article/details/40477235 参照<World wind Java三维地理信息系统开发指南随书光盘>以及官 ...
- [转]World Wind Java开发之四——搭建本地WMS服务器
在提供地理信息系统客户端时,NASA还为用户提供了开源的WMS Server 服务器应用:World Wind WMS Server.利用这个应用,我们可以架设自己的WMS服务并使用自己的数据(也支持 ...
- World Wind Java开发之六——解析shape文件(转)
http://blog.csdn.net/giser_whu/article/details/41647117 最近一直忙于导师项目的事情了,几天没更新了,昨天和今天研究了下WWJ解析shp文件的源代 ...
- SpringBoot开发十一-显示登录信息
需求介绍-显示登录信息 我们需要在每个页面的头部都要把登录用户的头像显示出来,另外在详细信息里面你需要显示用户的名字,除此之外如果登录了,我们显示首页 信息 头像 三个功能的链接,否则显示首页 登录两 ...
- World Wind Java开发之八——加载本地缓存文件构建大范围三维场景(
http://blog.csdn.net/giser_whu/article/details/42044599 上一篇博客主要是针对小文件直接导入WW中显示,然而当文件特别大时,这种方式就不太可行.因 ...
- [转]World Wind Java开发之五——读取本地shp文件
World Wind Java 使用IconLayer图层类表现点和多点数据,使用RenderableLayer图层表现线和面数据,一个图层只能对应一组shape文件.World Wind Java首 ...
- World Wind Java开发之五——读取本地shp文件(转)
http://blog.csdn.net/giser_whu/article/details/41484433 World Wind Java 使用IconLayer图层类表现点和多点数据,使用Ren ...
- World Wind Java开发之十一——加载热点信息(仿Google Earth)(转)
在GE的图层中有一个照片图层,在浏览时可以看到各地的一些图片,我们称之为热点信息,如下图所示: 再来看下本文的实现效果: 效果是不是很像呢,其实实现这个很简单,参照examples中的Balloons ...
随机推荐
- 微信H5支付----报undened index openid
1.检查传过来的订单号是否是恒定不变的 2.检查总价是否为整数(微信要求订单金额是整数).以及不能为0 以下是这次错误的具体原因: 主要是前面读取的金额数据需要读取接口的,而不是数据库的(接口读取的是 ...
- 《OD大数据实战》Spark入门实例
一.环境搭建 1. 编译spark 1.3.0 1)安装apache-maven-3.0.5 2)下载并解压 spark-1.3.0.tgz 3)修改make-distribution.sh VER ...
- uva1610 聚会游戏(细节处理)
uva1610 聚会游戏(细节处理) 输入一个n(n<=1000且为偶数)个字符串的集合D,找一个长度最短的字符串(不一定要在D中出现)S,使得D中恰好一半字符串小于等于S,另一半大于S.如果有 ...
- 没有找零 状压dp
没有找零 状压dp 约翰到商场购物,他的钱包里有K(1 <= K <= 16)个硬币,面值的范围是1..100,000,000.约翰想按顺序买 N个物品(1 <= N <= 1 ...
- hdu3887 Counting Offspring
Counting Offspring HDU - 3887 问你对于每个节点,它的子树上标号比它小的点有多少个 /* 子树的问题,dfs序可以很轻松的解决,因为点在它的子树上,所以在线段树中,必定在它 ...
- FoundToday for HK 技术支持
FoundToday for HK 技术支持 技术支持网址:有问题或建议请留言. 邮箱地址: swvrwafet@zoho.com Program design & system cons ...
- CentOS 6.6 x64安装TensorFlow
CentOS 6.6 x64安装TensorFlow升级Python到2.7(系统自带Python版本为2.6) // 安装编译工具 $ yum -y install gcc automake aut ...
- java程序调用.net接口服务地址的写法
参考文章:http://download.csdn.net/detail/davidiao/7424767 http://www.cnblogs.com/mq0036/p/3554002.html . ...
- 判断文件是否存在 local/hdfs
在Linux文件系统中,我们可以使用下面的Shell脚本判断某个文件是否存在: # 这里的-f参数判断$file是否存在 if [ ! -f "$file" ]; then ech ...
- 转 rman-08120 以及查询隐含参数
rman-08120 We need RMAN to automatically purge archivelogs from the FRA once they are applied to the ...