Tensorflow实现LSTM识别MINIST
import tensorflow as tf

import numpy as np

from tensorflow.contrib import rnn

from tensorflow.examples.tutorials.mnist import input_data

config=tf.ConfigProto()

config.gpu_options.allow_growth=True

sess=tf.Session(config=config)

mnist = input_data.read_data_sets('MNIST_data',one_hot=True)

print(mnist.train.images.shape)
Extracting MNIST_data\train-images-idx3-ubyte.gz

Extracting MNIST_data\train-labels-idx1-ubyte.gz

Extracting MNIST_data\t10k-images-idx3-ubyte.gz

Extracting MNIST_data\t10k-labels-idx1-ubyte.gz

(55000, 784)
lr = 1e-3

input_size = 28      # 每个时刻的输入特征是28维的,就是每个时刻输入一行,一行有 28 个像素

timestep_size = 28   # 时序持续长度为28,即每做一次预测,需要先输入28行

hidden_size = 256    # 隐含层的数量

layer_num = 2        # LSTM layer 的层数

class_num = 10       # 最后输出分类类别数量,如果是回归预测的话应该是 1

_X = tf.placeholder(tf.float32, [None, 784])

y = tf.placeholder(tf.float32, [None, class_num])

# 在训练和测试的时候,我们想用不同的 batch_size.所以采用占位符的方式

batch_size = tf.placeholder(tf.int32, [])  # 注意类型必须为 tf.int32, batch_size = 128

keep_prob = tf.placeholder(tf.float32, [])
# 把784个点的字符信息还原成 28 * 28 的图片

# 下面几个步骤是实现 RNN / LSTM 的关键

####################################################################

# **RNN 的输入shape = (batch_size, timestep_size, input_size)

X = tf.reshape(_X, [-1, 28, 28])

# 在 tf 1.2.1 版本中,可以通过下面方式来创建

def lstm_cell():

    cell = rnn.LSTMCell(hidden_size, reuse=tf.get_variable_scope().reuse)

    return rnn.DropoutWrapper(cell, output_keep_prob=keep_prob)

mlstm_cell = tf.contrib.rnn.MultiRNNCell([lstm_cell() for _ in range(layer_num)], state_is_tuple = True)

# **用全零来初始化state

init_state = mlstm_cell.zero_state(batch_size, dtype=tf.float32)

# **调用 dynamic_rnn() 来让我们构建好的网络运行起来

# ** 当 time_major==False 时, outputs.shape = [batch_size, timestep_size, hidden_size]

# ** 所以,可以取 h_state = outputs[:, -1, :] 作为最后输出

# ** state.shape = [layer_num, 2, batch_size, hidden_size],

# ** 或者,可以取 h_state = state[-1][1] 作为最后输出

# ** 最后输出维度是 [batch_size, hidden_size]

outputs, state = tf.nn.dynamic_rnn(mlstm_cell, inputs=X, initial_state=init_state, time_major=False)

h_state = state[-1][1]
W=tf.Variable(tf.truncated_normal([hidden_size,class_num],stddev=0.1),dtype=tf.float32)

bias=tf.Variable(tf.constant(0.1,shape=[class_num]),dtype=tf.float32)

y_pred=tf.nn.softmax(tf.matmul(h_state,W)+bias)

cross_entropy=-tf.reduce_mean(y*tf.log(y_pred))

train_op=tf.train.AdamOptimizer(lr).minimize(cross_entropy)

correct_prediction=tf.equal(tf.argmax(y_pred,1),tf.argmax(y,1))

accuracy=tf.reduce_mean(tf.cast(correct_prediction,"float"))

sess.run(tf.global_variables_initializer())

for i in range(2000):

    _batch_size=128

    batch=mnist.train.next_batch(_batch_size)

    if (i+1)%200 ==0:

        train_accuracy=sess.run(accuracy,feed_dict={

            _X:batch[0],y:batch[1],keep_prob:1.0,batch_size:_batch_size

        })

        print(y_pred)

        print(batch[0].shape)

        print("Iter%d, step %d, training accuracy %g" % (mnist.train.epochs_completed,(i+1),train_accuracy))

    sess.run(train_op,feed_dict={_X:batch[0],y:batch[1],keep_prob:0.5,batch_size:_batch_size})

print("test accuracy %g"% sess.run(accuracy,feed_dict={

    _X:mnist.test.images,y:mnist.test.labels,keep_prob:1.0,batch_size:mnist.test.images.shape[0]

}))
Tensor("Softmax_1:0", shape=(?, 10), dtype=float32)

(128, 784)

Iter5, step 200, training accuracy 0.9375

Tensor("Softmax_1:0", shape=(?, 10), dtype=float32)

(128, 784)

Iter5, step 400, training accuracy 0.976562

Tensor("Softmax_1:0", shape=(?, 10), dtype=float32)

(128, 784)

Iter6, step 600, training accuracy 0.96875

Tensor("Softmax_1:0", shape=(?, 10), dtype=float32)

(128, 784)

Iter6, step 800, training accuracy 0.984375

Tensor("Softmax_1:0", shape=(?, 10), dtype=float32)

(128, 784)

Iter6, step 1000, training accuracy 0.984375

Tensor("Softmax_1:0", shape=(?, 10), dtype=float32)

(128, 784)

Iter7, step 1200, training accuracy 0.984375

Tensor("Softmax_1:0", shape=(?, 10), dtype=float32)

(128, 784)

Iter7, step 1400, training accuracy 0.984375

Tensor("Softmax_1:0", shape=(?, 10), dtype=float32)

(128, 784)

Iter8, step 1600, training accuracy 0.992188

Tensor("Softmax_1:0", shape=(?, 10), dtype=float32)

(128, 784)

Iter8, step 1800, training accuracy 0.984375

Tensor("Softmax_1:0", shape=(?, 10), dtype=float32)

(128, 784)

Iter9, step 2000, training accuracy 0.992188

test accuracy 0.9863
_batch_size=5

X_batch,y_batch=mnist.test.next_batch(_batch_size)

print(X_batch.shape,y_batch.shape)

_outputs,_state=sess.run([outputs,state],feed_dict={

    _X:X_batch,y:y_batch,keep_prob:1.0,batch_size:_batch_size

})

print('outputs.shape=',np.asarray(_outputs).shape)

print('arr_state.shape=',np.asarray(_state).shape)

print(np.asarray(_state[-1][1]))

print(np.asarray(_state[0][1]))
(5, 784) (5, 10)

outputs.shape= (5, 28, 256)

arr_state.shape= (2, 2, 5, 256)

[[-0.29114476 -0.84908068 -0.02608863 ..., -0.26059726 -0.41139302

   0.59013247]

 [-0.6596756   0.1405973   0.32068741 ...,  0.78834546 -0.85109633

  -0.55030227]

 [ 0.91946286 -0.6195702   0.00405734 ...,  0.50050467  0.4910633

  -0.59666592]

 [-0.89336431  0.21388607  0.50573528 ...,  0.75225669  0.6082601

  -0.56074399]

 [-0.36205587 -0.87424242  0.77999097 ...,  0.395004   -0.788903

  -0.25867409]]

[[ 0.02811883 -0.1008996   0.03933555 ..., -0.26678833 -0.0076026

  -0.04358114]

 [-0.27545795  0.08285692 -0.09781252 ..., -0.40972584  0.14314541

   0.83173752]

 [-0.21126685  0.08805162  0.52263641 ..., -0.16019027  0.06584492

   0.14457463]

 [ 0.10716452  0.02429411  0.23363011 ...,  0.07705231  0.1158627

   0.38137382]

 [ 0.10278453 -0.19593915  0.18716493 ..., -0.15240444 -0.24707885

   0.18361446]]
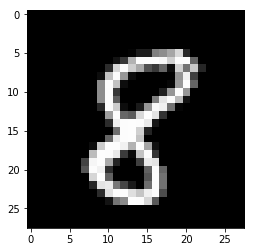
import matplotlib.pyplot as plt
print(mnist.train.labels[4])
[ 0. 0. 0. 0. 0. 0. 0. 1. 0. 0.]
X3=mnist.train.images[3]

img3=X3.reshape([28,28])

print(img3.shape)

plt.imshow(img3,cmap='gray')

plt.show()
(28, 28)
X3.shape=[-1,784]

y_batch=mnist.train.labels[0]

y_batch.shape=[-1,class_num]

X3_outputs=np.array(sess.run(outputs,feed_dict={

    _X:X3,y:y_batch,keep_prob:1.0,batch_size:1

}))

print(X3_outputs.shape)

X3_outputs.shape=[28,hidden_size]

print(X3_outputs.shape)
(1, 28, 256)

(28, 256)
h_W=sess.run(W,feed_dict={
_X:X3,y:y_batch,keep_prob:1.0,batch_size:1
})
print(h_W)
h_bias=sess.run(bias,feed_dict={
_X:X3,y:y_batch,keep_prob:1.0,batch_size:1
})
print(h_bias)
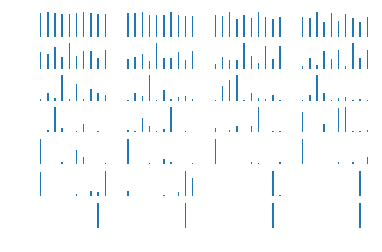
bar_index=range(class_num)
for i in range(X3_outputs.shape[0]):
plt.subplot(7,4,i+1)
x3_h_shate=X3_outputs[i,:].reshape([-1,hidden_size])
pro=sess.run(tf.nn.softmax(tf.matmul(x3_h_shate,h_W)+h_bias))
plt.bar(bar_index,pro[0],width=0.2,align='center')
plt.axis('off')
plt.show()
[[-0.08456483  0.08745969 -0.07621165 ..., -0.00773322 -0.15107249

   0.10566489]

 [ 0.26069802  0.13171725  0.0247799  ...,  0.08384562  0.06285298

   0.03339371]

 [-0.02133826 -0.08564553  0.09821648 ...,  0.05742728  0.02910433

   0.17623523]

 ...,

 [ 0.14126052  0.15447645 -0.08539373 ..., -0.27805188  0.12536794

   0.0209918 ]

 [-0.11653625  0.07422358  0.14709686 ..., -0.03686545  0.01324715

  -0.12571484]

 [-0.14584878  0.00623576  0.01669303 ...,  0.08890152 -0.1124042

  -0.15828955]]

[ 0.0999197   0.14981271  0.07992077  0.08728788  0.08243027  0.11954871

  0.08033348  0.12624525  0.10010903  0.08718728]
该文章主要参考An understandable example to implement Multi-LSTM for MNIST
在自己的github中也有内容Tensorflow_LSTM
并且发现如果多次使用jupyter调用 tf.contrib.rnn.MultiRNNCell那一段的内容容易导致程序报错,后面的程序不能执行,具体原因不详,若遇到问题,可restart and clear outputs 并且重新 start all即可
Tensorflow实现LSTM识别MINIST的更多相关文章
- 用CNN及MLP等方法识别minist数据集
用CNN及MLP等方法识别minist数据集 2017年02月13日 21:13:09 hnsywangxin 阅读数:1124更多 个人分类: 深度学习.keras.tensorflow.cnn ...
- 单向LSTM笔记, LSTM做minist数据集分类
单向LSTM笔记, LSTM做minist数据集分类 先介绍下torch.nn.LSTM()这个API 1.input_size: 每一个时步(time_step)输入到lstm单元的维度.(实际输入 ...
- TensorFlow环境 人脸识别 FaceNet 应用(一)验证测试集
TensorFlow环境 人脸识别 FaceNet 应用(一)验证测试集 前提是TensorFlow环境以及相关的依赖环境已经安装,可以正常运行. 一.下载FaceNet源代码工程 git clone ...
- 学习Tensorflow的LSTM的RNN例子
学习Tensorflow的LSTM的RNN例子 基于TensorFlow一次简单的RNN实现 极客学院-递归神经网络 如何使用TensorFlow构建.训练和改进循环神经网络
- Tensorflow Mask-RCNN训练识别箱子的模型运行结果(练习)
Tensorflow Mask-RCNN训练识别箱子的模型
- tensorflow训练验证码识别模型
tensorflow训练验证码识别模型的样本可以使用captcha生成,captcha在linux中的安装也很简单: pip install captcha 生成验证码: # -*- coding: ...
- TensorFlow实现多层感知机MINIST分类
TensorFlow实现多层感知机MINIST分类 TensorFlow 支持自动求导,可以使用 TensorFlow 优化器来计算和使用梯度.使用梯度自动更新用变量定义的张量.本文将使用 Tenso ...
- 如何基于TensorFlow使用LSTM和CNN实现时序分类任务
https://www.jiqizhixin.com/articles/2017-09-12-5 By 蒋思源2017年9月12日 09:54 时序数据经常出现在很多领域中,如金融.信号处理.语音识别 ...
- Tensorflow的验证码识别
最近在弄深度学习,从网上找了一些资料.这是基于Tensorflow的深度学习的验证码识别.https://cuijiahua.com/blog/2018/01/dl_5.html http://blo ...
随机推荐
- 1.4 NBU配置备份策略(Policy)
1.4 配置备份策略(Policy) 一个备份策略由四部分组成. Attributes(属性) Policy是否Active Policy类型 由此Policy产生的任务的优先级 使用的Storage ...
- 命令搜索命令whereis与which
whereis 命令名 #搜索命令所在路径及帮助文档所在位置,只能搜索系统命令. 选项: -b: 只查找可执行文件 -m: 只查找帮助文件 whoami whatis ls #ls 是什么命令 whi ...
- Spring MVC的一些学习笔记-入门配置和HttpMessageConverter
1.初步配置 [1]. 配置web.xml以及在web.xml中配置DispatcherServlet: <context-param> <param-name>context ...
- GDB调试手册[转]
Linux 包含了一个叫gdb 的GNU 调试程序.gdb 是一个用来调试C和C++程序的强力调试器.它使你能在程序运行时观察程序的内部结构和内存的使用情况.以下是 gdb 所提供的一些功能:它使你能 ...
- 虚拟dom和真实dom的转化和class解析的顺序
昨天出去溜了一圈,被问到几个问题回来整理了一下,当被特意问到一看感觉就会的问题,千万要不要急于回答,先想想,因为这往往是一个被忽略的坑(例如class解析顺序)!!! 1.写出虚拟dom和真实dom之 ...
- 【赛时总结】◇赛时·VII◇ Atcoder ABC-106
[赛时·VII] ABC-106 一条比赛时莫名其妙发了半个小时呆的菜鸡&咸鱼得到了自己应有的下场……279th. Rating:1103(+) 终于AK,一次通过…… ◇ 简单总结 ABC还 ...
- 数据结构学习-BST二叉查找树 : 插入、删除、中序遍历、前序遍历、后序遍历、广度遍历、绘图
二叉查找树(Binary Search Tree) 是一种树形的存储数据的结构 如图所示,它具有的特点是: 1.具有一个根节点 2.每个节点可能有0.1.2个分支 3.对于某个节点,他的左分支小于自身 ...
- C语言函数篇(一)函数的组成
函数的组成: 函数名 输入参数 返回值 返回值 函数名 (输入参数){ 执行体 } 用指针保存函数: int func(int a, int b, char c){ } --> int (*fu ...
- [CodeForces954G]Castle Defense(二分答案+差分)
Description 题目链接 Solution 二分答案,套一个差分标记即可 每次放弓箭手显然越右边越优 Code #include <cstdio> #include <alg ...
- 4x4矩阵键盘 扫描程序
一:不排除第四位异常处理 uchar JuzhenkeyScan() { // P3=0xfe; // temp=P3; // while(temp!=0xfe) // { // temp=P3; / ...