
.net到Java那些事儿--structs做了那些事(二)
一、跟着项目先来看下structs怎么执行的
首先看下web.xml配置文件,下面有如下代码
  <filter>

    <filter-name>struts2</filter-name>

    <filter-class>org.apache.struts2.dispatcher.ng.filter.StrutsPrepareAndExecuteFilter</filter-class>

  </filter>

  <filter-mapping>

    <filter-name>struts2</filter-name>

    <url-pattern>/*</url-pattern>

  </filter-mapping>
这是一个过滤器,过滤器不管是Java还是.net的人都清楚,简单说一下拦截Http的请求,所以上面这段配置就很清楚启动一个Filter来拦截自与客户端的请求,这里我们先不关心源码方面的东西就在表面上走,之后在下面说Struts2内部怎么处理的;
接下来我们看下struts.xml下面的配置
<?xml version="1.0" encoding="UTF-8"?>

<!DOCTYPE struts PUBLIC

        "-//Apache Software Foundation//DTD Struts Configuration 2.3//EN"

        "http://struts.apache.org/dtds/struts-2.3.dtd">

<struts>

    <constant name="struts.objectFactory" value="spring" />

    <constant name="struts.ui.theme" value="simple"/>

    <constant name="struts.devMode" value="true" />

    <constant name="struts.i18n.encoding" value="UTF-8" />

    <package name="store" namespace="/" extends="struts-default">

        <action name="login" method="login" class="userAction">

            <result name="success">/WEB-INF/login.jsp</result>

        </action>

    </package>

</struts>
这里我也不讲那些属性是那些意思,网上很多自己查,我们就看下action配置,这里我们是通过Spring集成的所以我们那个class属性放入了bean那个id的名字,当然这里我就不进行替换成文件的全限定名了,我就解释下下面这段话的意思,查找一个叫做userAction类下面有个叫llogin方法名的方法,如果返回success就转发到login.jsp的页面上。
这个地方加一下Struts页面跳转方式的介绍吧:
1.dispather这个是默认的配置转发,页面跳转属于同一个线程,Action中数据始终存在,简单一点说这是一个请求;
2.redirect这个当接收到状态码的时候,重新请求服务器资源返回到客户端,这个地方意味是产生两个请求,原来请求的数据是无法访问到的;
3.redirectAction 这个相当于重新定向到另外一个Action,这个与redirect方式都是重新生成一个新的请求,但是这个redirectAction是使用ActionMapperFactory提供的ActionMapper来重定向请求。
4.chain这个可以在多个action之间跳转,处于chain中的action属于同一个http请求,共享一个ActionContext,由于是同一个请求所以请求参数和属性都可以保留,可以理解为2和3的增强版,新增功能保留请求的数据。
5.stream 这个文件下载时候使用的
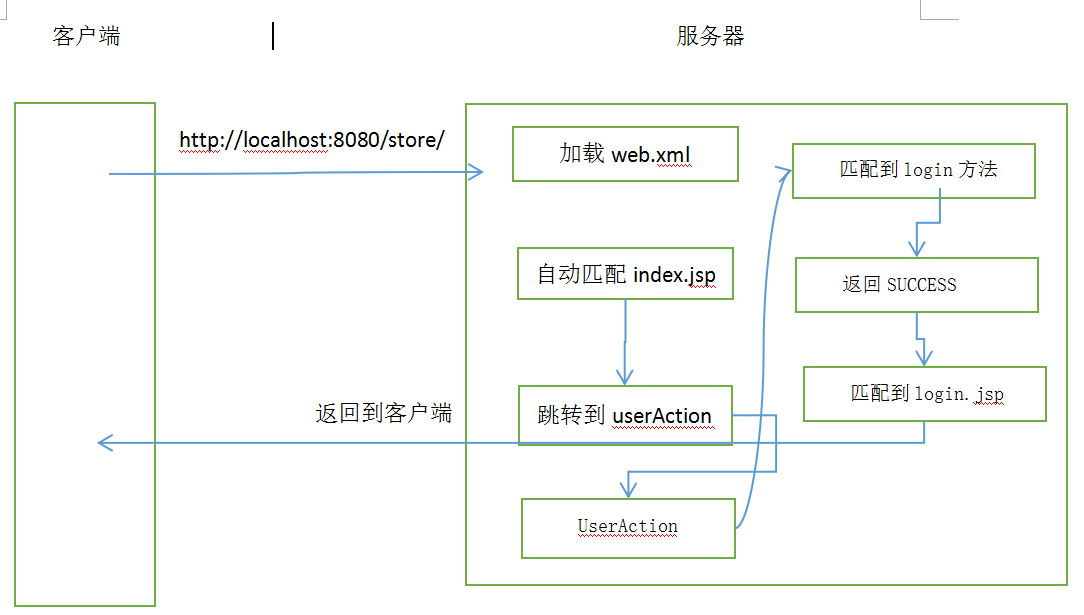
基本上就是上面这个样子,中间少了一个过滤器,没事下面重点就是他;
二、structs内部是怎么匹配的
上面我们再看web.xml配置的时候我们看到过滤器配置,现在我们就把他解剖一下;
// 这里继承Filter进行实现,那么我们就按照Filter的方式来读一下这个源码
public class StrutsPrepareAndExecuteFilter implements StrutsStatics, Filter {

    protected PrepareOperations prepare;

    protected ExecuteOperations execute;

    protected List<Pattern> excludedPatterns = null;

//init实现初始化配置信息

    public void init(FilterConfig filterConfig) throws ServletException {

        InitOperations init = new InitOperations();

        Dispatcher dispatcher = null;//这个是初始配置时候的重点对象

        try {//主要用来存储filter

            FilterHostConfig config = new FilterHostConfig(filterConfig);

            init.initLogging(config);//加载日志的配置

            dispatcher = init.initDispatcher(config);//这个地方主要为了初始化这个对象,同时加载一些重要的配置文件

            init.initStaticContentLoader(config, dispatcher);//静态文件的加载

            //初始化类属性

            prepare = new PrepareOperations(dispatcher);

            execute = new ExecuteOperations(dispatcher);

            this.excludedPatterns = init.buildExcludedPatternsList(dispatcher);

            postInit(dispatcher, filterConfig);

        } finally {

            if (dispatcher != null) {

                dispatcher.cleanUpAfterInit();

            }

            init.cleanup();

        }

    }

    protected void postInit(Dispatcher dispatcher, FilterConfig filterConfig) {

    }
*/

    public Dispatcher initDispatcher( HostConfig filterConfig ) {

        Dispatcher dispatcher = createDispatcher(filterConfig);
        //主要用来加载配置文件

        dispatcher.init();

        return dispatcher;

    }

    /**

     * Initializes the static content loader with the filter configuration

     */

    public StaticContentLoader initStaticContentLoader( HostConfig filterConfig, Dispatcher dispatcher ) {

        StaticContentLoader loader = dispatcher.getContainer().getInstance(StaticContentLoader.class);

        loader.setHostConfig(filterConfig);

        return loader;

    }/**

     * Create a {@link Dispatcher}

     */

    private Dispatcher createDispatcher( HostConfig filterConfig ) {

        Map<String, String> params = new HashMap<String, String>();
        //将参数存放到Map中

        for ( Iterator e = filterConfig.getInitParameterNames(); e.hasNext(); ) {

            String name = (String) e.next();

            String value = filterConfig.getInitParameter(name);

            params.put(name, value);

        }
       return new Dispatcher(filterConfig.getServletContext(), params);

    }
    /**

     * Load configurations, including both XML and zero-configuration strategies,

     * and update optional settings, including whether to reload configurations and resource files.

     */

    //这个主要初始化加载一些文件,我是感觉这里写的代码真好起码比我写的好太多了,一个人是否优秀在代码确实能看出很多来我自愧不如

    public void init() {

        if (configurationManager == null) {

            configurationManager = createConfigurationManager(DefaultBeanSelectionProvider.DEFAULT_BEAN_NAME);

        }

        try {

            init_FileManager();

            init_DefaultProperties(); // [1]

            init_TraditionalXmlConfigurations(); // [2]

            init_LegacyStrutsProperties(); // [3]

            init_CustomConfigurationProviders(); // [5]

            init_FilterInitParameters() ; // [6]

            init_AliasStandardObjects() ; // [7]

            Container container = init_PreloadConfiguration();

            container.inject(this);

            init_CheckWebLogicWorkaround(container);

            if (!dispatcherListeners.isEmpty()) {

                for (DispatcherListener l : dispatcherListeners) {

                    l.dispatcherInitialized(this);

                }

            }

            errorHandler.init(servletContext);

        } catch (Exception ex) {

            if (LOG.isErrorEnabled())

                LOG.error("Dispatcher initialization failed", ex);

            throw new StrutsException(ex);

        }

    }
以上基本上加载配置文件的过程,这里面有几个值得学习的方法,日志加载的抽象类可以兼容日志插件,还有init方法中清晰明了一步一步,我感觉这可能就是看源码的好处;最近正在Bob大叔的代码的整洁之道,在这里我算是看到了。
接下来我们看重点,请求拦截到以后Struts帮我们做了什么吧!
    public void doFilter(ServletRequest req, ServletResponse res, FilterChain chain) throws IOException, ServletException {

        HttpServletRequest request = (HttpServletRequest) req;

        HttpServletResponse response = (HttpServletResponse) res;

        try {//这个地方有配置就放行

            if (excludedPatterns != null && prepare.isUrlExcluded(request, excludedPatterns)) {

                chain.doFilter(request, response);

            } else {

                prepare.setEncodingAndLocale(request, response);//设置编码

                prepare.createActionContext(request, response);//创建Action请求的上下文

                prepare.assignDispatcherToThread();//将这个对象放入线程

                request = prepare.wrapRequest(request);//包装请求对象

                ActionMapping mapping = prepare.findActionMapping(request, response, true);//查找action

                if (mapping == null) {//找不到就查找静态的资源

                    boolean handled = execute.executeStaticResourceRequest(request, response);

                    if (!handled) {

                        chain.doFilter(request, response);

                    }

                } else {//找到以后执行

                    execute.executeAction(request, response, mapping);

                }

            }

        } finally {

            prepare.cleanupRequest(request);

        }

    }
设置编码这块就不要看了挺简单的封装,我们这里看创建action这个作者玩的高招,学习下哈哈
  public ActionContext createActionContext(HttpServletRequest request, HttpServletResponse response) {

        ActionContext ctx;

        Integer counter = 1;

        Integer oldCounter = (Integer) request.getAttribute(CLEANUP_RECURSION_COUNTER);

        if (oldCounter != null) {

            counter = oldCounter + 1;

        }

        //这个地方玩的比较高大上,这里每次请求都会创建Actioncontext这个对象,并做相同的初始化,改地方使用了ThreadLocal

        ActionContext oldContext = ActionContext.getContext();

        if (oldContext != null) {

            // 这个地方我认为可能是分开部署的时候这个可能是跳转过来的Action

            ctx = new ActionContext(new HashMap<String, Object>(oldContext.getContextMap()));

        } else {
         //这里创建值栈

            ValueStack stack = dispatcher.getContainer().getInstance(ValueStackFactory.class).createValueStack();
         //创建ContextMap,并加入值栈,

            stack.getContext().putAll(dispatcher.createContextMap(request, response, null));

            ctx = new ActionContext(stack.getContext());//使用值栈创建上下文

        }

        request.setAttribute(CLEANUP_RECURSION_COUNTER, counter);

        ActionContext.setContext(ctx);//绑定到本地线程

        return ctx;

    }
以上创建请求上下文基本是可以了,通过使用ThreadLocal保证线程安全,主要是为了将Dispatcher绑定到本地线程
    public ActionMapping findActionMapping(HttpServletRequest request, HttpServletResponse response, boolean forceLookup) {

        ActionMapping mapping = (ActionMapping) request.getAttribute(STRUTS_ACTION_MAPPING_KEY);

        if (mapping == null || forceLookup) {

            try {
                //通过反射去容器中查找action创建ActionMapping对象

                mapping = dispatcher.getContainer().getInstance(ActionMapper.class).getMapping(request, dispatcher.getConfigurationManager());

                if (mapping != null) {

                    request.setAttribute(STRUTS_ACTION_MAPPING_KEY, mapping);

                }

            } catch (Exception ex) {

                dispatcher.sendError(request, response, HttpServletResponse.SC_INTERNAL_SERVER_ERROR, ex);

            }

        }

        return mapping;

    }
这里需要说一下ActionMapping这个对象,对比下下面2段代码,相信你瞬间就明白了这个对象的作用;
    @Override

    public String toString() {

        return "ActionMapping{" +

                "name='" + name + '\'' +

                ", namespace='" + namespace + '\'' +

                ", method='" + method + '\'' +

                ", extension='" + extension + '\'' +

                ", params=" + params +

                ", result=" + (result != null ? result.getClass().getName() : "null") +

                '}';

    }
    <package name="store" namespace="/" extends="struts-default">

        <action name="userAction" method="login" class="userAction">

            <result name="success">/WEB-INF/login.jsp</result>

        </action>

    </package>
这里简单总结下这个对象作用,主要功能是管理Action信息和管理Action执行完以后的重定向,都是通过初始化配置容器中查找到的。说到这里我感觉就对Struts有了一个整体上的认知了,Struts就是帮我们造了一个巨大容器,里面放了几张网,每张网的作用就是为了找到合适自己的对象,找到以后就展示出来,基本都这样就后面的Spring也是这样。
最后就是显示到网页上了呗,我们看下这里也玩的比较好,这块玩了一个代理工厂;
    public void serviceAction(HttpServletRequest request, HttpServletResponse response, ActionMapping mapping)

            throws ServletException {

        Map<String, Object> extraContext = createContextMap(request, response, mapping);

        // 这个地方如果有就创建一个新的值栈,然后将值栈的信息放入extraContext中

        ValueStack stack = (ValueStack) request.getAttribute(ServletActionContext.STRUTS_VALUESTACK_KEY);

        boolean nullStack = stack == null;

        if (nullStack) {//没有就找见当前线程的的值栈放入新建的值栈当中

            ActionContext ctx = ActionContext.getContext();

            if (ctx != null) {

                stack = ctx.getValueStack();

            }

        }

        if (stack != null) {

            extraContext.put(ActionContext.VALUE_STACK, valueStackFactory.createValueStack(stack));

        }

        String timerKey = "Handling request from Dispatcher";

        try {

            UtilTimerStack.push(timerKey);

            String namespace = mapping.getNamespace();

            String name = mapping.getName();

            String method = mapping.getMethod();//这2个就是获取属性的值然后到下面的代理中找到自己action中的方法

            //代理工厂找见合适的action

            ActionProxy proxy = getContainer().getInstance(ActionProxyFactory.class).createActionProxy(

                    namespace, name, method, extraContext, true, false);

            //更新对应值栈属性

            request.setAttribute(ServletActionContext.STRUTS_VALUESTACK_KEY, proxy.getInvocation().getStack());

            // 如果有就执行就好了

            if (mapping.getResult() != null) {

                Result result = mapping.getResult();

                result.execute(proxy.getInvocation());

            } else {

                proxy.execute();

            }

            // 如果有值栈,设置值栈的值

            if (!nullStack) {

                request.setAttribute(ServletActionContext.STRUTS_VALUESTACK_KEY, stack);

            }

        } catch (ConfigurationException e) {

            logConfigurationException(request, e);

            sendError(request, response, HttpServletResponse.SC_NOT_FOUND, e);

        } catch (Exception e) {

            if (handleException || devMode) {

                sendError(request, response, HttpServletResponse.SC_INTERNAL_SERVER_ERROR, e);

            } else {

                throw new ServletException(e);

            }

        } finally {

            UtilTimerStack.pop(timerKey);

        }

    }
这里的重点就在ActionFactory了,来来我们看看这里搞了什么,这里通过ActionProxyFactory这个工厂反射创建,我们看下这个接口是有DeafultActionFactory这个类实现的,那我们看下这里面做了什么好玩的事情;
    public ActionProxy createActionProxy(String namespace, String actionName, String methodName, Map<String, Object> extraContext, boolean executeResult, boolean cleanupContext) {

        ActionInvocation inv = new DefaultActionInvocation(extraContext, true);

        container.inject(inv);

        return createActionProxy(inv, namespace, actionName, methodName, executeResult, cleanupContext);

    }

    public ActionProxy createActionProxy(ActionInvocation inv, String namespace, String actionName, boolean executeResult, boolean cleanupContext) {

        return createActionProxy(inv, namespace, actionName, null, executeResult, cleanupContext);

    }

    public ActionProxy createActionProxy(ActionInvocation inv, String namespace, String actionName, String methodName, boolean executeResult, boolean cleanupContext) {

        //这里重点

        DefaultActionProxy proxy = new DefaultActionProxy(inv, namespace, actionName, methodName, executeResult, cleanupContext);

        container.inject(proxy);

        proxy.prepare();//这里事执行

        return proxy;

    }
看到这里会发现我们真正的重点就要到来了,DedaultActionProxy这个实现了ActionProxy这个接口的类,里面是怎么找到Action,我们把重点放到这里;
    protected void prepare() {

        String profileKey = "create DefaultActionProxy: ";

        try {

            UtilTimerStack.push(profileKey);
            //这里主要事根据命名空间和Action寻找到正确的Action

            config = configuration.getRuntimeConfiguration().getActionConfig(namespace, actionName);

            if (config == null && unknownHandlerManager.hasUnknownHandlers()) {
                //寻找未知的Action

                config = unknownHandlerManager.handleUnknownAction(namespace, actionName);

            }

            if (config == null) {

                throw new ConfigurationException(getErrorMessage());

            }

            //寻找方法

            resolveMethod();

            if (!config.isAllowedMethod(method)) {

                throw new ConfigurationException("Invalid method: " + method + " for action " + actionName);

            }

            //初始化创建

            invocation.init(this);

        } finally {

            UtilTimerStack.pop(profileKey);

        }

    }
    private void resolveMethod() {

        // 没有就执行默认的execite方法

        if (StringUtils.isEmpty(this.method)) {

            this.method = config.getMethodName();

            if (StringUtils.isEmpty(this.method)) {

                this.method = ActionConfig.DEFAULT_METHOD;

            }

            methodSpecified = false;

        }

    }
    public void init(ActionProxy proxy) {

        this.proxy = proxy;

        Map<String, Object> contextMap = createContextMap();

        // Setting this so that other classes, like object factories, can use the ActionProxy and other

        // contextual information to operate

        ActionContext actionContext = ActionContext.getContext();

        if (actionContext != null) {

            actionContext.setActionInvocation(this);

        }

        //创建Action类

        createAction(contextMap);

        if (pushAction) {

            stack.push(action);

            contextMap.put("action", action);

        }

        invocationContext = new ActionContext(contextMap);

        invocationContext.setName(proxy.getActionName());

        // 生成一个迭代器列表

        List<InterceptorMapping> interceptorList = new ArrayList<InterceptorMapping>(proxy.getConfig().getInterceptors());

        interceptors = interceptorList.iterator();

    }
    protected void createAction(Map<String, Object> contextMap) {

        // load action

        String timerKey = "actionCreate: " + proxy.getActionName();

        try {

            UtilTimerStack.push(timerKey);

            action = objectFactory.buildAction(proxy.getActionName(), proxy.getNamespace(), proxy.getConfig(), contextMap);

        } catch (InstantiationException e) {

            throw new XWorkException("Unable to intantiate Action!", e, proxy.getConfig());

        } catch (IllegalAccessException e) {

            throw new XWorkException("Illegal access to constructor, is it public?", e, proxy.getConfig());

        } catch (Exception e) {

            String gripe;

            if (proxy == null) {

                gripe = "Whoa!  No ActionProxy instance found in current ActionInvocation.  This is bad ... very bad";

            } else if (proxy.getConfig() == null) {

                gripe = "Sheesh.  Where'd that ActionProxy get to?  I can't find it in the current ActionInvocation!?";

            } else if (proxy.getConfig().getClassName() == null) {

                gripe = "No Action defined for '" + proxy.getActionName() + "' in namespace '" + proxy.getNamespace() + "'";

            } else {

                gripe = "Unable to instantiate Action, " + proxy.getConfig().getClassName() + ",  defined for '" + proxy.getActionName() + "' in namespace '" + proxy.getNamespace() + "'";

            }

            gripe += (((" -- " + e.getMessage()) != null) ? e.getMessage() : " [no message in exception]");

            throw new XWorkException(gripe, e, proxy.getConfig());

        } finally {

            UtilTimerStack.pop(timerKey);

        }

        if (actionEventListener != null) {

            action = actionEventListener.prepare(action, stack);

        }

    }
所有的准备工作都完成了,接下来就是执行方法了
    public String execute() throws Exception {

        ActionContext nestedContext = ActionContext.getContext();

        ActionContext.setContext(invocation.getInvocationContext());

        String retCode = null;

        String profileKey = "execute: ";

        try {

            UtilTimerStack.push(profileKey);

            //这里就是执行,,这里面又玩一朵花

            retCode = invocation.invoke();

        } finally {

            if (cleanupContext) {

                ActionContext.setContext(nestedContext);

            }

            UtilTimerStack.pop(profileKey);

        }

        return retCode;

    }
这里将拦截遍历一遍,最后输出Action的实例方法,然后在返回拦截器的情况,这个地方我不解释了,我也是看了一位大神得解释明悟哈哈
    public String invoke() throws Exception {

        String profileKey = "invoke: ";

        try {

            UtilTimerStack.push(profileKey);

            if (executed) {

                throw new IllegalStateException("Action has already executed");

            }

            if (interceptors.hasNext()) {

                final InterceptorMapping interceptor = interceptors.next();

                String interceptorMsg = "interceptor: " + interceptor.getName();

                UtilTimerStack.push(interceptorMsg);

                try {

                                resultCode = interceptor.getInterceptor().intercept(DefaultActionInvocation.this);

                            }

                finally {

                    UtilTimerStack.pop(interceptorMsg);

                }

            } else {

                resultCode = invokeActionOnly();

            }

            // this is needed because the result will be executed, then control will return to the Interceptor, which will

            // return above and flow through again

            if (!executed) {

                if (preResultListeners != null) {

                    for (Object preResultListener : preResultListeners) {

                        PreResultListener listener = (PreResultListener) preResultListener;

                        String _profileKey = "preResultListener: ";

                        try {

                            UtilTimerStack.push(_profileKey);

                            listener.beforeResult(this, resultCode);

                        }

                        finally {

                            UtilTimerStack.pop(_profileKey);

                        }

                    }

                }

                // now execute the result, if we're supposed to

                if (proxy.getExecuteResult()) {

                    executeResult();

                }

                executed = true;

            }

            return resultCode;

        }

        finally {

            UtilTimerStack.pop(profileKey);

        }

    }
三、总结
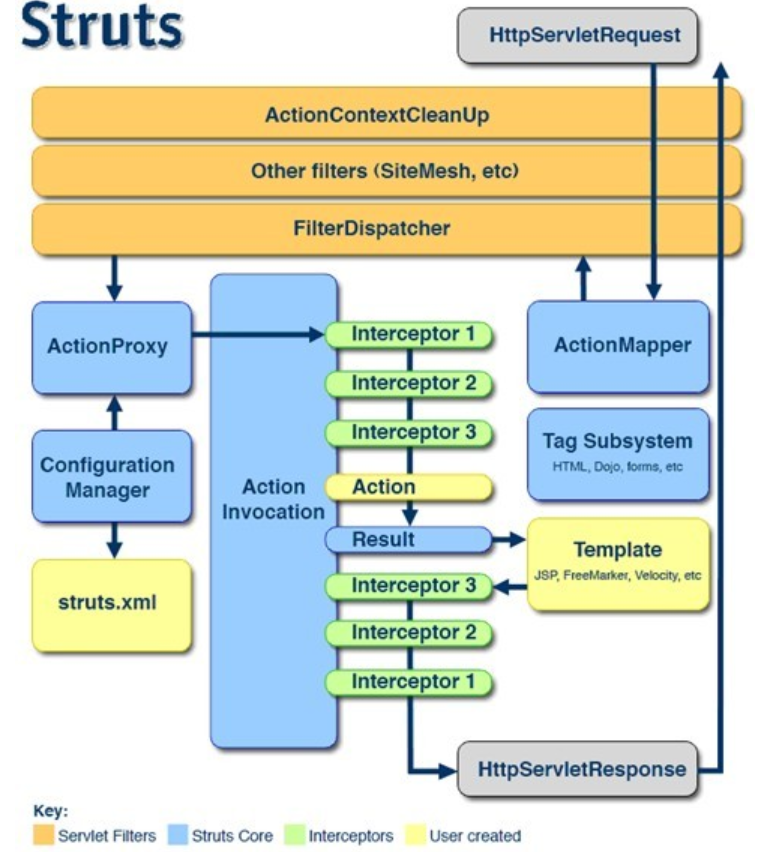
推荐博客:http://blog.csdn.net/fcbayernmunchen/article/details/8441210
看了这个我感觉我理解得就是小儿科,这个大神上一篇也值得看下。结合整体得架构图,加上我中间提到得几个重要得对象,相信应该基本对Struts会有个整体印象;
这里欢迎大家加一下我的群438836709,欢迎大家一起学习!
.net到Java那些事儿--structs做了那些事(二)的更多相关文章
- java对xml文件做增删改查------摘录
java对xml文件做增删改查 package com.wss; import java.io.File;import java.util.ArrayList;import java.util.Lis ...
- .net到Java那些事儿--整合SSH
一.介绍 整体介绍分成两个部分,第一.net转到Java的原因,第二开发SSH时候的环境介绍: .net到Java的原因: .net开发也将近快3年的样子,加上现在的老东家换过 ...
- 在java中使用JMH(Java Microbenchmark Harness)做性能测试
文章目录 使用JMH做性能测试 BenchmarkMode Fork和Warmup State和Scope 在java中使用JMH(Java Microbenchmark Harness)做性能测试 ...
- 做一些Spring AOP做过的事,封装 jdk动态代理成为一个黑盒子
怎么使用eclise 抽取方法,请看 利用eclipse 抽取代码片段为方法 抽取完成之后,还需要 ① 将Collection.class换成 target.getClass(),targ ...
- Java 之 I/O 系列 02 ——序列化(二)
Java 之 I/O 系列 目录 Java 之 I/O 系列 01 ——基础 Java 之 I/O 系列 02 ——序列化(一) Java 之 I/O 系列 02 ——序列化(二) 继续上篇的第二个问 ...
- C# Java间进行RSA加密解密交互(二)
原文:C# Java间进行RSA加密解密交互(二) 接着前面一篇文章C# Java间进行RSA加密解密交互,继续探讨这个问题. 在前面,虽然已经实现了C# Java间进行RSA加密解密交互,但是还是与 ...
- Java数据类型在实际开发中的应用二枚举类型
在实际编程中,往往存在着这样的"数据集",它们的数值在程序中是稳定的,而且"数据集"中的元素是有限的.在JDK1.5之前,人们用接口来描述这一种数据类型. 1. ...
- 从零开始,跟我一起做jblog项目(二)Maven
从零开始,跟我一起做jblog项目(一)引言 从零开始,跟我一起做jblog项目(二)Maven maven是一个项目管理工具,尤其适用于JAVA世界 在jblog的开发前期,还没有系统使用过mave ...
- (转)Java任务调度框架Quartz入门教程指南(二) 使用job、trigger、schedule调用定时任务
http://blog.csdn.net/zixiao217/article/details/53044890 读完第一节,我们已经对Quartz有了一个大体的认识,它可以定时帮我们执行一些处理程序, ...
随机推荐
- 解决无线网络连接出现黄色感叹号---win10
今天使用公司的电脑,这个电脑是另一位同事用过的,然后到我这里就连不上网了.然后把自己解决的方法记录一下: 开始运行输入以下命令来重置IP. 打开运行输入:cmd 在命令窗口中输入:ipconfig / ...
- 运行shell脚本时报错"[[ : not found"解决方法
问题描述 在运行shell脚本时报错,命令为: sh test.sh 报错如图: 脚本代码如下: #!/bin/bash # file:test.sh # author:13 # date:2017- ...
- JStorm与Storm源码分析(一)--nimbus-data
Nimbus里定义了一些共享数据结构,比如nimbus-data. nimbus-data结构里定义了很多公用的数据,请看下面代码: (defn nimbus-data [conf inimbus] ...
- MySQL学习笔记(六):索引
本文主要介绍MySQL 中关于索引的一些问题,例如:索引的作用:怎么创建索引:设计索引的原则:怎么优化索引等等. 一:索引概述 索引一般是通过排序,然后查找时可以二分查找,这一特点来达到加速查找的目的 ...
- jquery validate bootstrap 错误样式配置
$().ready(function () { $("#commentForm").validate({ errorPlacement: function (error, elem ...
- 使用pdfbox分页保存pdf为图片
一.背景 pdfbox作为Apache开源的PDF操作工具,允许创建新的PDF文档,操作现有文档,以及从文档中提取内容的能力.Apache PDFBox还包括一些命令行实用工具.本文楼主主要介绍其中的 ...
- hdu--1013--Digital Roots(字符串)
Digital Roots Time Limit: 2000/1000 MS (Java/Others) Memory Limit: 65536/32768 K (Java/Others)Tot ...
- 让这三个月来的更猛烈些吧,前端react同构项目
昨天一篇文章讲述了我在这三个月中由.net到java的过程,其中踩坑填坑的细节真不是三言两语可以道尽,而完成时的喜悦也远非寻常可比(仅次于涨工资).然而到这并不算完结,作为前后端分离的忠实粉丝,我认为 ...
- 初笔,JAVA.HelloWorld代码详解
HelloWorld.java //文件名 public class HelloWorld{ public static void main(String[] args){ System.out.pr ...
- Unity NGUI Tween动画回调不执行问题
最近工作中遇到了一个问题 NGUI的Tween动画完成 回调函数 偶尔不执行 偶现Bug 今天我仔细看了下代码发现 TweenPosition tempTween = varTar.GetCompon ...