Hadoop-CDH5.7.0 for CentOS7
一、需求
系统
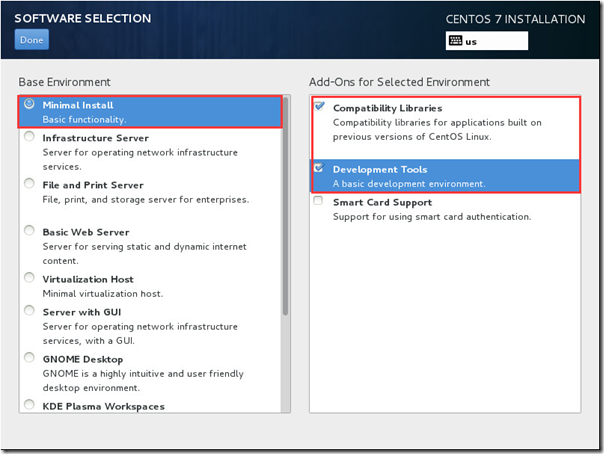
CentOS 7 最小化安装
JDK环境
JDK版本:1.8.0_91 jdk-8u91-linux-x64.rpm
下载地址:http://www.oracle.com/technetwork/java/javase/downloads/jdk8-downloads-2133151.html
CM包
CM版本:5.7.0 cloudera-manager-centos7-cm5.7.0_x86_64.tar.gz
下载地址:http://archive.cloudera.com/cm5/cm/5/cloudera-manager-centos7-cm5.7.0_x86_64.tar.gz
CDH包
CDH版本:5.7.0
CDH-5.7.0-1.cdh5.7.0.p0.45-el7.parcel CDH-5.7.0-1.cdh5.7.0.p0.45-el7.parcel.sha1 manifest.json
下载地址
http://archive.cloudera.com/cdh5/parcels/5.7/CDH-5.7.1-1.cdh5.7.1.p0.11-el7.parcel
http://archive.cloudera.com/cdh5/parcels/5.7/CDH-5.7.1-1.cdh5.7.1.p0.11-el7.parcel.sha1
http://archive.cloudera.com/cdh5/parcels/5.7/manifest.json
java-mysql连接jar包
下载地址:http://central.maven.org/maven2/mysql/mysql-connector-java/6.0.2/mysql-connector-java-6.0.2.jar
数据库
类型:MariaDB
版本:5.5.47-MariaDB MariaDB Server
节点
|
主机名 |
IP地址 |
说明 |
|
bigdata01.tfpay.com |
172.17.28.1 |
master datanode namenode |
|
bigdata02.tfpay.com |
172.17.28.2 |
datanode |
|
bigdata03.tfpay.com |
172.17.28.3 |
datanode |
|
bigdata04.tfpay.com |
172.17.28.4 |
datanode |
节点的数量可以根据自己的需求变更,也可以在CDH安装完成后,在管理界面自己拓展添加
二、底层环境准备
注:准备安装前需要把相关的包文件下载下来,并上传到服务器上
1、安装JDK
所有节点
1)安装系统原有java
# yum -y install java

# java -version

openjdk version "1.8.0_91"

OpenJDK Runtime Environment (build 1.8.0_91-b14)

OpenJDK 64-Bit Server VM (build 25.91-b14, mixed mode)

# rpm -qa|grep java

javapackages-tools-3.4.1-11.el7.noarch

python-javapackages-3.4.1-11.el7.noarch

java-1.8.0-openjdk-headless-1.8.0.91-0.b14.el7_2.x86_64

java-1.8.0-openjdk-1.8.0.91-0.b14.el7_2.x86_64

tzdata-java-2016d-1.el7.noarch
2)卸载OpenJDK
# rpm -e --nodeps java-1.8.0-openjdk-headless-1.8.0.91-0.b14.el7_2.x86_64

# rpm -e --nodeps java-1.8.0-openjdk-1.8.0.91-0.b14.el7_2.x86_64
# rpm -e --nodeps java-1.8.0-openjdk-headless-1.8.0.91-0.b14.el7_2.x86_64
# rpm -e --nodeps java-1.8.0-openjdk-1.8.0.91-0.b14.el7_2.x86_64
3)安装下载的java
# rpm -ivh jdk-8u91-linux-x64.rpm

Preparing...                          ################################# [100%]

Updating / installing...

   1:jdk1.8.0_91-2000:1.8.0_91-fcs    ################################# [100%]

Unpacking JAR files...

    tools.jar...

    plugin.jar...

    javaws.jar...

    deploy.jar...

    rt.jar...

    jsse.jar...

    charsets.jar...

    localedata.jar...

    jfxrt.jar...

# java -version

java version "1.8.0_91"

Java(TM) SE Runtime Environment (build 1.8.0_91-b14)

Java HotSpot(TM) 64-Bit Server VM (build 25.91-b14, mixed mode)

# javac -version

javac 1.8.0_91
2、更改主机名和hosts
所有节点
注意每个主机名对应的IP,按实际情况更改。
# echo "bigdata0*.tfpay.com" > /etc/hostname

# echo "172.17.28.1    bigdata01.tfpay.com    bigdata01" >> /etc/hosts

# echo "172.17.28.2    bigdata02.tfpay.com    bigdata02" >> /etc/hosts

# echo "172.17.28.3    bigdata03.tfpay.com    bigdata03" >> /etc/hosts

# echo "172.17.28.4    bigdata04.tfpay.com    bigdata04" >> /etc/hosts
3、关闭防火墙
所有节点
# systemctl stop firewalld

# systemctl disable firewalld

Removed symlink /etc/systemd/system/dbus-org.fedoraproject.FirewallD1.service.

Removed symlink /etc/systemd/system/basic.target.wants/firewalld.service.

# systemctl status firewalld

● firewalld.service - firewalld - dynamic firewall daemon

   Loaded: loaded (/usr/lib/systemd/system/firewalld.service; disabled; vendor preset: enabled)

   Active: inactive (dead)

Jun 20 16:05:43 bigdata05.tfpay.com systemd[1]: Starting firewalld - dynamic firewall daemon...

Jun 20 16:05:45 bigdata05.tfpay.com systemd[1]: Started firewalld - dynamic firewall daemon.

Jun 20 16:17:51 bigdata05.tfpay.com systemd[1]: Stopping firewalld - dynamic firewall daemon...

Jun 20 16:17:52 bigdata05.tfpay.com systemd[1]: Stopped firewalld - dynamic firewall daemon.

# sed -i "s/SELINUX=enforcing/SELINUX=disabled/" /etc/selinux/config

# reboot
重启服务器使hostname和selinux的配置生效
# getenforce

Disabled

# sestatus -v

SELinux status:                 disabled
4、安装NTP服务
所有节点
# yum -y install ntp
更改配置文件/etc/ntp.conf
在master节点namenode节点
注释掉原有的server指向把时间服务器的域名地址指向一个靠谱可连的时间服务器,我选择的是ntp.api.bz.
# vi /etc/ntp.conf

    ……

     #server 0.centos.pool.ntp.org iburst

    #server 1.centos.pool.ntp.org iburst

    #server 2.centos.pool.ntp.org iburst

    #server 3.centos.pool.ntp.org iburst

    server ntp.api.gz iburst

    ......
在其余的节点上,把时间服务器的server指向master namenode节点
# vi /etc/ntp.conf

     ……

     #server 0.centos.pool.ntp.org iburst

    #server 1.centos.pool.ntp.org iburst

    #server 2.centos.pool.ntp.org iburst

    #server 3.centos.pool.ntp.org iburst

    server 172.17.28.1 iburst

    ......
所有节点
# systemctl start ntpd

# systemctl enable ntpd

Created symlink from /etc/systemd/system/multi-user.target.wants/ntpd.service to /usr/lib/systemd/system/ntpd.service.
# systemctl start ntpd
# systemctl enable ntpd
Created symlink from /etc/systemd/system/multi-user.target.wants/ntpd.service to /usr/lib/systemd/system/ntpd.service.
5、SSH无密码登陆
配置master namenode节点无密码登陆到其他节点
在master namenode节点
# ssh-keygen -t rsa

Generating public/private rsa key pair.

Enter file in which to save the key (/root/.ssh/id_rsa): 回车

Enter passphrase (empty for no passphrase): 回车

Enter same passphrase again: 回车

Your identification has been saved in /root/.ssh/id_rsa.

Your public key has been saved in /root/.ssh/id_rsa.pub.

The key fingerprint is:

bc:14:e2:59:42:1f:21:80:eb:49:d8:3b:7c:8d:b7:f9 root@bigdata05.tfpay.com

The key's randomart image is:

+--[ RSA 2048]----+

|   ...o o.       |

|  .  . o .       |

| o .  o +        |

|. +  . * .       |

| + o oo S        |

|  * o o. .       |

|   o . o.        |

|      o          |

|       .E        |

+-----------------+

# ssh-copy-id 172.17.28.2

# ssh-copy-id 172.17.28.3

# ssh-copy-id 172.17.28.4
6、安装数据库
master namenode节点
# yum -y install mariadb-server

# vi /etc/my.cnf

    [mysqld]

    datadir=/var/lib/mysql

    socket=/var/lib/mysql/mysql.sock

    symbolic-links=0

    character-set-server=utf8     \\添加的行

    [mysqld_safe]

    log-error=/var/log/mariadb/mariadb.log

    pid-file=/var/run/mariadb/mariadb.pid

    !includedir /etc/my.cnf.d

# systemctl start mariadb

# systemctl enable mariadb

ln -s '/usr/lib/systemd/system/mariadb.service' '/etc/systemd/system/multi-user.target.wants/mariadb.service'

# mysql_secure_installation

/usr/bin/mysql_secure_installation: line 379: find_mysql_client: command not found

NOTE: RUNNING ALL PARTS OF THIS SCRIPT IS RECOMMENDED FOR ALL MariaDB

      SERVERS IN PRODUCTION USE!  PLEASE READ EACH STEP CAREFULLY!

In order to log into MariaDB to secure it, we'll need the current

password for the root user.  If you've just installed MariaDB, and

you haven't set the root password yet, the password will be blank,

so you should just press enter here.

Enter current password for root (enter for none):

OK, successfully used password, moving on...

Setting the root password ensures that nobody can log into the MariaDB

root user without the proper authorisation.

Set root password? [Y/n] y          \\设置数据库root密码

New password:                       \\设置密码

Re-enter new password:              \\再次输入密码

Password updated successfully!

Reloading privilege tables..

 ... Success!

By default, a MariaDB installation has an anonymous user, allowing anyone

to log into MariaDB without having to have a user account created for

them.  This is intended only for testing, and to make the installation

go a bit smoother.  You should remove them before moving into a

production environment.

Remove anonymous users? [Y/n] y  \\移除匿名用户

 ... Success!

Normally, root should only be allowed to connect from 'localhost'.  This

ensures that someone cannot guess at the root password from the network.

Disallow root login remotely? [Y/n] y  \\禁止root用户远程登录

 ... Success!

By default, MariaDB comes with a database named 'test' that anyone can

access.  This is also intended only for testing, and should be removed

before moving into a production environment.

Remove test database and access to it? [Y/n] y \\删除测试数据库

 - Dropping test database...

 ... Success!

 - Removing privileges on test database...

 ... Success!

Reloading the privilege tables will ensure that all changes made so far

will take effect immediately.

Reload privilege tables now? [Y/n]    //

 ... Success!

Cleaning up...

All done!  If you've completed all of the above steps, your MariaDB

installation should now be secure.

Thanks for using MariaDB!
数据库只是安装了一下,并没有做一些详细的配置。如果有需求可以另行配置。
7、其他安装与配置
所有节点
# yum  -y  install psmisc MySQL-python at bc bind-libs bind-utils cups-client cups-libs cyrus-sasl-gssapi cyrus-sasl-plain ed fuse fuse-libs httpd httpd-tools keyutils-libs-devel krb5-devel libcom_err-devel libselinux-devel libsepol-devel libverto-devel mailcap noarch mailx mod_ssl openssl-devel pcre-devel postgresql-libs python-psycopg2 redhat-lsb-core redhat-lsb-submod-security  x86_64 spax time zlib-devel

# chmod +x /etc/rc.d/rc.local

# echo "echo 0 > /proc/sys/vm/swappiness" >>/etc/rc.d/rc.local

# echo "echo never > /sys/kernel/mm/transparent_hugepage/defrag" >>/etc/rc.d/rc.local

# echo 0 > /proc/sys/vm/swappiness

# echo never > /sys/kernel/mm/transparent_hugepage/defrag

# yum -y install rpcbind

# systemctl start rpcbind

# echo "systemctl start rpcbind" >> /etc/rc.d/rc.local
三、开始安装CDH
1、传宝、解包
把下载好的一下相应包文件上传到master namenode节点内
mysql-java连接包在所有节点上都要上传
# ls

CDH-5.7.0-1.cdh5.7.0.p0.45-el7.parcel       cloudera-manager-centos7-cm5.7.0_x86_64.tar.gz  manifest.json

CDH-5.7.0-1.cdh5.7.0.p0.45-el7.parcel.sha1     jdk-8u91-linux-x64.rpm        mysql-connector-java-6.0.2.jar

# tar zxvf cloudera-manager-centos7-cm5.7.0_x86_64.tar.gz -C /opt/

# ls /opt/

cloudera  cm-5.7.0
2、创建数据库
# mysql -uroot -p

Enter password:          \\输入数据库密码

Welcome to the MariaDB monitor.  Commands end with ; or \g.

Your MariaDB connection id is 10

Server version: 5.5.47-MariaDB MariaDB Server

Copyright (c) 2000, 2015, Oracle, MariaDB Corporation Ab and others.

Type 'help;' or '\h' for help. Type '\c' to clear the current input statement.

MariaDB [(none)]> create database hive DEFAULT CHARSET utf8 COLLATE utf8_general_ci;

Query OK, 1 row affected (0.00 sec)

MariaDB [(none)]> create database amon DEFAULT CHARSET utf8 COLLATE utf8_general_ci;

Query OK, 1 row affected (0.00 sec)

MariaDB [(none)]> create database hue DEFAULT CHARSET utf8 COLLATE utf8_general_ci;

Query OK, 1 row affected (0.00 sec)

MariaDB [(none)]> create database monitor DEFAULT CHARSET utf8 COLLATE utf8_general_ci;

Query OK, 1 row affected (0.00 sec)

MariaDB [(none)]> create database oozie DEFAULT CHARSET utf8 COLLATE utf8_general_ci;

Query OK, 1 row affected (0.00 sec)

MariaDB [(none)]> grant all on *.* to root@"%" Identified by "1234.com";

Query OK, 0 rows affected (0.00 sec)

MariaDB [(none)]> exit

# /opt/cm-5.7.0/share/cmf/schema/scm_prepare_database.sh mysql cm -hlocalhost -uroot -p1234.com --scm-host localhost scm scm scm

JAVA_HOME=/usr/java/jdk1.8.0_91

Verifying that we can write to /opt/cm-5.7.0/etc/cloudera-scm-server

Creating SCM configuration file in /opt/cm-5.7.0/etc/cloudera-scm-server

Executing:  /usr/java/jdk1.8.0_91/bin/java -cp /usr/share/java/mysql-connector-java.jar:/usr/share/java/oracle-connector-java.jar:/opt/cm-5.7.0/share/cmf/schema/../lib/* com.cloudera.enterprise.dbutil.DbCommandExecutor /opt/cm-5.7.0/etc/cloudera-scm-server/db.properties com.cloudera.cmf.db.

2016-06-17 13:32:20,562 [main] INFO  com.cloudera.enterprise.dbutil.DbCommandExecutor  - Successfully connected to database.

All done, your SCM database is configured correctly!
3、创建用户
所有节点
#useradd --system --home=/opt/cm-5.7.0/run/cloudera-scm-server --shell=/bin/false --comment "Cloudera SCM User" cloudera-scm
4、制作本地源
master datanote节点执行
# ls

CDH-5.7.0-1.cdh5.7.0.p0.45-el7.parcel       cloudera-manager-centos7-cm5.7.0_x86_64.tar.gz  manifest.json

CDH-5.7.0-1.cdh5.7.0.p0.45-el7.parcel.sha1     jdk-8u91-linux-x64.rpm        mysql-connector-java-6.0.2.jar

# cp CDH-5.7.0-1.cdh5.7.0.p0.45-el7.parcel CDH-5.7.0-1.cdh5.7.0.p0.45-el7.parcel.sha1 manifest.json /opt/cloudera/parcel-repo/

# mv CDH-5.7.0-1.cdh5.7.0.p0.45-el7.parcel.sha1 CDH-5.7.0-1.cdh5.7.0.p0.45-el7.parcel.sha
5、拷贝jar包
所有节点
# ls

CDH-5.7.0-1.cdh5.7.0.p0.45-el7.parcel       cloudera-manager-centos7-cm5.7.0_x86_64.tar.gz  manifest.json

CDH-5.7.0-1.cdh5.7.0.p0.45-el7.parcel.sha1     jdk-8u91-linux-x64.rpm        mysql-connector-java-6.0.2.jar

# cp mysql-connector-java-6.0.2.jar /usr/share/java/mysql-connector-java.jar
# ls
CDH-5.7.0-1.cdh5.7.0.p0.45-el7.parcel cloudera-manager-centos7-cm5.7.0_x86_64.tar.gz manifest.json
CDH-5.7.0-1.cdh5.7.0.p0.45-el7.parcel.sha1 jdk-8u91-linux-x64.rpm mysql-connector-java-6.0.2.jar
# cp mysql-connector-java-6.0.2.jar /usr/share/java/mysql-connector-java.jar
master namenode节点
# cp mysql-connector-java-6.0.2.jar /opt/cloudera/parcels/CDH-5.7.0-1.cdh5.7.0.p0.45/lib/hive/lib/

# cp mysql-connector-java-6.0.2.jar /opt/cm-5.7.0/share/cmf/lib/
6、更改配置
# sed -i "s/server_host=localhost/server_host=172.17.28.1/" /opt/cm-5.7.0/etc/cloudera-scm-agent/config.ini

# mkdir /opt/cm-5.7.0/run/cloudera-scm-agent
7、启动服务
master namenode节点
# /opt/cm-5.7.0/etc/init.d/cloudera-scm-server start
除了master namenode节点
# scp -r 172.17.28.1:/opt/cm-5.7.0 /opt
所有节点
# /opt/cm-5.7.0/etc/init.d/cloudera-scm-agent start
8、浏览页面开始安装
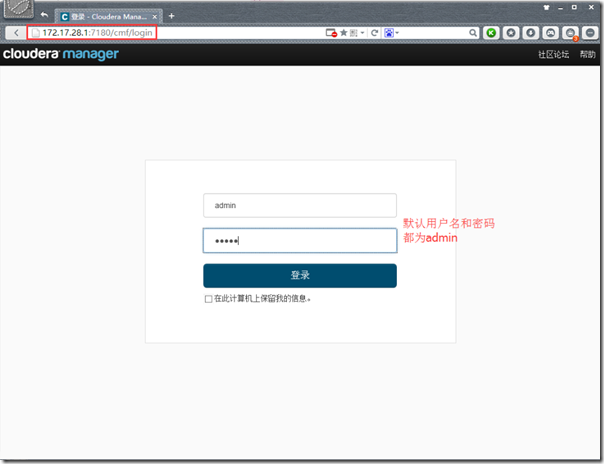
1)登陆
打开浏览器,访问maser namenode节点的7180端口
输入用户名和密码admin、admin
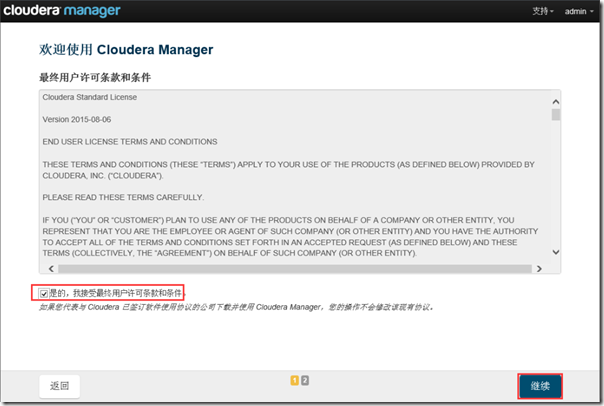
2)接受协议
3)选择版本
本文档选择Cloudera Express免费开源版本


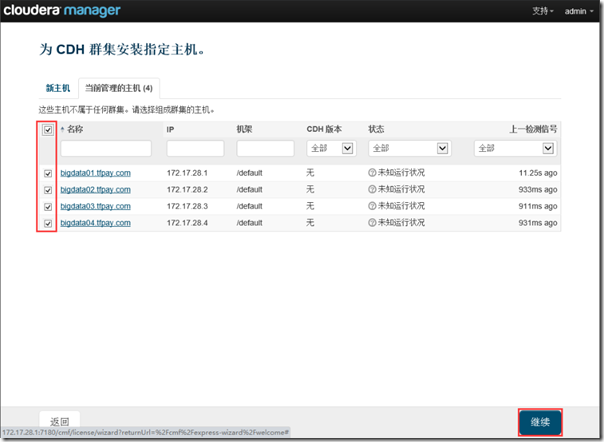
4)指定主机

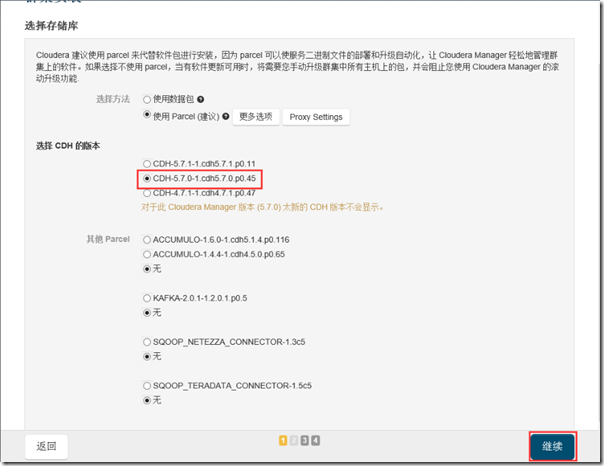
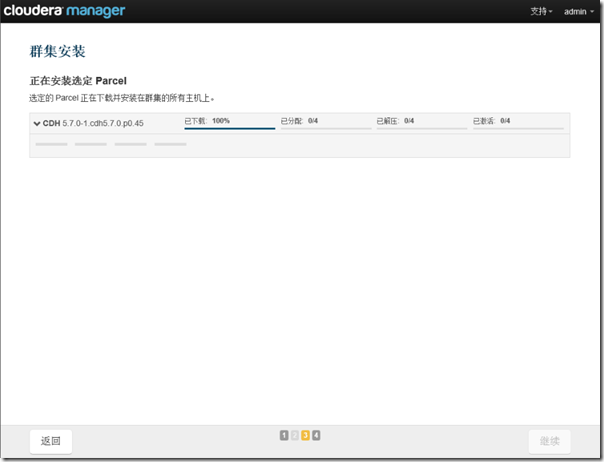
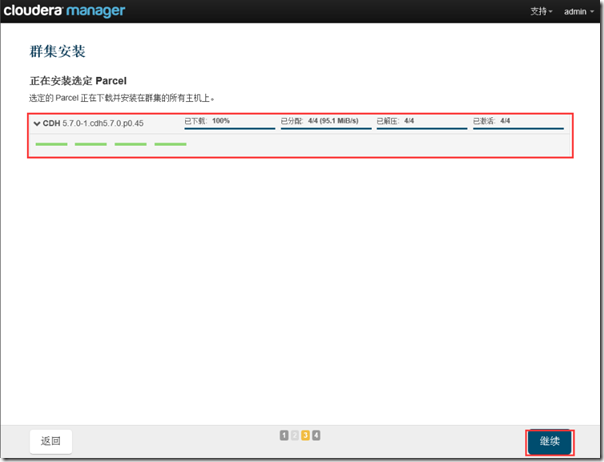
5)选择CDH版本
注:选择在制作本地源时选择的版本,如果选择别的版本的话会去官网下载那样安装速度会很慢
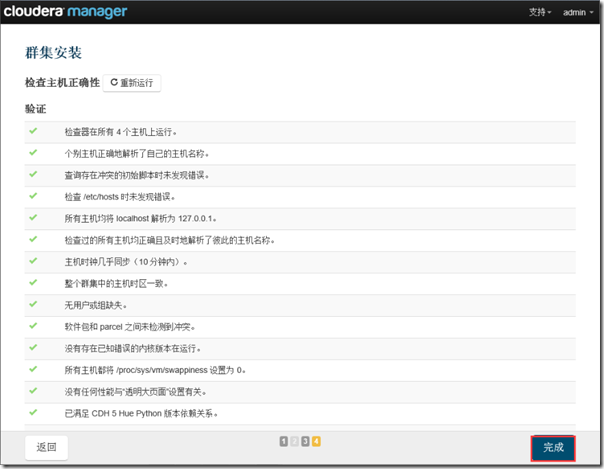
6)检查主机正确性
确保全部验证通过
7)选择安装的服务
本文选择的是安装所有服务

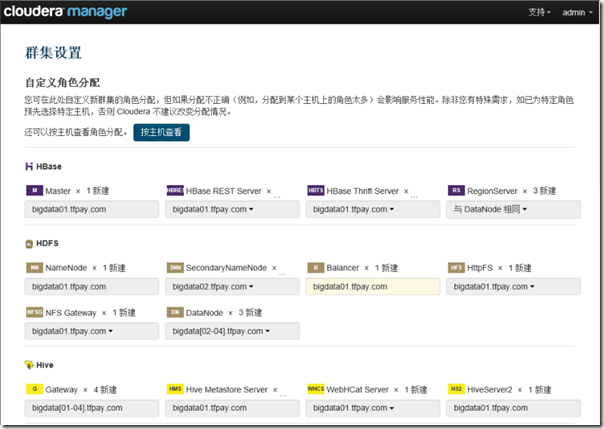
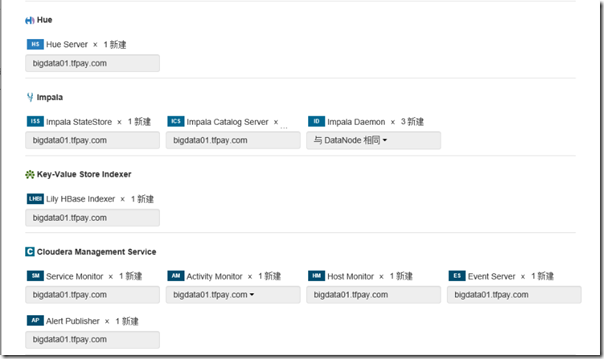
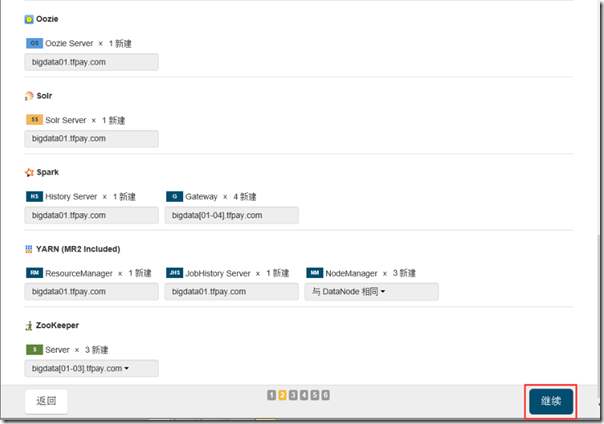
8)角色分配
这里应该根据自己的实际需求和服务器的硬件参数自己选择
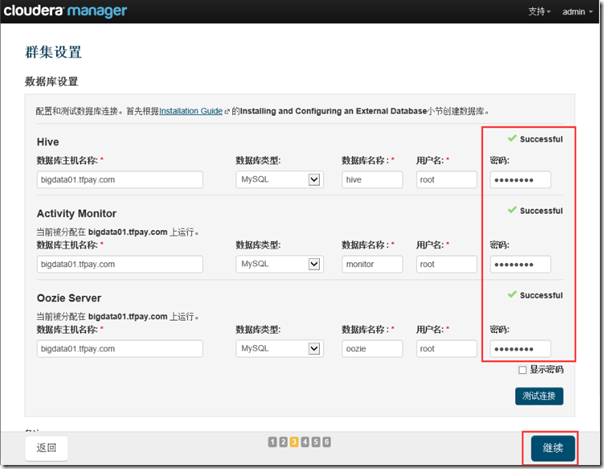
9)数据库设置

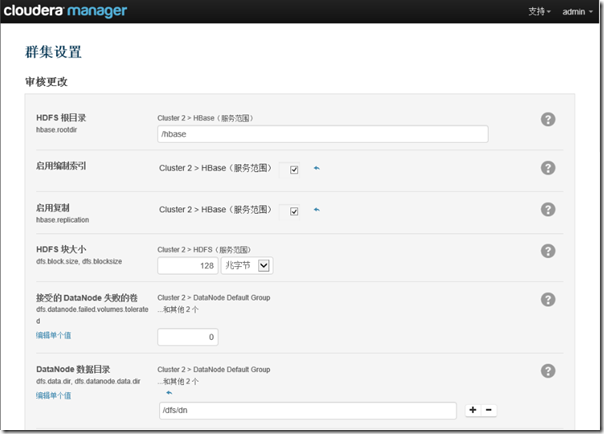
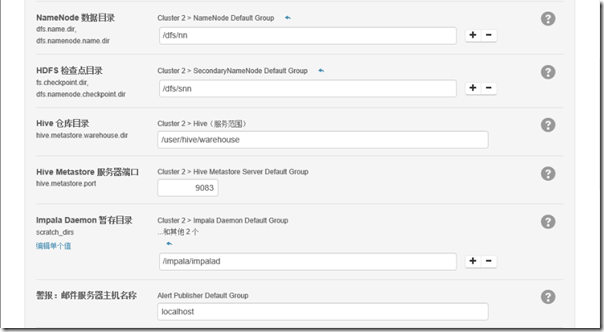
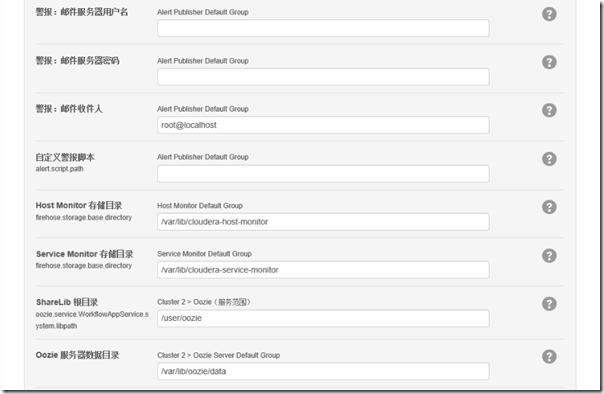
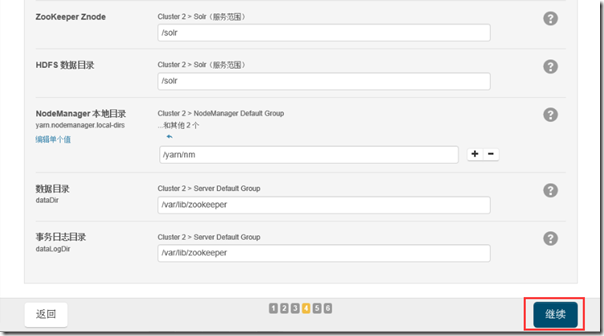
10)群集设置
可以根据自己的实际情况更改设置,本文采用默认配置。这些配置可以在集群安装完成以后后续更改
11)开始安装
无错误信息全部通过
12)安装完成

第一次安装完成后,会出现一些配置的警告信息。这些可以根据提示信息更改。
四、错误总结
1、pstree: command not found
错误展示
# /opt/cm-5.7.0/etc/init.d/cloudera-scm-server start

/opt/cm-5.7.0/etc/init.d/cloudera-scm-server: line 109: pstree: command not found

Starting cloudera-scm-server:                              [FAILED]

# /opt/cm-5.7.0/etc/init.d/cloudera-scm-agent start

/opt/cm-5.7.0/etc/init.d/cloudera-scm-agent: line 108: pstree: command not found

Starting cloudera-scm-agent:                               [FAILED]
原因
因为系统是最小化安装,默认没有安装
解决方法
# yum -y install psmisc
2、cloudera-scm-agent start 启动失败
错误展示
# /opt/cm-5.7.0/etc/init.d/cloudera-scm-agent start

Starting cloudera-scm-agent:                               [FAILED]
查询日志
、
# cd /opt/cm-5.7.0/log/cloudera-scm-agent/

# ls

cloudera-scm-agent.out

# cat cloudera-scm-agent.out

[22/Jun/2016 11:02:09 +0000] 3695 MainThread agent        INFO     SCM Agent Version: 5.7.0

Unable to create the pidfile.
原因
经过查找后发现/opt/cm-5.7.0/run目录下没有cloudera-scm-agent文件夹
# cd /opt/cm-5.7.0/run/

# ls

cloudera-scm-server
解决方法
# mkdir /opt/cm-5.7.0/run/cloudera-scm-agent
3、install: invalid user ‘cloudera-scm’
错误展示
# /opt/cm-5.7.0/etc/init.d/cloudera-scm-server start

install: invalid user ‘cloudera-scm’
原因
没有创建运行server的用户
解决方法
#useradd --system --home=/opt/cm-5.7.0/run/cloudera-scm-server --shell=/bin/false --comment "Cloudera SCM User" cloudera-scm
4、检查主机正确性警告
警告

解决方法
# echo 0 > /proc/sys/vm/swappiness

# echo never > /sys/kernel/mm/transparent_hugepage/defrag

# echo "echo 0 > /proc/sys/vm/swappiness" >>/etc/rc.d/rc.local

# echo "echo never > /sys/kernel/mm/transparent_hugepage/defrag" >>/etc/rc.d/rc.local
5、启动Hive失败
错误展示
原因
根据提示发现是没有mysql-java连接的驱动jar包
解决方法
# ls

CDH-5.7.0-1.cdh5.7.0.p0.45-el7.parcel       cloudera-manager-centos7-cm5.7.0_x86_64.tar.gz  manifest.json

CDH-5.7.0-1.cdh5.7.0.p0.45-el7.parcel.sha1     jdk-8u91-linux-x64.rpm        mysql-connector-java-6.0.2.jar

# cp mysql-connector-java-6.0.2.jar /opt/cloudera/parcels/CDH-5.7.0-1.cdh5.7.0.p0.45/lib/hive/lib/
6、启动NFS Gateway失败
错误展示
原因
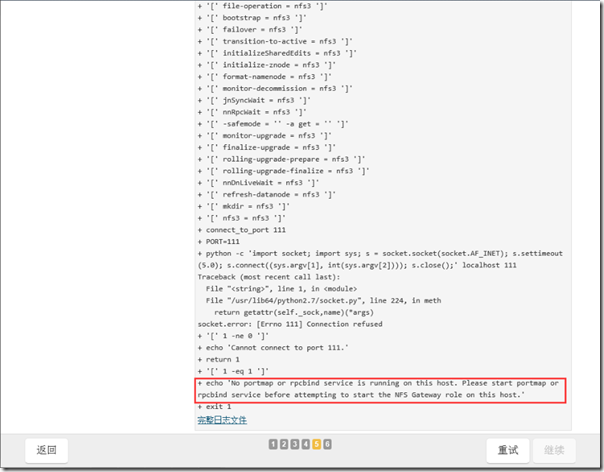
解决方法
# yum -y install rpcbind

# systemctl start rpcbind

# echo "systemctl start rpcbind" >> /etc/rc.d/rc.local

# chmod +x /etc/rc.d/rc.local
7、启动Oozie,impala失败
错误展示
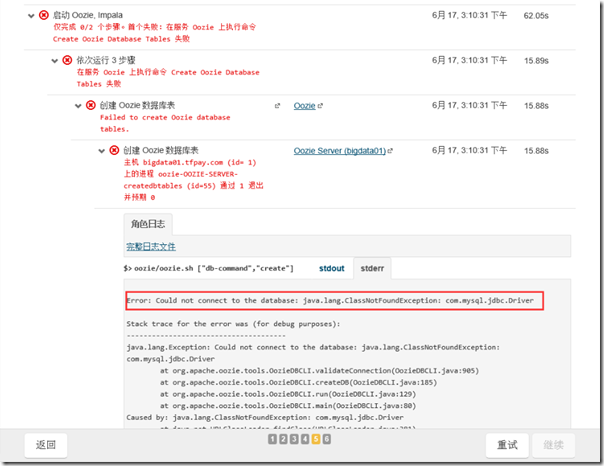
原因
没有mysql-java连接jar包
解决方法
# ls

CDH-5.7.0-1.cdh5.7.0.p0.45-el7.parcel       cloudera-manager-centos7-cm5.7.0_x86_64.tar.gz  manifest.json

CDH-5.7.0-1.cdh5.7.0.p0.45-el7.parcel.sha1     jdk-8u91-linux-x64.rpm        mysql-connector-java-6.0.2.jar

# cp mysql-connector-java-6.0.2.jar /usr/share/java/mysql-connector-java.jar
Hadoop-CDH5.7.0 for CentOS7的更多相关文章
- centos7+cdh5.10.0搭建
一.选择环境: 1.说明 本次部署使用台机器,3台用于搭建CDH集群,1台为内部源.内部源机器是可以连接公网的,可以提前部署好内部源,本次部署涉及到的服务器的hosts配置如下: 192.168.10 ...
- centos7.5搭建cdh5.13.0
序言 本文集群搭建为三台机器,cdh版本为5.13.0,以下是安装过程中所用到的软件包等,可以自行下载.一.前期准备1.安装环境 系统:centos7.5/最小安装版本/64位 内存:主节点 --&g ...
- CentOS7安装CDH 第五章:CDH的安装和部署-CDH5.7.0
相关文章链接 CentOS7安装CDH 第一章:CentOS7系统安装 CentOS7安装CDH 第二章:CentOS7各个软件安装和启动 CentOS7安装CDH 第三章:CDH中的问题和解决方法 ...
- Ubuntu14.04用apt在线/离线安装CDH5.1.2[Apache Hadoop 2.3.0]
目录 [TOC] 1.CDH介绍 1.1.什么是CDH和CM? CDH一个对Apache Hadoop的集成环境的封装,可以使用Cloudera Manager进行自动化安装. Cloudera-Ma ...
- CentOS7.0分布式安装HADOOP 2.6.0笔记-转载的
三台虚拟机,IP地址通过路由器静态DHCP分配 (这样就无需设置host了). 三台机器信息如下 - 1. hadoop-a: 192.168.0.20 #master 2. ha ...
- Cloudera Hadoop 5& Hadoop高阶管理及调优课程(CDH5,Hadoop2.0,HA,安全,管理,调优)
1.课程环境 本课程涉及的技术产品及相关版本: 技术 版本 Linux CentOS 6.5 Java 1.7 Hadoop2.0 2.6.0 Hadoop1.0 1.2.1 Zookeeper 3. ...
- CentOS7+CDH5.14.0安装全流程记录,图文详解全程实测-8CDH5安装和集群配置
Cloudera Manager Server和Agent都启动以后,就可以进行CDH5的安装配置了. 准备文件 从 http://archive.cloudera.com/cdh5/par ...
- CentOS7+CDH5.14.0安装全流程记录,图文详解全程实测-总目录
CentOS7+CDH5.14.0安装全流程记录,图文详解全程实测-总目录: 0.Windows 10本机下载Xshell,以方便往Linux主机上上传大文件 1.CentOS7+CDH5.14.0安 ...
- centos7安装CDH5.5.0
1.安装jdk mkdir -p /usr/java tar zxvf jdk-7u80-linux-x64.tar.gz -C /usr/java/ vi /etc/profile export J ...
- Pentaho Kettle 6.1连接CDH5.4.0集群
作者:Syn良子 出处:http://www.cnblogs.com/cssdongl 欢迎转载 最近把之前写的Hadoop MapReduce程序又总结了下,发现很多逻辑基本都是大致相同的,于是想到 ...
随机推荐
- 控制uwsgi 的信号量
最近在用nginx+uwsgi+djano搭建一个网站,当.py文件修改后,如果不重启uwsgi,修改无法应用. 查了下uwsgi的相关文档 ,找到几个解决方案.顺便翻译下以备查看 启动服务 Star ...
- DNA Sequence - POJ 2778(AC自动机+矩阵乘法)
题目大意:DNA序列是有 ATGC 组成的,现在知道一些动物的遗传片段有害的,那么如果给出这些有害的片段,能否求出来所有长度为 N 的基因中有多少是不包含这些有害片段的. 分析:也是断断续续做了一 ...
- M - 昂贵的聘礼 - poj1062
Description 年轻的探险家来到了一个印第安部落里.在那里他和酋长的女儿相爱了,于是便向酋长去求亲.酋长要他用10000个金币作为聘礼才答应把女儿嫁给他.探险家拿不出这么多金币,便请求酋长降低 ...
- Linux下设置允许myql数据库远程连接
系统环境: Linux ubuntu --generic #-Ubuntu SMP Thu Apr :: UTC x86_64 x86_64 x86_64 GNU/Linux 系统中已经安装好mysq ...
- Intellij 快捷键大全
Intellij IDEA的快捷键非常好用,能大大提高我们的开发速度.这里列举了一些常用的快捷键. 快速查找: Ctrl+N 查找类 Ctrl+R 替换当前窗口的文本 Ctrl+F 当前代码中查 ...
- hibernate两表连接查询
1.两表的关联关系为一对一 2.库存表Stock与商品信息表Product 3.库存表查询商品表里的商品名称,商品编号 库存表字段: private String id; private ...
- visual stduio 插件及代码生成器
下图是本人常用的visual stuido开发工具插件. 2 使用NArrange格式化代码,这个工具,可以将代码格式化,用region分隔开来. NArrange 0.2.9.0 ________ ...
- 如何看懂Code128条形码
条形码就是我们看到的商品上有的那些竖条条. 要不是项目上用到这个或许我一辈子也不会对那个感兴趣. 条形码其实是分成很多类的,虽然他们看起来都差不多…… 常见的条形码的码制被称为39码.128码.417 ...
- [Angular 2] @ngrx/devtools demo
Check the Github: https://github.com/ngrx/devtools Example:
- PHP学习路径
php学习大致可分为三个阶段: 第一阶段:基础知识,页面布局. 学习内容:html.div+css.js. 学习目标:div+css设计. 阶段二:php核心知识和数据库交互. 学习内容:php核心知 ...