android之TabWidget选项卡
1 概览
l TabWidget与TabHost。tab组件一般包括TabHost和TabWidget、FrameLayout,且TabWidget、FrameLayout属于TabHost。
l 是否继承TabActivity的问题
l 实现步骤。两种实现方式,一种是将每个Tab的布局嵌在TabHost中的FrameLayout中,每个Tab的内容布局与显示都在FrameLayout中进行,缺点是布局会显得很臃肿;一种是每个Tab从FrameLayout中独立出来,以Activity呈现,这样使得每个Tab有单独的布局。
2 效果图


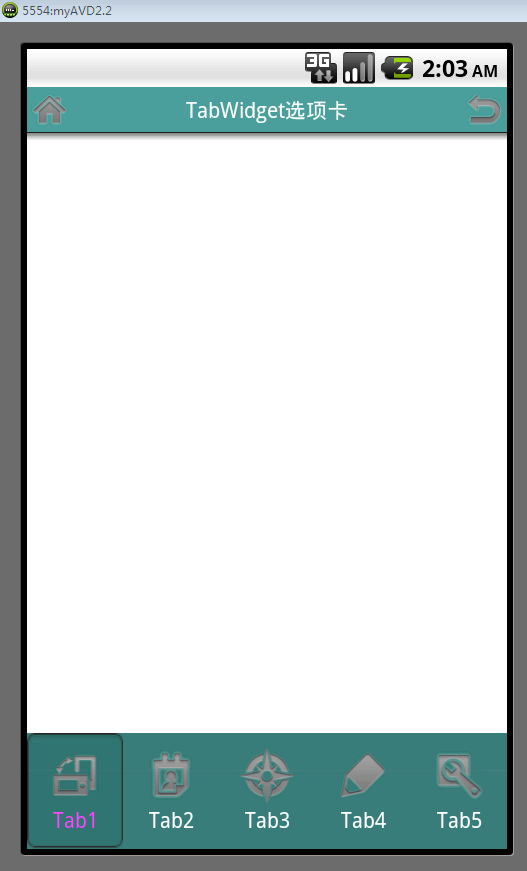
Widget在顶部的情形:

3 主要布局
3.1 TabMain布局
方式一:
- <?xml version="1.0" encoding="utf-8"?>
- <TabHost xmlns:android="http://schemas.android.com/apk/res/android"
- android:id="@+id/tabhost"
- android:layout_width="match_parent"
- android:layout_height="match_parent"
- android:orientation="vertical" >
- <RelativeLayout
- android:layout_width="fill_parent"
- android:layout_height="fill_parent"
- android:orientation="vertical" >
- <TabWidget
- android:id="@android:id/tabs"
- android:layout_width="fill_parent"
- android:layout_height="60dip"
- android:layout_alignParentBottom="true"
- android:background="#424242" >
- </TabWidget>
- <FrameLayout
- android:id="@android:id/tabcontent"
- android:layout_width="fill_parent"
- android:layout_height="fill_parent" >
- <LinearLayout
- android:id="@+id/theme"
- android:layout_width="fill_parent"
- android:layout_height="fill_parent"
- android:orientation="vertical" >
- <TextView
- android:id="@+id/theme_title"
- android:layout_width="wrap_content"
- android:layout_height="wrap_content"
- android:text="Tab1" />
- </LinearLayout>
- <LinearLayout
- android:id="@+id/wallpaper"
- android:layout_width="fill_parent"
- android:layout_height="fill_parent"
- android:orientation="vertical" >
- <TextView
- android:id="@+id/wallpaper_title"
- android:layout_width="wrap_content"
- android:layout_height="wrap_content"
- android:text="Tab2" />
- </LinearLayout>
- <LinearLayout
- android:id="@+id/iconbg"
- android:layout_width="fill_parent"
- android:layout_height="fill_parent"
- android:orientation="vertical" >
- <TextView
- android:id="@+id/iconbg_title"
- android:layout_width="wrap_content"
- android:layout_height="wrap_content"
- android:text="Tab3" />
- </LinearLayout>
- <LinearLayout
- android:id="@+id/screenlock"
- android:layout_width="fill_parent"
- android:layout_height="fill_parent"
- android:orientation="vertical" >
- <TextView
- android:id="@+id/screenlock_title"
- android:layout_width="wrap_content"
- android:layout_height="wrap_content"
- android:text="Tab4" />
- </LinearLayout>
- <LinearLayout
- android:id="@+id/effect"
- android:layout_width="fill_parent"
- android:layout_height="fill_parent"
- android:orientation="vertical" >
- <TextView
- android:id="@+id/effect_title"
- android:layout_width="wrap_content"
- android:layout_height="wrap_content"
- android:text="Tab5" />
- </LinearLayout>
- </FrameLayout>
- </RelativeLayout>
- </TabHost>
方式二:
- <?xml version="1.0" encoding="utf-8"?>
- <TabHost xmlns:android="http://schemas.android.com/apk/res/android"
- android:id="@android:id/tabhost"
- android:layout_width="fill_parent"
- android:layout_height="fill_parent"
- android:background="@color/wcity_normal_bg" >
- <LinearLayout
- android:layout_width="fill_parent"
- android:layout_height="fill_parent"
- android:orientation="vertical" >
- <FrameLayout
- android:id="@android:id/tabcontent"
- android:layout_width="fill_parent"
- android:layout_height="fill_parent"
- android:layout_weight="1" >
- </FrameLayout>
- <TabWidget
- android:id="@android:id/tabs"
- android:layout_width="fill_parent"
- android:layout_height="wrap_content"
- android:background="@drawable/tab"
- />
- </LinearLayout>
- </TabHost>
3.2 TabItem布局
这一部分中方式一与方式二没有什么区别,只有表示形式的区别。比如,根据需求,Tab可以
只以文字呈现,
可以只以图片呈现,
可以同时有图片和文字
其中有文字和图片的布局如下:
- <?xml version="1.0" encoding="utf-8"?>
- <LinearLayout xmlns:android="http://schemas.android.com/apk/res/android"
- android:layout_width="fill_parent"
- android:layout_height="fill_parent"
- android:gravity="center_horizontal|center_vertical"
- android:orientation="vertical" >
- <LinearLayout
- android:id="@+id/tabItem
- android:layout_width="wrap_content"
- android:layout_height="wrap_content"
- android:background="@drawable/bg_ispressed"
- android:gravity="center_horizontal|center_vertical"
- android:orientation="vertical" >
- <ImageView
- android:id="@+id/icon"
- android:layout_width="wrap_content"
- android:layout_height="wrap_content" />
- <TextView
- android:id="@+id/name"
- android:layout_width="wrap_content"
- android:layout_height="wrap_content" />
- </LinearLayout>
- </LinearLayout>
3.3点击状态
Tab键点击后状态的问题,如果点击后,没有状态提示对用户是不友好的。点击状态的实现就是对TabItem布局的android:background进行设置。例如:
上述TabItem中LinearLayout的android:background设置的属性:@drawable/bg_ispressed
其中bg_ispressed文件如下:
- <?xml version="1.0" encoding="utf-8"?>
- <selector xmlns:android="http://schemas.android.com/apk/res/android">
- <item android:drawable="@drawable/tab_selected_bg" android:state_pressed="false" android:state_selected="true"/>
- </selector>
tab_selected_bg即是点击后变换的图片效果。
3.4 关于Tab位置的问题
Tab标签显示在顶部还是底部也是经常会遇到的问题。
通常TabMain布局中TabWidget在FrameLayout上面默认就是显示在顶部了,如果改成在底部显示,首先会想到的是直接调换顺序,将TabWidget放在FrameLayout后面。
情形一:
问题来了,Tab栏直接消失掉(我试过),后来解决方法是:FrameLayout中添加属性:android:layout_weight="1"。这种情形可以解决的条件是,TabWidget和FrameLayout被嵌套在LinearLayout布局中,如果是其他则行不通。
情形二:
TabWidget与FrameLayout顺序任意,在TabWidget中添加属性
android:layout_alignParentBottom="true"
当然,这种情形适合TabWidget和FrameLayout被嵌套在RelativeLayout布局中,同样的,如果是其他则行不通。
注:以上两种情形也不是绝对的,只实践过以上两种情形,至于其他布局就不清楚了,具体问题具体分析吧。
4 继承TabActivity?
4.1 继承TabActivity与不继承的问题
继承不继承TabActivity,看自己习惯了,都能正确实现,没什么区别,至于在代码方面唯一的区别在于:
不继承TabActivity而继承Activity的需要在代码中加入:
mTabHost.setup();
4.2 主要代码
直接继承自Activity的代码
- import java.util.ArrayList;
- import java.util.List;
- import android.app.Activity;
- import android.content.Context;
- import android.os.Bundle;
- import android.view.LayoutInflater;
- import android.view.View;
- import android.widget.ImageView;
- import android.widget.LinearLayout;
- import android.widget.TabHost;
- import android.widget.TextView;
- public class TabDesignActivity extends Activity{
- private Context mContex = this;
- private TabHost mTabHost;
- private String TAB1 = "tab1";
- private String TAB2 = "tab2";
- private String TAB3 = "tab3";
- private String TAB4 = "tab4";
- private String TAB5 = "tab5";
- private List<LinearLayout> menuItemList;
- @Override
- protected void onCreate(Bundle savedInstanceState) {
- // TODO Auto-generated method stub
- super.onCreate(savedInstanceState);
- setContentView(R.layout.tab_main);
- menuItemList = new ArrayList<LinearLayout>();
- mTabHost = (TabHost) findViewById(R.id.tabhost);
- mTabHost.setup();
- mTabHost.addTab(mTabHost.newTabSpec("tab1").setIndicator(getMenuItem(R.drawable.tab1_ispressed, TAB1)).setContent(R.id.tab1));
- mTabHost.addTab(mTabHost.newTabSpec("tab2").setIndicator(getMenuItem(R.drawable.tab2_ispressed, TAB2)).setContent(R.id.tab2));
- mTabHost.addTab(mTabHost.newTabSpec("tab3").setIndicator(getMenuItem(R.drawable.tab3_ispressed, TAB3)).setContent(R.id.tab3));
- mTabHost.addTab(mTabHost.newTabSpec("tab4").setIndicator(getMenuItem(R.drawable.tab4_ispressed, TAB4)).setContent(R.id.tab4));
- mTabHost.addTab(mTabHost.newTabSpec("tab5").setIndicator(getMenuItem(R.drawable.tab5_ispressed, TAB5)).setContent(R.id.tab5));
- }
- public View getMenuItem(int imgID, String textID){
- LinearLayout ll = (LinearLayout) LayoutInflater.from(mContex).inflate(R.layout.tab_item, null);
- ImageView imgView = (ImageView)ll.findViewById(R.id.icon);
- imgView.setBackgroundResource(imgID);
- TextView textView = (TextView)ll.findViewById(R.id.name);
- textView.setText(textID);
- menuItemList.add(ll);
- return ll;
- }
- }
继承自TabActivity的实现
- /**
- * @author aaron
- */
- package com.aaron.activity;
- import java.util.ArrayList;
- import java.util.List;
- import android.annotation.SuppressLint;
- import android.app.TabActivity;
- import android.content.Context;
- import android.content.Intent;
- import android.os.Bundle;
- import android.view.LayoutInflater;
- import android.widget.ImageView;
- import android.widget.LinearLayout;
- import android.widget.TabHost;
- import android.widget.TextView;
- import android.widget.TabHost.TabSpec;
- import com.aaron.util.R;
- /**
- * @author aaron
- *
- */
- public class TabWidget extends TabActivity {// 声明TabHost对象
- private TabHost mTabhost;
- private LayoutInflater mInflater;
- private List<TextView> mtext;
- private List<ImageView> mimage;
- private List<TabSpec> mTabSpec;
- private List<LinearLayout> linearLayout;
- private List<Intent> intent;
- private Context mContext;
- private static final String[] tabTitle = { "Tab1", "Tab2", "Tab3", "Tab4","Tab5"};
- private static final int[] tabImage = { R.drawable.main1
- , R.drawable.main2, R.drawable.main3, R.drawable.main4,R.drawable.main5};
- /** Called when the activity is first created. */
- @Override
- public void onCreate(Bundle savedInstanceState) {
- super.onCreate(savedInstanceState);
- setContentView(R.layout.tab_main);
- mContext = this;
- mInflater = LayoutInflater.from(this);
- mTabhost = (TabHost) findViewById(android.R.id.tabhost);
- mTabSpec = new ArrayList<TabSpec>();
- linearLayout = new ArrayList<LinearLayout>();
- mtext = new ArrayList<TextView>();
- intent = new ArrayList<Intent>();
- //****************************************************************
- //若是引用有图片的布局
- mimage = new ArrayList<ImageView>();
- //****************************************************************
- creatTab();
- }
- @SuppressLint("NewApi")
- public void creatTab() {
- for (int i = 0; i < tabTitle.length; i++) {
- mTabSpec.add(mTabhost.newTabSpec(tabTitle[i]));
- //****************************************************************
- //选择使用哪种布局
- //****************************************************************
- linearLayout.add((LinearLayout) mInflater.inflate(
- R.layout.tabwidget2, null));
- mtext.add((TextView) linearLayout.get(i)
- .findViewById(R.id.tab_Text_name));
- mtext.get(i).setText(tabTitle[i]);
- //****************************************************************
- //若是引用有图片的布局依次添加进图片
- mimage.add((ImageView) linearLayout.get(i)
- .findViewById(R.id.tab_Image_name));
- mimage.get(i).setImageResource(tabImage[i]);
- //****************************************************************
- // 依次加入每个Tab的Activity
- switch (i) {
- case 0:
- intent.add(new Intent().setClass(TabWidget.this,
- UdoActivity.class));
- break;
- case 1:
- intent.add(new Intent().setClass(TabWidget.this, UdoActivity.class));
- break;
- case 2:
- intent.add(new Intent().setClass(TabWidget.this,
- UdoActivity.class));
- break;
- case 3:
- intent.add(new Intent().setClass(TabWidget.this,
- UdoActivity.class));
- break;
- case 4:
- intent.add(new Intent().setClass(TabWidget.this,
- UdoActivity.class));
- break;
- }
- mTabSpec.get(i).setIndicator(linearLayout.get(i));
- mTabSpec.get(i).setContent(intent.get(i));
- mTabhost.addTab(mTabSpec.get(i));
- }
- }
4.3 关键代码详解
1)mTabHost.newTabSpec("tab1")用来new一个tab,同时标记这个tab的tag。
2)setContent()用来处理点击这个tab后的动作,可以是这个Activity下的一个组件,如setContent(R.id.tab1),也可以是一个intent,比如:setContent(newIntent(this, SubTab.class))。
3)setIndicator()用来标记这个tab的名字,可以是setIndicator("tab1"),也可以包含其他的属性,如图片:setIndicator( "名称",getResources().getDrawable(android.R.tab1))。
4)tabs.addTab(spec)将这个tab添加进TabHost。
5)getMenuItem(R.drawable.tab_ispressed,TAB1)设置其中一Tab被按下的状态改变,R.drawable.tab_ispressed布局如下:
- <?xml version="1.0" encoding="utf-8"?>
- <selector xmlns:android="http://schemas.android.com/apk/res/android">
- <item android:drawable="@drawable/tab1_menu_effect_selected" android:state_pressed="false" android:state_selected="true"/>
- <item android:drawable="@drawable/tab1_menu_effect"/>
- </selector>
android之TabWidget选项卡的更多相关文章
- Android TabHost TabWidget 去除黑线(底部下划线)
采用TabHost布局时,往往会发现默认的系统风格与软件风格很不协调,比如TabWidget的下划线影响布局效果.通常情况下会去除其下划线.如果是采用xml布局文件,在TabWidget的属性项设置a ...
- Android 自学之选项卡TabHost
选项卡(TabHost)是一种非常实用的组件,TabHost可以很方便地在窗口上放置多个标签页,每个标签页相当于获得了一个与外部容器相同大小的组建摆放区域.通过这种方式,就可以在一个容器中放置更多组件 ...
- android自定义TabWidget
在做项目的时候,需要用到这个选项卡,刚开始看了系统的tabwidget,囧了,底边有黑线不说,还不美观,扒了好多的网页发现前辈做的能够满足自己的需求,将代码修改了下,就能用喽,伟人说过,站在前辈的肩膀 ...
- Android ViewPager实现选项卡切换
ViewPager实现选项卡切换,效果图如下: 步骤一:这里使用兼容低版本的v4包进行布局,这里eclipse没有输入提示,所以要手动输入,文件名称“activity_main.xml” <Re ...
- android自定义TabWidget样式
先看看效果图吧,个人觉得图标丑了点,不过还行,自己用PS做的 下面是全部代码和流程,一定要按流程顺序来,不然错误! 1.tabhost.xml <TabHost xmlns:android=&q ...
- Android之标签选项卡
TabWidget可以通过不同的标签进行切换并且显示不同的内容,相当于Button按钮实现不同的功能. TabHost的布局: (1):我们先在Layouts拖一个Vertical(纵向视图)的Lin ...
- android学习--TabHost选项卡组件
TabHost是一种非常有用的组件,TabHost能够非常方便地在窗体上放置多个标签页,每一个标签页获得了一个与外部容器同样大小的组件摆放区域.在手机系统的应用类似"未接电话".& ...
- Android TabHost切换选项卡实现数据实时刷新
手机界面大小有限,使用TabHost可以达到在一个Activity中放入多个容器(界面)的效果.但存在一个问题是,当数据信息在一个容器(界面)中有所改变时,需要在用户切换选项卡到其他容器(界面)的时候 ...
- Android快速开发-选项卡
介绍 几行代码实现Android选项卡界面,支持标准底部Tab自定义视图选项卡,头部文字选项卡. 底部自定义视图选项卡 先来看看实现下图中的效果我们代码应该怎么写? 实现上图效果只需以下代码: pub ...
随机推荐
- leetcode 第九题 Palindrome Number(java)
Palindrome Number time=434ms 负数不是回文数 public class Solution { public boolean isPalindrome(int x) { in ...
- Sprint5
进展:今天开始进行了登录界面的编写及实现. 燃尽图: 工作照:
- PCB快速打样规范
基本情况 板材为FR-4,板厚1.6mm 板材铜厚为1/2oz,成品铜厚为1oz(加工过程中的沉铜工艺会让铜层增加厚度) 绿油白字 喷锡工艺 最小孔内铜厚1.27um 电铜18 ...
- ScrollView中嵌套两个ListView
做的项目中要使用两个ListView在同一个页面上下显示,因为数据源不同,不能通过在Adapter中设置标志位去区分显示,最后只能硬着头皮做一个ScrollView嵌套两个ListView,但按正常情 ...
- Java 多维数组 按某列 排序
public MetaCell[][] getByColumn(final int columnIndex, int decisionIndex) {//[注意]final咯 ...
- 备份及还原Xcode的模拟器
http://blog.csdn.net/it_magician/article/details/8749876 每次更新或者重装Xcode之后,最麻烦的莫过于各个模拟器的安装了,因为下载速度实在让人 ...
- 【Android 复习】:Android之ViewFlipper(一)
屏幕切换指的是在同一个Activity内屏幕见的切换,最长见的情况就是在一个FrameLayout内有多个页面,比如一个系统设置页面:一个个性化设置页面. 通过查看Android API文档可以发现, ...
- Java程序员从笨鸟到菜鸟全部博客目录
本文来自:曹胜欢博客专栏.转载请注明出处:http://blog.csdn.net/csh624366188 大学上了一年半,接触java也一年半了,虽然中间也有其他东西的学习,但是还是以java为主 ...
- HDU 5965 扫雷 【模拟】 (2016年中国大学生程序设计竞赛(合肥))
扫雷 Time Limit: 2000/1000 MS (Java/Others) Memory Limit: 65536/65536 K (Java/Others)Total Submissi ...
- Hay Points
Hay Points TimeLimit: 1 Second MemoryLimit: 32 Megabyte Totalsubmit: 1022 Accepted: 602 Descript ...