java如何编写多线程
1.如何实现多线程
1.1实现Runnable接口,实现run()方法。
public class Main4 implements Runnable {

    public static void main(String[] args) {

        Main4 m = new Main4();

        new Thread(m).start();

    }

    @Override

    public void run() {

        for (int i = 0; i < 10; i++) {

            System.out.println(i);

        }

    }

}
1.2继承Thread接口,重写run()方法。
public class Main4 extends Thread {

    public static void main(String[] args) {

        new Main4().start();

    }

    @Override

    public void run() {

        for (int i = 0; i < 10; i++) {

            System.out.println(i);

        }

    }

}
1.3实现Callable接口,实现call()方法。
public class Main4 implements Callable {

    public static void main(String[] args) throws ExecutionException, InterruptedException {

        Callable c = new Main4();

        FutureTask<Integer> ft = new FutureTask<>(c);

        new Thread(ft).start();

        System.out.println(ft.get());

    }

    @Override

    public Integer call() throws Exception {

        int i = 0;

        for (i = 0; i < 10; i++) {}

        return i;

    }

}
2.Runnable、Thread、Callable三种方式实现多线程的区别
2.1Runnable
@FunctionalInterface

public interface Runnable {

    public abstract void run();

}
Runnable接口很简单,里面只有一个抽象方法run()。run()方法里面的是这个线程要执行的内容。
2.2Thread
public class Thread implements Runnable {

    public Thread() {

        init(null, null, "Thread-" + nextThreadNum(), 0);

    }

    public Thread(Runnable target) {

        init(null, target, "Thread-" + nextThreadNum(), 0);

    }

    Thread(Runnable target, AccessControlContext acc) {

        init(null, target, "Thread-" + nextThreadNum(), 0, acc);

    }

    public Thread(ThreadGroup group, Runnable target) {

        init(group, target, "Thread-" + nextThreadNum(), 0);

    }

    public Thread(String name) {

        init(null, null, name, 0);

    }

    public Thread(ThreadGroup group, String name) {

        init(group, null, name, 0);

    }

    public Thread(ThreadGroup group, String name) {

        init(group, null, name, 0);

    }

    public Thread(Runnable target, String name) {

        init(null, target, name, 0);

    }

    public Thread(ThreadGroup group, Runnable target, String name) {

        init(group, target, name, 0);

    }

    public Thread(ThreadGroup group, Runnable target, String name,

                  long stackSize) {

        init(group, target, name, stackSize);

    }

}
Thread类实现了Runnable接口,因此我们继承Thread,实际上也是间接的实现了Runnable接口。
Thread中一共有9个构造函数,但是里面实际调用的分别是:
init(ThreadGroup g, Runnable target, String name, long stackSize)
init(ThreadGroup g, Runnable target, String name, long stackSize, AccessControlContext acc)
我们查看了第一个init()方法源码,在内部其实是调用了第二个init方法,将最后一个参数置空。因此我们只要详细看5个参数的init()方法即可。
    private void init(ThreadGroup g, Runnable target, String name,

                      long stackSize) {

        init(g, target, name, stackSize, null); //内部其实调用了另一个init方法

    }

    private void init(ThreadGroup g, Runnable target, String name,

                      long stackSize, AccessControlContext acc) {

        if (name == null) {throw new NullPointerException("name cannot be null");

        }

        this.name = name; //指定线程名称

        Thread parent = currentThread(); //获取当前线程

        SecurityManager security = System.getSecurityManager();

        if (g == null) {

            /* Determine if it's an applet or not */

            /* If there is a security manager, ask the security manager

               what to do. */

            if (security != null) {

                g = security.getThreadGroup(); //使用安全管理器要求的线程组

            }

            /* If the security doesn't have a strong opinion of the matter

               use the parent thread group. */

            if (g == null) {

                g = parent.getThreadGroup(); //安全性没有明确的要求,可以使用父类线程组。

            }

        }

        /* checkAccess regardless of whether or not threadgroup is

           explicitly passed in. */

        g.checkAccess();

        /*

         * Do we have the required permissions?

         */

        if (security != null) {

            if (isCCLOverridden(getClass())) {

                security.checkPermission(SUBCLASS_IMPLEMENTATION_PERMISSION);

            }

        }

        g.addUnstarted();

        this.group = g; //线程组

        this.daemon = parent.isDaemon(); //是否守护线程

        this.priority = parent.getPriority(); //优先级

        if (security == null || isCCLOverridden(parent.getClass())) //上下文类加载器

            this.contextClassLoader = parent.getContextClassLoader();

        else

            this.contextClassLoader = parent.contextClassLoader;

        this.inheritedAccessControlContext =

                acc != null ? acc : AccessController.getContext();

        this.target = target; //将被执行的目标线程

        setPriority(priority); //设置优先级(1-10),不在范围内则抛出异常。由于线程组的最大优先级可以设置,参数大于线程组的最大优先级,取线程组最大优先级。

        if (parent.inheritableThreadLocals != null)

            this.inheritableThreadLocals =

                ThreadLocal.createInheritedMap(parent.inheritableThreadLocals);

        /* Stash the specified stack size in case the VM cares */

        this.stackSize = stackSize;

        /* Set thread ID */

        tid = nextThreadID(); //线程的唯一id

    }
2.3Callable
@FunctionalInterface

public interface Callable<V> {

    V call() throws Exception;

}
Callable接口也很简单,里面只有一个方法call()。
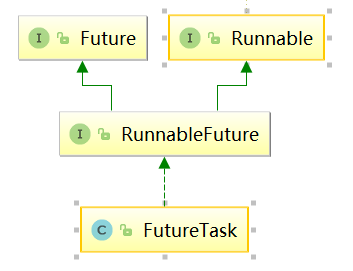
使用Callable时,需要使用FutureTask类进行调用。
查看FutureTask类的继承关系,可知其最上面也是实现了Runnable接口。
查看FutureTask的构造函数,一共有两个。
FutureTask(Callable<V> callable):futureTask内部有一个私有变量Callable,令其等于传入的callable。
FutureTask(Runnable runnable, V result):调用Executors的静态方法,创建内部一个实现了callable接口的内部类,call()方法执行Runnable的run(),执行成功后返回result。
源码如下:
    public FutureTask(Callable<V> callable) {

        if (callable == null)

            throw new NullPointerException();

        this.callable = callable;

        this.state = NEW;       // ensure visibility of callable

    }

    public FutureTask(Runnable runnable, V result) {

        this.callable = Executors.callable(runnable, result); //见下方

        this.state = NEW;       // ensure visibility of callable

    }
    public static <T> Callable<T> callable(Runnable task, T result) {

        if (task == null)

            throw new NullPointerException();

        return new RunnableAdapter<T>(task, result);

    }

    static final class RunnableAdapter<T> implements Callable<T> {

        final Runnable task;

        final T result;

        RunnableAdapter(Runnable task, T result) {

            this.task = task;

            this.result = result;

        }

        public T call() {

            task.run();

            return result;

        }

    }
在FutureTask中定义了运行状态一共有7种(注意它们各自的数值,会经常使用>=、<=等方式来处理逻辑走向):
    /*

     * NEW -> COMPLETING -> NORMAL 新建->执行->完成

     * NEW -> COMPLETING -> EXCEPTIONAL 新建->执行->异常

     * NEW -> CANCELLED 新建->取消

     * NEW -> INTERRUPTING -> INTERRUPTED 新建->中断运行->中断状态

     */

    private volatile int state;

    private static final int NEW          = ;

    private static final int COMPLETING   = ;

    private static final int NORMAL       = ;

    private static final int EXCEPTIONAL  = ;

    private static final int CANCELLED    = ;

    private static final int INTERRUPTING = ;

    private static final int INTERRUPTED  = ;
FutureTask的run()方法,内部核心代码是调用了callable.call()。如果顺利执行,会执行set(result)方法,将结果保存到成员变量private Object outcome中。
    public void run() {

        if (state != NEW ||

            !UNSAFE.compareAndSwapObject(this, runnerOffset,

                                         null, Thread.currentThread()))

            return;

        try {

            Callable<V> c = callable;

            if (c != null && state == NEW) {

                V result;

                boolean ran;

                try {

                    result = c.call();

                    ran = true;

                } catch (Throwable ex) {

                    result = null;

                    ran = false;

                    setException(ex);

                }

                if (ran)

                    set(result);

            }

        } finally {

            // runner must be non-null until state is settled to

            // prevent concurrent calls to run()

            runner = null;

            // state must be re-read after nulling runner to prevent

            // leaked interrupts

            int s = state;

            if (s >= INTERRUPTING)

                handlePossibleCancellationInterrupt(s);

        }

    }
FutureTask的get()方法,在线程t1中调用线程t2的get()方法,可见如果t2的run()仍未执行完成,则会一直等待执行完成后,获取返回值,才会继续往下执行t1。
    public V get() throws InterruptedException, ExecutionException {

        int s = state;

        if (s <= COMPLETING)

            s = awaitDone(false, 0L); //如果线程刚被新建,或正在运行,等待执行完成。

        return report(s); //返回run()方法中保存的outcome

    }

    private int awaitDone(boolean timed, long nanos)

        throws InterruptedException {

        final long deadline = timed ? System.nanoTime() + nanos : 0L; //在线程类中,0通常用来代表不限制时间

        WaitNode q = null;

        boolean queued = false;

        for (;;) {

            if (Thread.interrupted()) {

                removeWaiter(q);

                throw new InterruptedException();

            }

            int s = state;

            if (s > COMPLETING) {

                if (q != null)

                    q.thread = null;

                return s;

            }

            else if (s == COMPLETING) // cannot time out yet

                Thread.yield(); //仍在执行中,令当前线程让出cpu资源。因为通常是在一个线程t1里调用另一个线程t2的get()方法,即令t1让出cpu,t2可以参与竞争

            else if (q == null)

                q = new WaitNode();

            else if (!queued)

                queued = UNSAFE.compareAndSwapObject(this, waitersOffset,

                                                     q.next = waiters, q);

            else if (timed) {

                nanos = deadline - System.nanoTime();

                if (nanos <= 0L) {

                    removeWaiter(q);

                    return state;

                }

                LockSupport.parkNanos(this, nanos);

            }

            else

                LockSupport.park(this);

        }

    }
3总结
实际上不论是使用哪一种方式实现,最后调用时都是需要使用Thread类的start()方法进行调用。因此,线程的主要类,我们研究Thread类即可。
线程的状态state,在Thread类中以内部枚举的形式存在
    public enum State {

        NEW, //新建状态,尚未执行start方法

        RUNNABLE, //可运行状态,已经执行start方法,竞争cpu资源

        BLOCKED, //阻塞状态,等待获取锁进入代码块

        WAITING, //等待状态,线程进入此状态只有三种方法:wait()、join()、park(),注意这些方法都没有参数,即不会由于超时问题而重新变为可运行或执行状态

        TIMED_WAITING, //定时等待状态,进入此方法的方式与waiting类似,但是该方法有时间限制,当达到指定时间后会重新变为Runnable,如sleep、wait(long)等

        TERMINATED; //终止状态,线程已经执行完毕

    }
几种常用方法介绍:
yield():当前线程暂停执行,让出cpu,重新竞争。有可能仍然是该线程竞争到cpu。
sleep(long):当前线程暂停执行(不释放锁),休眠指定毫秒数,其他线程竞争cpu,当指定时间过去,当前线程继续执行。
interrupt():中断当前线程,通常用来让内部是while(!Thread.currentThread().isInterrupt())的run()方法中断运行。
wait():令当前线程进入等待状态(释放锁),只能使用在synchronized块中。因此,当线程执行wait方法的时候一定是取得了锁。可以通过notify()或notifyAll()方法重新唤醒
join():通常是在一个线程t1里面调用另一个线程t2的join方法,当t1执行到这里的时候,会获取t2的锁并执行t2,直到t2执行完毕,再继续执行t1下面的步骤。
join(long):与join()类似,不同处在于t1最多只会等待long秒,当时间到达后,如果t2仍没有执行完毕,那么t1也会继续执行下面的步骤。
join()方法例子:
public class Main4 extends Thread {

    public static void main(String[] args) throws ExecutionException, InterruptedException {

        Main4 m1 = new Main4();

        Main4 m2 = new Main4();

        m1.start();

        m1.join();

        System.out.println("---------------main---------------");

        m2.start();

    }

    @Override

    public void run() {

        int i = 0;

        for (i = 0; i < 10; i++) {

            System.out.println(Thread.currentThread().getName() + "[i="+i+"]");

            try {

                Thread.sleep(1000);

            } catch (InterruptedException e) {

                e.printStackTrace();

            }

        }

    }

}
如上程序,控制台会先打印m1线程的0-9,然后再打印"---main---",最后打印m2线程的0-9.
如果我们将m1.join()改为m1.join(1000),那么会先打印m1的0,这时达到参数1000ms,main线程会继续并行往下执行,打印"---main---",然后启动m2线程,m1与m2争夺cpu竞相打印。
需要注意的是,join(0)不是等待0ms,而是等价于join()方法。源码中join()内部只有一行代码:join(0)。
_
java如何编写多线程的更多相关文章
- java 如何编写多线程的代码
线程是干活的所以线程一定是Thread,或者改线程实现Runnable接口多线程是竞争关系,所以多个线程竞争同一个资源,也就是同一个对象所以这个竞争对象发到Thread中即: // resources ...
- Java基础之多线程框架
一.进程与线程的区别 1.定义: 进程是具有一定独立功能的程序关于某个数据集合上的一次运行活动,进程是系统进行资源分配和调度的一个独立单位. 线程是进程的一个实体,是CPU调度和分派的基本单位,它是比 ...
- [Java][读书笔记]多线程编程
前言:最近复习java,发现一本很好的资料,<Java2参考大全 (第五版)> Herbert.Schildt.书比较老了,06年的,一些 ...
- Java中的 多线程编程
Java 中的多线程编程 一.多线程的优缺点 多线程的优点: 1)资源利用率更好2)程序设计在某些情况下更简单3)程序响应更快 多线程的代价: 1)设计更复杂虽然有一些多线程应用程序比单线程的应用程序 ...
- Java回顾之多线程
在这篇文章里,我们关注多线程.多线程是一个复杂的话题,包含了很多内容,这篇文章主要关注线程的基本属性.如何创建线程.线程的状态切换以及线程通信,我们把线程同步的话题留到下一篇文章中. 线程是操作系统运 ...
- Java程序设计17——多线程-Part-C
11 使用管道流 前面介绍的两种方式与其称为线程之间的通信,还不如称为线程之间协调运行的控制策略.如果需要在两条线程之间进行更多的信息交互,则可以考虑使用管道流进行通信. 管道流有3中存在形式:Pip ...
- Java复习8.多线程
Java复习8 多线程知识 20131007 前言: 在Java中本身就是支持多线程程序的,而不是像C++那样,对于多线程的程序,需要调用操作系统的API 接口去实现多线程的程序,而Java是支持多线 ...
- Java中的多线程=你只要看这一篇就够了
如果对什么是线程.什么是进程仍存有疑惑,请先Google之,因为这两个概念不在本文的范围之内. 用多线程只有一个目的,那就是更好的利用cpu的资源,因为所有的多线程代码都可以用单线程来实现.说这个话其 ...
- Java并发基础--多线程基础
一.多线程基础知识 1.进程和线程 进程:是指一个内存中运行的应用程序,每个进程都有一个独立的内存空间,一个应用程序可以同时运行多个进程:进程也是程序的一次执行过程,是系统运行程序的基本单位:系统运行 ...
随机推荐
- python3 参数*args 、 **args 在函数定义和调用中的应用
一.函数调用时 说明:*args 表示解包(解包 列表.元组.字符串类型) #定义函数cn_musql def cn_musql(host,port,user,pwd,db): print(host) ...
- js 检查登录态方法封装(闭包、状态缓存)
前端页面开发时,经常需要异步校验登录态,每次都重新copy之前写的方法,比较繁琐不好维护,固将登录态校验封装成一个js. (function(){ //登录状态 1 登录态有效 2 登录态无效 3 请 ...
- Git branch && Git checkout常见用法
https://www.cnblogs.com/qianqiannian/p/6011404.html git branch 和 git checkout经常在一起使用,所以在此将它们合在一起 1.G ...
- Git 提示fatal: remote origin already exists 错误解决办法
今天使用git 添加远程github仓库的时候提示错误:fatal: remote origin already exists. 最后找到解决办法如下: 1.先删除远程 Git 仓库 $ git re ...
- python 包下载地址
https://www.lfd.uci.edu/~gohlke/pythonlibs/
- html/jsp导出pdf格式的几种方法(jsPDF,iText,wkhtmltopdf)
在许多生成报表的时候需要我们后台作出动态的数据,并渲染到前端生成pdf格式,Excel格式的各种报表,但是浏览器自带的生成pdf功能,windows系统的ctrl+p键就能完全搞定这一需求,但对客户来 ...
- Redis Keys的通用操作
keys * 显示所有key 127.0.0.1:6379> keys * 1) "sort1" 2) "l2" 3) "set2" ...
- leetcode 之 two sum (easy)c++
1.数组的长度 length() .容器vector长度 size() .容器vector vector是C++标准模板库中的部分内容,它是一个多功能的,能够操作多种数据结构和算法的模板类和函数库. ...
- spring-session 2.0 实现细节
一. 前置知识 1. redis 在键实际过期之后不一定会被删除,可能会继续存留 2. 具有过期时间的 key 有两种方式来保证过期 一是这个键在过期的时候被访问了 二是后台运行一个定时任务自己删除过 ...
- afn3.0源码解析---AFURLRequestSerialization
AFHTTPRequestSerialization: @方法1 - (NSMutableURLRequest *)requestWithMethod:(NSString *)method URLSt ...