Android OpenGL ES(九)绘制线段Line Segment .
创建一个DrawLine Activity,定义四个顶点:
float vertexArray[] = {

 -0.8f, -0.4f * 1.732f, 0.0f,

 -0.4f, 0.4f * 1.732f, 0.0f,

 0.0f, -0.4f * 1.732f, 0.0f,

 0.4f, 0.4f * 1.732f, 0.0f,

};
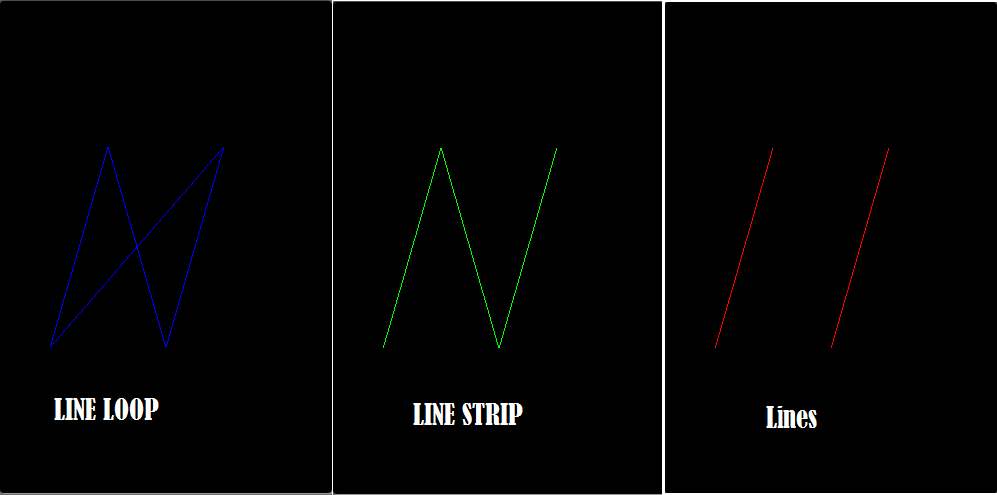
分别以三种模式GL_LINES,GL_LINE_STRIP,GL_LINE_LOOP 来绘制直线:
public void DrawScene(GL10 gl) {

 super.DrawScene(gl);

 ByteBuffer vbb

 = ByteBuffer.allocateDirect(vertexArray.length*);

 vbb.order(ByteOrder.nativeOrder());

 FloatBuffer vertex = vbb.asFloatBuffer();

 vertex.put(vertexArray);

 vertex.position();

 gl.glLoadIdentity();

 gl.glTranslatef(, , -);

 gl.glEnableClientState(GL10.GL_VERTEX_ARRAY);

 gl.glVertexPointer(, GL10.GL_FLOAT, , vertex);

 index++;

 index%=;

 switch(index){

 case :

 case :

 case :

 gl.glColor4f(1.0f, 0.0f, 0.0f, 1.0f);

 gl.glDrawArrays(GL10.GL_LINES, , );

 break;

 case :

 case :

 case :

 gl.glColor4f(0.0f, 1.0f, 0.0f, 1.0f);

 gl.glDrawArrays(GL10.GL_LINE_STRIP, , );

 break;

 case :

 case :

 case :

 case :

 gl.glColor4f(0.0f, 0.0f, 1.0f, 1.0f);

 gl.glDrawArrays(GL10.GL_LINE_LOOP, , );

 break;

 }

 gl.glDisableClientState(GL10.GL_VERTEX_ARRAY);

}
这里index 的目的是为了延迟一下显示(更好的做法是使用固定时间间隔)。前面说过GLSurfaceView 的渲染模式有两种,一种是连续不断的更新屏幕,另一种为on-demand ,只有在调用requestRender() 在更新屏幕。 缺省为RENDERMODE_CONTINUOUSLY 持续刷新屏幕。
OpenGLDemos 使用的是缺省的RENDERMODE_CONTINUOUSLY持续刷新屏幕 ,因此Activity的drawScene 会不断的执行。本例中屏幕上顺序以红,绿,蓝色显示LINES, LINE_STRIP,LINE_LOOP。
完整代码:
MainActivity.java
package com.example.gltest;

import java.nio.ByteBuffer;

import java.nio.ByteOrder;

import java.nio.FloatBuffer;

import javax.microedition.khronos.opengles.GL10;

import android.opengl.GLSurfaceView;

import android.os.Bundle;

import android.app.Activity;

import android.view.Menu;

import android.view.Window;

import android.view.WindowManager;

public class MainActivity extends Activity

       implements IOpenGLDemo{

    float vertexArray[] = {

             -0.8f, -0.4f * 1.732f, 0.0f,

             -0.4f, 0.4f * 1.732f, 0.0f,

             0.0f, -0.4f * 1.732f, 0.0f,

             0.4f, 0.4f * 1.732f, 0.0f,

            };

        /** Called when the activity is first created. */

        @Override

        public void onCreate(Bundle savedInstanceState) {

            super.onCreate(savedInstanceState);

            this.requestWindowFeature(Window.FEATURE_NO_TITLE);

            getWindow()

             .setFlags(WindowManager.LayoutParams.FLAG_FULLSCREEN,

                WindowManager.LayoutParams.FLAG_FULLSCREEN);

            mGLSurfaceView = new GLSurfaceView(this);

            mGLSurfaceView.setRenderer(new OpenGLRenderer(this));

            setContentView(mGLSurfaceView);

        }

//        public void DrawScene(GL10 gl) {

//            gl.glClearColor(1.0f, 0.0f, 0.0f, 0.0f);

//            // Clears the screen and depth buffer.

//            gl.glClear(GL10.GL_COLOR_BUFFER_BIT

//              | GL10.GL_DEPTH_BUFFER_BIT);

//

//        }

        public void DrawScene(GL10 gl) {

             //super.DrawScene(gl);

             ByteBuffer vbb

             = ByteBuffer.allocateDirect(vertexArray.length*);

             vbb.order(ByteOrder.nativeOrder());

             FloatBuffer vertex = vbb.asFloatBuffer();

             vertex.put(vertexArray);

             vertex.position();

             gl.glLoadIdentity();

             gl.glTranslatef(, , -);

             gl.glEnableClientState(GL10.GL_VERTEX_ARRAY);

             gl.glVertexPointer(, GL10.GL_FLOAT, , vertex);

             int index = ;

            index ++;

             index%=;

             switch(index){

             case :

             case :

             case :

             gl.glColor4f(1.0f, 0.0f, 0.0f, 1.0f);

             gl.glDrawArrays(GL10.GL_LINES, , );

             break;

             case :

             case :

             case :

             gl.glColor4f(0.0f, 1.0f, 0.0f, 1.0f);

             gl.glDrawArrays(GL10.GL_LINE_STRIP, , );

             break;

             case :

             case :

             case :

             case :

             gl.glColor4f(0.0f, 0.0f, 1.0f, 1.0f);

             gl.glDrawArrays(GL10.GL_LINE_LOOP, , );

             break;

             }

             gl.glDisableClientState(GL10.GL_VERTEX_ARRAY);

            }

        @Override

        protected void onResume() {

            // Ideally a game should implement

            // onResume() and onPause()

            // to take appropriate action when the

            //activity looses focus

            super.onResume();

            mGLSurfaceView.onResume();

        }

        @Override

        protected void onPause() {

            // Ideally a game should implement onResume()

            //and onPause()

            // to take appropriate action when the

            //activity looses focus

            super.onPause();

            mGLSurfaceView.onPause();

        }

        private GLSurfaceView mGLSurfaceView;

    }
OpenGLRenderer.java
package com.example.drawpointer;

import javax.microedition.khronos.opengles.GL10;

import android.opengl.EGLConfig;

import android.opengl.GLSurfaceView.Renderer;

import android.opengl.GLU;

public class OpenGLRenderer implements Renderer {

     private final IOpenGLDemo openGLDemo;

     public OpenGLRenderer(IOpenGLDemo demo){

     openGLDemo=demo;

     }

     public void onSurfaceCreated(GL10 gl, EGLConfig config) {

     // Set the background color to black ( rgba ).

     gl.glClearColor(0.0f, 0.0f, 0.0f, 0.5f);

     // Enable Smooth Shading, default not really needed.

     gl.glShadeModel(GL10.GL_SMOOTH);

     // Depth buffer setup.

     gl.glClearDepthf(1.0f);

     // Enables depth testing.

     gl.glEnable(GL10.GL_DEPTH_TEST);

     // The type of depth testing to do.

     gl.glDepthFunc(GL10.GL_LEQUAL);

     // Really nice perspective calculations.

     gl.glHint(GL10.GL_PERSPECTIVE_CORRECTION_HINT,

     GL10.GL_NICEST);

     }

     public void onDrawFrame(GL10 gl) {

     if(openGLDemo!=null){

     openGLDemo.DrawScene(gl);

     }

     }

     public void onSurfaceChanged(GL10 gl, int width, int height) {

     // Sets the current view port to the new size.

     gl.glViewport(, , width, height);

     // Select the projection matrix

     gl.glMatrixMode(GL10.GL_PROJECTION);

     // Reset the projection matrix

     gl.glLoadIdentity();

     // Calculate the aspect ratio of the window

     GLU.gluPerspective(gl, 45.0f,

     (float) width / (float) height,

     0.1f, 100.0f);

     // Select the modelview matrix

     gl.glMatrixMode(GL10.GL_MODELVIEW);

     // Reset the modelview matrix

     gl.glLoadIdentity();

     }

    @Override

    public void onSurfaceCreated(GL10 arg0,

            javax.microedition.khronos.egl.EGLConfig arg1) {

        // TODO Auto-generated method stub

    }

    }
IOpenGLDemo.java
package com.example.gltest;

import javax.microedition.khronos.opengles.GL10;

public interface IOpenGLDemo {

     public void DrawScene(GL10 gl);

    }
Android OpenGL ES(九)绘制线段Line Segment .的更多相关文章
- Android OpenGL ES 开发教程 从入门到精通
感谢,摘自:http://blog.csdn.net/mapdigit/article/details/7526556 Android OpenGL ES 简明开发教程 Android OpenGL ...
- Android OpenGL ES(七)基本几何图形定义 .
在前面Android OpenGL ES(六):创建实例应用OpenGLDemos程序框架 我们创建了示例程序的基本框架,并提供了一个“Hello World”示例,将屏幕显示为红色. 本例介绍Ope ...
- Android OpenGL ES(八)绘制点Point ..
上一篇介绍了OpenGL ES能够绘制的几种基本几何图形:点,线,三角形.将分别介绍这几种基本几何图形的例子.为方便起见,暂时在同一平面上绘制这些几何图形,在后面介绍完OpenGL ES的坐标系统和坐 ...
- [置顶] 使用Android OpenGL ES 2.0绘图之五:添加运动
传送门 ☞ 系统架构设计 ☞ 转载请注明 ☞ http://blog.csdn.net/leverage_1229 传送门 ☞ GoF23种设计模式 ☞ 转载请注明 ☞ http://blog.csd ...
- Android OpenGL ES(十二):三维坐标系及坐标变换初步 .
OpenGL ES图形库最终的结果是在二维平面上显示3D物体(常称作模型Model)这是因为目前的打部分显示器还只能显示二维图形.但我们在构造3D模型时必须要有空间现象能力,所有对模型的描述还是使用三 ...
- Android OpenGL ES(五)GLSurfaceView .
Android OpenGL ES 相关的包主要定义在 javax.microedition.khronos.opengles GL 绘图指令 javax.microedition.khrono ...
- [工作记录] Android OpenGL ES: non-square texture - continue
previous: [工作记录] Android OpenGL ES 2.0: square texture not supported on some device recently I found ...
- Android OpenGL ES(十三)通用的矩阵变换指令 .
Android OpenGL ES 对于不同坐标系下坐标变换,大都使用矩阵运算的方法来定义和实现的.这里介绍对应指定的坐标系(比如viewmodel, projection或是viewport) An ...
- Android OpenGL ES .介绍
引自:http://blog.csdn.net/hgl868/article/details/6971624 1. OpenGL ES 简介 Android 3D引擎采用的是OpenGL ES. ...
随机推荐
- hdu_5193_Go to movies Ⅱ(带插入删除的逆序对,块状链表)
题目链接:hdu_5193_Go to movies Ⅱ 题意: 有n个人站成一排,每个人的身高为Hi.每次有人加入或者有人离开,就要判断有多少人站反了(i < j&&Hi> ...
- Adobe Acrobat Pro 9破解
(转载,Window8.1/64bit系统亲测可用) 1.删除C:\Program Files\Common Files\Adobe\Adobe PCD\cache\cache.db和C:\Docum ...
- 三、WCF的宿主
注:本文为学习摘抄,原文地址:http://www.cnblogs.com/iamlilinfeng/archive/2012/10/01/2706353.html 一.WCF服务应用程序与WCF服务 ...
- 实现简单的手写涂鸦板(demo源码)
在一些软件系统中,需要用到手写涂鸦的功能,然后可以将涂鸦的结果保存为图片,并可以将"真迹"通过网络发送给对方.这种手写涂鸦功能是如何实现的了?最直接的,我们可以使用Windows提 ...
- Chapter 14_4 使用_ENV
因为_ENV是一个普通的变量,我们可以像其他变量一样去对它进行赋值和访问. _ENV = nil 上面的赋值操作,将会使得在它之后的代码块不能直接访问全局变量.不过,对控制你的代码所使用的变量有用处. ...
- Business Intelligence(BI) 商务智能
商业智能技术正是一种能够帮助企业迅速地完成信息采集.分析的先进技术.它以数据仓库(Data Warehousing).在线分析处理(OLAP).数据挖掘(Data Mining)3种技术的整合为基础, ...
- 第三次冲刺spring会议(第五次会议)
[例会时间]2014/5/24 21:15 [例会地点]9#446 [例会形式]轮流发言 [例会主持]马翔 [例会记录]兰梦 小组成员:兰梦 ,马翔,李金吉,赵天,胡佳奇
- ural 1146. Maximum Sum(动态规划)
1146. Maximum Sum Time limit: 1.0 second Memory limit: 64 MB Given a 2-dimensional array of positive ...
- Laravel框架开发规范-修订前期版
1.追加App/Models目录,App/User.php迁移至App/Models目录中 ①配置内容属于架构信息.服务器信息.有必要隐藏无法提交git的信息,请使用.env文件配合env()方法进行 ...
- 常用 ajax js 表单
$(function () { /** * 图片点击放大处理 */ $('.mini_img').click(function () { $(this).hide().next().show(); } ...