
Ionic2中的Navigation.md
1. 概述
为了能够得到同原生应用类似的导航效果,Ionic创建了几个navagation组件来实现pages之间的导航操作,这种导航跟原生Angular2中的route机制是不一样的,我们可以借助于一下几种方式,在Ionic中实现导航效果:
1.1. Basic Navigation
Navigation通过一个<ion-nav>组件来实现pages之间的导航处理,<ion-nav>组件就像是一个stack,新的页面push进入,然后pop出栈,就类似于history接口的forward和backward。
每一个<ion-nav>组件都有一个root属性来设置其根页面。
例如定义的如下Component:
import {StartPage} from 'start'

@Component({

  template: '<ion-nav [root]="rootPage"></ion-nav>'

})

class MyApp {

  // First page to push onto the stack

  rootPage = StartPage;

}
然后我们就可以在其root属性指向的Root Page,以及Root Page通过push导航到的page中,通过DI的方式将NavController注入,以方便通过其push和pop进行具体导航。
@Component({

  template: `

  <ion-header>

    <ion-navbar>

      <ion-title>Login</ion-title>

    </ion-navbar>

  </ion-header>

  <ion-content>Hello World</ion-content>`

})

export class StartPage {

  constructor(public navCtrl: NavController) {

  }

}
注意:这里要强调一点,任何Component中注入的NavController都是其直接根<ion-nav>对应的NavController,如下图:
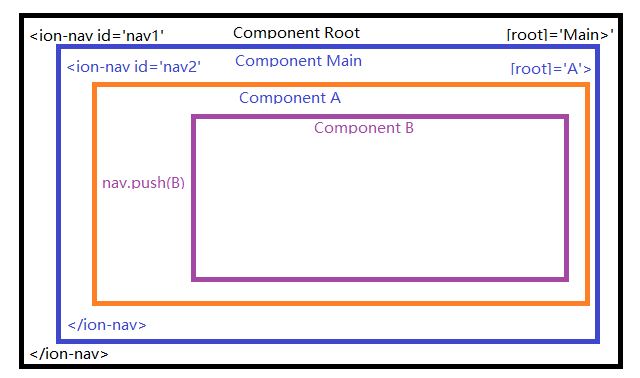
各个Component中注入的NavController对应的<ion-nav>如下:
1、我们如何从Component Root中获取到nav1呢?
2、我们如何从nav1中获取到nav2呢?
1.2. 从Component Root中获取nav1
在说明这一部分前,先定义两个术语:
Root Component:包含<ion-nav>的根Component,例如上图中的Component Root,当然,相对于Component A来说其Root Component为Coponent Main。Root Page:组件<ion-nav>中root属性指向的Comonent,例如上图中的Component Main相对于Component Root,Component A相对于Component Main。
在Root Component中是无法通过DI的方式将NavController注入的,那么如和获取呢?
Angular提供了一个@ViewChild注解,可以用来实现这个功能。Angular官方文档是这么解释的:
You can use ViewChild to get the first element or the directive matching the selector from the view DOM. If the view DOM changes, and a new child matches the selector, the property will be updated.
View queries are set before the
ngAfterViewInitcallback is called.
Metadata Properties:
- selector - the directive type or the name used for querying.
- read - read a different token from the queried elements.
在Ionic源码中有这么一段话:
 /* ## Basic usage

 * The simplest way to navigate through an app is to create and initialize a new

 * nav controller using the `<ion-nav>` component.  `ion-nav` extends the `NavController`

 * class.

 * `ion-nav` is the declarative component for a [NavController](../../../navigation/NavController/).*/
官方推荐的获取方式如下:
import { Component, ViewChild } from '@angular/core';

import { NavController } from 'ionic-angular';

@Component({

   template: '<ion-nav #myNav [root]="rootPage"></ion-nav>'

})

export class MyApp {

   @ViewChild('myNav') nav: NavController

   public rootPage = TabsPage;

   // Wait for the components in MyApp's template to be initialized

   // In this case, we are waiting for the Nav with reference variable of "#myNav"

   ngOnInit() {

      // Let's navigate from TabsPage to Page1

      this.nav.push(Page1);

   }

}
1.3. 如何通过nav1获取到nav2
NavController提供一个方法getActiveChildNav(),官方解释如下:
Returns the active child navigation.
返回当前起作用的那个Child NavController,所以如上图中,我们就可以在Component Root或Component Main中通过nav1.getActiveChildNav()来获取nav2。
2. 高级使用
2.1. 页面导航入栈中的参数传递
导航页面入栈切换主要有如下两个方法:
push(page, params, opts)
Push a new component onto the current navigation stack. Pass any aditional information along as an object. This additional information is accessible through NavParams
| Param | Type | Details |
|---|---|---|
| page | Page or string | The component class or deeplink name you want to push onto the navigation stack. |
| params | object | Any NavParams you want to pass along to the next view.OPTIONAL |
| opts | object | Nav options to go with this transition.OPTIONAL |
Returns: Promise
Returns a promise which is resolved when the transition has completed.
setRoot(page, params, opts)
Set the root for the current navigation stack.
| Param | Type | Details |
|---|---|---|
| page | Page or string or ViewController | The name of the component you want to push on the navigation stack. |
| params | object | Any NavParams you want to pass along to the next view.OPTIONAL |
| opts | object | Any options you want to use pass to transtion.OPTIONAL |
Returns: Promise
Returns a promise which is resolved when the transition has completed.
可以看到push和setRoot方法的第二个参数都是params, 我们可以通过这个参数来进行信息传递,举例如下:
import { Component } from '@angular/core';

import { NavController } from 'ionic-angular';

import { OtherPage } from './other-page';

@Component({

   template: `

   <ion-header>

     <ion-navbar>

       <ion-title>Login</ion-title>

     </ion-navbar>

   </ion-header>

   <ion-content>

     <button ion-button (click)="pushPage()">

       Go to OtherPage

     </button>

   </ion-content>

   `

})

export class StartPage {

  constructor(public navCtrl: NavController) {

  }

  pushPage(){

    // push another page onto the navigation stack

    // causing the nav controller to transition to the new page

    // optional data can also be passed to the pushed page.

    this.navCtrl.push(OtherPage, {

      id: "123",

      name: "Carl"

    });

  }

}

import { NavParams } from 'ionic-angular';

@Component({

  template: `

  <ion-header>

    <ion-navbar>

      <ion-title>Other Page</ion-title>

    </ion-navbar>

  </ion-header>

  <ion-content>I'm the other page!</ion-content>`

})

class OtherPage {

  constructor(private navParams: NavParams) {

     let id = navParams.get('id');

     let name = navParams.get('name');

  }

}
其他的还有很多导航入栈方法,具体可以查看官方文档:
insert(insertIndex, page, params, opts)
insertPages(insertIndex, insertPages, opts)
setPages(pages, opts):Set the views of the current navigation stack and navigate to the last view. By default animations are disabled, but they can be enabled by passing options to the navigation controller.You can also pass any navigation params to the individual pages in the array.
2.2. 页面出栈方法
pop(opts)
popToRoot(opts)
remove(startIndex, removeCount, opts)
removeView(viewController, opts)
都比较简单,具体的查看官方文档
2.3. 其他常用方法
canGoBack()
Returns true if there’s a valid previous page that we can pop back to. Otherwise returns false.
Returns: boolean
first()
Returns the first view controller in this nav controller’s stack.
Returns: ViewController
getActive()
Returns: ViewController
Returns the active page's view controller.
getViews()
Returns the current stack of views in this nav controller.
Returns: Array
the stack of view controllers in this nav controller.
indexOf(view)
Returns the index number of the given view controller.
isActive(view)
Returns if the given view is the active view or not.
last()
Returns the last page in this nav controller’s stack.
Returns: ViewController
length()
Returns the number of views in this nav controller.
Returns: number
The number of views in this stack, including the current view.
parent
The parent navigation instance. If this is the root nav, then it’ll be null. A Tab instance’s parent is Tabs, otherwise the parent would be another nav, if it’s not already the root nav.
3. ion-navbar组件
如果在Component中有一个<ion-navbar>标签定义,那么可以在<ion-navbar>中定义<ion-title>来改变界面的title,而且当这个Component不是一个rootPage的时候,就会自动添加一个回退按钮,来实现navController.pop()相同的功能,如下图:
Template部分代码如下:
<ion-header>

  <ion-navbar>

    <button menuToggle *ngIf="!item">

      <ion-icon name="menu"></ion-icon>

    </button>

    <ion-title>选择</ion-title>

  </ion-navbar>

</ion-header>
参考:
https://ionicframework.com/docs/components/#navigation
https://ionicframework.com/docs/api/navigation/NavController/
Ionic2中的Navigation.md的更多相关文章
- Ionic2系列——在Ionic2中使用ECharts
在群里看到有人问怎么在Ionic2中集成ECharts来显示图表.当时答应说写个blog,简单写下步骤. 在TypeScript中如果要使用第三方库,必须要有d.ts,也就是定义文件,没有这个文件的话 ...
- Ionic2系列——在Ionic2中使用高德地图
之前讲过了如何在Ionic2中使用第三方库,因为第三方库必须针对TypeScript提供相应的声明文件——即d.ts文件,才能被TypeScript正确识别并编译.好在大多数的第三方库已经有了定义文件 ...
- Ionic2中集成腾讯Bugly之自定义插件
Ionic2混合开发,入坑系列:Ionic2中集成腾讯Bugly之自定义插件 1.编写Bugly.js代码 var exec = require('cordova/exec'); module.exp ...
- Ionic2中集成第三方控件Sweetalert
Ionic2混合开发,入坑系列:Ionic2中集成第三方控件Sweetalert 注:Sweetalert2已经可以直接从npm中下载安装 npm install --save sweetalert2 ...
- Ionic2中腾讯Bugly异常捕获以及上报
Ionic2混合开发,入坑系列:Ionic2中腾讯Bugly异常捕获以及上报 1.Ionic2中处理全局异常,直接继承IonicErrorHandler即可,代码如下 import { IonicEr ...
- ionic2中使用自定义图标
在ionic2中使用自定义图标,如iconfont(阿里巴巴矢量图标). 先在http://www.iconfont.cn/ 中找到自己需要的图标,然后将图标加入购物车,然后下载该图标. 下载完成后解 ...
- ionic2中如何使用自动生成器
ionic generator是命令行的功能,ionic2自动帮我们创建应用程序,从而节省了大量的时间,并增加我们的速度来开发一个项目的关键部分. ionic generator使我们可以自动创建以下 ...
- Ionic2中使用第三方插件极光推送
不同于Ionic1中插件的调用,Ionic2提供了Ionic Native.Ionic Native封装了一些常见的插件(如:Camera.Barcode Scanner等),这些插件的使用方式在官方 ...
- 如何在github中的readme.md加入项目截图
1. 先在之前的本地项目文件夹里创建一个存放截图的文件夹.(如img文件夹) 2. 将新增的内容通过github desktop上传到github中 3. 在github中立马能看到刚刚上传的图片,打 ...
随机推荐
- nova shelve 的使用
对于云中的资源我们常有例如以下需求 1,用户对临时不使用的VM进行停止操作.以节省费用. 2.对于长时间未使用的VM.管理员想要从hypervisor层面上清除它们从而节省主机资源. 3.但之前的停止 ...
- hadoop相关
执行wordcount 代码 package org.apache.hadoop.examples; import java.io.IOException; import java.util.Iter ...
- doT.js变量和数组混合读取方式
可以包裹任意大小的html 变量在其包裹的任意区域都有效 单个变量可以和数组分开展示 最好放置在最下方执行js 数据结构 var data = { "id": "1280 ...
- JAVA设计模式之【组合模式】
组合模式 用面向对象的方式来处理树形结构 组合多个对象形成树形结构以表示具有"整体-部分"关系的层次结构. 在组合模式中引入了抽象构件类Component,它是所有容器类和叶子类的 ...
- [jzoj 6084] [GDOI2019模拟2019.3.25] 礼物 [luogu 4916] 魔力环 解题报告(莫比乌斯反演+生成函数)
题目链接: https://jzoj.net/senior/#main/show/6084 https://www.luogu.org/problemnew/show/P4916 题目: 题解: 注: ...
- CentOS7-1810 系统DNS服务器BIND软件配置说明
DNS的出现的历史 网络出现的早期是使用IP地址通讯的,那时就几台主机通讯.但是随着接入网络主机的增多,这种数字标识的地址非常不便于记忆,UNIX上就出现了建立一个叫做hosts的文件(Linux和W ...
- CodeForces-766D Mahmoud and a Dictionary 并查集 维护同类不同类元素集合
题目链接:https://cn.vjudge.net/problem/CodeForces-766D 题意 写词典,有些词是同义词,有些是反义词,还有没关系的词 首先输入两个词,需要判断是同义还是是反 ...
- UNIX系统高级编程——第六章-系统数据文件和信息-总结
口令文件: /* The passwd structure. */ struct passwd { char *pw_name; /* Username. */ char *pw_passwd; /* ...
- tree编译
没有tree命令,就需要下载源代码 [root@fyc tree-1.7.0]#cd /opt/src [root@fyc tree-1.7.0]# wget ftp://mama.indstate. ...
- ztree实现根节点单击事件,显示节点信息
这段时间在维护公司的项目,去年做的项目里面有ztree树的例子,想起之前还没有开始写博客,一些知识点也无从找起,要新加一个右击节点事件,折腾了半天,其中也包含了一些知识点,稍稍做了一些demo. zT ...