React 轮播图实现
接到项目, 用react和material-ui实现轮播图. 搜索了一些方法参考, 不论语言/框架的使用,大体上分为两种思路
超宽列表实现法
在原生JS或者JQuery中,轮播图的实现一般是这样子的
设置一个ul, 把所有图片横向展开,复制第一张图到最后,设置显示的界面 正好为一张图的大小和宽度,然后不断向后移动. 到最后一张图时无变化的切换到第一张,
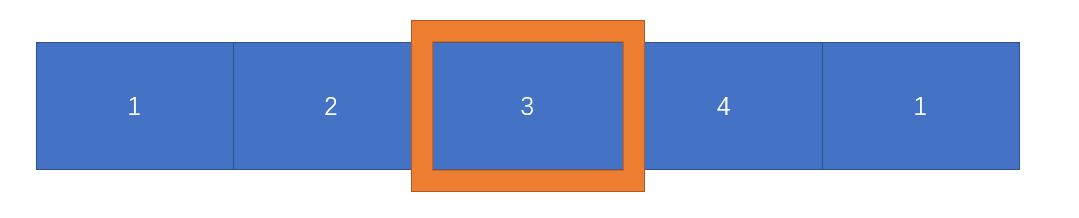
橙色框为显示穿体,可以想象成在后面抽动图片条, 抽到后一个的时候瞬间无动画的回到初始状态.
这个可以类比数据结构中的循环数组,首尾相连,从一个元素开始可以遍历完整个队列然后回到初始元素,类似项链的一个圈.
循环队列显示法
而我们观察到,影响整个动画的只有3个元素,当前图像和前后两个图像,因此可以类比数据结构中的循环队列,每次只记录当前元素和当前元素前后的状态,用index指向当前元素即可
那么就有三种状态
center 显示在屏幕中间的图片
left 即将从屏幕中移除的图片,动画效果直到完全出屏幕
right 即将进入屏幕的图片,动画效果从右侧贴紧屏幕到正中
图片被包裹在一个div中 以下为代码
import React, { Component } from 'react';

import PropTypes from 'prop-types';

import classNames from 'classnames';

import { withStyles } from '@material-ui/core/styles';

const styles = ({

  root: {

    position: "relative",

    padding: 0,

    margin: 0,

    overflow: "hidden",

    width: "100%",

  },

  center: {

    position: "relative",  //显示在中间的要撑开div

    width: "100%",

    left: 0,  //用于transition动画,必须设定left值

    transition :"all 1s ease-in-out",

  },

  right: {

    position :"absolute",

    left: "100%",

    width: "100%",

    top: 0,

  },

  left: {

    position :"absolute",

    left: "-100%",

    width: "100%",

    top: 0,

    transition :"all 1s ease-in-out",

  }

});

class Slideshow extends Component {

  state = {

    index: 0,

    images: [],

  };

  turn = step => {

    let index = this.state.index + step;

    if (index >= this.state.images.length) {

      index = 0;

    }

    if (index < 0) {

      index = this.props.images.length - 1;

    }

    this.setState({ index: index })

  };

  go = () => {

    this.timer = setInterval(

      () => this.turn(1),

      this.props.delay * 1000,

    )

  };

  clear = () => {

    clearInterval(this.timer)

  };

  componentDidMount() {

    const images = [

       require('../image/1.jpg'),

       require('../image/2.jpg'),

       require('../image/3.png'),

    ];

    this.setState({

      images: images,

    });

    this.go()

  };

  componentWillUnmount() {

    this.clear();

  }

  render() {

    const { classes } = this.props;

    return (

      <div

        className={classes.root}

        onMouseOver={this.clear}  //鼠标悬停时停止计时

        onMouseLeave={this.go}

      >

        { this.state.images.map((item, index) => (

          <img

            src={ item }

            alt=""

            key={index}

            className={ classNames(

            { [classes.center]: index === this.state.index },

            {

              [classes.right]:

              index === this.state.index + 1 || (index === 0 && this.state.index === this.state.images.length - 1)

            },

            {

              [classes.left]:

              index === this.state.index - 1 || (index === this.state.images.length - 1 && this.state.index === 0)

            },

          ) }/>

        ))

        }

      </div>

    )

  }

}

Slideshow.propTypes = {

  classes: PropTypes.object.isRequired,

};

export default withStyles(styles)(Slideshow);
有了基本框架之后,向左向右翻动的按钮和显示页数的按钮也可以直接做出来了. 只需要改变当前页面的index即可生效
在做按钮的时候发现一个问题,这个方法在只有3张图片的时候 会有奇怪的情况出现.原因是因为 只有3张图片 每一张都是本体 前驱 后继 每次转换的时候都会进行一次transform
解决办法 用4张图片 或者设置left和right 的opacity:0
React 轮播图实现的更多相关文章
- reactjs-swiper react轮播图组件基于swiper
react轮播图组件基于swiper demo地址:http://reactjs-ui.github.io/reactjs-swiper/simple.html 1. 下载安装 npm install ...
- react轮播图----react-slick
1.安装 npm install react-slick; //安装样式 npm install slick carousel; 再在App.css中引入 @import "~slick-c ...
- React视角下的轮播图
天猫购物网站最显眼的就是轮播图了.我在学习一样新js库,一个新框架或新的编程思想的时候,总是感叹"入门必做选项卡,进阶须撸轮播图."作为一个React组件,它是状态操控行为的典型, ...
- React中使用CSSTransitionGroup插件实现轮播图
动画效果,是一个页面上必不可少的功能,学习一个新的东西,当然就要学习,如何用新的东西,用它的方法去实现以前的东西啦.今天呢,我就在这里介绍一个试用react-addons-css-transition ...
- React Native学习(六)—— 轮播图
本文基于React Native 0.52 Demo上传到Git了,有需要可以看看,写了新内容会上传的.Git地址 https://github.com/gingerJY/React-Native-D ...
- React Native 如何做轮播图 react-native-swiper
//:仿饿了么github:https://github.com/stoneWeb/elm-react-native 欢迎各位同学加入: React-Native群:397885169 大前端群:54 ...
- React Native 之轮播图swiper组件
注释:swiper组件是第三方组件 所以在使用之前应该先在命令行安装,然后将第三方的模块引入(第三方模块地址:https://github.com/leecade/react-native-swipe ...
- React Native布局实践:开发京东client首页(三)——轮播图的实现
上篇文章中,我们一起构建了京东client的TabBar.在本文中.将继续向大家介绍京东client首页轮播图及其下发功能button的开发方法,如今就让我们開始吧! 1.相关控件调研 眼下在Gith ...
- ReactNative新手学习之路04 组件化开发轮播图swiper支持安卓和IOS
react native 新手之路04 组件化开发轮播图swiper支持安卓和IOS npm install react-native-carousel --save git 地址Properties ...
随机推荐
- Redis进阶之使用Lua脚本开发
1.在Redis中使用Lua 在Redis中执行Lua脚本有两种方法:eval和evalsha. (1)eval eval 脚本内容 key个数 key列表 参数列表 下面例子使用了key列表和参数列 ...
- ABP之多租户
“软件多租户”指的是一种软件架构,一个软件实例在一个服务器上运行,但为多个租户服务.租户们对软件实例有通用的访问入口,但是每个租户都有特定的权限. 在多租户体系架构中,用程序旨在为每个租户提供一个专用 ...
- 01-Django介绍和安装
01-Django介绍和安装 1.Django介绍 1.1介绍 Django是一个开放源代码的Web应用框架,由Python写成.采用了MVC的框架模式,即模型M(Model),视图V(View)和控 ...
- 论学好Linux系统的超级重要性
不知道各位在日常的工作生活中有没有接触过“rm -rf /*”这个命令,因为这个命令搞出来的事情可还不少呢!前段时间就在一个群里看到了有个小伙子,老板让他去维护一下服务器,这小伙也不太懂,就问群里的大 ...
- 菜鸟学IT之python词云初体验
作业来源:https://edu.cnblogs.com/campus/gzcc/GZCC-16SE1/homework/2822 1. 下载一长篇中文小说. 2. 从文件读取待分析文本. txt = ...
- CodeForces Round #555 Div.3
A. Reachable Numbers 代码: #include <bits/stdc++.h> using namespace std; ; int N; set<int> ...
- nginx配置https双向验证(ca机构证书+自签证书)
nginx配置https双向验证 服务端验证(ca机构证书) 客户端验证(服务器自签证书) 本文用的阿里云签发的免费证书实验,下载nginx安装ssl,文件夹有两个文件 这两个文件用于做服务器http ...
- tensorflow-TFRecord报错ValueError: Protocol message Feature has no "feature" field.
编写代码用TFRecord数据结构存储数据集信息是报错:ValueError: Protocol message Feature has no "feature" field.或和 ...
- docker容器运行后退出,怎么才能一直运行?【转】
现象 启动docker容器 docker run –name [CONTAINER_NAME] [CONTAINER_ID] 查看容器运行状态 docker ps -a 发现刚刚启动的mydocker ...
- luogu P2194 HXY烧情侣
残忍的题面 我们来看这一道题,其实冗长的题目告诉我们一个核心——用tarjan tarjan是用来干什么呢?是用来求强连通分量(代码中指sc) 求出来又有什么用呢?每当我们求出一个强连通分量时,就去计 ...