
Winform Chart
Chart图表解释说明:
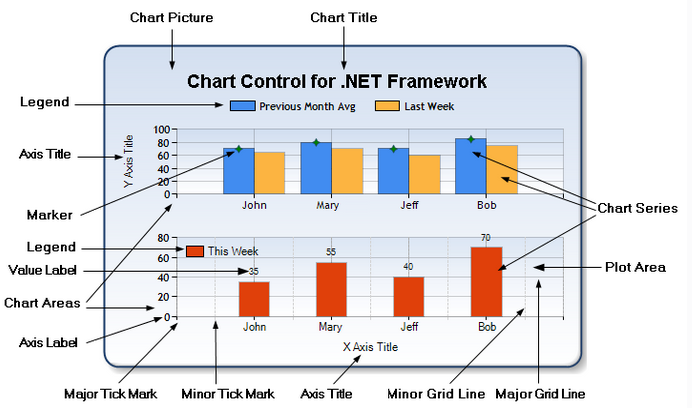
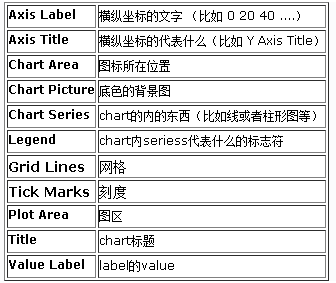
第一步:使用VS创建Winform项目;
第二步:工具箱中拖入Chart控件;
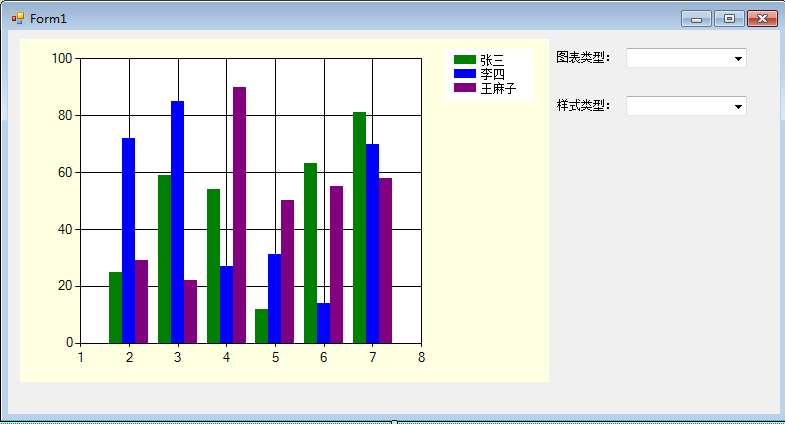
第三步:所有控件拖入其他控件如下图所示:
using System;

using System.Collections.Generic;

using System.Drawing;

using System.Windows.Forms;

using System.Windows.Forms.DataVisualization.Charting;

namespace ZB.PISS.StatisticsSys

{

    public partial class Form1 : Form

    {

        public Form1()

        {

            InitializeComponent();

        }

        private void Form1_Load(object sender, EventArgs e)

        {

            List<int> x = new List<int> { , , , ,  };

            List<int> a = new List<int> { , , , ,  };

            List<int> b = new List<int> { , , , ,  };

            List<int> c = new List<int> { , , , ,  };

            var dd = chartDemo.Series;

            this.chartDemo.Series["name1"].Points.DataBindXY(x, a);

            this.chartDemo.Series["name2"].Points.DataBindXY(x, b);

            this.chartDemo.Series["name3"].Points.DataBindXY(x, c);
Winfrom chart DataBindXY X内容显示不全解决方法如下:
chartImage.ChartAreas["ChartArea1"].AxisX.LabelAutoFitStyle = LabelAutoFitStyles.None;
chartImage.ChartAreas["ChartArea1"].AxisX.LabelStyle.Interval = 1;
chartImage.ChartAreas["ChartArea1"].AxisX.LabelStyle.IsStaggered = false;
//Chart Title

            this.chartDemo.Titles.Add("人员信息统计").Alignment = ContentAlignment.MiddleCenter;

            Color[] arr = chartDemo.PaletteCustomColors;

            this.cmbPattern.DataSource = PatternList();

            this.cmbType.DataSource = SeriesTypeList();

            //Axis Title

            this.chartDemo.ChartAreas[].AxisX.Title = "月份信息";

            this.chartDemo.ChartAreas[].AxisY.Title = "数量信息";

            //Lable

            //          #VALX 显示当前图例的X轴的对应文本(或数据)

            //#VAL, #VALY, 显示当前图例的Y轴的对应文本(或数据)

            //#VALY2, #VALY3, 显示当前图例的辅助Y轴的对应文本(或数据)

            //#SER: 显示当前图例的名称

            //#LABEL 显示当前图例的标签文本

            //#INDEX 显示当前图例的索引

            //#PERCENT 显示当前图例的所占的百分比

            //#TOTAL 总数量

            //#LEGENDTEXT 图例文本

            this.chartDemo.Series[].Label = "#VAL";

            this.chartDemo.Series[].Label = "#VAL";

            this.chartDemo.Series[].Label = "#VAL";

            //Marker

            this.chartDemo.Series[].MarkerSize = ;

            this.chartDemo.Series[].MarkerSize = ;

            this.chartDemo.Series[].MarkerSize = ;

            this.chartDemo.Series[].MarkerStyle = MarkerStyle.Circle;

            this.chartDemo.Series[].MarkerStyle = MarkerStyle.Square;

            this.chartDemo.Series[].MarkerStyle = MarkerStyle.Diamond;

        }

        #region ChartType

        public List<string> SeriesTypeList()

        {

            List<string> list = new List<string>();

            foreach (string item in Enum.GetNames(typeof(SeriesChartType)))

            {

                list.Add(item);

            }

            return list;

        }

        private void cmbType_SelectedValueChanged(object sender, EventArgs e)

        {

            try

            {

                SeriesChartType type = (SeriesChartType)Enum.Parse(typeof(SeriesChartType),

              this.cmbType.Text);

                this.chartDemo.Series["name1"].ChartType = type;

                this.chartDemo.Series["name2"].ChartType = type;

                this.chartDemo.Series["name3"].ChartType = type;

            }

            catch

            {

                return;

            }

        }

        #endregion

        #region Pattern

        public List<string> PatternList()

        {

            List<string> list = new List<string>();

            foreach (string item in Enum.GetNames(typeof(ChartColorPalette)))

            {

                list.Add(item);

            }

            return list;

        }

        private void cmbPattern_SelectedValueChanged(object sender, EventArgs e)

        {

            ChartColorPalette palette = (ChartColorPalette)Enum.Parse(typeof(ChartColorPalette),

                this.cmbPattern.Text);

            this.chartDemo.Palette = palette;

        }

        #endregion

    }

}
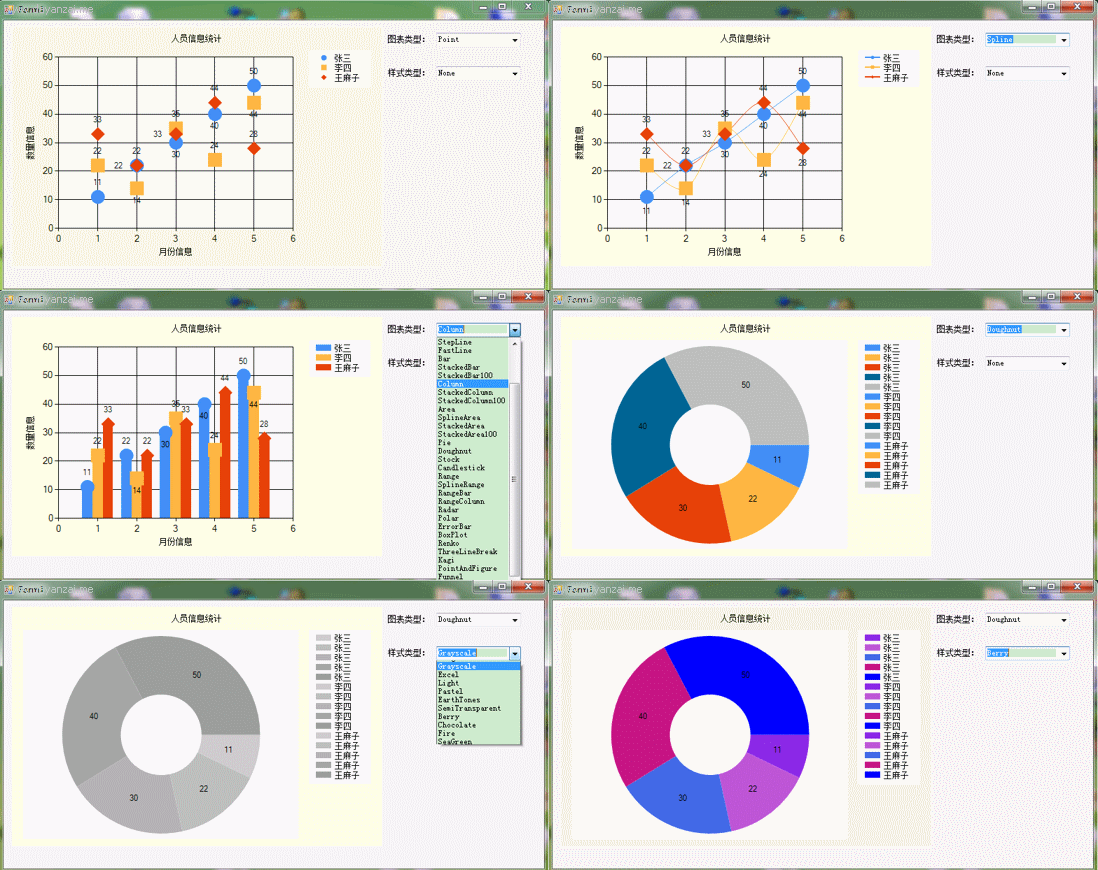
运行效果如下:
资源源码下载地址:http://download.csdn.net/my Winfrom Chart
补充:
一:实现3D效果
 private void comboBox1_SelectedValueChanged(object sender, EventArgs e)

        {

            if (this.comboBox1.Text.Equals("3D"))

            {

                 //this.chartDemo.ChartAreas[0].Area3DStyle.Enable3D = true;

                 //开启三维模式的原因是为了避免标签重叠

                 this.chartDemo.ChartAreas["ChartArea1"].Area3DStyle.Enable3D = true;//开启三维模式;PointDepth:厚度BorderWidth:边框宽

                 this.chartDemo.ChartAreas["ChartArea1"].Area3DStyle.Rotation = ;//起始角度

                 this.chartDemo.ChartAreas["ChartArea1"].Area3DStyle.Inclination = ;//倾斜度(0~90)

                 this.chartDemo.ChartAreas["ChartArea1"].Area3DStyle.LightStyle = LightStyle.Realistic;//表面光泽度

                 this.chartDemo.ChartAreas["ChartArea1"].AxisX.Interval = ; //决定x轴显示文本的间隔,1为强制每个柱状体都显示,3则间隔3个显示

                 this.chartDemo.ChartAreas["ChartArea1"].AxisX.LabelStyle.Font = new Font("宋体", , FontStyle.Regular);

                 this.chartDemo.ChartAreas["ChartArea1"].AxisX.MajorGrid.Enabled = false;

            }

            else

            {

                this.chartDemo.ChartAreas["ChartArea1"].Area3DStyle.Enable3D = false;

            }

        }
Winform Chart的更多相关文章
- c# winform Chart Pie 中若X轴数据为字符串时,#VALX取值为0
https://q.cnblogs.com/q/83848/ 在winform程序中用自带的Chart进行画图表时,若画饼图,其中X轴数据为字符串,这时候如果想设置Label值的格式为#VALX:#V ...
- c# Winform Chart入门
额外参考链接:http://www.cnblogs.com/greenerycn/archive/2008/10/27/microsoft-chart.html winform 仪表盘相关下载链接:/ ...
- winform Chart控件 获取鼠标处坐标值方法
Chart控件本身功能强大,应用广泛,因此其属性.方法也很多.此处介绍在很多应用中需要查看鼠标位置处坐标值的一些方法 1,调用Chart事件 GetToolTip 利用ToolTipEventArg ...
- WPF 使用WinForm Chart控件
第一步: 页面 首先引用命名空间 xmlns:wfi="clr-namespace:System.Windows.Forms.Integration;assembly=WindowsFor ...
- 使用WinForm Chart控件 制作饼装,柱状,折线图
http://blog.csdn.net/dream2050csdn/article/details/53510340 chart控件的属性很多,主要用到Chart控件图表区域的属性有五个属性 1.A ...
- 【207】WinForm Chart类
目录: 在工具箱中找到 Chart 控件并使用 设置 Chart 属性 代码中设置属性 属性中设置属性 Chart 类说明 ChartAreas ChartAreaCollection 类 Chart ...
- Winform Chart 控件读取datatable后显示图表
private void Button2_Click(object sender, EventArgs e) { DataTable table = new DataTable(); this.cha ...
- C# chart,有关如何在鼠标移动到Series上时显示节点及数据 (有待继续更新)
一.效果与思路 效果: 解决方案1 用chart的mousemove时间,实时跟踪鼠标最近的X轴的位置,然后把cursorX设置到那个位置上,让用户知道我是选的那一个X的值,同时用tooltip显示该 ...
- Winform & Devexpress Chart使用入门
一.Chart(Winform) 使用图表控件(chart)首先要理解图表区域(ChartArea).XY轴(AxisX.AxisY).数据点(Series).标题(Title).图例(Legend) ...
随机推荐
- [转]Peer-to-Peer Communication Across Network Address Translators
Peer-to-Peer Communication Across Network Address Translators Bryan Ford Massachusetts Institute of ...
- python time 时间处理
a='2018-03-26 17:20:11' >>> print time.strftime("%Y%m%d", a)Traceback (most recen ...
- 检查是否使用PAM认证模块禁止wheel组之外的用户su为root
编辑su文件(vi /etc/pam.d/su),在开头添加下面两行: auth sufficient pam_rootok.so 和 auth required pam_wheel.so group ...
- urllib模块通过post请求获取数据
功能: 输入你要查找的单词,会返回相对应的结果 import urllib.request import urllib.parse import json class youdaoSpider: de ...
- [LeetCode&Python] Problem 563. Binary Tree Tilt
Given a binary tree, return the tilt of the whole tree. The tilt of a tree node is defined as the ab ...
- OpenCV2类批量处理文件夹及文件图像 及批量处理后保存到txt文件
//采用windows控制台实现计算文件夹中对象总数以及批量读取对象 //#include <afx.h> //和windows.h是一样的作用 #include <opencv2/ ...
- Unity 3D用简单的Cube、Sphere实现镜面/哈哈镜效果,只需十几秒哦!
Unity实现镜面和哈哈镜效果 本文提供全流程,中文翻译. Chinar 坚持将简单的生活方式,带给世人!(拥有更好的阅读体验 -- 高分辨率用户请根据需求调整网页缩放比例) Chinar -- 心分 ...
- 如何更改Apache的根目录指向
更改Apache的默认网站根目录地址方法如下: 0,先找到主目录下的apache文件,然后进行下面操作 1.找到 DocumentRoot “X:/Apache/htdocs” 将“X:/Apache ...
- 2017 ACM-ICPC EC-Final ShangHai 东亚洲大陆-上海
比赛链接:传送门 Gym 101775A Chat Group(签到:待补) Gym 101775B Scapegoat(待补) Gym 101775C Traffic Light(贪心+思维) 思路 ...
- HDU 4639 Hehe 2013 Multi-University Training Contest 4
题意大致如下:屌丝找女神聊天,女神回了一句 hehe ,而我们都知道 Hehe 有两个意思,一个就是 Hehe ,另外一个则是 wqnmlgb (我去年买了个表) ,所以屌丝很纠结,于是开始思考到底女 ...