Google Colab 免费GPU服务器使用教程
今天突然看到一篇推文,里面讲解了如何薅资本主义羊毛,即如何免费使用Google免费提供的GPU使用权。
可以免费使用的方式就是通过Google Colab,全名Colaboratory。我们可以用它来提高Python技能,也可以用Keras、TensorFlow、PyTorch、OpenCV等等流行的深度学习库来练习开发深度学习的应用。
现在我们介绍如何免费的使用这个非常非常给力的应用!!!
一 项目建立与配置
(1)在Google Drive上创建文件夹:这项功能的使用主要是通过Google Drive,首先需要在Google Drive里面创建新的文件夹,因为我们所有的操作都是通过Google Drive文件的方式进行的,这里我们创建了一个名为gpu的文件夹,然后打开文件夹;
(2)创建新的Colaboratory:右键更多选择Colaboratory, 如果更多没有的话,可以点击关联更多应用搜索添加即可!
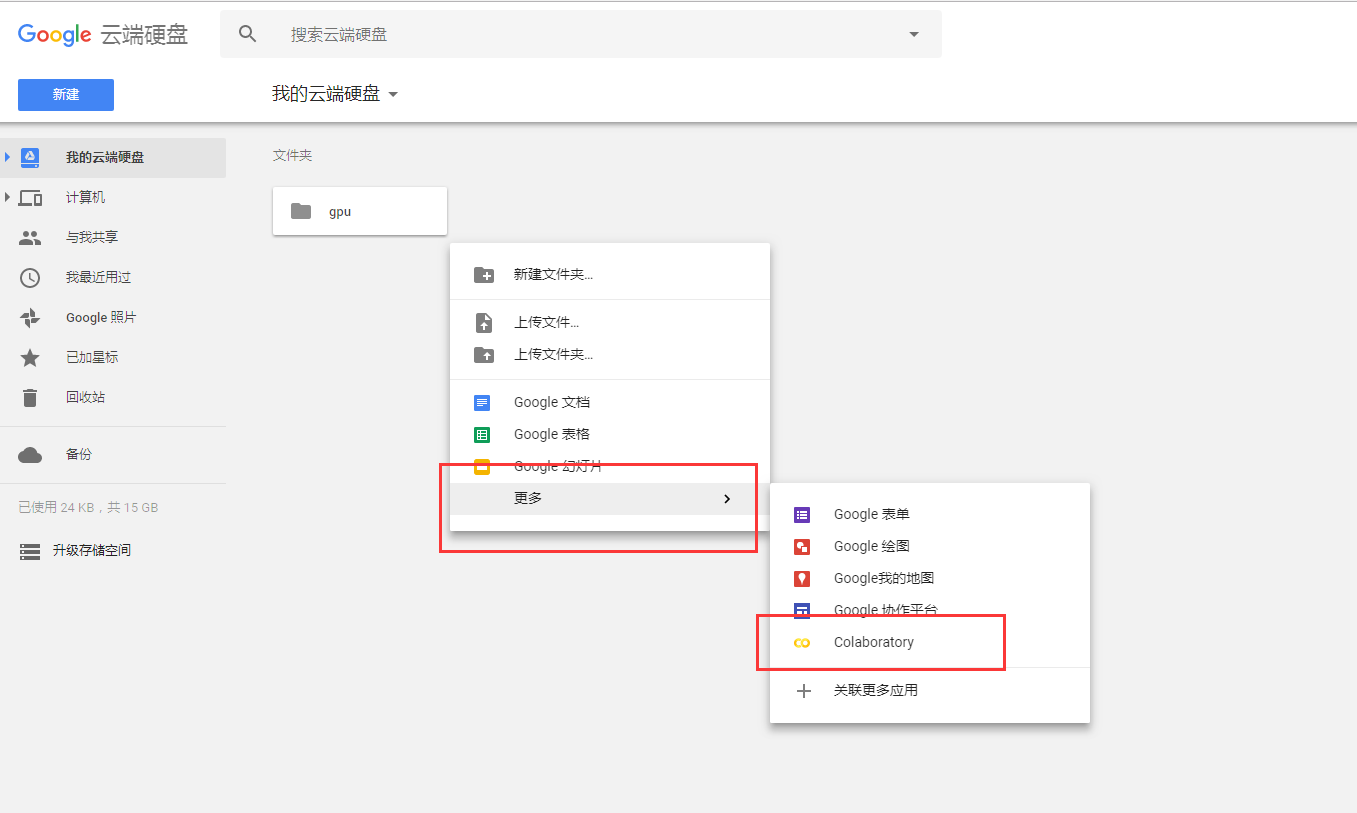
并且这里可以随意修改文件名

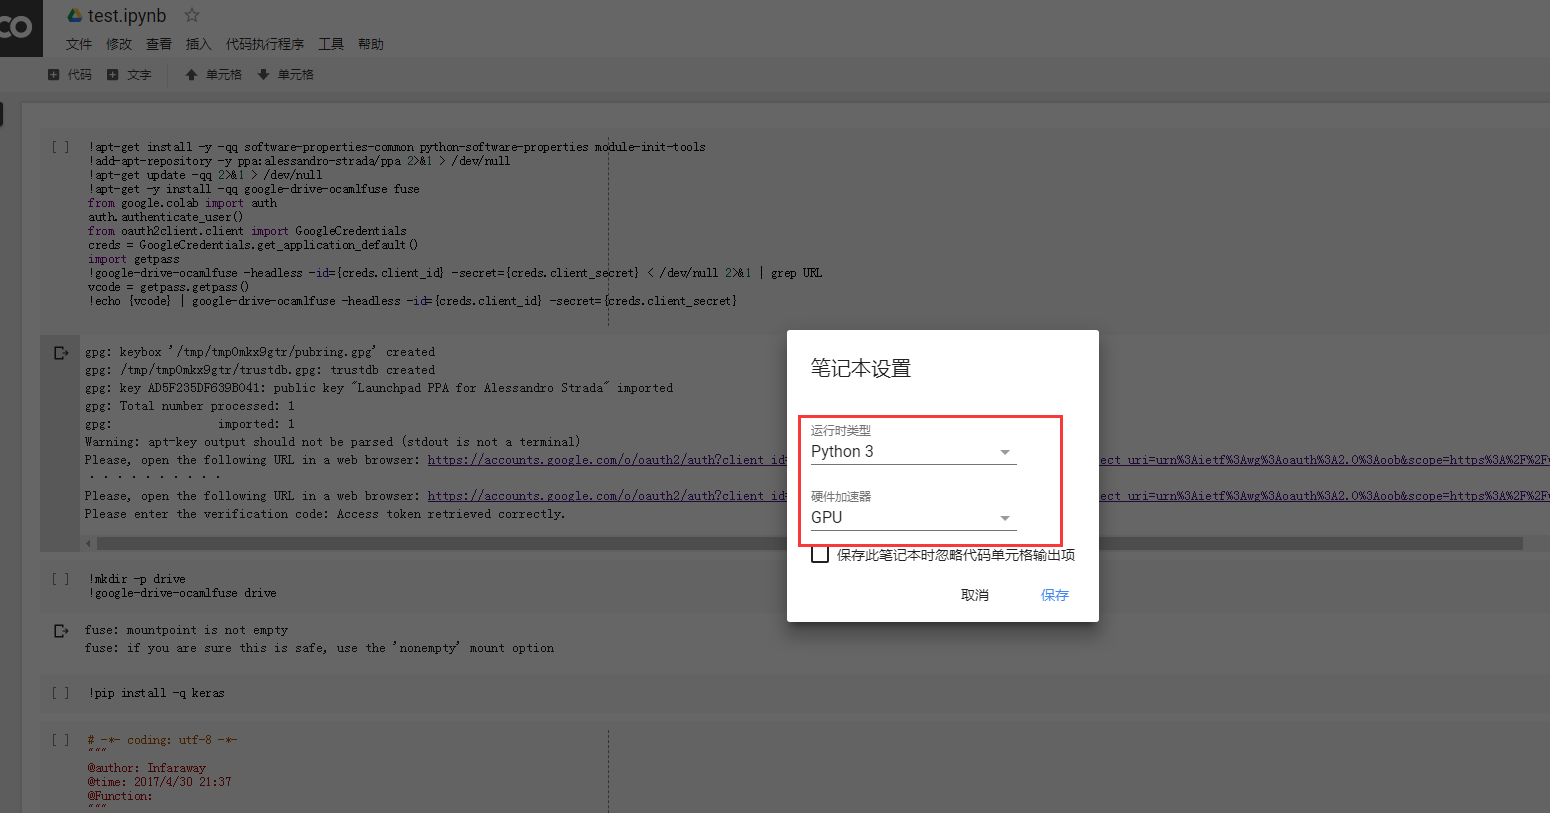
(3)点击修改,设置后端Python版本和免费的GPU使用:然后就可以进行代码编写了~~~
二 授权与挂载
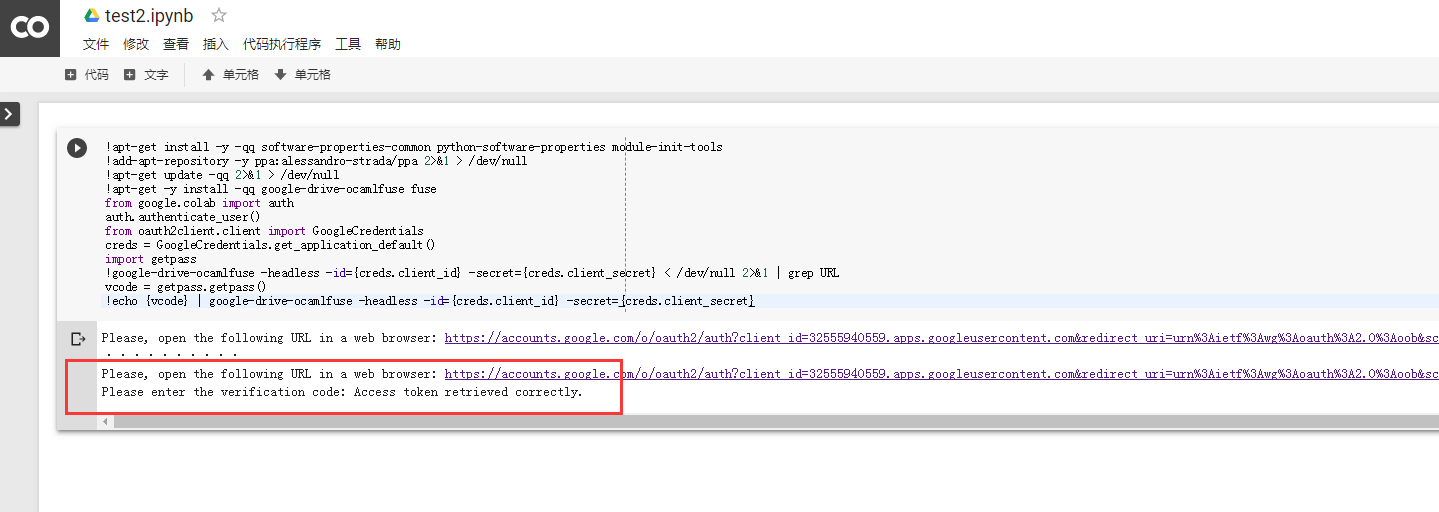
(4)当完成基本的文件建立和配置后,就需要先运行下面这些代码,来安装必要的库、执
!apt-get install -y -qq software-properties-common python-software-properties module-init-tools

!add-apt-repository -y ppa:alessandro-strada/ppa 2>&1 > /dev/null

!apt-get update -qq 2>&1 > /dev/null

!apt-get -y install -qq google-drive-ocamlfuse fuse

from google.colab import auth

auth.authenticate_user()

from oauth2client.client import GoogleCredentials

creds = GoogleCredentials.get_application_default()

import getpass

!google-drive-ocamlfuse -headless -id={creds.client_id} -secret={creds.client_secret} < /dev/null 2>&1 | grep URL

vcode = getpass.getpass()

!echo {vcode} | google-drive-ocamlfuse -headless -id={creds.client_id} -secret={creds.client_secret}
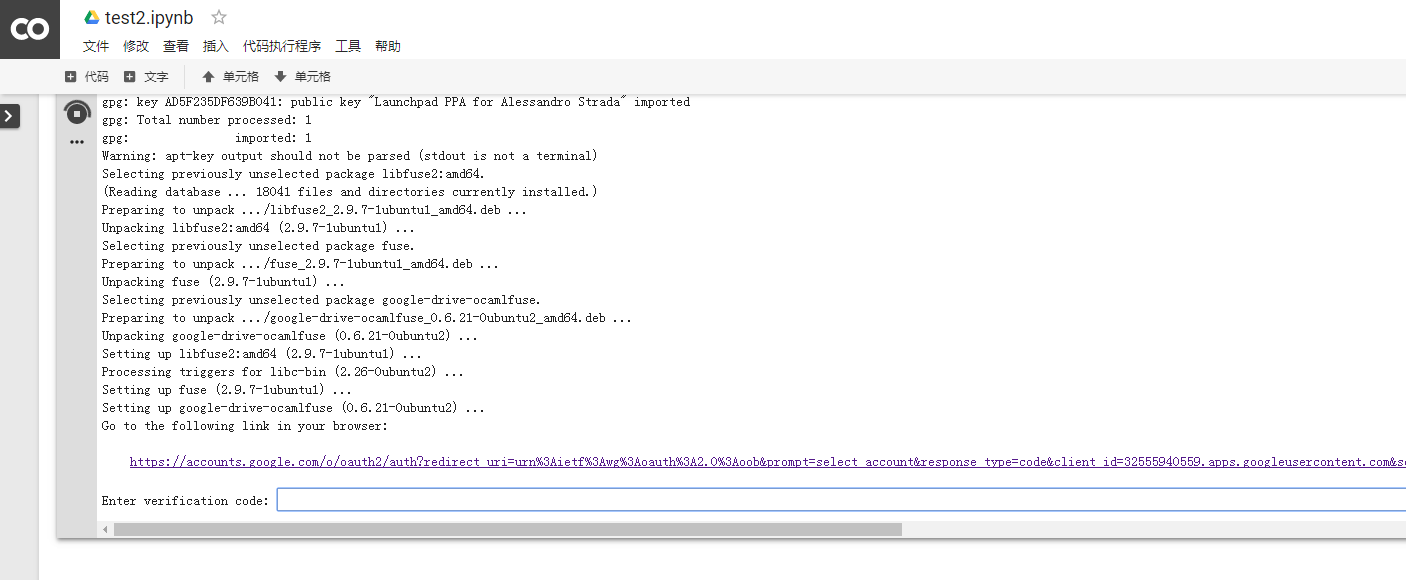
点击链接地址,获取验证码。

提示成功!
(5)授权完成后,就可以挂载Google Drive了
 !mkdir -p drive

 !google-drive-ocamlfuse drive
三 测试阶段
我们使用安装Keras中的测试样例代码进行效果的测试:
 1 # -*- coding: utf-8 -*-

 2

 3

 4 '''Trains a simple convnet on the MNIST dataset.

 5 Gets to 99.25% test accuracy after 12 epochs

 6 (there is still a lot of margin for parameter tuning).

 7 16 seconds per epoch on a GRID K520 GPU.

 8 '''

 9

10 from __future__ import print_function

11 import keras

12 from keras.datasets import mnist

13 from keras.models import Sequential

14 from keras.layers import Dense, Dropout, Flatten

15 from keras.layers import Conv2D, MaxPooling2D

16 from keras import backend as K

17

18 batch_size = 128

19 num_classes = 10

20 epochs = 12

21

22 # input image dimensions

23 img_rows, img_cols = 28, 28

24

25 # the data, shuffled and split between train and test sets

26 (x_train, y_train), (x_test, y_test) = mnist.load_data()

27

28 if K.image_data_format() == 'channels_first':

29     x_train = x_train.reshape(x_train.shape[0], 1, img_rows, img_cols)

30     x_test = x_test.reshape(x_test.shape[0], 1, img_rows, img_cols)

31     input_shape = (1, img_rows, img_cols)

32 else:

33     x_train = x_train.reshape(x_train.shape[0], img_rows, img_cols, 1)

34     x_test = x_test.reshape(x_test.shape[0], img_rows, img_cols, 1)

35     input_shape = (img_rows, img_cols, 1)

36

37 x_train = x_train.astype('float32')

38 x_test = x_test.astype('float32')

39 x_train /= 255

40 x_test /= 255

41 print('x_train shape:', x_train.shape)

42 print(x_train.shape[0], 'train samples')

43 print(x_test.shape[0], 'test samples')

44

45 # convert class vectors to binary class matrices

46 y_train = keras.utils.to_categorical(y_train, num_classes)

47 y_test = keras.utils.to_categorical(y_test, num_classes)

48

49 model = Sequential()

50 model.add(Conv2D(32, kernel_size=(3, 3),

51                  activation='relu',

52                  input_shape=input_shape))

53 model.add(Conv2D(64, (3, 3), activation='relu'))

54 model.add(MaxPooling2D(pool_size=(2, 2)))

55 model.add(Dropout(0.25))

56 model.add(Flatten())

57 model.add(Dense(128, activation='relu'))

58 model.add(Dropout(0.5))

59 model.add(Dense(num_classes, activation='softmax'))

60

61 model.compile(loss=keras.losses.categorical_crossentropy,

62               optimizer=keras.optimizers.Adadelta(),

63               metrics=['accuracy'])

64

65 model.fit(x_train, y_train,

66           batch_size=batch_size,

67           epochs=epochs,

68           verbose=1,

69           validation_data=(x_test, y_test))

70 score = model.evaluate(x_test, y_test, verbose=0)

71 print('Test loss:', score[0])

72 print('Test accuracy:', score[1])
这里使用Google GPU的效率每个Epoch大概需要11s左右即可完成
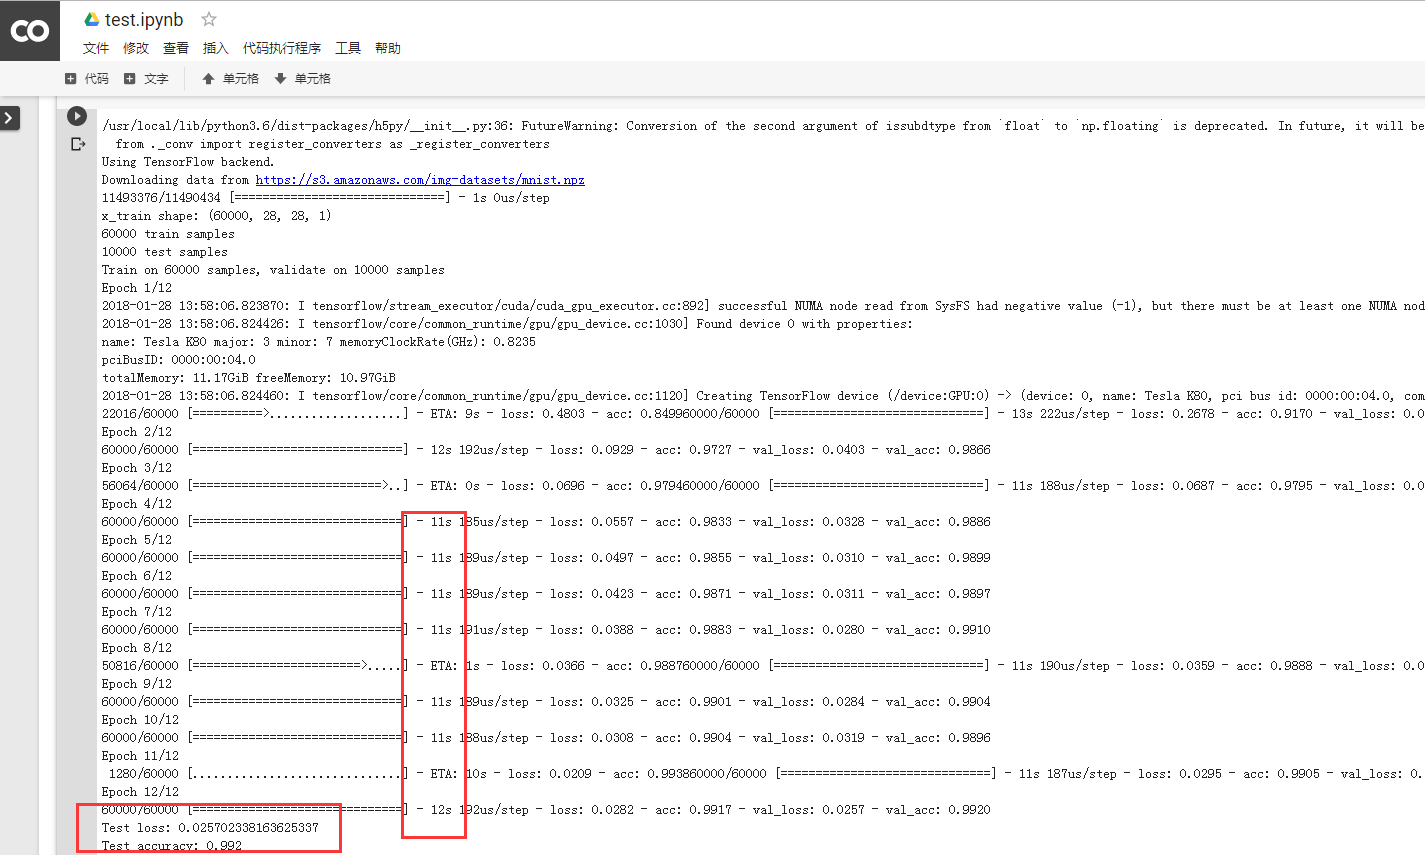
而我们使用实验室的工作站
每个率每个Epoch大概需要130s+完成

四 相关命令
(1)查看是否使用GPU:
1 import tensorflow as tf

2 tf.test.gpu_device_name()
(2)在使用哪个GPU:
1 from tensorflow.python.client import device_lib

2 device_lib.list_local_devices()
(3)RAM大小:
1 !cat /proc/meminfo
当然Google的使用需要自备FQ工具!
重点:
授权:可能是google为了防止机器人,所以每次连接都需要验证一下。
挂载:因为我们连接的gpu服务器与google云盘是两个独立的机器,因此需要通过挂载操作将云盘上的文件夹连接到gpu服务器上。
因为我们连接的机器安装的是linux系统,我们可以使用linux命令行。(在命令行前面添加!即可)
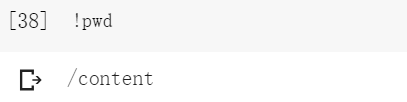
查看当前路径:
查看当前目录下的文件:
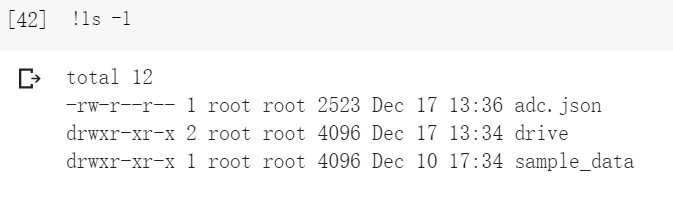
在这里我们可以看到drive目录,而这个drive目录保存的是云盘上的所有信息。
进入drive目录:

这里无法使用cd命令行。
运行的时候最好不要关闭页面。

大家可以看到google云盘与Colab的服务器存在时差
云盘上文件即使上传上去了,但很可能早不到文件,这一般是网络延时的原因。多刷新几次,最好用ls命令看一下
云盘文件上传上去之后,可能会出现名字发生改变,用引号括起来。还多了一窜不知道什么的数字,这个要注意一下。
https://github.com/astrada/google-drive-ocamlfuse
原文链接:https://medium.com/deep-learning-turkey/google-colab-free-gpu-tutorial-e113627b9f5d
Google Colab 免费GPU服务器使用教程的更多相关文章
- Google Colab 免费GPU服务器使用教程 挂载云端硬盘
一.前言二.Google Colab特征三.开始使用3.1在谷歌云盘上创建文件夹3.2创建Colaboratory3.3创建完成四.设置GPU运行五.运行.py文件5.1安装必要库5.2 挂载云端硬盘 ...
- Google Colab免费GPU使用教程(一)
一.前言 现在你可以开发Deep Learning Applications在Google Colaboratory,它自带免费的Tesla K80 GPU.重点是免费.免费!(国内可能需要tz) 这 ...
- Google Colab 免费的谷歌GPU for deep learning
Who wants to use a free GPU for deep learning?Google Colab is a free cloud service and now it suppor ...
- Google Colab Free GPU Tutorial【转载】
转自:https://medium.com/deep-learning-turkey/google-colab-free-gpu-tutorial-e113627b9f5d 1.Google Cola ...
- Google免费GPU使用教程(Google Colab Colaboratory)
参考: https://www.234du.com/1154.html https://mp.weixin.qq.com/s/TGTToLYSQJui94-bQC4HIQ 注册gmail时遇到手机号无 ...
- Google Colab——用谷歌免费GPU跑你的深度学习代码
Google Colab简介 Google Colaboratory是谷歌开放的一款研究工具,主要用于机器学习的开发和研究.这款工具现在可以免费使用,但是不是永久免费暂时还不确定.Google Col ...
- Google免费GPU使用教程
今天突然看到一篇推文,里面讲解了如何薅资本主义羊毛,即如何免费使用Google免费提供的GPU使用权. 可以免费使用的方式就是通过Google Colab,全名Colaboratory.我们可以用它来 ...
- Google Colab使用教程
简介Google Colaboratory是谷歌开放的云服务平台,提供免费的CPU.GPU和TPU服务器. 目前深度学习在图像和文本上的应用越来越多,不断有新的模型.新的算法获得更好的效果,然而,一方 ...
- 一幅图的知识科普--Google免费DNS服务器
学习源于问题的解决 前段时间在虚拟机上安装了一个oracle软件,虚拟机和宿主机器的网络连接方式是桥接模式的,手动设置了静态ip地址,网关地址,但是发现虚拟机的浏览器不能用. 于是通过ping测试了一 ...
随机推荐
- 应用通信-方案二:Feign
------------------客户端controller层--------------------- @RestController public class ClientFeignContro ...
- 【面试 SQL】【第十六篇】SQL相关面试
=================================================================================== 1.一张表,姓名,科目,成绩,一 ...
- Servlet第五课:Cookie的使用
目标规划: 通过这一节课,我们能够懂得怎样使用Cookie.以及怎样获取Cookie中的内容. 插播广告:博客之星评选.点击投我一票.谢谢. Cookie的具体概述. 1. Cookie 是保存在cl ...
- C++ stringstream 简化数据类型转换
C++标准库中的<sstream>提供了比ANSI C的<stdio.h>更高级的一些功能,即单纯性.类型安全和可扩展性. 在C++中经常会使用到snprintf来格式化一些输 ...
- Permutations II leetcode java
题目: Given a collection of numbers that might contain duplicates, return all possible unique permutat ...
- 【Yaml】Yaml学习笔记
转载:https://blog.csdn.net/moshenglv/article/details/52084899 YAML何许物也?在XML泛滥的情况下,YAML的出现的确让人眼前一亮,在初步学 ...
- Java 对字符串数据进行MD5/SHA1哈希散列运算
Java对字符串数据进行MD5/SHA1哈希散列运算 [java] view plain copy package cn.aibo.test; import java.security.Message ...
- MySQL查看当前的连接信息
1:查看当前有多少个连接 mysql> status; Threads: 4 2:查看连接的详细信息 mysql> SHOW FULL PROCESSLIST;
- 【Linux】top命令
top命令经常用来监控linux的系统状况,比如cpu.内存的使用,程序员基本都知道这个命令,但比较奇怪的是能用好它的人却很少,例如top监控视图中内存数值的含义就有不少的曲解.本文通过一个运行中的W ...
- 通过nginx中转获取不到IP的问题解决
第一步:在nginx.conf中配置反向代理时把真实IP带上,例如: server { listen 80; server_name myibook.com.cn; loca ...