
[cloud][ovs][sdn] 安装 openvswitch-dpdk
[cloud][OVS][sdn] Open vSwitch 初步了解
继之前的内容,安装基于dpdk的ovs
https://docs.openvswitch.org/en/latest/intro/install/dpdk/
摘要:
一 内核设置与版本依赖:
On Linux Distros running kernel version >= 3.0, only IOMMU needs to enabled via the grub cmdline, assuming you are using VFIO. For older kernels,
ensure the kernel is built with UIO, HUGETLBFS, PROC_PAGE_MONITOR, HPET, HPET_MMAP support. If these are not present, it will be necessary to
upgrade your kernel or build a custom kernel with these flags enabled.
步骤:
1. 编译dpdk-17.11.1
编辑 config/common_base 修改 如下:
[root@D128 dpdk-stable-17.11.]# cat config/common_base |grep SHARE

CONFIG_RTE_BUILD_SHARED_LIB=y
[root@D128 dpdk-stable-17.11.]# make config T=$RTE_TARGET O=$RTE_TARGET

[root@D128 dpdk-stable-17.11.]# cd x86_64-native-linuxapp-gcc/

[root@D128 x86_64-native-linuxapp-gcc]# make
2. 安装
[root@D128 dpdk-stable-17.11.]# make install prefix=/root/BUILD_ovs/

make[]: Nothing to be done for `pre_install'.

================== Installing /root/BUILD_ovs//

Installation in /root/BUILD_ovs// complete

[root@D128 dpdk-stable-17.11.]#
3. 加载ld目录
[root@D128 dpdk-stable-17.11.]# tail -n1 ~/.bash_profile

export LD_LIBRARY_PATH=$HOME/BUILD_ovs/lib

[root@D128 dpdk-stable-17.11.]# source ~/.bash_profile

[root@D128 dpdk-stable-17.11.]# ldconfig

[root@D128 dpdk-stable-17.11.]#
4. 编译ovs
[root@D128 ovs]# ./boot.sh

[root@D128 ovs]# yum install libpcap-devel

[root@D128 ovs]# ./configure --prefix=/root/BUILD_ovs/ --with-dpdk=/root/BUILD_ovs/
[root@D128 ovs]# make
报错了。。。有是版本问题。。。。
lib/netdev-dpdk.c::: fatal error: rte_virtio_net.h: No such file or directory
ovs切到2.9.0
[root@D128 ovs]# git checkout v2.9.0
继续安装:
[root@D128 ovs]# make

[root@D128 ovs]# make install
5. 配置
a 大页(原来还可以这样,用sysctl)
[root@D128 ovs]# cat /sys/kernel/mm/hugepages/hugepages-2048kB/nr_hugepages

[root@D128 ovs]# sysctl -w vm.nr_hugepages=256

vm.nr_hugepages = 256

[root@D128 ovs]# cat /sys/kernel/mm/hugepages/hugepages-2048kB/nr_hugepages

[root@D128 ovs]#
b 挂载大页(已经挂上了)
[root@D128 ovs]# mount -l |grep hugetlbfs

hugetlbfs on /dev/hugepages type hugetlbfs (rw,relatime)

[root@D128 ovs]#
c iommu
check:这地方很重要,新知识,以前一直想搞清楚IOMMU到底怎么配的,终于找到了,在这里。要读一下文档。
$ dmesg | grep -e DMAR -e IOMMU

$ cat /proc/cmdline | grep iommu=pt

$ cat /proc/cmdline | grep intel_iommu=on
修改内核参数,并重启
[root@D128 ~]# cat /etc/default/grub |grep CMD

GRUB_CMDLINE_LINUX="crashkernel=auto rd.lvm.lv=centos/root rd.lvm.lv=centos/swap intel_iommu=on iommu=pt rhgb quiet"

[root@D128 ~]# grub2-mkconfig -o /boot/grub2/grub.cfg
d 绑定vfio
[root@D128 ~]# modprobe vfio-pci

[root@D128 ~]# chmod a+x /dev/vfio

[root@D128 ~]# chmod  /dev/vfio/*

[root@D128 ~]# ~/BUILD_ovs/share/dpdk/usertools/dpdk-devbind.py --bind=vfio-pci 0000:02:05.0

Error: bind failed for 0000:02:05.0 - Cannot bind to driver vfio-pci
绑定失败:
[root@D128 ~]# dmesg |grep vfio

[ 1113.056898] vfio-pci: probe of ::05.0 failed with error -

[ 1116.163472] vfio-pci: probe of ::05.0 failed with error -

[ 1562.817267] vfio-pci: probe of ::05.0 failed with error -

[ 1646.964904] vfio-pci: probe of ::05.0 failed with error -

[root@D128 ~]#
需要给vmware启用iommu
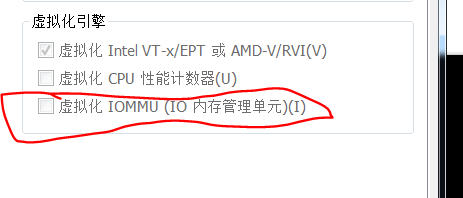
e 再开机
1. 设置大页,页数
2. 加载vfio-pci
3. bind 网卡
[root@D128 ~]# sysctl -w vm.nr_hugepages=

[root@D128 ~]# ll /dev/vfio/vfio

crw------- 1 root root 10, 196 Apr 11 10:13 /dev/vfio/vfio

[root@D128 ~]# ll /dev/ |grep vfio

drwxr-xr-x 2 root root          60 Apr 11 10:13 vfio

[root@D128 ~]# lsmod |grep vfio

[root@D128 ~]# modprobe vfio-pci

[root@D128 ~]# lsmod |grep vfio

vfio_pci

vfio_iommu_type1

vfio                      vfio_iommu_type1,vfio_pci

irqbypass                 kvm,vfio_pci

[root@D128 ~]# ll /dev/vfio/vfio

crw-rw-rw- 1 root root 10, 196 Apr 11 10:17 /dev/vfio/vfio

[root@D128 ~]# ll /dev/ |grep vfio

drwxr-xr-x 2 root root          60 Apr 11 10:13 vfio
[root@D128 ~]# /root/BUILD_ovs/share/dpdk/usertools/dpdk-devbind.py -b vfio-pci ens37

[root@D128 ~]# /root/BUILD_ovs/share/dpdk/usertools/dpdk-devbind.py -s

Network devices using DPDK-compatible driver

============================================

::05.0 '82545EM Gigabit Ethernet Controller (Copper) 100f' drv=vfio-pci unused=e1000

Network devices using kernel driver

===================================

::01.0 '82545EM Gigabit Ethernet Controller (Copper) 100f' if=ens33 drv=e1000 unused=vfio-pci
6. 设置 OVS
a 正常启动ovs
root@D128 ~/B/s/o/scripts# modprobe openvswitch

root@D128 ~/B/s/o/scripts# ./ovs-ctl --system-id=random start

Starting ovsdb-server                                      [  OK  ]

Configuring Open vSwitch system IDs                        [  OK  ]

Starting ovs-vswitchd                                      [  OK  ]

Enabling remote OVSDB managers                             [  OK  ]

root@D128 ~/B/s/o/scripts#
b 设置dpdk参数
root@D128 ~/B/s/o/scripts# ovs-vsctl --no-wait set Open_vSwitch . other_config:dpdk-init=true

root@D128 ~/B/s/o/scripts# ovs-vsctl --no-wait set Open_vSwitch . other_config:dpdk-socket-mem=
7. 使用ovs with dpdk
root@D128 ~/B/s/o/scripts# ovs-vsctl add-br ovs-br0

root@D128 ~/B/s/o/scripts# ip link

: lo: <LOOPBACK,UP,LOWER_UP> mtu  qdisc noqueue state UNKNOWN mode DEFAULT qlen

    link/loopback ::::: brd :::::

: ens33: <BROADCAST,MULTICAST,UP,LOWER_UP> mtu  qdisc pfifo_fast master br-ext state UP mode DEFAULT qlen

    link/ether :0c::2f:cf: brd ff:ff:ff:ff:ff:ff

: br-ext: <BROADCAST,MULTICAST,UP,LOWER_UP> mtu  qdisc noqueue state UP mode DEFAULT qlen

    link/ether :0c::2f:cf: brd ff:ff:ff:ff:ff:ff

12: ovs-system: <BROADCAST,MULTICAST> mtu 1500 qdisc noop state DOWN mode DEFAULT qlen 1000

    link/ether ee:be:5d:5c:01:ca brd ff:ff:ff:ff:ff:ff

: ovs-br0: <BROADCAST,MULTICAST> mtu  qdisc noop state DOWN mode DEFAULT qlen

    link/ether ee:3c:::8b:4a brd ff:ff:ff:ff:ff:ff

root@D128 ~/B/s/o/scripts# ovs-vsctl show

528b5679-22e8-484b-947b-4499959dc341

    Bridge "ovs-br0"

        Port "ovs-br0"

            Interface "ovs-br0"

                type: internal

    ovs_version: "2.9.0"

root@D128 ~/B/s/o/scripts# ovs-vsctl set bridge ovs-br0 datapath_type=netdev

root@D128 ~/B/s/o/scripts# ip link

: lo: <LOOPBACK,UP,LOWER_UP> mtu  qdisc noqueue state UNKNOWN mode DEFAULT qlen

    link/loopback ::::: brd :::::

: ens33: <BROADCAST,MULTICAST,UP,LOWER_UP> mtu  qdisc pfifo_fast master br-ext state UP mode DEFAULT qlen

    link/ether :0c::2f:cf: brd ff:ff:ff:ff:ff:ff

: br-ext: <BROADCAST,MULTICAST,UP,LOWER_UP> mtu  qdisc noqueue state UP mode DEFAULT qlen

    link/ether :0c::2f:cf: brd ff:ff:ff:ff:ff:ff

14: ovs-netdev: <BROADCAST,PROMISC> mtu 1500 qdisc noop state DOWN mode DEFAULT qlen 1000

    link/ether ba:37:40:3e:b7:64 brd ff:ff:ff:ff:ff:ff

: ovs-br0: <BROADCAST,PROMISC> mtu  qdisc noop state DOWN mode DEFAULT qlen

    link/ether ee:3c:::8b:4a brd ff:ff:ff:ff:ff:ff

root@D128 ~/B/s/o/scripts#
加port失败,查看vswitchd.log, 在启动时有如下错误信息:
[root@D128]# ovs-vsctl add-port ovs-br0 dpdk-p0 -- set Interface dpdk-p0 type=dpdk options:dpdk-devargs=02:01.0
... ...
2018--11T03::.040Z||dpdk|ERR|EAL:   ::05.0 VFIO group is not viable!

--11T03::.040Z||dpdk|ERR|EAL: Requested device ::05.0 cannot be used
解决办法:
http://webcache.googleusercontent.com/search?q=cache:Xx_mIPljxWAJ:danny270degree.blogspot.com/2015/12/iommu-error-of-vfio-group-is-not-viable.html+&cd=1&hl=zh-CN&ct=clnk&gl=cn
http://webcache.googleusercontent.com/search?q=cache:http://vfio.blogspot.com/2014/08/iommu-groups-inside-and-out.html&gws_rd=cr
原因即使,一个iommu group里现在有两个设备:
[root@D128 scripts]# find /sys/kernel/iommu_groups/ -type l

/sys/kernel/iommu_groups//devices/::00.0

/sys/kernel/iommu_groups//devices/::01.0

/sys/kernel/iommu_groups//devices/::07.0

/sys/kernel/iommu_groups//devices/::07.1

/sys/kernel/iommu_groups//devices/::07.3

/sys/kernel/iommu_groups//devices/::07.7

/sys/kernel/iommu_groups//devices/::0f.

/sys/kernel/iommu_groups//devices/::10.0

/sys/kernel/iommu_groups//devices/::11.0

/sys/kernel/iommu_groups//devices/::00.0

/sys/kernel/iommu_groups//devices/::01.0

/sys/kernel/iommu_groups//devices/::02.0

/sys/kernel/iommu_groups//devices/::03.0

/sys/kernel/iommu_groups//devices/::05.0

/sys/kernel/iommu_groups//devices/::15.0

/sys/kernel/iommu_groups//devices/::15.1

/sys/kernel/iommu_groups//devices/::15.2

/sys/kernel/iommu_groups//devices/::15.3

/sys/kernel/iommu_groups//devices/::15.4

/sys/kernel/iommu_groups//devices/::15.5

/sys/kernel/iommu_groups//devices/::15.6

/sys/kernel/iommu_groups//devices/::15.7

/sys/kernel/iommu_groups//devices/::16.0

/sys/kernel/iommu_groups//devices/::16.1

/sys/kernel/iommu_groups//devices/::16.2

/sys/kernel/iommu_groups//devices/::16.3

/sys/kernel/iommu_groups//devices/::16.4

/sys/kernel/iommu_groups//devices/::16.5

/sys/kernel/iommu_groups//devices/::16.6

/sys/kernel/iommu_groups//devices/::16.7

/sys/kernel/iommu_groups//devices/::17.0

/sys/kernel/iommu_groups//devices/::17.1

/sys/kernel/iommu_groups//devices/::17.2

/sys/kernel/iommu_groups//devices/::17.3

/sys/kernel/iommu_groups//devices/::17.4

/sys/kernel/iommu_groups//devices/::17.5

/sys/kernel/iommu_groups//devices/::17.6

/sys/kernel/iommu_groups//devices/::17.7

/sys/kernel/iommu_groups//devices/::18.0

/sys/kernel/iommu_groups//devices/::18.1

/sys/kernel/iommu_groups//devices/::18.2

/sys/kernel/iommu_groups//devices/::18.3

/sys/kernel/iommu_groups//devices/::18.4

/sys/kernel/iommu_groups//devices/::18.5

/sys/kernel/iommu_groups//devices/::18.6

/sys/kernel/iommu_groups//devices/::18.7

[root@D128 scripts]#
解决方法有两个:1 换个网卡插槽,是他们不再一个group,二,内核patch。
So, the solutions are these two:

. Install the device into a different slot

. Bypass ACS using the ACS overrides patch
但是,虚拟机怎么换插槽。。。。。
解决不了。。。。。
解决方案:
修改网卡的驱动类型为e1000e, 修改文件 CentOS 7 64 位.vmx 中的如下内容:
ethernet1.virtualDev = "e1000e"
然后重启,重新设置以上流程:
[root@D128 ~]# ovs-vsctl add-port ovs-br0 dpdk-p0 -- set Interface dpdk-p0 type=dpdk options:dpdk-devargs=::00.0

[root@D128 ~]# ovs-vsctl show

528b5679-22e8-484b-947b-4499959dc341

    Bridge "ovs-br0"

        Port "ovs-br0"

            Interface "ovs-br0"

                type: internal

        Port "dpdk-p0"

            Interface "dpdk-p0"

                type: dpdk

                options: {dpdk-devargs="0000:03:00.0"}

    ovs_version: "2.9.0"

[root@D128 ~]# tail /root/BUILD_ovs/var/log/openvswitch/ovs-vswitchd.log

--11T08::.221Z||dpdk|INFO|EAL:   using IOMMU type  (Type )

--11T08::.251Z||dpdk|INFO|EAL: Ignore mapping IO port bar()

--11T08::.357Z||netdev_dpdk|INFO|Device '0000:03:00.0' attached to DPDK

--11T08::.385Z||dpif_netdev|INFO|PMD thread on numa_id: , core id:   created.

--11T08::.385Z||dpif_netdev|INFO|There are  pmd threads on numa node

--11T08::.592Z||netdev_dpdk|INFO|Port : :0c::2f:cf:3c

--11T08::.593Z||dpif_netdev|INFO|Core  on numa node  assigned port 'dpdk-p0' rx queue  (measured processing cycles ).

--11T08::.595Z||bridge|INFO|bridge ovs-br0: added interface dpdk-p0 on port

--11T08::.600Z||bridge|INFO|bridge ovs-br0: using datapath ID 0000000c292fcf3c

--11T08::.606Z||netdev_dpdk|WARN|Failed to enable flow control on device

[root@D128 ~]#
8 使用vhost-user连接vm
http://docs.openvswitch.org/en/latest/topics/dpdk/vhost-user/
vhost-user client mode ports require QEMU version 2.7.

Use of vhost-user ports requires QEMU >= 2.2; vhost-user ports are deprecated.
CentOS7里面qemu,qemu-kvm的版本都太低了,不支持vhost。就用tap/virio做了。
二: 搭建一个标准计算节点的网络环境
参考图:https://yeasy.gitbooks.io/openstack_understand_neutron/content/vxlan_mode/
1. 添加一个安全网桥,用于连接VM的interface(也就是前边提到的tap/virtio)。
[root@D128 j]# nmcli c add type bridge ifname br-safe- autoconnect yes save yes

Connection 'bridge-br-safe-0' (fb4058cc-3d9a-4d0e-88a8-8b1ef551f6bc) successfully added.

[root@D128 j]# brctl show

bridge name    bridge id        STP enabled    interfaces

br-ext        .000c292fcf32    yes        ens33

br-safe-        8000.000000000000    yes

[root@D128 j]#
2. 添加一个veth,用于连接 安全网桥和ovs的bt-int
[root@D128 j]# ip link add veth0-safe type veth peer name veth0-ovs
[cloud][ovs][sdn] 安装 openvswitch-dpdk的更多相关文章
- [cloud][OVS][sdn] Open vSwitch 初步了解
What is Open vSwitch? Open vSwitch is a production quality, multilayer virtual switch licensed under ...
- [qemu][cloud][centos][ovs][sdn] centos7安装高版本的qemu 以及 virtio/vhost/vhost-user咋回事
因为要搭建ovs-dpdk,所以需要vhost-user的qemu centos默认的qemu与qemu-kvm都不支持vhost-user,qemu最高版本是2.0.0, qemu-kvm最高版本是 ...
- Ubuntu 12.04 Server OpenStack Havana多节点(OVS+GRE)安装
1.需求 节点角色 NICs 控制节点 eth0(10.10.10.51)eth1(192.168.100.51) 网络节点 eth0(10.10.10.52)eth1(10.20.20.52)eth ...
- (原创)openvswitch实验连载1-fedora 17下安装openvswitch
1 软件安装 1.1测试环境和网络拓朴 大部分朋友估计也没有一个真实环境来完全整个的测试,所以我也是使用了在一台PC机上使用Vmware Workstation的方式来进行实验.总体结构是在PC机上安 ...
- ubuntu 14.04 安装 openvswitch
安装 openvswitch (这里以openvswitch lib 分支为例) 如果没有安装git,如果有请跳过 $ sudo apt-get install git install ovs $ g ...
- openvswitch dpdk
作者:张华 发表于:2016-04-07版权声明:可以任意转载,转载时请务必以超链接形式标明文章原始出处和作者信息及本版权声明 ( http://blog.csdn.net/quqi99 ) 硬件要 ...
- CentOS7安装Openvswitch 2.3.1 LTS
CentOS7安装Openvswitch 2.3.0 LTS,centos7openvswitch 一.环境: 宿主机:windows 8.1 update 3 虚拟机:vmware 11 虚拟机操作 ...
- 安装OpenvSwitch (ovs)
简介 搭建SDN环境少不了SDN交换机,SDN交换机跟普通交换机最大的区别就是将普通交换机的数据平面和控制平面相分离,SDN交换机只负责数据的转发,而控制指令则由更上一级的控制器下发. Open vS ...
- openstack grizzly版cloud控制节点安装
openstack-ubuntu-create 参考官方文档 三个节点:cloud :控制节点内网:10.10.10.10外网:172.16.56.252 network:网络节点内网:10.10.1 ...
随机推荐
- Spring Boot 2.0 整合Thymeleaf 模板引擎
本节将和大家一起实战Spring Boot 2.0 和thymeleaf 模板引擎 1. 创建项目 2. 使用Spring Initlizr 快速创建Spring Boot 应用程序 3. 填写项目配 ...
- ES Grafana
https://github.com/trevorndodds/elasticsearch-metrics https://grafana.com/dashboards/878 https://gra ...
- 为什么zookeeper会导致磁盘IO高【转】
由于早期的storm版本心跳信息严重依赖zookeeper,心跳风暴会导致zookeeper的事务日志频繁的写磁盘,带来的问题首当其冲的是磁盘IO会爆掉. 优化思路 将zookeeper事务的日志放入 ...
- Java知多少(14)数组
如果希望保存一组有相同类型的数据,可以使用数组. 数组的定义和内存分配 Java 中定义数组的语法有两种: type arrayName[]; type[] arrayName; type 为Java ...
- Cocos2dx网络读取图片
// // Connection.h // XXDemo // // Created by LeeHonGee on 14-9-4. // // #ifndef __XXDemo__Connectio ...
- Python内置类型——set
Python中,内置类型set和frozenset用来表示集合,我们首先查看这两个类型支持的特殊对象,从而可以理解他们的特性. >>> dir(set) ['__and__', '_ ...
- 二、主流区块链技术特点及Hyperledger Fabric V0.6版本特点
一.主流区块链技术特点 二.HyperLedger子项目 三.Hyperledger fabric架构 V0.6逻辑架构: V0.6区块链网络 对应的0.6版本的运行时架构: 0.6版本的架构特点是: ...
- “failed to excute script xxx” PyInstaller 打包python程序为exe文件过程错误
在使用PyInstaller打包python程序,打包命令为: pyinstaller -F -w -i manage.ico yourpyfile.py 顺便说一下几个参数的作用 -F:是直接生成单 ...
- Keras查看model weights .h5 文件的内容
Keras的模型是用hdf5存储的,如果想要查看模型,keras提供了get_weights的函数可以查看: for layer in model.layers: weights = layer.ge ...
- 设计模式-结构型模式,python组合模式
设计模式上大的方向上分继承和组合,就是类模式和对象模式.此篇的组合模式非继承和组合概念中的组合.桥接 策略 代理 装饰者都用了组合,此组合非彼组合. 组合模式 组合模式(Composite Patte ...