
【SpringBoot1.x】SpringBoot1.x 缓存
SpringBoot1.x 缓存
JSR107
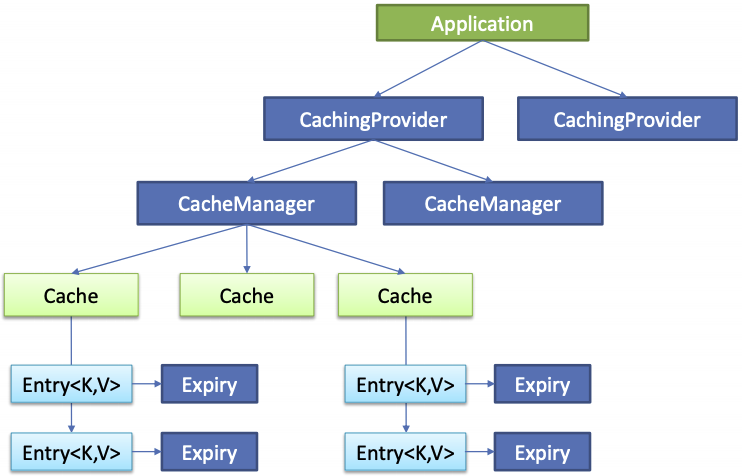
Java Caching 定义了 5 个核心接口,分别为:
- CachingProvider 定义了创建、配置、获取、管理和控制多个 CacheManager。一个应用可以在运行期访问多个 CachingProvider。
- CacheManager 定义了创建、配置、获取、管理和控制多个唯一命名的 Cache,这些 Cache 存在于 CacheManager 的上下文中。一个 CacheManager 仅被一个 CachingProvider 拥有。
- Cache 是一个类似 Map 的数据结构并临时存储以 Key 为索引的值。一个 Chache 仅被一个 CacheManager 拥有。
- Entry 是一个存储在 Cache 中的 key-value 对。
- Expiry 指每一个存储在 Chche 中的条目有一个定义的有效期,一旦超过这个时间,条目就为过期的状态。一旦过期,条目将不可访问、更新和删除。有效期可以通过 ExpiryPolicy 设置。
Spring 缓存抽象
Spring3.1 后定义了 org.springframework.cache.Cache 和 org.springframework.cache.CacheManager 接口来统一不同的缓存技术,并支持使用 JCache(JSR107) 注解简化我们开发。
- Cache 接口 为缓存的组件规范定义,包含缓存的各种操作集合;
- Cache 接口下 Spring 提供了各种 xxxCache 的实现,如 RedisCache、EhCacheCache、ConcurrentMapCache等;
- 每次调用需要缓存功能的方法时,Spring 会检查指定参数的指定目标方法是否被调用过。如果有就直接从缓存中获取方法调用后的结果,如果没有就调用方法就缓存结果后返回给用户。下次调用直接从缓存中获取。
- 使用 Spring 缓存抽象需注意:
- 确定方法需要被缓存以及它们的缓存策略;
- 从缓存中读取之前缓存存储的数据。
重要概念及缓存注解
- Chche 缓存接口,定义缓存操作。实现有 RedisCache、EhCacheCache、ConcurrentMapCache等。
- ChacheManager 缓存管理器,管理各种缓存组件。
@EnableCaching开启基于注解的缓存,用在主配置类上。@Cacheable能够根据方法的请求参数对其结果进行缓存@CachePut即调用方法,又更新缓存数据@CacheEvict清除缓存@Caching定义复杂的缓存规则
@Cacheable、@CachePut、@Caching 等注解主要的参数:
cacheNames/value缓存的名字,即将方法的返回结果放在那个缓存中,可以指定多个key缓存的数据,为空时默认是使用方法参数的值,可以为 SpEL 表达式,例如#idkeyGeneratorkey 的生成器,可以自己指定 key 的生成器的组件 id,它与 key 二选一cacheManager缓存管理器cacheResolver缓存解析器,它与 cacheManager 二选一condition执行符合条件才缓存unless执行不符合条件才缓存sync是否使用异步模式allEntries是否清空所有缓存,默认为 false,如果指定为 true,则方法调用后将立即清空所有缓存beforeInvocation默认为 false,即缓存清除操作是在方法之后执行,出现异常不会清除缓存。如果指定为 true,即缓存清除操作是在方法之前执行。无论是否出现异常,缓存都会清除
SpEL 表达式
| 名字 | 位置 | 描述 | 示例 |
|---|---|---|---|
| methodName | root object | 当前被调用的方法名 | #root.methodName |
| method | root object | 当前被调用的方法 | #root.method.name |
| target | root object | 当前被调用的目标对象 | #root.target |
| targetClass | root object | 当前被调用的目标对象类 | #root.targetClass |
| args | root object | 当前被调用的方法的参数列表 | #root.args[0] |
| caches | root object | 当前方法调用使用的缓存列表,例如@Cacheable(value={"cache1", "cache2"}),则有两个 cache |
#root.caches[0].name |
| argument name | evaluation context | 方法参数的名字,可以直接 #参数名,也可以使用 #p0 或 #a0 的形式,0 代表参数的索引 |
#id、#a0、#p0 |
| result | evaluation context | 方法执行后的返回值,仅当方法执行之后的判断有效 | #result |
缓存使用
使用步骤:
- 第一步:建立相应表结构
- 第二步:编写相应的实体类
- 第三步:整合 MyBatis
- 配置数据源信息
- 使用注解版的 Mybatis,即在主配置类上加上
@MapperScan
- 第四步:使用缓存
- 在主配置类上加上
@EnableCaching - 在业务层方法加上
@Cacheable、@CachePut、@CacheEvict、@Caching等注解
- 在主配置类上加上
缓存配置原理:
- 使用
CacheAutoConfiguration自动配置类 - 扫描到各种缓存的配置类:
- org.springframework.boot.autoconfigure.cache.GenericCacheConfiguration
- org.springframework.boot.autoconfigure.cache.JCacheCacheConfiguration
- org.springframework.boot.autoconfigure.cache.EhCacheCacheConfiguration
- org.springframework.boot.autoconfigure.cache.HazelcastCacheConfiguration
- org.springframework.boot.autoconfigure.cache.InfinispanCacheConfiguration
- org.springframework.boot.autoconfigure.cache.CouchbaseCacheConfiguration
- org.springframework.boot.autoconfigure.cache.RedisCacheConfiguration
- org.springframework.boot.autoconfigure.cache.CaffeineCacheConfiguration
- org.springframework.boot.autoconfigure.cache.GuavaCacheConfiguration
- org.springframework.boot.autoconfigure.cache.SimpleCacheConfiguration,这是默认生效的
- org.springframework.boot.autoconfigure.cache.NoOpCacheConfiguration
- 给容器中注册了一个 CacheManager,默认是
ConcurrentMapCacheManager - 创建和获取 ConcurrentMapCache 类型的缓存组件,它的作用是将数据保存在 ConcurrentMap 中
EmployeeService:
/**

 * @Author : parzulpan

 * @Time : 2020-12

 * @Desc : 员工业务层

 */

@Service

public class EmployeeService {

    @Autowired

    EmployeeMapper employeeMapper;

    /**

     *

     * 根据 Id 查询员工信息

     *

     * @Cacheable 运行流程:

     * 1. 方法运行之前,先去查询 Cache 缓存组件,按照 cacheNames 指定的名字获取,第一次获取缓存时如果没有 Cache 组件会自动创建

     * 2. 去 Cache 中查询缓存的内容,使用一个 key,默认是方法的参数。也可以按照某种策略生成,默认使用 SimpleKeyGenerator 生成 key

     *    SimpleKeyGenerator 生成 key 的默认策略为:

     *      如果没有参数,key = new SimpleKey()

     *      如果有一个参数,key = 参数的值

     *      如果有多个参数,key = new SimpleKey(params)

     * 3. 有查询到缓存,则直接使用缓存;没有查询到缓存,则调用目标方法并将目标方法返回的结果放进缓存中

     */

    @Cacheable(cacheNames = {"emp"})

    public Employee getEmp(Integer id) {

        return employeeMapper.getEmpById(id);

    }

    /**

     *

     * 更新员工信息

     *

     * @CachePut 运行流程

     * 1. 先调用目标方法

     * 2. 将目标方法的结果缓存起来

     * 3. 比较适用与修改了数据库某个数据后,更新缓存

     */

    @CachePut(value = {"emp"}, key = "#result.id")

    public Employee updateEmp(Employee employee) {

        employeeMapper.updateEmp(employee);

        return  employee;

    }

    /**

     *

     * 删除员工信息

     *

     */

    @CacheEvict(value = {"emp"}, key = "#id")

    public void deleteEmp(Integer id) {

        employeeMapper.deleteEmpById(id);

    }

    /**

     *

     * 根据 lastName 查询员工信息

     *

     * @Caching 定义复杂的缓存规则

     */

    @Caching(

            cacheable = {

                    @Cacheable(value = {"emp"}, key = "#lastName")

            },

            put = {

                    @CachePut(value = {"emp"}, key = "#result.id"),

                    @CachePut(value = {"emp"}, key = "#result.email")

            }

    )

    public Employee getEmp(String lastName) {

        List<Employee> employees = employeeMapper.getEmpByName(lastName);

        if (employees.isEmpty()) {

            return null;

        }

        return employees.get(0);

    }

}
EmployeeController:
/**

 * @Author : parzulpan

 * @Time : 2020-12

 * @Desc : 员工控制器

 */

@RestController

public class EmployeeController {

    @Autowired

    EmployeeService employeeService;

    // http://localhost:8080/emp/1

    @GetMapping("/emp/{id}")

    public Employee getEmp(@PathVariable("id") Integer id) {

        return employeeService.getEmp(id);

    }

    // http://localhost:8080/emp?id=1&lastName=ha&email=ha@gmail.com&gender=0&dId=1001

    @GetMapping("/emp")

    public Employee updateEmp(Employee employee) {

        return employeeService.updateEmp(employee);

    }

    // http://localhost:8080/empDel?id=1

    @GetMapping("/empDel")

    public String deleteEmp(Integer id) {

        employeeService.deleteEmp(id);

        return "success";

    }

    // http://localhost:8080/emp/lastName/parzulpan

    @GetMapping("/emp/lastName/{lastName}")

    public Employee getEmp(@PathVariable("lastName") String lastName) {

        return employeeService.getEmp(lastName);

    }

}
开启 debug 配置后,可以观察缓存的作用:
logging:

  level:

    cn.parzulpan.mapper: debug
可以使用 @CacheConfig,它指定这个类的缓存配置,通常用于抽取公共配置。
@CacheConfig(cacheNames = {"emp"})

@Service

public class EmployeeService {}
整合 Redis
使用步骤:
引入 Redis 启动器依赖
        <dependency>

            <groupId>org.springframework.boot</groupId>

            <artifactId>spring-boot-starter-data-redis</artifactId>

        </dependency>
配置 Redis
spring:

# 配置 Redis

redis:

    host: localhost
测试 Redis
@RunWith(SpringRunner.class)

@SpringBootTest

public class IntegrationCacheApplicationTests {

    @Autowired

    RedisTemplate redisTemplate;    // k-v 都是对象

    @Autowired

    StringRedisTemplate stringRedisTemplate;    // k-v 都是字符串

    @Test

    public void testRedisString() {

        // 字符串操作

        // String 类型 是 Redis 中最基本的数据类型,一个 key 对应一个 value 。

        stringRedisTemplate.opsForValue().set("stringMsg", "hello");

        stringRedisTemplate.opsForValue().append("stringMsg", "world");

        String msg = stringRedisTemplate.opsForValue().get("stringMsg");

        System.out.println(msg);

    }

    @Test

    public void testRedisList() {

        // 列表操作

        // List 类型 是简单的字符串列表,按照插入顺序排序。可以添加一个元素到列表的头部(左边)或者尾部(右边)。

        ListOperations<String, String> ops = redisTemplate.opsForList();

        ops.leftPush("listMsg", "hello");

        ops.leftPushAll("listMsg", "world", "parzulpan");

        List<String> listMsg = ops.range("listMsg", 0, 2);// 索引 0 到2的 listMsg

        System.out.println(listMsg.toString());

    }

    @Test

    public void testRedisSet() {

        // 集合操作

        // Set 类型 是 String 类型 的无序集合。它的特点是无序且唯一,它是通过哈希表实现的,所以添加、删除、查找的复杂度都是 O(1)。

        SetOperations<String, String> ops = redisTemplate.opsForSet();

        ops.add("setMsg", "hello");

        ops.add("setMsg", "world", "parzulpan");

        Set<String> setMsg = ops.members("setMsg"); //  取 set

        System.out.println(setMsg.toString());

    }

    @Test

    public void testRedisZSet() {

        // 有序集合操作

        // ZSet 类型 和 Set 类型 一样,也是 String 类型元素的集合,且不允许有重复的成员。

        // 不同的是每个元素都会关联一个 double 类型 的分数,它正是通过分数来为集合中的成员进行从小到大的排序。

        // ZSet 类型的成员是唯一的,但分数(score) 却可以重复。

        ZSetOperations<String, String> ops = redisTemplate.opsForZSet();

        ops.add("zsetMsg", "hello", 1);

        ops.add("zsetMsg", "parzulpan", 3);

        ops.add("zsetMsg", "world", 2);

        Set<String> zsetMsg = ops.range("zsetMsg", 0, 2);

        System.out.println(zsetMsg.toString());

    }

    @Test

    public void testRedisHash() {

        // 哈希操作

        // Hash 类型 是一个键值对的集合。它是一个 String 类型 的 field 和 value 组合的映射表,它特别适合用于存储对象。

        HashOperations<String, String, String> ops = redisTemplate.opsForHash();

        ops.put("hashMsg", "key1", "hello");

        ops.put("hashMsg", "key2", "world");

        ops.put("hashMsg", "key3", "parzulpan");

        String key2 = ops.get("hashMsg", "key2");

        System.out.println(key2);

    }

}
对于上面的测试,Redis 默认保存对象,使用 JDK 序列化机制,序列化后的数据保存到 redis 中。可以使用自定义的序列化器。值得注意的是,无论是 json 序列化还是 jdk 序列化,redis 接受的都是字符串的文本,而 jdk 的序列化方式字符串会把 json 序列化方式字符串大几倍,性能较差,所以一般都使用自定义的序列化器。
/**

 * @Author : parzulpan

 * @Time : 2021-01

 * @Desc : 自定义 Redis 配置类

 */

@Configuration

public class CustomRedisConfig {

    // 使用 Jackson 序列化器,不使用默认的 JDK 的

    @Bean

    public RedisTemplate<Object, Employee> employeeRedisTemplate(RedisConnectionFactory rcf){

        RedisTemplate<Object, Employee> template = new RedisTemplate<>();

        template.setConnectionFactory(rcf);

        Jackson2JsonRedisSerializer<Employee> jrs = new Jackson2JsonRedisSerializer<>(Employee.class);

        template.setDefaultSerializer(jrs);

        return template;

    }

}
@RunWith(SpringRunner.class)

@SpringBootTest

public class IntegrationCacheApplicationTests {

    @Autowired

    RedisTemplate employeeRedisTemplate;    // 使用自定义的 RedisTemplate

    @Test

    public void testEmployeeRedisTemplate() {

        ValueOperations ops = employeeRedisTemplate.opsForValue();

        Employee employee = employeeMapper.getEmpById(1);

        ops.set("emp-01", employee);

    }

}
使用 Redis 缓存,它的原理是:
CacheManager,生成一个 Cache 缓存组件来实际给缓存中存取数据
引入 redis 的 starter,容器中保存的是 RedisCacheManager;
RedisCacheManager 帮我们创建 RedisCache 来作为缓存组件,RedisCache 通过操作 redis 缓存数据
默认保存数据 k-v 都是 Object。利用序列化保存,所以实体类需要继承 Serializable。它默认使用的是
RedisTemplate<Object, Object>,它是 jdk 默认的序列化机制可以通过自定义
CacheManager,更改序列化机制:/**
* @Author : parzulpan
* @Time : 2021-01
* @Desc : 自定义 Redis 配置类
*/ @Configuration
public class CustomRedisConfig { // 使用 Jackson 序列化器,不使用默认的 JDK 的
@Bean
public RedisTemplate<Object, Employee> employeeRedisTemplate(RedisConnectionFactory rcf){
RedisTemplate<Object, Employee> template = new RedisTemplate<>();
template.setConnectionFactory(rcf);
Jackson2JsonRedisSerializer<Employee> jrs = new Jackson2JsonRedisSerializer<>(Employee.class);
template.setDefaultSerializer(jrs);
return template;
} // 自定义缓存管理器
@Bean
public RedisCacheManager employeeCacheManager(RedisTemplate<Object, Employee> employeeRedisTemplate) {
RedisCacheManager redisCacheManager = new RedisCacheManager(employeeRedisTemplate); // 使用前缀,默认将 CacheName 作为 key 的前缀
redisCacheManager.setUsePrefix(true); return redisCacheManager;
}
}
使用示例:
/**

 * @Author : parzulpan

 * @Time : 2021-01

 * @Desc : 部门业务层

 */

@Service

public class DepartmentService {

    @Autowired

    DepartmentMapper departmentMapper;

    @Autowired

    RedisCacheManager departmentCacheManager;

    // 注解的方式

    @Cacheable(cacheNames = "dept", cacheManager = "departmentCacheManager")

    public Department getDeptById(Integer id) {

        return departmentMapper.getDeptById(id);

    }

    // api 调用的方式

    public Department getDeptById2(Integer id) {

        Department department = departmentMapper.getDeptById(id);

        // 获取某个缓存

        Cache dept = departmentCacheManager.getCache("dept");

        dept.put("dept2:" + id, department);

        return department;

    }

}
总之,相对于默认的 Cache,使用 Redis,需要多写如下的一个 Redis 配置类:
/**

 * @Author : parzulpan

 * @Time : 2021-01

 * @Desc : 自定义 Redis 配置类

 */

@Configuration

public class CustomRedisConfig {

    // 使用 Jackson 序列化器,不使用默认的 JDK 的

    @Bean

    public RedisTemplate<Object, Employee> employeeRedisTemplate(RedisConnectionFactory rcf){

        RedisTemplate<Object, Employee> template = new RedisTemplate<>();

        template.setConnectionFactory(rcf);

        Jackson2JsonRedisSerializer<Employee> jrs = new Jackson2JsonRedisSerializer<>(Employee.class);

        template.setDefaultSerializer(jrs);

        return template;

    }

    @Bean

    public RedisTemplate<Object, Department> departmentRedisTemplate(RedisConnectionFactory rcf){

        RedisTemplate<Object, Department> template = new RedisTemplate<>();

        template.setConnectionFactory(rcf);

        Jackson2JsonRedisSerializer<Department> jrs = new Jackson2JsonRedisSerializer<>(Department.class);

        template.setDefaultSerializer(jrs);

        return template;

    }

    // 自定义缓存管理器

    @Primary    // 将其作为默认的

    @Bean

    public RedisCacheManager employeeCacheManager(RedisTemplate<Object, Employee> employeeRedisTemplate) {

        RedisCacheManager redisCacheManager = new RedisCacheManager(employeeRedisTemplate);

        // 使用前缀,默认将 CacheName 作为 key 的前缀

        redisCacheManager.setUsePrefix(true);

        return redisCacheManager;

    }

    @Bean

    public RedisCacheManager departmentCacheManager(RedisTemplate<Object, Department> departmentRedisTemplate) {

        RedisCacheManager redisCacheManager = new RedisCacheManager(departmentRedisTemplate);

        // 使用前缀,默认将 CacheName 作为 key 的前缀

        redisCacheManager.setUsePrefix(true);

        return redisCacheManager;

    }

}
练习和总结
【SpringBoot1.x】SpringBoot1.x 缓存的更多相关文章
- springboot1 缓存前端
@Configurationpublic class WebMvcConfig extends WebMvcConfigurerAdapter { public void addResourceHan ...
- 【SpringBoot1.x】SpringBoot1.x 数据访问
SpringBoot1.x 数据访问 简介 对于数据访问层,无论是 SQL 还是 NOSQL,Spring Boot 默认采用整合 Spring Data 的方式进行统一处理,添加大量自动配置,屏蔽了 ...
- 【SpringBoot1.x】RestfulCRUD
SpringBoot1.x RestfulCRUD 文章源码 添加资源 将所有的静态资源都添加到 src/main/resources/static 文件夹下,所有的模版资源都添加到 src/main ...
- 【SpringBoot1.x】SpringBoot1.x Web 开发
SpringBoot1.x Web 开发 文章源码 简介 SpringBoot 非常适合 Web 应用程序开发.可以使用嵌入式 Tomcat,Jetty 或 Undertow 轻松创建独立的 HTTP ...
- 记 SpringBoot1.* 转 Springoot2.0 遇到的问题
1.拦截器问题 到2.0之后在配置文件中写 static-path-pattern: /static/** 已经不起作用(2.0需要在方法中配置) SpringBoot1.*写法 @Configura ...
- SpringBoot1.x与监控(六)
由于2.x和1.x的监控不一样,此处先讲1.x 一 SpringBoot1.x监控 pom.xml <dependency> <groupId>org.springframew ...
- SpringBoot1.x升级SpringBoot2.x踩坑之文件上传大小限制
SpringBoot1.x升级SpringBoot2.x踩坑之文件上传大小限制 前言 LZ最近升级SpringBoo框架到2.1.6,踩了一些坑,这里介绍的是文件上传大小限制. 升级前 #文件上传配置 ...
- 使用SpringBoot1.4.0的一个坑
时隔半年,再次使用Spring Boot快速搭建微服务,半年前使用的版本是1.2.5,如今看官网最新的release版本是1.4.0,那就用最新的来构建,由于部署环境可能有多套所以使用maven-fi ...
- springboot1.5和jpa利用HikariCP实现多数据源的使用
背景 现在已有一个完整的项目,需要引入一个新的数据源,其实也就是分一些请求到从库上去 技术栈 springboot1.5 (哎,升不动啊) 思路 两个数据源,其中一个设置为主数据源 两个事物管理器,其 ...
随机推荐
- WPF页面刷新
WPF页面刷新: 在WPF项目中,类的属性变了,但界面值没有变,且我们也没有对类的属性做PropertyChanged的set处理. 如何实现呢? 首先我们需要实现一个INotifyPropertyC ...
- Java并发编程的艺术(十)——线程池
线程池的作用 降低资源消耗.重复利用已有线程,减少线程的创建和销毁造成的消耗. 提高响应速度.当有任务需要处理的时候,就不用再花费重新创建线程的时间了. 提高线程的可管理性.不合理利用线程,会浪费资源 ...
- js中的bind、apply、call、callee、caller的区别
1.bind.apply与call的区别与使用 相同点:2者是函数原型的一个方法,因此调用者都必须是函数,第1个参数都是对象.作用是,用另一个对象替换当前对象,另一对象也即是你传的第一个参数.通常用于 ...
- db2密码中有感叹号时,连接方法
在脚本文件中,可以将密码用单引号括起来 db2 "connect to testdb user test_user using 'Gb2Zk1!R'"
- git远程仓库Github
一.克隆项目 git clone 网址 1.配置信息 git config user.name '用户名' git config user.email '邮箱号' 2.推送项目到远程仓库 # 工作区代 ...
- 栈的应用:表达式括号匹配检测(C)
问题说明: 假设数学表达式中允许包含两种括号:圆括号"()"和方括号"[]",嵌套顺序任意. 正确的嵌套模式:( [ ] ( ) ).[ ( [ ] [ ] ) ...
- CDH6.3.0下Apache Atlas2.1.0安装与配置
CDH6.3.0下Apache Atlas2.1.0安装与配置 0. 说明 文中的${ATLAS_HOME}, ${HIVE_HOME} 环境变更需要根据实际环境进行替换. 1. 依赖 A. 软件依赖 ...
- Eureka部署在阿里云所带来的问题
没有那么多废话,直奔主题... 1.解决查看eureka界面时服务名显示而非ip+端口,以及解决显示ip而非阿里云公网ip问题(个人解决方式,如果和我这样配置还是不行,那就再百度或者谷歌下吧) eur ...
- Python的一个mysql实例
按公司名统计一定时期内入货的总车数,总重量还有总价格.数据表如下: 要用到的库是pymysql,读取excel表格的xlrd,写入excel的xlwt和复制excel模板的xlutils,代码如下: ...
- bootstrap(一)栅格系统
中文网:http://www.bootcss.com/ 官网:http://v3.bootcss.com/ 需要准备:离线手册 和 软件包 项目中引用bootstrap.min.js压缩版和boo ...