SpringBoot嵌入式Servlet容器
SpringBoot默认是将Tomcat作为嵌入式的servlet容器。
问题:
如何修改嵌入式的servlet容器?
1)在配置文件中设置对应的属性值
server.port=8081

# Tomcat access日志的编码格式

server.tomcat.accesslog.encoding=UTF-8

# 最小的空闲线程个数

server.tomcat.min-spare-threads=11
- 在spring1.x版本时,编写一个配置类,将EmbeddedServletContainerCustomizer加入到容器中,EmbeddedServletContainerCustomizer接口中的customize方法可以修改servlet的配置。
@Bean  //一定要将这个定制器加入到容器中

public EmbeddedServletContainerCustomizer embeddedServletContainerCustomizer(){

    return new EmbeddedServletContainerCustomizer() {

        //定制嵌入式的Servlet容器相关的规则

        @Override

        public void customize(ConfigurableEmbeddedServletContainer container) {

            container.setPort(8083);

        }

    };

}
到了springboot2.x,上面那个EmbeddedServletContainerCustomizer已经被WebServerFactoryCustomizer取代,
package org.springframework.boot.web.server;

@FunctionalInterface

public interface WebServerFactoryCustomizer<T extends WebServerFactory> {

    void customize(T factory);

}
所以编写一个config实现这个接口,T是ConfigurableServletWebServerFactory
@Component

public class EmbeddedTomcatConfig implements WebServerFactoryCustomizer<ConfigurableServletWebServerFactory> {

    @Override

    public void customize(ConfigurableServletWebServerFactory factory) {

        ((TomcatServletWebServerFactory)factory).addConnectorCustomizers(new TomcatConnectorCustomizer() {

            @Override

            public void customize(Connector connector) {

                Http11NioProtocol protocol = (Http11NioProtocol) connector.getProtocolHandler();

                protocol.setMaxConnections(200);

                protocol.setMaxThreads(200);

                protocol.setSelectorTimeout(3000);

                protocol.setSessionTimeout(3000);

                protocol.setConnectionTimeout(3000);

            }

        });

    }

}
springboot能不能支持其他的servlet容器?
支持Jetty,Undertow服务器。
这里了解一下两者的一些特点,undertow是一款红帽旗下的开源容器,是轻量级的,它是一个 内嵌Web 服务器, 由两个核心 Jar 包组成,它支持IO/NIO,在多款同类产品的压测中,在高并发情况下表现出色, 它还提供了对 Servlet4.0 的支持,WebSocket的支持。用以满足 Web 应用巨大数量的客户端。jetty也是轻量级别的服务器,它更加灵活,可扩展性强,作为嵌入式服务器在自动测试环境下不需要外部环境的支持,且运行速度较快。首先去除Tomcat相关依赖,然后引入undertow的依赖,pom.xml依赖的变化
<dependency>

    <groupId>org.springframework.boot</groupId>

    <artifactId>spring-boot-starter-web</artifactId>

    <exclusions>

        <!--去除Tomcat的依赖-->

        <exclusion>

            <artifactId>spring-boot-starter-tomcat</artifactId>

            <groupId>org.springframework.boot</groupId>

        </exclusion>

    </exclusions>

</dependency>

<!--引入undertow服务器的依赖-->

<dependency>

    <artifactId>spring-boot-starter-undertow</artifactId>

    <groupId>org.springframework.boot</groupId>

</dependency>
同样替换成jetty也是一样
<dependency>

          <groupId>org.springframework.boot</groupId>

          <artifactId>spring-boot-starter-web</artifactId>

          <exclusions>

              <!--去除Tomcat的依赖-->

              <exclusion>

                  <artifactId>spring-boot-starter-tomcat</artifactId>

                  <groupId>org.springframework.boot</groupId>

              </exclusion>

          </exclusions>

      </dependency>

      <!--引入jetty服务器的依赖-->

      <dependency>

          <groupId>org.springframework.boot</groupId>

          <artifactId>spring-boot-starter-jetty</artifactId>

      </dependency>
使用外置的servlet容器
嵌入式tomcat容器的优缺点:
优点:简单,便携
缺点:默认不支持JSP、优化定制比较复杂(使用定制器【ServerProperties、自定义EmbeddedServletContainerCustomizer】,自己编写嵌入式Servlet容器的创建工厂【EmbeddedServletContainerFactory】);
外置的Servlet容器:外面安装的Tomcat—应用打成war包
步骤
必须创建一个war的项目,
将嵌入式的Tomcat制定成provided;
		<dependency>

            <groupId>org.springframework.boot</groupId>

            <artifactId>spring-boot-starter-tomcat</artifactId>

            <scope>provided</scope>

        </dependency>
编写一个SpringBootServletInitializer的子类,这件事idea在我们创建好项目的时候就已经帮我们做好了。
public class ServletInitializer extends SpringBootServletInitializer {

    @Override

    protected SpringApplicationBuilder configure(SpringApplicationBuilder application) {

        return application.sources(Springboot04JspApplication.class);

    }

}
启动服务器就可以使用(注意这时候就不要再使用SpringBoot默认的主类的main方法启动服务器了,这样做是启动不了的)
原理:
jar包:执行SpringBoot主类的main方法。启动IOC容器,创建嵌入式的servlet容器;
war包:启动服务器,服务器启动SpringBoot应用【ServletInitializer】这个也就是idea创建的时候帮我们生成的类是SpringBootServletInitializer的子类。再启动IOC容器
规则:
1)服务器启动会创建当前web应用里面每一个jar包的ServletContainerInitializer实例;
2)、ServletContainerInitializer的实现会放在jar包的META-INF/services文件夹下,有一个名为
javax.servlet.ServletContainerInitializer的文件,内容就是ServletContainerInitializer的实现类的全类名
3)、还可以使用@HandlesTypes,在应用启动的时候加载我们感兴趣的类;
流程:首先启动Tomcat,这时org\springframework\spring-web\5.2.3.RELEASE\spring-web-5.2.3.RELEASE.jar!\META-INF\services\javax.servlet.ServletContainerInitializer路径下的ServletContainerInitializer类就会起作用,打开这个类,查看他的实现,发现他上面@HandlesTypes({WebApplicationInitializer.class}),也就是说WebApplicationInitializer这个接口同样也创建出了实例对象。
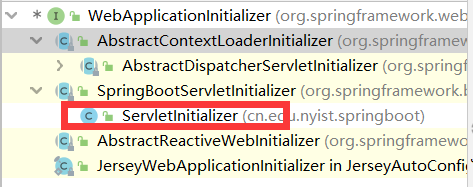
打开继承树,发现他就是idea帮我们自动创建的那个类的父类所实现的接口,并且创建完WebApplicationInitializer后有调用了他们的onStartup方法.
 while(var4.hasNext()) {

      WebApplicationInitializer initializer = (WebApplicationInitializer)var4.next();

      initializer.onStartup(servletContext);

      }
但是我们的idea帮我们生成的ServletInitializer类并没有这个onStartup方法,所以看他的父类SpringBootServletInitializer,果然,SpringBootServletInitializer实现了WebApplicationInitializer接口,重写了onStartup方法。
public void onStartup(ServletContext servletContext) throws ServletException {

    this.logger = LogFactory.getLog(this.getClass());

    //下面这个创建了IOC容器,点进去查看其实,方法就在本类中实现

    WebApplicationContext rootAppContext = this.createRootApplicationContext(servletContext);

    if (rootAppContext != null) {

        servletContext.addListener(new ContextLoaderListener(rootAppContext) {

            public void contextInitialized(ServletContextEvent event) {

            }

        });

    } else {

        this.logger.debug("No ContextLoaderListener registered, as createRootApplicationContext() did not return an application context");

    }

}
createRootApplicationContext方法;
   protected WebApplicationContext createRootApplicationContext(ServletContext servletContext) {

        SpringApplicationBuilder builder = this.createSpringApplicationBuilder();

        builder.main(this.getClass());

        ApplicationContext parent = this.getExistingRootWebApplicationContext(servletContext);

        if (parent != null) {

            this.logger.info("Root context already created (using as parent).");

            servletContext.setAttribute(WebApplicationContext.ROOT_WEB_APPLICATION_CONTEXT_ATTRIBUTE, (Object)null);

            builder.initializers(new ApplicationContextInitializer[]{new ParentContextApplicationContextInitializer(parent)});

        }

       builder.initializers(new ApplicationContextInitializer[]{new ServletContextApplicationContextInitializer(servletContext)});

    builder.contextClass(AnnotationConfigServletWebServerApplicationContext.class);

   //调用config方法,子类重写了这个方法,将SpringBoot主程序类传了进来

       builder = this.configure(builder);

    builder.listeners(new ApplicationListener[]{new SpringBootServletInitializer.WebEnvironmentPropertySourceInitializer(servletContext)});

       //创建spring应用

    SpringApplication application = builder.build();

    if (application.getAllSources().isEmpty() && MergedAnnotations.from(this.getClass(), SearchStrategy.TYPE_HIERARCHY).isPresent(Configuration.class)) {

        application.addPrimarySources(Collections.singleton(this.getClass()));

    }

    Assert.state(!application.getAllSources().isEmpty(), "No SpringApplication sources have been defined. Either override the configure method or add an @Configuration annotation");

    if (this.registerErrorPageFilter) {

        application.addPrimarySources(Collections.singleton(ErrorPageFilterConfiguration.class));

    }

//启动spring

    return this.run(application);

}
run方法的定义在SpringApplication类中找到
public ConfigurableApplicationContext run(String... args) {

    StopWatch stopWatch = new StopWatch();

    stopWatch.start();

    ConfigurableApplicationContext context = null;

    Collection<SpringBootExceptionReporter> exceptionReporters = new ArrayList();

    this.configureHeadlessProperty();

    SpringApplicationRunListeners listeners = this.getRunListeners(args);

    listeners.starting();

    Collection exceptionReporters;

    try {

        ApplicationArguments applicationArguments = new DefaultApplicationArguments(args);

        ConfigurableEnvironment environment = this.prepareEnvironment(listeners, applicationArguments);

        this.configureIgnoreBeanInfo(environment);

        Banner printedBanner = this.printBanner(environment);

        context = this.createApplicationContext();

        exceptionReporters = this.getSpringFactoriesInstances(SpringBootExceptionReporter.class, new Class[]{ConfigurableApplicationContext.class}, context);

        this.prepareContext(context, environment, listeners, applicationArguments, printedBanner);

        this.refreshContext(context);

        this.afterRefresh(context, applicationArguments);

        stopWatch.stop();

        if (this.logStartupInfo) {

            (new StartupInfoLogger(this.mainApplicationClass)).logStarted(this.getApplicationLog(), stopWatch);

        }

        listeners.started(context);

        this.callRunners(context, applicationArguments);

    } catch (Throwable var10) {

        this.handleRunFailure(context, var10, exceptionReporters, listeners);

        throw new IllegalStateException(var10);

    }

    try {

        listeners.running(context);

        return context;

    } catch (Throwable var9) {

        this.handleRunFailure(context, var9, exceptionReporters, (SpringApplicationRunListeners)null);

        throw new IllegalStateException(var9);

    }

}
SpringBoot嵌入式Servlet容器的更多相关文章
- java框架之SpringBoot(8)-嵌入式Servlet容器
前言 SpringBoot 默认使用的嵌入式 Servlet 容器为 Tomcat,通过依赖关系就可以看到: 问题: 如何定制和修改 Servlet 容器相关配置? SpringBoot 能否支持其它 ...
- springboot(八) 嵌入式Servlet容器自动配置原理和容器启动原理
1.嵌入式Servlet容器自动配置原理 1.1 在spring-boot-autoconfigure-1.5.9.RELEASE.jar => springboot自动配置依赖 jar包下,E ...
- SpringBoot源码学习系列之嵌入式Servlet容器
目录 1.博客前言简单介绍 2.定制servlet容器 3.变换servlet容器 4.servlet容器启动原理 SpringBoot源码学习系列之嵌入式Servlet容器启动原理 @ 1.博客前言 ...
- SpringBoot(七) -- 嵌入式Servlet容器
一.嵌入式Servlet容器 在传统的开发中,我们在完成开发后需要将项目打成war包,在外部配置好TomCat容器,而这个TomCat就是Servlet容器.在使用SpringBoot开发时,我们无需 ...
- SpringBoot配置嵌入式Servlet容器
1).如何定制和修改Servlet容器的相关配置: 1.修改和server有关的配置(ServerProperties[也是EmbeddedServletContainerCustomizer]): ...
- 嵌入式Servlet容器自动配置和启动原理
EmbeddedServletContainerAutoConfiguration:嵌入式的Servlet容器自动配置? @AutoConfigureOrder(Ordered.HIGHEST_PRE ...
- 配置嵌入式Servlet容器
SpringBoot默认是用的是Tomcat作为嵌入式的Servlet容器:问题?1).如何定制和修改Servlet容器的相关配置:1.修改和server有关的配置(ServerProperties) ...
- 19、配置嵌入式servlet容器(下)
使用外置的Servlet 嵌入式Servlet容器:应用打成可执行的j ar 优点:简单.便携: 缺点:默认不支持JSP.优化定制比较复杂 使用定制器[ServerProperti ...
- 18、配置嵌入式servlet容器(2)
使用其他Servlet容器 -Jetty(长连接) -Undertow(不支持jsp) 替换为其他嵌入式Servlet容器 默认支持: Tomcat(默认使用) Jetty: <depend ...
随机推荐
- 【题单】最近遇见的 SHIT DP题 三连
Hint: 本题单适合用于自虐和消磨时间. CF-Gym101620E https://codeforces.com/gym/101620 ARC109F https://atcoder.jp/con ...
- OI知识点/得分技巧的归纳总结
网络流 拆点/拆边技巧 题目来源 bzoj1070 题目描述 同一时刻有\(N\)位车主带着他们的爱车来到了汽车维修中心.维修中心共有\(M\)位技术人员,不同的技术人员对不同 的车进行维修所用的时间 ...
- AGC039D 题解
题目描述 给定在笛卡尔坐标系的单位圆上的\(N\)个点(圆心为\((0, 0)\)).第\(i\)个点的坐标为\((cos(\frac{2 \pi T_i}{L}), sin(\frac{2 \pi ...
- Aizu2970 Permutation Sort
题目大意 给你两个 \(n\) 个整数的排列,第一个排列表示原排列,第二个排列表示第 \(i\) 个数可以和i变成第 \(g_i\) 个数,问,最少对所有数进行几次操作可以使原排列变为有序的排列. 题 ...
- 纯css 实现文本换行
业务场景:dialog中嵌套的表单,实现信息展示,由于存储路径过长并且在一行显示,导致多出的文字出现在弹出框外面了,页面极丑,所以需要将存储路径实现自动换行. 技术点:<p style=&quo ...
- uniapp发布到微信小程序整改摘要
uniapp作为跨端的利器,可同时发布到安卓.ios.微信小程序.支付宝小程序.百度小程序.头条小程序.QQ小程序等8个平台. 如果是轻量级的应用,不涉及太多功能的话,或许可以直接打包移植,但涉及前后 ...
- SMART
SMART原则: S(Specific):目标必须是具体的,要对标特定的工作指标,不能笼统: M(Measurable):目标必须是可衡量的,衡量的指标是数量化或者行为化的,验证这些指标的数据或者信息 ...
- Elastic Search 学习之路(二)——inverted index(反向索引)
这是篇翻译文,图画的挺有意思. Elastic使用非常特殊的数据结构,称作反向索引.反向索引中,包括了一组document中出现的唯一的单词,和对应的单词,所出现的位置.反向索引是在ES中,docum ...
- js下 Day11、案例
一.成绩分类 效果图: 功能思路分析: 1. 渲染数据 2. 鼠标按下开启拖拽 \1. 给成绩盒子绑定鼠标按下事件(mousedown),用事件委托做多个标签的拖拽 \2. 开启控制拖拽的变量 \3. ...
- 网络编程-python实现-TCP(1.1.3)
@ 目录 1.TCP是什么 2.代码实现 1.TCP是什么 传输控制协议(TCP,Transmission Control Protocol)是一种面向连接的.可靠的.基于字节流的传输层通信协议,由I ...