子线程调用invalidate()产生“Only the original thread that created a view hierarchy can touch its views.”原因分析
备注:本文基于sdk28, ViewActivity页面禁用了硬件加速(AndroidManifest.xml中添加了android:hardwareAccelerated="false")。
1、异常出处
ViewActivity代码链接:https://gitee.com/2820174512/application/blob/master/app/src/main/java/com/example/myapplication/threadcheck/ViewActivity.java
点击Hello,World!后报如下异常:
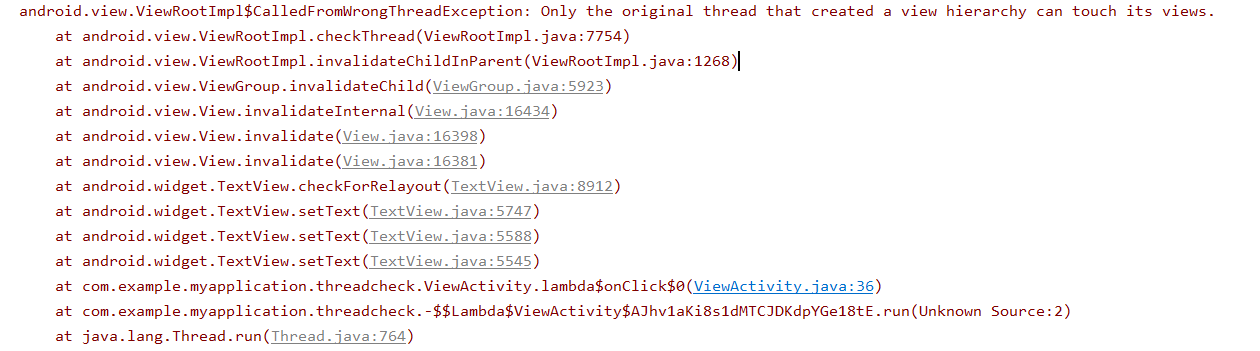
从图片中可以看出异常在ViewRootImpl类的invalidateChildInParent方法中进行检查的,判断当前线程是否是创建线程(View类一般是在主线程创建的),部分代码如下, 可以看出就是在checkThread方法中抛出的异常。
    @Override

    public ViewParent invalidateChildInParent(int[] location, Rect dirty) {

        checkThread();

        if (DEBUG_DRAW) Log.v(mTag, "Invalidate child: " + dirty);

        ...

        return null;

    }

    void checkThread() {

        if (mThread != Thread.currentThread()) {

            throw new CalledFromWrongThreadException(

                    "Only the original thread that created a view hierarchy can touch its views.");

        }

    }
2、从View.invalidate()方法开始分析
先看下TextView.invalidate()方法(View的invalidate()方法)
    public void invalidate() {

        invalidate(true);

    }

    public void invalidate(boolean invalidateCache) {

        invalidateInternal(0, 0, mRight - mLeft, mBottom - mTop, invalidateCache, true);

    }

    void invalidateInternal(int l, int t, int r, int b, boolean invalidateCache,

            boolean fullInvalidate) {

        ...

        // Reset content capture caches

        mCachedContentCaptureSession = null;

        if ((mPrivateFlags & (PFLAG_DRAWN | PFLAG_HAS_BOUNDS)) == (PFLAG_DRAWN | PFLAG_HAS_BOUNDS)

                || (invalidateCache && (mPrivateFlags & PFLAG_DRAWING_CACHE_VALID) == PFLAG_DRAWING_CACHE_VALID)

                || (mPrivateFlags & PFLAG_INVALIDATED) != PFLAG_INVALIDATED

                || (fullInvalidate && isOpaque() != mLastIsOpaque)) {

            ...

            // Propagate the damage rectangle to the parent view.

            final AttachInfo ai = mAttachInfo;

            final ViewParent p = mParent;

            if (p != null && ai != null && l < r && t < b) {

                final Rect damage = ai.mTmpInvalRect;

                damage.set(l, t, r, b);

                p.invalidateChild(this, damage);

            }

            ...

        }

    }
主要执行逻辑:向上请求父View执行invalidateChild()方法,
该方法为ViewParent接口的方法,ViewGroup类实现了该接口的invalidateChild方法
    public final void invalidateChild(View child, final Rect dirty) {

        final AttachInfo attachInfo = mAttachInfo;

        if (attachInfo != null && attachInfo.mHardwareAccelerated) {

            // HW accelerated fast path

            onDescendantInvalidated(child, child);

            return;

        }

        ViewParent parent = this;

        if (attachInfo != null) {

            ...

            do {

                View view = null;

                if (parent instanceof View) {

                    view = (View) parent;

                }

                if (drawAnimation) {

                    if (view != null) {

                        view.mPrivateFlags |= PFLAG_DRAW_ANIMATION;

                    } else if (parent instanceof ViewRootImpl) {

                        ((ViewRootImpl) parent).mIsAnimating = true;

                    }

                }

                ...

                parent = parent.invalidateChildInParent(location, dirty);

                if (view != null) {

                    // Account for transform on current parent

                    Matrix m = view.getMatrix();

                    if (!m.isIdentity()) {

                        RectF boundingRect = attachInfo.mTmpTransformRect;

                        boundingRect.set(dirty);

                        m.mapRect(boundingRect);

                        dirty.set((int) Math.floor(boundingRect.left),

                                (int) Math.floor(boundingRect.top),

                                (int) Math.ceil(boundingRect.right),

                                (int) Math.ceil(boundingRect.bottom));

                    }

                }

            } while (parent != null);

        }

    }

    public ViewParent invalidateChildInParent(final int[] location, final Rect dirty) {

        if ((mPrivateFlags & (PFLAG_DRAWN | PFLAG_DRAWING_CACHE_VALID)) != 0) {

            ...

            return mParent;

        }

        return null;

    }
do while循环一层层向上请求重绘,最终应该是到ViewRootImpl类的invalidateChildInParent方法
3、ViewRootImpl如何与View进行关联:从Activity的setContentView开始分析
3.1 最顶层的View——DecorView
要将View显示到界面上,需要在Activity中执行setContentView,这里主要分析setContentView(View)方法
    public void setContentView(View view) {

        getWindow().setContentView(view);

        initWindowDecorActionBar();

    }

    public Window getWindow() {

        return mWindow;

    }

    final void attach(Context context, ActivityThread aThread,

            Instrumentation instr, IBinder token, int ident,

            Application application, Intent intent, ActivityInfo info,

            CharSequence title, Activity parent, String id,

            NonConfigurationInstances lastNonConfigurationInstances,

            Configuration config, String referrer, IVoiceInteractor voiceInteractor,

            Window window, ActivityConfigCallback activityConfigCallback) {

        attachBaseContext(context);

        mFragments.attachHost(null /*parent*/);

        mWindow = new PhoneWindow(this, window, activityConfigCallback);

        ...

    }
mWindow属性在android.app.Activity#attach方法中进行赋值, 实现类为PhoneWindow,而PhoneWindow的setContentView实现如下:
    // This is the top-level view of the window, containing the window decor.

    private DecorView mDecor;

    @Override

    public void setContentView(View view) {

        setContentView(view, new ViewGroup.LayoutParams(MATCH_PARENT, MATCH_PARENT));

    }

    @Override

    public void setContentView(View view, ViewGroup.LayoutParams params) {

        // Note: FEATURE_CONTENT_TRANSITIONS may be set in the process of installing the window

        // decor, when theme attributes and the like are crystalized. Do not check the feature

        // before this happens.

        if (mContentParent == null) {

            installDecor();

        } else if (!hasFeature(FEATURE_CONTENT_TRANSITIONS)) {

            mContentParent.removeAllViews();

        }

        if (hasFeature(FEATURE_CONTENT_TRANSITIONS)) {

            view.setLayoutParams(params);

            final Scene newScene = new Scene(mContentParent, view);

            transitionTo(newScene);

        } else {

            mContentParent.addView(view, params);

        }

        mContentParent.requestApplyInsets();

        final Callback cb = getCallback();

        if (cb != null && !isDestroyed()) {

            cb.onContentChanged();

        }

        mContentParentExplicitlySet = true;

    }

    private void installDecor() {

        mForceDecorInstall = false;

        if (mDecor == null) {

            mDecor = generateDecor(-1);

            mDecor.setDescendantFocusability(ViewGroup.FOCUS_AFTER_DESCENDANTS);

            mDecor.setIsRootNamespace(true);

            if (!mInvalidatePanelMenuPosted && mInvalidatePanelMenuFeatures != 0) {

                mDecor.postOnAnimation(mInvalidatePanelMenuRunnable);

            }

        } else {

            mDecor.setWindow(this);

        }

        ...

    }

    protected DecorView generateDecor(int featureId) {

        // System process doesn't have application context and in that case we need to directly use

        // the context we have. Otherwise we want the application context, so we don't cling to the

        // activity.

        Context context;

        if (mUseDecorContext) {

            Context applicationContext = getContext().getApplicationContext();

            if (applicationContext == null) {

                context = getContext();

            } else {

                context = new DecorContext(applicationContext, getContext());

                if (mTheme != -1) {

                    context.setTheme(mTheme);

                }

            }

        } else {

            context = getContext();

        }

        return new DecorView(context, featureId, this, getAttributes());

    }
可以看出mDecor为View树中最顶层的View,是DecorView类的一个实例。
3.2 DecorView与ViewRootImpl进行关联
这里我是通过搜索“DecorView如何与ViewRootImpl进行关联”才知道具体关联代码,见链接https://www.cnblogs.com/huansky/p/11911549.html
主要在ActivityThread类的handleResumeActivity方法中
    @Override

    public void handleResumeActivity(IBinder token, boolean finalStateRequest, boolean isForward,

            String reason) {

        // If we are getting ready to gc after going to the background, well

        // we are back active so skip it.

        unscheduleGcIdler();

        mSomeActivitiesChanged = true;

        // TODO Push resumeArgs into the activity for consideration

        final ActivityClientRecord r = performResumeActivity(token, finalStateRequest, reason);

        if (r == null) {

            // We didn't actually resume the activity, so skipping any follow-up actions.

            return;

        }

        final Activity a = r.activity;

        if (localLOGV) {

            Slog.v(TAG, "Resume " + r + " started activity: " + a.mStartedActivity

                    + ", hideForNow: " + r.hideForNow + ", finished: " + a.mFinished);

        }

        final int forwardBit = isForward

                ? WindowManager.LayoutParams.SOFT_INPUT_IS_FORWARD_NAVIGATION : 0;

        // If the window hasn't yet been added to the window manager,

        // and this guy didn't finish itself or start another activity,

        // then go ahead and add the window.

        boolean willBeVisible = !a.mStartedActivity;

        if (!willBeVisible) {

            try {

                willBeVisible = ActivityManager.getService().willActivityBeVisible(

                        a.getActivityToken());

            } catch (RemoteException e) {

                throw e.rethrowFromSystemServer();

            }

        }

        if (r.window == null && !a.mFinished && willBeVisible) {

            r.window = r.activity.getWindow();

            View decor = r.window.getDecorView();

            decor.setVisibility(View.INVISIBLE);

            ViewManager wm = a.getWindowManager();

            WindowManager.LayoutParams l = r.window.getAttributes();

            a.mDecor = decor;

            l.type = WindowManager.LayoutParams.TYPE_BASE_APPLICATION;

            l.softInputMode |= forwardBit;

            if (r.mPreserveWindow) {

                a.mWindowAdded = true;

                r.mPreserveWindow = false;

                // Normally the ViewRoot sets up callbacks with the Activity

                // in addView->ViewRootImpl#setView. If we are instead reusing

                // the decor view we have to notify the view root that the

                // callbacks may have changed.

                ViewRootImpl impl = decor.getViewRootImpl();

                if (impl != null) {

                    impl.notifyChildRebuilt();

                }

            }

            if (a.mVisibleFromClient) {

                if (!a.mWindowAdded) {

                    a.mWindowAdded = true;

                    wm.addView(decor, l);

                } else {

                    // The activity will get a callback for this {@link LayoutParams} change

                    // earlier. However, at that time the decor will not be set (this is set

                    // in this method), so no action will be taken. This call ensures the

                    // callback occurs with the decor set.

                    a.onWindowAttributesChanged(l);

                }

            }

            // If the window has already been added, but during resume

            // we started another activity, then don't yet make the

            // window visible.

        } else if (!willBeVisible) {

            if (localLOGV) Slog.v(TAG, "Launch " + r + " mStartedActivity set");

            r.hideForNow = true;

        }

        ...

    }
一般执行流程: 获取Activity实例a对应的WindowManager实例wm,然后addView。
Activity的attach方法中对mWindowManager对象赋值,mWindowManager对象从mWindow对象中获得
    final void attach(Context context, ActivityThread aThread,

            Instrumentation instr, IBinder token, int ident,

            Application application, Intent intent, ActivityInfo info,

            CharSequence title, Activity parent, String id,

            NonConfigurationInstances lastNonConfigurationInstances,

            Configuration config, String referrer, IVoiceInteractor voiceInteractor,

            Window window, ActivityConfigCallback activityConfigCallback) {

        attachBaseContext(context);

        mFragments.attachHost(null /*parent*/);

        mWindow = new PhoneWindow(this, window, activityConfigCallback);

        ...

        mWindowManager = mWindow.getWindowManager();

        ...

    }
mWindow对象为Window类,getWindowManager实现如下,则ActivityThread类中handleResumeActivity获取的wm对象实现类为WindowManagerImpl类
    public WindowManager getWindowManager() {

        return mWindowManager;

    }

    public void setWindowManager(WindowManager wm, IBinder appToken, String appName,

            boolean hardwareAccelerated) {

        mAppToken = appToken;

        mAppName = appName;

        mHardwareAccelerated = hardwareAccelerated

                || SystemProperties.getBoolean(PROPERTY_HARDWARE_UI, false);

        if (wm == null) {

            wm = (WindowManager)mContext.getSystemService(Context.WINDOW_SERVICE);

        }

        mWindowManager = ((WindowManagerImpl)wm).createLocalWindowManager(this);

    }
WindowManagerImpl类addView(View, ViewGroup.LayoutParams)实现如下
    @Override

    public void addView(@NonNull View view, @NonNull ViewGroup.LayoutParams params) {

        applyDefaultToken(params);

        mGlobal.addView(view, params, mContext.getDisplay(), mParentWindow);

    }
委托给WindowManagerGlobal类的addView(View, ViewGroup.LayoutParams, Display, Window)实现,最终调用ViewRootImpl的setView方法关联DecorView与ViewRootImpl
public void addView(View view, ViewGroup.LayoutParams params,

            Display display, Window parentWindow) {

        ...

        ViewRootImpl root;

        View panelParentView = null;

        synchronized (mLock) {

            ...

            root = new ViewRootImpl(view.getContext(), display);

            view.setLayoutParams(wparams);

            mViews.add(view);

            mRoots.add(root);

            mParams.add(wparams);

            // do this last because it fires off messages to start doing things

            try {

                root.setView(view, wparams, panelParentView);

            } catch (RuntimeException e) {

                // BadTokenException or InvalidDisplayException, clean up.

                if (index >= 0) {

                    removeViewLocked(index, true);

                }

                throw e;

            }

        }

    }
4、其他
4.1 获取DecorView与ViewRootImpl的直接方法
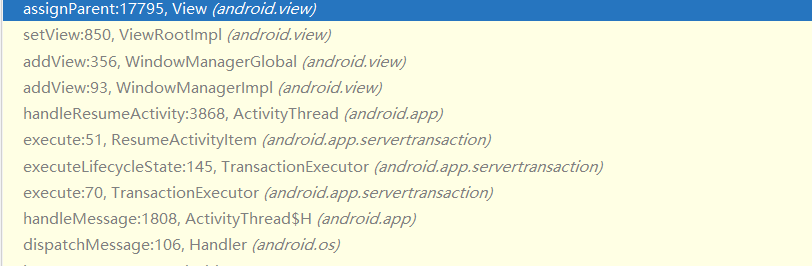
在View中mParent只有一处赋值,就是在void assignParent(ViewParent parent)方法中,可以在这里添加一个条件断点 parent instanceof ViewRootImpl, 就可以获取对应的调用信息
4.2 硬件加速相关以及invalidate()流程图
ViewGroup类的invalidateChild部分代码如下,
    public final void invalidateChild(View child, final Rect dirty) {

        final AttachInfo attachInfo = mAttachInfo;

        if (attachInfo != null && attachInfo.mHardwareAccelerated) {

            // HW accelerated fast path

            onDescendantInvalidated(child, child);

            return;

        }

        ...

        do {

            View view = null;

            if (parent instanceof View) {

                view = (View) parent;

            }

            if (drawAnimation) {

                if (view != null) {

                    view.mPrivateFlags |= PFLAG_DRAW_ANIMATION;

                } else if (parent instanceof ViewRootImpl) {

                    ((ViewRootImpl) parent).mIsAnimating = true;

                }

            }

            // If the parent is dirty opaque or not dirty, mark it dirty with the opaque

            // flag coming from the child that initiated the invalidate

            if (view != null) {

                if ((view.mViewFlags & FADING_EDGE_MASK) != 0 &&

                        view.getSolidColor() == 0) {

                    opaqueFlag = PFLAG_DIRTY;

                }

                if ((view.mPrivateFlags & PFLAG_DIRTY_MASK) != PFLAG_DIRTY) {

                    view.mPrivateFlags = (view.mPrivateFlags & ~PFLAG_DIRTY_MASK) | opaqueFlag;

                }

            }

            parent = parent.invalidateChildInParent(location, dirty);

            if (view != null) {

                // Account for transform on current parent

                Matrix m = view.getMatrix();

                if (!m.isIdentity()) {

                    RectF boundingRect = attachInfo.mTmpTransformRect;

                    boundingRect.set(dirty);

                    m.mapRect(boundingRect);

                    dirty.set((int) Math.floor(boundingRect.left),

                            (int) Math.floor(boundingRect.top),

                            (int) Math.ceil(boundingRect.right),

                            (int) Math.ceil(boundingRect.bottom));

                }

            }

        } while (parent != null);

    }
其中attachInfo.mHardwareAccelerated表示启用硬件加速,如果启用硬件加速,子线程invalidate()不会产生异常(genymotion9.0模拟器中未产生异常,genymotion6.0模拟器中会产生异常)。
本文开始在activity中禁用硬件加速就是因为这个原因,而像子线程中requestLayout、addView等硬件没有加速问题,一定会报异常。
invalidate()执行后方法调用流程图如下:

4.3 View加载线程问题
只要View没有添加到Window中View就可以在子线程中操作,不过会有线程安全问题。
子线程调用invalidate()产生“Only the original thread that created a view hierarchy can touch its views.”原因分析的更多相关文章
- 开发错误记录1:解决:Only the original thread that created a view hierarchy can touch its views.
今天在项目中要使用圆角头像,导入开源 CircleImageView ,然后setImageBitmap()时 运行时就会发现,它会报一个致命性的异常:: · ERROR/AndroidRuntime ...
- 浅析Android中的消息机制-解决:Only the original thread that created a view hierarchy can touch its views.
在分析Android消息机制之前,我们先来看一段代码: public class MainActivity extends Activity implements View.OnClickListen ...
- Android: Only the original thread that created a view hierarchy can touch its views 异常
最近自己再写一个小项目练手,创建一个线程从网络获取数据然后显示在 recyclerView 上.写好后发现页面能够显示,但是有时候会把请求的数据显示过来,有时候不会.点开 android monito ...
- Only the original thread that created a view hierarchy can touch its views解决办法
这周操作系统作业布置了一个作业,内容是做个小软件,来模拟消费者生产者问题,作业实现起来不来,因为之前写过这个算法,所以关键步骤就是在消费和生产的时候更新缓存区的UI控件就行,之后问题就来了,出现了标题 ...
- 错误:Only the original thread that created a view hierarchy can touch its views——Handler的使用
在跟随教程学习到显示web页面的html源码时报错:Only the original thread that created a view hierarchy can touch its views ...
- Only the original thread that created a view hierarchy can touch its views
在调试软件的时候出现如下的错误: 01-05 20:53:36.492: E/ZZShip(2043): android.view.ViewRootImpl$CalledFromWrongThread ...
- 解决Only the original thread that created a view hierarchy can touch its views
这种异常出现在子线程中处理UI操作产生的异常,将UI操作放在主线程中就OK了
- andriod 错误:Only the original thread that created a view hierarchy can touch its views——Handler的使用
package com.example.yanlei.myapplication; import android.media.MediaMetadataRetriever; import androi ...
- "Only the original thread that created a view hierarchy can touch its views.” 解决方法
这个主要总是,开启的线程和 UI 线程(主线程)不是同一个线程.可以Runnable方式避免,如下例所示就可以解决这个问题了. public static void updateText(Activi ...
随机推荐
- 001 win10下安装linux子系统--Ubuntu及其图形界面
首次启动图形界面关键步骤及相关命令: 步骤: 打开Xlunch 打开XLaunch,选择:"one large window",Display number设置成0,其它默认即可, ...
- E: 无法获得锁 /var/lib/dpkg/lock - open (11: 资源暂时不可用)
Linux下sudo apt-get install 安装时报错: 解决办法 1. 终端输入 ps -aux ,列出进程.找到含有apt'-get或者wget的进程, 直接sudo k ...
- npm包管理器报错-npm ERR! Response timeout while trying to fetch https://registry.npmjs.org/@XXX(over 30000ms)
由于这两天买的新电脑在短期内频频蓝屏.卡机,不得不把自己其他的本本拿出来换上,但是程序员换电脑是真的痛苦,其他不说就说一个配环境 真的折腾哈 我是一名前端菜鸟,现在自己的本本上使用的是npm包管理工具 ...
- 手把手教你AspNetCore WebApi:Serilog(日志)
前言 小明目前已经把"待办事项"功能实现了,API文档也搞定了,但是马老板说过,绝对不能让没有任何监控的项目上线的. Serilog是什么? 在.NET使用日志框架第一时间会想到N ...
- Oracle 存储过程解锁及表解锁和停止执行
查看进程: select * from v$process; 根据存储过程名称查找是否被锁: select * FROM dba_ddl_locks where name =upper('sp_1') ...
- ORA-00018: maximum number of sessions exceeded 超出最大会话数
ORA-00018: maximum number of sessions exceededORA-00018: 超出最大会话数 Cause: All session state obje ...
- .NET Standard 类库的使用技巧
系列目录 [已更新最新开发文章,点击查看详细] 在前一篇博客<.NET Standard中配置TargetFrameworks输出多版本类库>中详细介绍了如何创建.配置.条件编译. ...
- 网络io控制器
网络io控制器 网络io控制器 ZLAN6842,ZLAN6844是8路远程网络IO控制器.含有8路DI.8路DO,8路AI输入.其中DI支持干节点和湿节点,带光耦隔离:DO为继电器输出,具有5A 2 ...
- day20 Pyhton学习 面向对象-类与类之间的关系
一.类与类之间的依赖关系 class Elphant: def __init__(self, name): self.name = name def open(self, ref): print(&q ...
- bootStrap小结2
<!DOCTYPE html> <html lang="en"> <head> <meta http-equiv="Conten ...