NLNet-Theme for cnblogs
这篇文档仅作为markdown在cnblogs中的渲染效果展示。第一部分NLNet' Samples为自定义内容的效果展示。NOTE 第二、三部分的Markdown Reference(From Typora)和Example(From OneDark Theme for Typora)内容非原创,这里仅作为效果展示用。图标连源于iconfont,感谢 !
想用这套主题吗?传送门
NLNet' Samples
预设图标
预设图标主要通过css样式预设,支持hover动画,后续将会支持持续动画等。使用方式如下代码。注意,class="icon"不能缺少,且必须使用</i>作为标签结尾。另外如果希望在Typora同套主题受到较好的支持,标签内部请输入一个空格。
<i id="id" class="icon"> </i>

<i id="id" class="icon" size="16"> </i>

<i id="id" class="icon" style="width:22px;height:22px"> </i>
目前预设支持的size有:8、12、16、20、24、32、64,其他尺寸请使用第三种方式,如dragon - 54px: ,通过css属性自行设置。支持的id有:
| id | icon | id | icon |
|---|---|---|---|
| angry | add | ||
| smile | forbid, stop | ||
| fine | info | ||
| check, ok | error | ||
| uncheck | love | ||
| warn, warn1 | dragon | ||
| warn2 | cloud | ||
| warn3 | question | ||
| going |
类Github的徽章
使用方法:
行内徽章见右边<tag>我的博客</tag><cnt>[NLNet (cnblogs)](https://www.cnblogs.com/liwuqingxin/)</cnt>我是行内徽章的小尾巴。
效果如下:
行内徽章见右边我的博客NLNet (cnblogs)我是行内徽章的小尾巴。
image的alt支持的配置
| shadow | radius | zoom | border |
|---|---|---|---|
| shadow | radius | zoom | border |
| shadow-light | radius3 | zoom25 | border0 |
| radius6 | zoom50 | border1 | |
| radius9 | zoom66 | border2 | |
| radius12 | zoom75 | border3 | |
| zoom125 | border4 | ||
| zoom150 | border5 | ||
| zoom200 |
| 选项 | 效果 | ||
|---|---|---|---|
| shadow |  |
shadow-light | |
| radius3 | |
border4 | |
| radius12 | |
zoom50 | |
Markdown Reference(From Typora)
January 1, 2016 by typora.io
Overview
Markdown is created by Daring Fireball; the original guideline is here. Its syntax, however, varies between different parsers or editors. Typora try to follow GitHub Flavored Markdown, but may still have small incompatibilities.
- Overview
- Block Elements
- Span Elements
- HTML
Block Elements
Paragraph and line breaks
A paragraph is simply one or more consecutive lines of text. In markdown source code, paragraphs are separated by two or more blank lines. In Typora, you only need one blank line (press Return once) to create a new paragraph.
Press Shift + Return to create a single line break. Most other markdown parsers will ignore single line breaks, so in order to make other markdown parsers recognize your line break, you can leave two spaces at the end of the line, or insert <br/>.
Headers
Headers use 1-6 hash (#) characters at the start of the line, corresponding to header levels 1-6. For example:
# This is an H1

## This is an H2

###### This is an H6
In Typora, input ‘#’s followed by title content, and press Return key will create a header. Or type ⌘1 to ⌘6 as a shortcut.
Blockquotes
Markdown uses email-style > characters for block quoting. They are presented as:
> This is a blockquote with two paragraphs. This is first paragraph.

>

> This is second pragraph. Vestibulum enim wisi, viverra nec, fringilla in, laoreet vitae, risus.

> This is another blockquote with one paragraph. There is three empty line to seperate two blockquote.
In Typora, typing ‘>’ followed by your quote contents will generate a quote block. Typora will insert a proper ‘>’ or line break for you. Nested block quotes (a block quote inside another block quote) by adding additional levels of ‘>’.
Lists
Typing * list item 1 will create an unordered list. (The * symbol can be replace with + or -.)
Typing 1. list item 1 will create an ordered list.
For example:
## un-ordered list

*   Red

*   Green

*   Blue

## ordered list

1.  Red

2. 	Green

3.	Blue
Task List
Task lists are lists with items marked as either [ ] or [x] (incomplete or complete). For example:
- [ ] a task list item

- [ ] list syntax required

- [ ] normal **formatting**, @mentions, #1234 refs

- [ ] incomplete

- [x] completed
You can change the complete/incomplete state by clicking on the checkbox before the item.
(Fenced) Code Blocks
Typora only supports fences in GitHub Flavored Markdown, not the original code block style.
Using fences is easy: type and press `return`. Add an optional language identifier after and Typora runs it through syntax highlighting:
Here's an example:
```
function test() {
console.log("notice the blank line before this function?");
}
```
syntax highlighting:
```ruby
require 'redcarpet'
markdown = Redcarpet.new("Hello World!")
puts markdown.to_html
```
Math Blocks
You can render LaTeX mathematical expressions using MathJax.
To add a mathematical expression, enter $$ and press the ‘Return’ key. This will trigger an input field which accepts Tex/LaTex source. For example:
V1×V2=∣∣∣∣∣i∂X∂u∂X∂vj∂Y∂u∂Y∂vk00∣∣∣∣∣V1×V2=|ijk∂X∂u∂Y∂u0∂X∂v∂Y∂v0|
In the markdown source file, the math block is a LaTeX expression wrapped by a pair of ‘$$’ marks:
$$

\mathbf{V}_1 \times \mathbf{V}_2 =  \begin{vmatrix}

\mathbf{i} & \mathbf{j} & \mathbf{k} \\

\frac{\partial X}{\partial u} &  \frac{\partial Y}{\partial u} & 0 \\

\frac{\partial X}{\partial v} &  \frac{\partial Y}{\partial v} & 0 \\

\end{vmatrix}

$$
You can find more details here.
Tables
Standard Markdown has been extended in several ways to add table support., including by GFM. Typora supports this with a graphical interface, or writing the source code directly.
Enter | First Header | Second Header | and press the return key. This will create a table with two columns.
After a table is created, placing the focus on that table will open up a toolbar for the table where you can resize, align, or delete the table. You can also use the context menu to copy and add/delete individual columns/rows.
The full syntax for tables is described below, but it is not necessary to know the full syntax in detail as the markdown source code for tables is generated automatically by Typora.
In markdown source code, they look like:
| First Header  | Second Header |

| ------------- | ------------- |

| Content Cell  | Content Cell  |

| Content Cell  | Content Cell  |
You can also include inline Markdown such as links, bold, italics, or strikethrough in the table.
By including colons (:) within the header row, you can set text in that column to be left-aligned, right-aligned, or center-aligned:
| Left-Aligned  | Center Aligned  | Right Aligned |

| :------------ |:---------------:| -----:|

| col 3 is      | some wordy text | $1600 |

| col 2 is      | centered        |   $12 |

| zebra stripes | are neat        |    $1 |
A colon on the left-most side indicates a left-aligned column; a colon on the right-most side indicates a right-aligned column; a colon on both sides indicates a center-aligned column.
Footnotes
MultiMarkdown extends standard Markdown to provide two ways to add footnotes.
You can create reference footnotes like this1 and this2.
will produce:
You can create footnotes like this[^fn1] and this[^fn2].

[^fn1]: Here is the *text* of the first **footnote**.

[^fn2]: Here is the *text* of the second **footnote**.
Hover over the ‘fn1’ or ‘fn2’ superscript to see content of the footnote. You can use whatever unique identified you like as the footnote marker (e.g. “fn1”).
Hover over the footnote superscripts to see content of the footnote.
Horizontal Rules
Entering *** or --- on a blank line and pressing return will draw a horizontal line.
YAML Front Matter
Typora now supports YAML Front Matter. Enter --- at the top of the article and then press Return to introduce a metadata block. Alternatively, you can insert a metadata block from the top menu of Typora.
Table of Contents (TOC)
Enter [toc] and press the Return key to create a “Table of Contents” section. The TOC extracts all headers from the document, and its contents are updated automatically as you add to the document.
Span Elements
Span elements will be parsed and rendered right after typing. Moving the cursor in middle of those span elements will expand those elements into markdown source. Below is an explanation of the syntax for each span element.
Links
Markdown supports two styles of links: inline and reference.
In both styles, the link text is delimited by [square brackets].
Inline Links
To create an inline link, use a set of regular parentheses immediately after the link text’s closing square bracket. Inside the parentheses, put the URL where you want the link to point, along with an optional title for the link, surrounded in quotes. For example:
This is [an example](http://example.com/ "Title") inline link.

[This link](http://example.net/) has no title attribute.
will produce:
This is an example inline link. (<p>This is <a href="http://example.com/" title="Title">)
This link has no title attribute. (<p><a href="http://example.net/">This link</a> has no)
Internal Links
To create an internal link that creates a ‘bookmark’ that allow you to jump to that section after clicking on it, use the name of the header element as the href. For example:
Hold down Cmd (on Windows: Ctrl) and click on this link to jump to header Block Elements.
Hold down Cmd (on Windows: Ctrl) and click on [this link](#block-elements) to jump to header `Block Elements`.
Reference Links
Reference-style links use a second set of square brackets, inside which you place a label of your choosing to identify the link:
This is [an example][id] reference-style link.

Then, anywhere in the document, you define your link label on a line by itself like this:

[id]: http://example.com/  "Optional Title Here"
In Typora, they will be rendered like so:
This is an example reference-style link.
The implicit link name shortcut allows you to omit the name of the link, in which case the link text itself is used as the name. Just use an empty set of square brackets — for example, to link the word “Google” to the google.com web site, you could simply write:
[Google][]

And then define the link:

[Google]: http://google.com/
In Typora, clicking the link will expand it for editing, and command+click will open the hyperlink in your web browser.
URLs
Typora allows you to insert URLs as links, wrapped by <brackets>. For example <i@typora.io> becomes i@typora.io.
Typora will also automatically link standard URLs (for example: www.google.com) without these brackets.
Images
Images have similar syntax as links, but they require an additional ! char before the start of the link. The syntax for inserting an image looks like this:


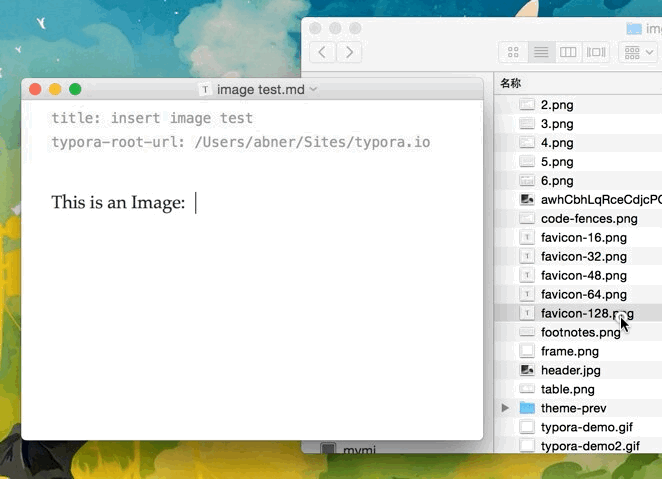
You are able to use drag and drop to insert an image from an image file or your web browser. You can modify the markdown source code by clicking on the image. A relative path will be used if the image that is added using drag and drop is in same directory or sub-directory as the document you’re currently editing.
If you’re using markdown for building websites, you may specify a URL prefix for the image preview on your local computer with property typora-root-url in YAML Front Matter. For example, Enter typora-root-url:/User/Abner/Website/typora.io/ in YAML Front Matter, and then  will be treated as  in Typora.
Emphasis
Markdown treats asterisks (*) and underscores (_) as indicators of emphasis. Text wrapped with one * or _ will be wrapped with an HTML <em> tag. For example:
*single asterisks*

_single underscores_
produces:
single asterisks
single underscores
GFM will ignore underscores in words, which is commonly used in code and names, like this:
wow_great_stuff
do_this_and_do_that_and_another_thing.
To produce a literal asterisk or underscore at a position where it would otherwise be used as an emphasis delimiter, you can backslash escape it with a backslash character:
\*this text is surrounded by literal asterisks\*
Typora recommends using the * symbol.
Strong
A double * or _ will cause its enclosed contents to be wrapped with an HTML <strong> tag, e.g:
**double asterisks**

__double underscores__
produces:
double asterisks
double underscores
Typora recommends using the ** symbol.
Code
To indicate an inline span of code, wrap it with backtick quotes (`). Unlike a pre-formatted code block, a code span indicates code within a normal paragraph. For example:
Use the `printf()` function.
will produce:
Use the printf() function.
Strikethrough
GFM adds syntax to create strikethrough text, which is missing from standard Markdown.
~~Mistaken text.~~ becomes Mistaken text.
Emoji :happy:
Enter emoji with syntax :smile:. To make it easier, an auto-complete helper will pop up after typing : and the start of an emoji name.
Entering UTF-8 emoji characters directly is also supported by going to Edit -> Emoji & Symbols in the menu bar.
Inline Math
To use this feature, please enable it first in the Markdown tab of the preference panel. Then, use $ to wrap a LaTeX command. For example: $\lim_{x \to \infty} \exp(-x) = 0$.
To trigger inline preview for inline math: input “$”, then press the ESC key, then input a TeX command.
You can find more details here.
Subscript
To use this feature, please enable it first in the Markdown tab of the preference panel. Then, use ~ to wrap subscript content. For example: H~2~O, X~long\ text~/
Superscript
To use this feature, please enable it first in the Markdown tab of the preference panel. Then, use ^ to wrap superscript content. For example: X^2^.
Highlight
To use this feature, please enable it first in the Markdown tab of the preference panel. Then, use == to wrap highlight content. For example: ==highlight==.
highlight
HTML
You can use HTML to style content what pure Markdown does not support. For example, use <span style="color:red">this text is red</span> to add text with red color.
Underlines
Underline isn’t specified in Markdown of GFM, but can be produced by using underline HTML tags:
<u>Underline</u> becomes Underline.
Embed Contents
Some websites provide iframe-based embed code which you can also paste into Typora. For example:
<iframe height='265' scrolling='no' title='Fancy Animated SVG Menu' src='http://codepen.io/jeangontijo/embed/OxVywj/?height=265&theme-id=0&default-tab=css,result&embed-version=2' frameborder='no' allowtransparency='true' allowfullscreen='true' style='width: 100%;'></iframe>
Video
You can use the <video> HTML tag to embed videos. For example:
<video src="xxx.mp4" />
Other HTML Support
You can find more details here.
- Here is the text of the first footnote.
- Here is the text of the second footnote.
hosted on Github.
Example(From OneDark Theme for Typora)
Headers
h3
Markdown is a lightweight markup language with plain-text-formatting syntax. Its design allows it to be converted to many output formats, but the original tool by the same name only supports HTML. Markdown is often used to format readme files, for writing messages in online discussion forums, and to create rich text using a plain text editor.
h4
Since the initial description of Markdown contained ambiguities and unanswered questions, the implementations that appeared over the years have subtle differences and many come with syntax extensions.
h5
In MediaWiki, it is implemented in the currently unmaintained MarkdownExtraParser parser function extension
h6
Implementations of Markdown are available for over a dozen programming languages.
Quote
Most UI components including tooltip, dialog and buttons are painted by HTML. And you only need to change those part when you find the UI components are incompatible with your editor theme after finishing steps above. HTML files from the toolkit includes most common UI components for you to easily debug.
Font Style
Bold, italic, delete
underline, Link
H2O, E=mc2
colored text, highlight
emoji:
- [x] checkbox
Codeblock
# hello_world.py

class HelloWorld():

	def __init__(self):

        self.text='hello world!'

    def show(self,word):

        print(f'{word}, {self.text}')

test=HelloWorld()

test.show()
Run terminal then enter: python hello_world.py
KBD
bold:Ctrl/Command + B
italic:Ctrl/Command + I
MathJax
Given two populations, \(x_1\) and \(x_2\) , with logistic dynamics, the Lotka–Volterra formulation adds an additional term to account for the species' interactions. Thus the competitive Lotka–Volterra equations are:
\cfrac{dx_1}{dt}=r_1x_1\bigg(1-\cfrac{x_1+\alpha_{12} x_2}{K_1}\bigg)\\
\cfrac{dx_2}{dt}=r_2x_2\bigg(1-\cfrac{x_2+\alpha_{21} x_1}{K_2}\bigg)
\end{cases}
\]
Here, \(\alpha_{12}\) represents the effect species 2 has on the population of species 1 and \(\alpha_{21}\)represents the effect species 1 has on the population of species 2.
Order
- first item
- second item
- first item
- second item
- third item
- first item
- second item
- first item
- first item
- first item
- fourth item
Table
| Cinderella | 11 | glass | transparent |
|---|---|---|---|
| Name | Size | Material | Color |
| All Business | 9 | leather | brown |
| Roundabout | 10 | hemp canvas | natural |
Footnote
You can create footnotes like this[1] and this[2].
Image, Video

| Bash command | Description |
| ls | List directory contents |
| cd | Change directory |
| cp | Copy files |
| mv | Move files |
Graph
sequence
Alice->Bob: Hello Bob, how are you?

Note right of Bob: Bob thinks

Bob-->Alice: I am good thanks!
flow
st=>start: Start

op=>operation: Your Operation

cond=>condition: Yes or No?

e=>end

st->op->cond

cond(yes)->e

cond(no)->op
mermaid
Flowchart
Start --> Stop
A([A]) --- B(B) -- C --- C{C}
C -- D --> D[[D]]
C -.->|E| E[E]
C -. F .-> F[(F)]
C ==>|G| G((G))
B == edge ==> H>H]
B --> I{{I}}
subgraph sub [subgraph]
I -->|J| J[/J/]
I -->|K| K[\K\]
I -->|L| L[\L/]
I -->|M| M[/M\]
end
Sequence diagram
sequenceDiagram
participant A
participant B
participant C
Note right of B: note
Note over A,B: note
A->B: a
activate B
A-->B: b
activate B
A->>B: c
deactivate B
A-->>B: d
deactivate B
rect rgba(128,0,0,0.5)
A-xA: e
end
loop loop
A--xB: f
end
alt alt
B->>A: g
else else
B->>A: h
end
par par
A->C: i
and and
A->B: j
par nest
B->C: k
end
end
Class diagram
A <|-- B: label
A "1" *-- "1.." C
A "*" o-- "0..1" D
C <-- E
C -- F
D <.. G
D <|.. H
D .. I
A: +int i1
A: -String s1
A: #List~int~ l1
A: ~f1(arg) bool
A: +f2()*
A: +f3()$
class B {
<<enumeration>>
RED
GREEN
BLUE
}
class D {
<<interface>>
int i1
f1()
}
State diagram
[*] --> Still
Still --> [*]
Still --> Moving
Moving --> Still
Moving --> Crash
Crash --> [*]
state fork_state <<fork>>
state "This is A" as A
[*] --> fork_state
[*] --> D
D --> fork_state
note right of D
note for D
end note
note left of A: note for A
fork_state --> A
fork_state --> B
A --> C: trans
B --> C
C --> [*]
state C {
[*] --> C1: test
C1 --> C2
C2 --> C3
C3 --> [*]
state C2 {
[*] --> C21
C21 --> [*]
state C21 {
[*] --> C211
}
}
C1: This is C1
--
[*] --> T
}
Entity Relationship Diagram
A |o--o| B : b
B ||--|| C : c
A }o..o{ D : d
D }|..|{ E : e
User Journey Diagram
title My working day
section A
A1: 5: Me
A2: 3: Me
A3: 1: Me, Cat
Gantt
gantt
dateFormat YYYY-MM-DD
title Adding GANTT diagram functionality to mermaid
section A section
Completed task :done, des1, 2014-01-06,2014-01-08
Active task :active, des2, 2014-01-09, 3d
Future task : des3, after des2, 5d
Future task2 : des4, after des3, 5d
section Critical tasks
Completed task in the critical line :crit, done, 2014-01-06,24h
Implement parser and jison :crit, done, after des1, 2d
Create tests for parser :crit, active, 3d
Future task in critical line :crit, 5d
Create tests for renderer :2d
Add to mermaid :1d
section Documentation
Describe gantt syntax :active, a1, after des1, 3d
Add gantt diagram to demo page :after a1 , 20h
Add another diagram to demo page :doc1, after a1 , 48h
section Last section
Describe gantt syntax :after doc1, 3d
Add gantt diagram to demo page : 20h
Add another diagram to demo page : 48h
Pie Chart
title Pie Chart
"A" : 1
"B" : 2
"C" : 3
"D" : 4
"E" : 5
"F" : 6
"G" : 7
"H" : 8
NLNet-Theme for cnblogs的更多相关文章
- 未开通js之前的纯css网页主题
本主题修改自其他大佬:Rocket1184/MaterialCnblogs: Material Theme for cnblogs.com (github.com) 只需在博客后台选择"禁用 ...
- [转][MVC] 剖析 NopCommerce 的 Theme 机制
本文转自:http://www.cnblogs.com/coolite/archive/2012/12/28/NopTheme.html?utm_source=tuicool&utm_medi ...
- 重新想象 Windows 8.1 Store Apps (86) - 系统 UI 的新特性: Theme, 窗口宽度大小可变, ApplicationView, DisplayInformation
[源码下载] 重新想象 Windows 8.1 Store Apps (86) - 系统 UI 的新特性: Theme, 窗口宽度大小可变, ApplicationView, DisplayInfor ...
- ExtJS4.2.1自定义主题(theme)样式详解
(基于Ext JS 4.2.1版本) UI组件 学习ExtJS就是学习组件的使用.ExtJS4对框架进行了重构,其中最重要的就是形成了一个结构及层次分明的组件体系,由这些组件形成了Ext的控件. Ex ...
- POJ 1743 Musical Theme (后缀数组,求最长不重叠重复子串)(转)
永恒的大牛,kuangbin,膜拜一下,Orz 链接:http://www.cnblogs.com/kuangbin/archive/2013/04/23/3039313.html Musical T ...
- 【转载】总结一下Android中主题(Theme)的正确玩法
http://www.cnblogs.com/zhouyou96/p/5323138.html 总结一下Android中主题(Theme)的正确玩法 在AndroidManifest.xml文件中有& ...
- sencha app build 到 Capturing theme image不执行
解决sencha app build 到 Capturing theme image不执行 今天电脑重装系统,重新安装了sencha cmd,但是在打包时,到了 Capturing theme ima ...
- 【转】Android 避免APP启动闪黑屏(Theme和Style)
前几天Boss就反应说,机器每次启动程序都会闪一下黑屏,这个客户不接受.没办法,只能想想怎么解决,最后找到了下面的方法.闪黑屏的原因主要是我们启动Activity的时候,需要跑完onCreate和on ...
- android学习之-Theme和Style
android学习之-Theme和Style 分类: android 2013-10-11 15:01 960人阅读 评论(0) 收藏 举报 android style和theme的使用. style ...
随机推荐
- 【Oracle】归档日志的删除操作
[root@sha3 oracle]# rman target / Recovery Manager: Release 10.2.0.4.0 - Production on Tue Jan 20 01 ...
- windows下如何安装Python、pandas
windows下如何安装Python.pandas 本篇主要涵盖以下三部分内容: Python.Pycharm的安装 使用Pycharm创建.运行Python程序 安装pandas 1.Python. ...
- C#使用OracleParameter操作数据库
public static int GetScalar(string sql,params OracleParameter [] OracleParms) { using (OracleConnect ...
- CodeMonkey少儿编程第2章 turnTo对象
目标 了解对象的概念 了解方法与对象的关系 掌握turnTo指令的用法 在开始本章的学习之前,我们先来复习一下上一章的知识点. 在第1章中,我们学会了在这个游戏中最简单的两个指令. step x 其中 ...
- Python-Flask搭建Web项目
最近因项目需要,学习了用flask搭建web项目,以下是自己的使用感悟 Flask框架结构 static:存储一些静态资源 templates:存储对应的view app.py:涉及到页面的跳转,以及 ...
- 知识图谱KnowledgeGraph核心技术培训班 2月03日— 2月06日
- (010)每日SQL学习:按字母顺序排列字符串
需求:一串字母'ADFGH',需要按照顺序来显示:A D F G H 第一步:先把字符串拆分 with test as( select 'ADFGH' as a from dual ) select ...
- 极光推送的设备唯一性标识 RegistrationID
极光推送的设备唯一性标识 RegistrationID 极光推送的设备唯一性标识 RegistrationID | 极光博客 https://blog.jiguang.cn/registrationi ...
- 从零搭建TypeScript与React开发环境
前言 平时进行开发大多数是基于vue-cli或者create-react-app等官方或者公司内部搭建的脚手架. 我们业务仔做的最多就是npm i和npm run dev或者npm start,然 ...
- 如何使用Conda源快速安装PyTorch?
数据科学交流群,群号:189158789,欢迎各位对数据科学感兴趣的小伙伴的加入! 1.切换国内源 1.1.在家目录生成.condarc conda config --set show_channel ...