Arduino IDE for ESP8266 项目(4)HTTP客户端+服务端
Arduio for esp8266
官网API:http://arduino-esp8266.readthedocs.io/en/latest/esp8266wifi/readme.html
很有价值的参考文献:http://blog.csdn.net/sadshen/article/details/46883245
参考的例程:https://github.com/SmartArduino/ESPDuino/tree/master/Book
网友参考:http://www.arduino.cn/thread-18958-1-1.html
手机一键配置软件
下载ESPTOUCH软件:https://github.com/EspressifApp/IOT-Espressif-Apk
ESPTOUCH的源码:https://github.com/EspressifApp/EsptouchForAndroid


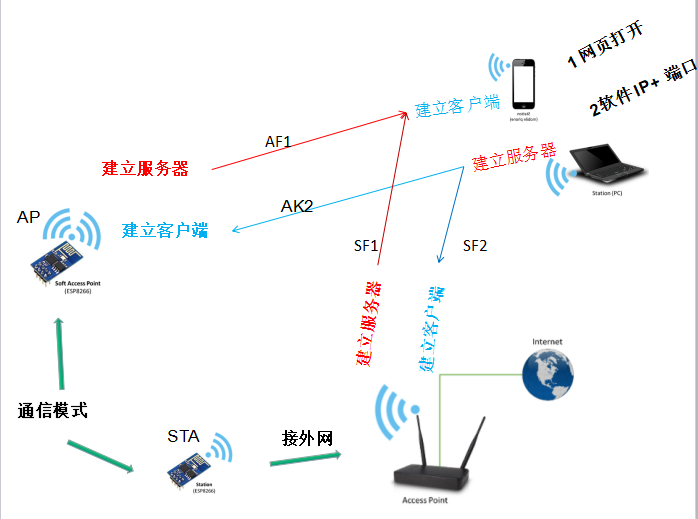
要想端到端通信两步
1 AP或STA,将自己接入某网络或者自己当网路。
2 建立一个server 或者 client ,在第一里形成的网络里去通信。
1 SF1 STA模式-连接路由器-设置AP-建立sever-手机通过软件 ip+端口访问
/*  WiFiTelnetToSerial - 使用通用异步收发传输器(Universal Asynchronous

Receiver/Transmitter,UART)与ESPDUINO进行TCP透传的例子 */

#include <ESP8266WiFi.h>

//定义可连接的客户端数目最大值

#define MAX_SRV_CLIENTS 1

const char* ssid = "Doit";

const char* password = "doit3305";

WiFiServer server(23);

WiFiClient serverClients[MAX_SRV_CLIENTS];

void setup() {

  Serial.begin(115200);

  WiFi.begin(ssid, password);

  Serial.print("\nConnecting to "); Serial.println(ssid);

  uint8_t i = 0;

  while (WiFi.status() != WL_CONNECTED && i++ < 20) delay(500);

  if(i == 21){ //超时(20x500=10000,10秒钟),提示连接失败

    Serial.print("Could not connect to"); Serial.println(ssid);

    while(1) delay(500);

  }

  //启动UART传输和服务器

  server.begin();

  server.setNoDelay(true);

  Serial.print("Ready! Use 'telnet ");

  Serial.print(WiFi.localIP());//获得服务器本地IP

  Serial.println(" 23' to connect");

}

void loop() {

  uint8_t i;

  //检测服务器端是否有活动的客户端连接

  if (server.hasClient()){

    for(i = 0; i < MAX_SRV_CLIENTS; i++){

      //查找空闲或者断开连接的客户端,并置为可用

      if (!serverClients[i] || !serverClients[i].connected()){

        if(serverClients[i]) serverClients[i].stop();

        serverClients[i] = server.available();

        Serial.print("New client: "); Serial.println(i);

        continue;

      }

    }

    //若没有可用客户端,则停止连接

    WiFiClient serverClient = server.available();

    serverClient.stop();

  }

  //检查客户端的数据

  for(i = 0; i < MAX_SRV_CLIENTS; i++){

    if (serverClients[i] && serverClients[i].connected()){

      if(serverClients[i].available()){

        //从Telnet客户端获取数据,并推送到URAT端口

        while(serverClients[i].available()) Serial.write(serverClients[i].read());

      }

    }

  }

  //检查UART端口数据

  if(Serial.available()){

    size_t len = Serial.available();

    uint8_t sbuf[len];

    Serial.readBytes(sbuf, len);

    //将UART端口数据推送到所有已连接的telnet客户端,实现双向通信

    for(i = 0; i < MAX_SRV_CLIENTS; i++){

      if (serverClients[i] && serverClients[i].connected()){

        serverClients[i].write(sbuf, len);

        delay(1);

      }

    }

  }

}
1.2 SF1 STA模式-连接路由器-设置AP-建立sever-手机通过 网页+软件IP+端口 访问
#include <ESP8266WiFi.h>

const char* ssid = "dongdong";

const char* password = "dongdong";

WiFiServer server(80);

void setup()

{

  Serial.begin(115200);

  Serial.println();


IPAddress staticIP(192,168,1,22);
IPAddress gateway(192,168,1,9);
IPAddress subnet(255,255,255,0);

  Serial.printf("Connecting to %s ", ssid);

  WiFi.begin(ssid, password);

WiFi.config(staticIP, gateway, subnet);

  while (WiFi.status() != WL_CONNECTED)

  {

    delay(500);

    Serial.print(".");

  }

  Serial.println(" connected");

  server.begin();

  Serial.printf("Web server started, open %s in a web browser\n", WiFi.localIP().toString().c_str());

}

// prepare a web page to be send to a client (web browser)

String prepareHtmlPage()

{

  String htmlPage =

     String("HTTP/1.1 200 OK\r\n") +

            "Content-Type: text/html\r\n" +

            "Connection: close\r\n" +  // the connection will be closed after completion of the response

            "Refresh: 5\r\n" +  // refresh the page automatically every 5 sec

            "\r\n" +

            "<!DOCTYPE HTML>" +

            "<html>" +

            "Analog input:  " + String(analogRead(A0)) +

            "</html>" +

            "\r\n";

  return htmlPage;

}

void loop()

{

  WiFiClient client = server.available();

  // wait for a client (web browser) to connect

  if (client)

  {

    Serial.println("\n[Client connected]");

    while (client.connected())

    {

      // read line by line what the client (web browser) is requesting

      if (client.available())

      {

        String line = client.readStringUntil('\r');

        Serial.print(line);

        // wait for end of client's request, that is marked with an empty line

        if (line.length() == 1 && line[0] == '\n')

        {

          client.println(prepareHtmlPage());

          break;

        }

      }

    }

    delay(1); // give the web browser time to receive the data

    // close the connection:

    client.stop();

    Serial.println("[Client disonnected]");

  }

}
2 SF2
2.1 SAT模式-连接WIFI-建立client+远程访问IP+端口
#include <ESP8266WiFi.h>

const char* ssid      = "Doit";    //change to your own ssid

const char* password  = "doit3305";//change to your own password

const char* serverIP  = "115.29.109.104";

int serverPort = 6535;

WiFiClient client;

bool bConnected = false;

char buff[512];

int nm = 0;

void setup() {

  Serial.begin(115200);

  delay(10);

  Serial.println();

  Serial.println();

  Serial.print("Connecting to ");

  Serial.println(ssid);

  WiFi.begin(ssid, password);

  while (WiFi.status() != WL_CONNECTED) {

    delay(500);

    Serial.print(".");

  }

  Serial.println("");

  Serial.println("WiFi connected");

  Serial.println("IP address: ");

  Serial.println(WiFi.localIP());

}

void loop() {

  delay(1);

  if (bConnected == false)

  {

    if (!client.connect(serverIP, serverPort))

    {

      Serial.println("connection failed");

      delay(5000);

      return;

    }

    bConnected = true;

    Serial.println("connection ok");

  }

  else if (client.available())

  {

    Serial.println("Data is coming");

    while (client.available())

    {

      buff[nm++] = client.read();

      if (nm >= 511) break;

    }

    buff[nm] = 0x00;

    nm=0;

    Serial.print(buff);

    client.print(buff);

    client.flush();

  }

}
2.2 SAT模式-连接WIFI-建立client+远程访问网页
#include <ESP8266WiFi.h>

const char* ssid = "********";

const char* password = "********";

const char* host = "www.example.com";

void setup()

{

  Serial.begin(115200);

  Serial.println();

  Serial.printf("Connecting to %s ", ssid);

  WiFi.begin(ssid, password);

  while (WiFi.status() != WL_CONNECTED)

  {

    delay(500);

    Serial.print(".");

  }

  Serial.println(" connected");

}

void loop()

{

  WiFiClient client;

  Serial.printf("\n[Connecting to %s ... ", host);

  if (client.connect(host, 80))

  {

    Serial.println("connected]");

    Serial.println("[Sending a request]");

    client.print(String("GET /") + " HTTP/1.1\r\n" +

                 "Host: " + host + "\r\n" +

                 "Connection: close\r\n" +

                 "\r\n"

                );

    Serial.println("[Response:]");

    while (client.connected())

    {

      if (client.available())

      {

        String line = client.readStringUntil('\n');

        Serial.println(line);

      }

    }

    client.stop();

    Serial.println("\n[Disconnected]");

  }

  else

  {

    Serial.println("connection failed!]");

    client.stop();

  }

  delay(5000);

}
3 AF1 AP-Sever
 #include <ESP8266WiFi.h>

const char *ssid = "Charlie Testing AP";

const char *password = "12345678";

WiFiServer server(80);

void setup()

{

  Serial.begin(115200);

  Serial.println();

  Serial.print("Setting soft-AP ... ");

IPAddress softLocal(192,168,128,1);

IPAddress softGateway(192,168,128,1);

IPAddress softSubnet(255,255,255,0);

WiFi.softAPConfig(softLocal, softGateway, softSubnet);

    WiFi.softAP(ssid, password);

   IPAddress myIP = WiFi.softAPIP();

  Serial.print("AP IP address: ");

  Serial.println(myIP);

 server.begin();

 Serial.printf("Web server started, open %s in a web browser\n", WiFi.localIP().toString().c_str());

}

void loop()

{

 WiFiClient client = server.available();

 if (client)

  {

    Serial.println("\n[Client connected]");

    while (client.connected())

    {

      // read line by line what the client (web browser) is requesting

      if (client.available())

      {

        String line = client.readStringUntil('\r');

        Serial.print(line);

        // wait for end of client's request, that is marked with an empty line

        if (line.length() == 1 && line[0] == '\n')

        {

          client.println(prepareHtmlPage());

          break;

        }

      }

    }

    delay(1); // give the web browser time to receive the data

    // close the connection:

    client.stop();

    Serial.println("[Client disonnected]");

  }

}

// prepare a web page to be send to a client (web browser)

String prepareHtmlPage()

{

  String htmlPage =

     String("HTTP/1.1 200 OK\r\n") +

            "Content-Type: text/html\r\n" +

            "Connection: close\r\n" +  // the connection will be closed after completion of the response

            "Refresh: 5\r\n" +  // refresh the page automatically every 5 sec

            "\r\n" +

            "<!DOCTYPE HTML>" +

            "<html>" +

            "Analog input:  " + String(analogRead(A0)) +

            "</html>" +

            "\r\n";

  return htmlPage;
}
Arduino IDE for ESP8266 项目(4)HTTP客户端+服务端的更多相关文章
- Arduino IDE for ESP8266 项目云盒子(2)一键自配置+网页服务器
https://item.taobao.com/item.htm?spm=a230r.1.14.20.eYblO3&id=521945102409&ns=1&abbucket= ...
- Arduino IDE for ESP8266 项目(1) 点亮灯+按键LED+pwm
官方文档 http://esp8266.github.io/Arduino/versions/2.1.0/doc/libraries.html 引脚口说明 http://yfrobot.com/thr ...
- Arduino IDE for ESP8266 项目云盒子(3)外网访问
互联网访问esp8266 https://item.taobao.com/item.htm?spm=a230r.1.14.20.eYblO3&id=521945102409&ns=1& ...
- Arduino IDE for ESP8266 项目云盒子 (1)AP直接模式
手机直接连接esp8266辐射的WIFI,通信. https://item.taobao.com/item.htm?spm=a230r.1.14.20.eYblO3&id=5219451024 ...
- Arduino IDE for ESP8266 项目(3)创建AP+STA
官网API:http://arduino-esp8266.readthedocs.io/en/latest/esp8266wifi/readme.html STA (客户端)手机连接路由器 S1 *简 ...
- Arduino IDE for ESP8266 项目云盒子(4)组网
- Arduino IDE for ESP8266 项目(2)wifi扫描
#include "ESP8266WiFi.h" void setup() { Serial.begin(115200); //设定WiFi为STA模式,如果先前已连接上AP,则与 ...
- ESP8266开发之旅 进阶篇② 闲聊Arduino IDE For ESP8266烧录配置
授人以鱼不如授人以渔,目的不是为了教会你具体项目开发,而是学会学习的能力.希望大家分享给你周边需要的朋友或者同学,说不定大神成长之路有博哥的奠基石... QQ技术互动交流群:ESP8266&3 ...
- Arduino IDE搭建ESP8266开发环境,文件下载过慢解决方法 | ESP-01制作WiFi开关教程,改造宿舍灯
1. Arduino IDE配置ESP8266环境 参考:https://www.jianshu.com/p/cb0274d612b5 首先从 Arduino 官网 下载最新版本的 Arduino I ...
随机推荐
- Linux中ls命令用法
ls 命令的含义是list显示当前目录中的文件名字.注意不加参数它显示除隐藏文件外的所有文件及目录的名字. 1)ls –a 显示当前目录中的所有文件,包含隐藏文件 命令: aijian.shi@U-a ...
- 无法打开锁文件 /var/lib/dpkg/lock - open (13: 权限不够)
比如输入apt-get install eclipse,或者apt-get update 会提示 无法打开锁文件 /var/lib/dpkg/lock - open (13: 权限不够) 无法对状态 ...
- 【github&&git】6、SmartGit(试用期30后),个人继续使用的方法。
在我们做项目的过程中,我们会用到SmartGit这个软件来将本地的MAVEN项目push到国内的码云(https://git.oschina.net)或者是国外的github网站进行项目的管理,这个时 ...
- 服务器端事件发送SSE
背景 近期有这么一个需求: 手机端需要展示一个比较大的pdf 基于手机端网络/流量/体验等考虑,希望不通过pdf下载然后展示 而是把pdf转成一张张的图片,然后再在手机上展示. 分析 pdf转图片,肯 ...
- code for qint function
function [p,y,a] = qint(ym1,y0,yp1) %QINT - quadratic interpolation of three adjacent samples % % [p ...
- js之搜索框
目标效果:点击搜索框,搜索框内提示信息消失,可输入搜索信息,点击搜索框外搜索框如果没提示信息或者为空时,显示搜索框提示信息,如果有搜索信息,显示搜索信息. 代码如下: <!DOCTYPE htm ...
- Dockerfile 中 RUN, CMD, ENTRYPOINT 的区别
RUN 指令:用于指定 docker build 过程中要运行的命令. 语法格式: RUN <command> 或 RUN ["<executeable>" ...
- web全栈架构师[笔记] — 02 数据交互
数据交互 一.http协议 基本特点 1.无状态的协议 2.连接过程:发送连接请求.响应接受.发送请求 3.消息分两块:头.体 http和https 二.form 基本属性 action——提交到哪儿 ...
- MVP架构分析与搭建
一个项目的核心就是架构 1.什么是MVP:MVP是一种项目架构设计模式. 其实MVP的本质就是将view和model完全隔离出来,通过Presenter (主持人) 统一调度管理.
- WebSocket实现简单的在线聊天
SuperWebSocket在WebService中的应用 最开始使用是寄托在IIS中,发布之后测试时半个小时就会断开,所以改为WindowsService 1. 新建Windows服务项目[Test ...