
Springboot整合二 集成 rabbitmq
1、在application.yml文件中进行RabbitMQ的相关配置
先上代码
spring:

  rabbitmq:

    host: 192168.21.11

    port:

    username: guest

    password: password

    publisher-confirms: true    #  消息发送到交换机确认机制,是否确认回调
    virtual-host: / #默认主机

#自定义参数
defineProps:
 rabbitmq:
  wechat:
   template:
    topic: wxmsg.topic
    queue: wxmsg.queue
    # *表号匹配一个word,#匹配多个word和路径,路径之间通过.隔开
    queue1_pattern: wxmsg.message.exchange.queue.#
    # *表号匹配一个word,#匹配多个word和路径,路径之间通过.隔开
    queue2_pattern: wxmsg.message.exchange.queue.#
2. 项目启动配置
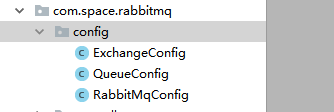
大家可以看到上图中的config包,这里就是相关配置类
下面,就这三个配置类,做下说明:(这里需要大家对RabbitMQ有一定的了解,知道生产者、消费者、消息交换机、队列等)
ExchangeConfig 消息交换机配置
package com.space.rabbitmq.config;

import org.springframework.amqp.core.DirectExchange;

import org.springframework.context.annotation.Bean;

import org.springframework.context.annotation.Configuration;

/**

 * 消息交换机配置  可以配置多个

 */

@Configuration

public class ExchangeConfig {

    @Value("${defineProps.rabbitmq.wechat.template.topic}")
    private String templateTopic;

    /**
     *   1.定义topic exchange,绑定路由
     *   2.direct交换器相对来说比较简单,匹配规则为:如果路由键匹配,消息就被投送到相关的队列
     *     fanout交换器中没有路由键的概念,他会把消息发送到所有绑定在此交换器上面的队列中。
     *     topic交换器你采用模糊匹配路由键的原则进行转发消息到队列中
     *   3.durable="true" rabbitmq重启的时候不需要创建新的交换机
     *   4.autoDelete:false ,默认不自动删除
     *   5.key: queue在该topic exchange中的key值,当消息符合topic exchange中routing_key规则,
     *   消息将会转发给queue参数指定的消息队列
     */
    public TopicExchange topicExchange(){
        return new TopicExchange(templateTopic, true, false);
    }

}
QueueConfig 队列配置
package com.space.rabbitmq.config;

import org.springframework.amqp.core.Queue;

import org.springframework.context.annotation.Bean;

import org.springframework.context.annotation.Configuration;

/**

 * 队列配置  可以配置多个队列

 */

@Configuration

public class QueueConfig {

    @Bean

    public Queue firstQueue() {

        /**

         durable="true" 持久化 rabbitmq重启的时候不需要创建新的队列

         auto-delete 表示消息队列没有在使用时将被自动删除 默认是false

         exclusive  表示该消息队列是否只在当前connection生效,默认是false

         */

        return new Queue("queue1",true,false,false);

    }

    @Bean

    public Queue secondQueue() {

        return new Queue("queue2",true,false,false);

    }

}
RabbitMqConfig RabbitMq配置
package com.space.rabbitmq.config;

import com.space.rabbitmq.mqcallback.MsgSendConfirmCallBack;

import org.springframework.amqp.core.AcknowledgeMode;

import org.springframework.amqp.core.Binding;

import org.springframework.amqp.core.BindingBuilder;

import org.springframework.amqp.rabbit.connection.ConnectionFactory;

import org.springframework.amqp.rabbit.core.RabbitTemplate;

import org.springframework.amqp.rabbit.listener.SimpleMessageListenerContainer;

import org.springframework.beans.factory.annotation.Autowired;

import org.springframework.context.annotation.Bean;

import org.springframework.context.annotation.Configuration;

/**

 * RabbitMq配置

 */

@Configuration

public class RabbitMqConfig {


    @Value("${spring.rabbitmq.host}")
    private String host;
    @Value("${spring.rabbitmq.port}")
    private int port;
    @Value("${spring.rabbitmq.username}")
    private String username;
    @Value("${spring.rabbitmq.password}")
    private String password;
    @Value("${spring.rabbitmq.virtual-host}")
    private String vhost;

    @Value("${defineProps.rabbitmq.wechat.template.queue1_pattern}")
    private String queue1_pattern;
    @Value("${defineProps.rabbitmq.wechat.template.queue2_pattern}")
    private String queue2_pattern;

    @Autowired

    private QueueConfig queueConfig;

    @Autowired

    private ExchangeConfig exchangeConfig;

    /**
     * 连接工厂
     */
    @Bean
    public ConnectionFactory connectionFactory() {
        CachingConnectionFactory connectionFactory = new CachingConnectionFactory(host, port);
        connectionFactory.setUsername(username);
        connectionFactory.setPassword(password);
        connectionFactory.setVirtualHost(vhost);
        return connectionFactory;
    }

    @Bean
    public RabbitTemplate rabbitTemplate(){
    	return new RabbitTemplate(connectionFactory());
    }/**

     将消息队列1和交换机进行绑定

     */

    @Bean

    public Binding binding_one() {

        return BindingBuilder.bind(queueConfig.firstQueue()).to(exchangeConfig.topicExchange()).with(queue1_pattern);

    }

    /**

     * 将消息队列2和交换机进行绑定

     */

    @Bean

    public Binding binding_two() {

        return BindingBuilder.bind(queueConfig.secondQueue()).to(exchangeConfig.topicExchange()).with(queue2_pattern);

    }

    /**

     * queue listener  观察 监听模式

     * 当有消息到达时会通知监听在对应的队列上的监听对象

     * @return

     */

    @Bean

    public SimpleMessageListenerContainer simpleMessageListenerContainer_one(){

        SimpleMessageListenerContainer simpleMessageListenerContainer = new SimpleMessageListenerContainer(connectionFactory);

        simpleMessageListenerContainer.addQueues(queueConfig.firstQueue());

        simpleMessageListenerContainer.setExposeListenerChannel(true);

        simpleMessageListenerContainer.setMaxConcurrentConsumers();

        simpleMessageListenerContainer.setConcurrentConsumers();

        simpleMessageListenerContainer.setAcknowledgeMode(AcknowledgeMode.MANUAL); //设置确认模式手工确认

        simpleMessageListenerContainer.setMessageListener(wechatPushMessageListener());
        return simpleMessageListenerContainer;

    }

    /**
     * 配置消费者bean
     * @return
     */
    @Bean
    public WechatPushMessageConsumer wechatPushMessageListener(){
    	return new WechatPushMessageConsumer(redisUtil, mqMsgExceptionRemote, wechatAppID, wechatAppSecret);
    }

    /**

     * 定义rabbit template用于数据的接收和发送

     * @return

     */

    @Bean

    public RabbitTemplate rabbitTemplate() {

        RabbitTemplate template = new RabbitTemplate(connectionFactory);

        /**若使用confirm-callback或return-callback,

         * 必须要配置publisherConfirms或publisherReturns为true

         * 每个rabbitTemplate只能有一个confirm-callback和return-callback

         */

        template.setConfirmCallback(msgSendConfirmCallBack());

        //template.setReturnCallback(msgSendReturnCallback());

        /**

         * 使用return-callback时必须设置mandatory为true,或者在配置中设置mandatory-expression的值为true,

         * 可针对每次请求的消息去确定’mandatory’的boolean值,

         * 只能在提供’return -callback’时使用,与mandatory互斥

         */

        //  template.setMandatory(true);

        return template;

    }

    /**

     * 消息确认机制

     * Confirms给客户端一种轻量级的方式,能够跟踪哪些消息被broker处理,

     * 哪些可能因为broker宕掉或者网络失败的情况而重新发布。

     * 确认并且保证消息被送达,提供了两种方式:发布确认和事务。(两者不可同时使用)

     * 在channel为事务时,不可引入确认模式;同样channel为确认模式下,不可使用事务。

     * @return

     */

    @Bean

    public MsgSendConfirmCallBack msgSendConfirmCallBack(){

        return new MsgSendConfirmCallBack();

    }

}
消息回调
package com.space.rabbitmq.mqcallback;

import org.springframework.amqp.rabbit.core.RabbitTemplate;

import org.springframework.amqp.rabbit.support.CorrelationData;

/**

 * 消息发送到交换机确认机制

 * @author zhuzhe

 * @date 2018/5/25 15:53

 * @email 1529949535@qq.com

 */

public class MsgSendConfirmCallBack implements RabbitTemplate.ConfirmCallback {

    @Override

    public void confirm(CorrelationData correlationData, boolean ack, String cause) {

        System.out.println("MsgSendConfirmCallBack  , 回调id:" + correlationData);

        if (ack) {

            System.out.println("消息消费成功");

        } else {

            System.out.println("消息消费失败:" + cause+"\n重新发送");

        }

    }

}
生产者/消息发送者
package com.space.rabbitmq.sender;

import com.space.rabbitmq.config.RabbitMqConfig;

import lombok.extern.slf4j.Slf4j;

import org.springframework.amqp.rabbit.core.RabbitTemplate;

import org.springframework.amqp.rabbit.support.CorrelationData;

import org.springframework.beans.factory.annotation.Autowired;

import org.springframework.stereotype.Component;

import java.util.UUID;

/**

 * 消息发送  生产者1

 * @author zhuzhe

 * @date 2018/5/25 14:28

 * @email 1529949535@qq.com

 */

@Slf4j

@Component

public class FirstSender {

    @Autowired

    private RabbitTemplate rabbitTemplate;

    /**

     * 发送消息

     * @param uuid

     * @param message  消息

     */

    public void send(String uuid,Object message) {

        CorrelationData correlationId = new CorrelationData(uuid);

        rabbitTemplate.convertAndSend(RabbitMqConfig.EXCHANGE, RabbitMqConfig.ROUTINGKEY2,

                message, correlationId);

    }

}
消费者
方式一(使用注解):

package com.space.rabbitmq.receiver;

import org.springframework.amqp.rabbit.annotation.RabbitListener;

import org.springframework.stereotype.Component;

/**

 * 消息消费者1

 * @author zhuzhe

 * @date 2018/5/25 17:32

 * @email 1529949535@qq.com

 */

@Component

public class FirstConsumer {

    @RabbitListener(queues = {"first-queue","second-queue"}, containerFactory = "rabbitListenerContainerFactory")

    public void handleMessage(String message) throws Exception {

        // 处理消息

        System.out.println("FirstConsumer {} handleMessage :"+message);

    }

}
方式二(利用配置):
package com.space.rabbitmq.receiver;

import org.springframework.amqp.rabbit.annotation.RabbitListener;

import org.springframework.stereotype.Component;

/**

 * 消息消费者1

 */public class WechatPushMessageConsumer extends BaseMessageConsumer implements ChannelAwareMessageListener


	@Override
	public void onMessage(Message message, Channel channel) throws Exception {
      System.out.println("接收到的消息:" + message.getBody());
    }

}
消息接收两种方式:
@RabbitListener @RabbitHandler 及 消息序列化
参看资料: https://www.jianshu.com/p/911d987b5f11
测试
package com.space.rabbitmq.controller;

import com.space.rabbitmq.sender.FirstSender;

import org.springframework.beans.factory.annotation.Autowired;

import org.springframework.web.bind.annotation.GetMapping;

import org.springframework.web.bind.annotation.RestController;

import java.util.UUID;

/**

 * @author zhuzhe

 * @date 2018/5/25 16:00

 * @email 1529949535@qq.com

 */

@RestController

public class SendController {

    @Autowired

    private FirstSender firstSender;

    @GetMapping("/send")

    public String send(String message){

        String uuid = UUID.randomUUID().toString();

        firstSender.send(uuid,message);

        return uuid;

    }

}
package com.space.rabbitmq.controller;
import com.space.rabbitmq.sender.FirstSender;
import org.springframework.beans.factory.annotation.Autowired;
import org.springframework.web.bind.annotation.GetMapping;
import org.springframework.web.bind.annotation.RestController;
import java.util.UUID;
/**
* @author zhuzhe
* @date 2018/5/25 16:00
* @email 1529949535@qq.com
*/
@RestController
public class SendController {
@Autowired
private FirstSender firstSender;
@GetMapping("/send")
public String send(String message){
String uuid = UUID.randomUUID().toString();
firstSender.send(uuid,message);
return uuid;
}
}
topicExchange
Springboot整合二 集成 rabbitmq的更多相关文章
- springboot整合logback集成elk实现日志的汇总、分析、统计和检索功能
在Spring Boot当中,默认使用logback进行log操作.logback支持将日志数据通过提供IP地址.端口号,以Socket的方式远程发送.在Spring Boot中,通常使用logbac ...
- 如何通过SpringBoot官方手册集成RabbitMQ
众所周知,SpringBoot是对Spring的一层封装,用来简化操作. 随着SpringBoot的越发成熟,很多的流行技术都提供了SpringBoot的版本. 可以点击下方的连接查看spring-b ...
- SpringBoot整合多个RabbitMQ
一.背景 最近项目中需要用到了RabbitMQ来监听消息队列,监听的消息队列的 虚拟主机(virtualHost)和队列名(queueName)是不一致的,但是接收到的消息格式相同的.而且可能还存 ...
- 【转载】Springboot整合 一 集成 redis
原文:http://www.ityouknow.com/springboot/2016/03/06/spring-boot-redis.html https://blog.csdn.net/plei_ ...
- SpringBoot集成rabbitmq(二)
前言 在使用rabbitmq时,我们可以通过消息持久化来解决服务器因异常崩溃而造成的消息丢失.除此之外,我们还会遇到一个问题,当消息生产者发消息发送出去后,消息到底有没有正确到达服务器呢?如果不进行特 ...
- 一篇学习完rabbitmq基础知识,springboot整合rabbitmq
一 rabbitmq 介绍 MQ全称为Message Queue,即消息队列, RabbitMQ是由erlang语言开发,基于AMQP(Advanced MessageQueue 高级消息队列协议 ...
- springboot集成rabbitmq(实战)
RabbitMQ简介RabbitMQ使用Erlang语言开发的开源消息队列系统,基于AMQP协议来实现(AMQP的主要特征是面向消息.队列.路由.可靠性.安全).支持多种客户端,如:Python.Ru ...
- RabbitMQ与SpringBoot整合
RabbitMQ SpringBoot 一.RabbitMQ的介绍 二.Direct模式 三.Topic转发模式 四.Fanout Exchange形式 原文地址: https://www.cnb ...
- springboot学习笔记-6 springboot整合RabbitMQ
一 RabbitMQ的介绍 RabbitMQ是消息中间件的一种,消息中间件即分布式系统中完成消息的发送和接收的基础软件.这些软件有很多,包括ActiveMQ(apache公司的),RocketMQ(阿 ...
随机推荐
- Redis基础、应用、第三方支持组件总结
这段时间一直在研究学习Redis的相关知识,现在大概做下总结吧首先,Redis的基础方面,不说配置,就单单说下Redis数据类型:Redis 五大数据类型有String 类型,Hash 类型,List ...
- es6那些事儿
一.参考链接 http://www.ecma-international.org/ecma-262/6.0/index.html http://www.ecma-international.org/e ...
- Java笔记(四)常用基础类
常用基础类 一)String String内部用一个字符数组表示字符串: private final char value[]; 注意:Java9对此做了优化,采用byte[],如果字符都是ASCII ...
- Linux——目录结构思维导图
- [CC-SEAPERM2]Sereja and Permutations
[CC-SEAPERM2]Sereja and Permutations 题目大意: 有一个\(n(n\le300)\)排列\(p\),将其中一个元素\(p_i\)拿掉,然后将原来大于\(p_i\)的 ...
- echarts动态添加数据
数据异步加载 EChart中实现异步数据的更新非常简单,在图表初始化后不管任何时候只要通过 jQuery 等工具异步获取数据后通过 setOption 填入数据和配置项就行. 绑定数据的方式有两种,一 ...
- JWTtoken的原理以及在django中的应用
JWT 在用户注册或者登陆完成之后,记录用户状态,或者为用户创建身份凭证(功能类似于session的作用). 什么是JWT Json web token (JWT), 是为了在网络应用环境间传递声明而 ...
- Oracle分组小计、总计示例(grouping sets的使用)
1.首先创建一个表 create table TE ( ID VARCHAR2(2), T_CODE VARCHAR2(4), T_NAME VARCHAR2(4), T_A ...
- 何谓sdk,何谓api
狭义上的 SDK 指 Windows SDK,包括在 Windows 平台进行开发的一系列头文件和库文件以及命令行工具等. API 是 SDK 提供给用户的函数,即接口就是这个 SDK 提供给你用于应 ...
- Linux内存管理学习资料
下面是Linux内存管理学习的一些资料. 博客 mlock() and mlockall() system calls. All about Linux swap space 逆向映射的演进 Linu ...