简单实现支付密码输入框 By HL
密码输入框在微信,支付宝中比较常见
主要功能点
1.6位(或者N位)密码输入框封装
//  SBTextFieldAlert.h
/**

 *  密码输入框封装

 */

#import <UIKit/UIKit.h>

@interface SBPwdTextField : UIView<UITextFieldDelegate>

@property(nonatomic,strong)  UITextField  *passwordTextField;

- (void)clearUpPassword;

@end
//

//  SBTextFieldAlert.m

//  SafeInpuTextFiled

#define kDotSize CGSizeMake (10.0f,10.0f) //密码点的大小

#define kDotCount 6  //密码点数

#import "SBPwdTextField.h"

@implementation SBPwdTextField

{

    NSMutableArray *passwordIndicatorArrary;

}

-(instancetype)initWithFrame:(CGRect)frame

{

    self=[super initWithFrame:frame];

    if (self) {

        self.layer.borderWidth=1;

        self.layer.borderColor=[UIColor lightGrayColor].CGColor;

        [self addSubview:self.passwordTextField];

        [self initPwdTextField];

    }

    return self;

}

-(UITextField *)passwordTextField

{

    if (!_passwordTextField) {

        _passwordTextField = [[UITextField alloc] initWithFrame:CGRectMake(0, 0,50, 30)];

        _passwordTextField.hidden = YES;

        _passwordTextField.delegate = self;

        _passwordTextField.autocapitalizationType = UITextAutocapitalizationTypeNone;

        _passwordTextField.keyboardType = UIKeyboardTypeNumberPad;

        [_passwordTextField addTarget:self action:@selector(PwdTextFieldDidChange:) forControlEvents:UIControlEventEditingChanged];

        [self addSubview:_passwordTextField];

    }

    return _passwordTextField;

}

-(void)PwdTextFieldDidChange:(UITextField *)tf

{

    NSLog(@"%@",tf.text);

    [self setDotWithCount:tf.text.length];

}

-(void)initPwdTextField

{

    //每个密码输入框的宽度

    CGFloat width = self.bounds.size.width/kDotCount;

    //生成分割线

    for (int i = 0; i < kDotCount-1; i++)

    {

        UIImageView *lineImageView = [[UIImageView alloc] initWithFrame:CGRectMake((i + 1) * width, 0, 0.5f, self.bounds.size.height)];

        lineImageView.backgroundColor = [UIColor grayColor];

        [self addSubview:lineImageView];

    }

    passwordIndicatorArrary=[[NSMutableArray alloc]init];

    //生成中间的点

    for (int i = 0; i < kDotCount; i++)

    {

        UIImageView *dotImageView = [[UIImageView alloc] initWithFrame:CGRectMake((width - kDotSize.width) / 2.0f + i * width, (self.bounds.size.height - kDotSize.height) / 2.0f, kDotSize.width, kDotSize.height)];

        dotImageView.backgroundColor = [UIColor blackColor];

        dotImageView.layer.cornerRadius = kDotSize.width / 2.0f;

        dotImageView.clipsToBounds = YES;

        dotImageView.hidden = YES; //先隐藏

        [self addSubview:dotImageView];

        [passwordIndicatorArrary addObject:dotImageView];

    }

}

- (BOOL)textField:(UITextField *)textField shouldChangeCharactersInRange:(NSRange)range replacementString:(NSString *)string

{

    if([string isEqualToString:@"\n"])

    {

        //按回车关闭键盘

        [textField resignFirstResponder];

        return NO;

    }

    else if(string.length == 0)

    {

        //判断是不是删除键

        return YES;

    }

    else if(textField.text.length >= kDotCount)

    {

        //输入的字符个数大于6,则无法继续输入,返回NO表示禁止输入

        NSLog(@"输入的字符个数大于6,忽略输入");

        return NO;

    }

    else

    {

        return YES;

    }

}

/**

 *  重置显示的点

 */

- (void)setDotWithCount:(NSInteger)count

{

    for (UIImageView *dotImageView in passwordIndicatorArrary)

    {

        dotImageView.hidden = YES;

    }

    for (int i = 0; i< count; i++)

    {

        ((UIImageView*)[passwordIndicatorArrary objectAtIndex:i]).hidden = NO;

    }

    if (count== kDotCount) {

        NSLog(@"输入完毕");

        [[NSNotificationCenter defaultCenter] postNotificationName:@"uuuu" object:self.passwordTextField.text];

    }

}

/**

 *  清除密码

 */

- (void)clearUpPassword

{

    _passwordTextField.text = @"";

    [self setDotWithCount:_passwordTextField.text.length];

}

/**

 *  点击self 弹出键盘

 */

-(void)touchesBegan:(NSSet *)touches withEvent:(UIEvent *)event

{

    [_passwordTextField becomeFirstResponder];

}

- (void)dealloc

{

    [_passwordTextField removeFromSuperview];

    _passwordTextField=nil;

}
2.显示提示框封装
//  SBInputTextAlert.h

//  SafeInpuTextFiled

#import <UIKit/UIKit.h>

#import "SBPwdTextField.h"

@interface SBInputTextAlert : UIView

@property(nonatomic,strong)  UILabel  *titleLabel;

/**

 *  密码输入框

 */

@property(nonatomic,strong)  SBPwdTextField  *TextFieldAlert;

-(void)show;

-(void)dismiss;

@end

@interface SBCoverMask : UIView

+(void)maskViewShow;

+(void)maskViewDismiss;

@end
//  SBInputTextAlert.m

//  SafeInpuTextFiled

#import "SBInputTextAlert.h"

#define SBKeyWindow [UIApplication sharedApplication].keyWindow

@interface SBInputTextAlert ()

@property(nonatomic,strong) UIView *linView;

@end

@implementation SBInputTextAlert

-(instancetype)initWithFrame:(CGRect)frame

{

    self=[super initWithFrame:frame];

    if (self) {

        self.layer.cornerRadius=8;

        self.layer.masksToBounds=YES;

        [self initSubViews];

        [self addSubview:self.titleLabel];

        [self addSubview:self.linView];

        [self  addSubview:self.TextFieldAlert];

    }

    return self;

}

-(UIView *)linView

{

    if (!_linView) {

        _linView=[[UIView alloc]initWithFrame:CGRectMake(0, CGRectGetMaxY(self.titleLabel.frame)+10, self.bounds.size.width,0.5)];

        _linView.backgroundColor=[UIColor greenColor];

    }

    return _linView;

}

-(void)initSubViews

{

    UIButton  *closeButton=[[UIButton alloc]initWithFrame:CGRectMake(0, 0, 50, 30)];

    [closeButton setTitle:@"关闭" forState:UIControlStateNormal];

    closeButton.backgroundColor=[UIColor greenColor];

    [closeButton addTarget:self action:@selector(dismiss) forControlEvents:UIControlEventTouchUpInside];

    [self addSubview:closeButton];

}

-(UILabel *)titleLabel

{

    if (!_titleLabel) {

        _titleLabel=[[UILabel alloc]init];

        _titleLabel.textAlignment=NSTextAlignmentCenter;

        _titleLabel.font=[UIFont boldSystemFontOfSize:18];

        _titleLabel.frame=CGRectMake(0,5, self.bounds.size.width,25);

    }

    return _titleLabel;

}

-(SBPwdTextField *)TextFieldAlert

{

    if (!_TextFieldAlert) {

        CGFloat textFieldwidth=(self.bounds.size.width-40);

        _TextFieldAlert=[[SBPwdTextField alloc]initWithFrame:CGRectMake(20, 50 ,textFieldwidth,textFieldwidth/6)];

    }

    return _TextFieldAlert;

}

/**

 *  显示这儿view

 */

-(void)show{

    [SBCoverMask maskViewShow];

    self.frame=CGRectMake(0,-100, self.bounds.size.width, self.bounds.size.height);

    [UIView animateWithDuration:0.3 animations:^{

        self.hidden = NO;

        self.frame=CGRectMake(SBKeyWindow.frame.size.width/2-self.bounds.size.width/2,100, self.bounds.size.width, self.bounds.size.height);

        [self.TextFieldAlert becomeFirstResponder];

        [SBKeyWindow addSubview:self];

    }];

}

/**

 *  隐藏这个view

 */

-(void)dismiss{

    [SBCoverMask maskViewDismiss];

    [UIView animateWithDuration:0.5 animations:^{

        self.hidden = YES;

        [self.TextFieldAlert resignFirstResponder];

        [self removeFromSuperview];

    }];

    //清空密码

    [self.TextFieldAlert clearUpPassword];

}

@end

/**

 *  蒙版MaskView

 */

@implementation SBCoverMask

+(void)maskViewShow{

    SBCoverMask *view = [[SBCoverMask alloc] initWithFrame:[[UIScreen mainScreen] bounds]];

    view.backgroundColor = [UIColor blackColor];

    view.alpha = 0.3;

    [[UIApplication sharedApplication].keyWindow addSubview:view];

}

+(void)maskViewDismiss{

    UIWindow *keyWidow=[UIApplication sharedApplication].keyWindow;

    for (UIView *view in keyWidow.subviews) {

        if ([view isKindOfClass:[SBCoverMask class]]) {

            [view removeFromSuperview];

        }

    }

}

@end
使用
- (void)viewDidLoad {

    [super viewDidLoad];

    // Do any additional setup after loading the view, typically from a nib.

    UIButton   *CSButton=[UIButton  buttonWithType:UIButtonTypeCustom];

    CSButton.frame=CGRectMake(50,350, 100, 80);

    CSButton.backgroundColor=[UIColor   redColor];

    [CSButton  setTitle:@"显示输入框" forState:UIControlStateNormal];

    [CSButton  addTarget:self action:@selector(showKeyBord) forControlEvents:UIControlEventTouchDown];

    [self.view  addSubview:CSButton];

    UIButton   *CSButton2=[UIButton  buttonWithType:UIButtonTypeCustom];

    CSButton2.frame=CGRectMake(self.view.frame.size.width-100-50,350, 100, 80);

    CSButton2.backgroundColor=[UIColor   redColor];

    [CSButton2  setTitle:@"隐藏输入框" forState:UIControlStateNormal];

    [CSButton2  addTarget:self action:@selector(hideKeyBord) forControlEvents:UIControlEventTouchDown];

    [self.view  addSubview:CSButton2];

    [[NSNotificationCenter defaultCenter] addObserver:self selector:@selector(gotoNextVC:) name:@"uuuu" object:nil];

}

-(SBInputTextAlert *)SBTextField{

    if (!_SBTextField) {

        _SBTextField=[[SBInputTextAlert alloc]initWithFrame:CGRectMake(0,0,self.view.frame.size.width-20,200)];

        _SBTextField.titleLabel.text=@"请输入6位支付密码";

        _SBTextField.backgroundColor=[UIColor whiteColor];

    }

    return _SBTextField;

}

-(void)gotoNextVC:(NSNotification *)nti

{

    NSLog(@"text=%@",nti.object);

    [self.SBTextField dismiss];

    secondViewController  *secvc=[[secondViewController alloc]init];

    [self presentViewController:secvc animated:YES completion:nil];

}

-(void)showKeyBord

{

    [self.SBTextField show];

    [self.SBTextField.TextFieldAlert.passwordTextField  becomeFirstResponder];

}

-(void)hideKeyBord

{

    [self.SBTextField dismiss];

    [self.SBTextField.TextFieldAlert.passwordTextField  resignFirstResponder];

}
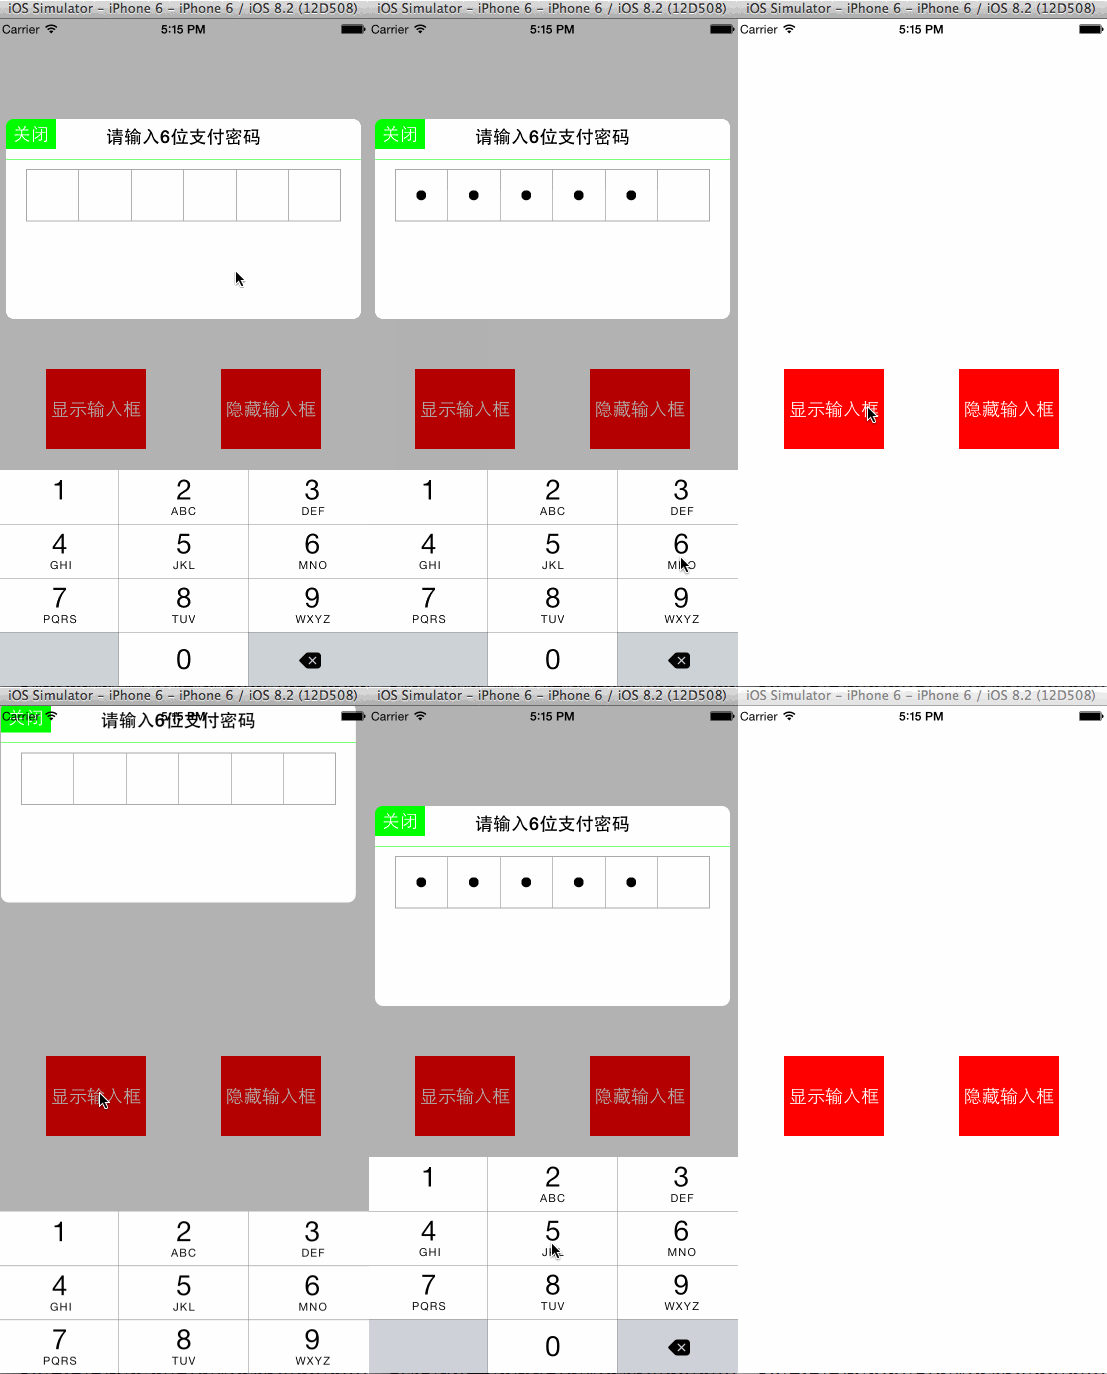
效果图 可根据设计图添加相关UI即可

Demo地址 https://files.cnblogs.com/files/sixindev/SafeInpuTextFiled.zip
简单实现支付密码输入框 By HL的更多相关文章
- Android 支付密码输入框,自定义EditText实现密码输入框功能;
刚撸出来的密码输入框,注释和逻辑看着挺清晰的,一些属性还没有添加,下个博客把属性添加上去: 看一下图: 直接看代码吧! import android.content.Context; import a ...
- springboot使用自定义注解和反射实现一个简单的支付
优点: 未使用if else,就算以后增加支付类型,也不用改动之前代码 只需要新写一个支付类,给添加自定义注解@Pay 首先: 定义自定义注解 Pay 定义 CMBPay ICBCPay 两种支付 根 ...
- (转载)Android支付宝支付封装代码
Android支付宝支付封装代码 投稿:lijiao 字体:[增加 减小] 类型:转载 时间:2015-12-22我要评论 这篇文章主要介绍了Android支付宝支付封装代码,Android支付的时候 ...
- Paypal 支付功能的 C# .NET / JS 实现
说明 最近用到了 Paypal 支付功能,英语一般般的我也不得不硬着头皮踩一踩这样的坑.经过近乎半个月的作,终于实现了简单的支付功能,那么首先就说说使用 Paypal 必定要知道的几点(当前日期 20 ...
- 微信小程序支付c#后台实现
今天为大家带来比较简单的支付后台处理 首先下载官方的c#模板(WxPayAPI),将模板(WxPayAPI)添加到服务器上,然后在WxPayAPI项目目录中添加两个“一般处理程序” (改名为GetOp ...
- 分享一个PC端六格密码输入框写法
如图.我们一般做商城类的项目不免会用到支付密码输入框,我研究了下并决定发上来,也当作是自己成长路上的一点小小的记录.本次介绍的是基于vue的项目 html: <template> < ...
- 信小程序支付(C#后台+前台)
今天为大家带来比较简单的支付后台处理 首先下载官方的c#模板(WxPayAPI),将模板(WxPayAPI)添加到服务器上,然后在WxPayAPI项目目录中添加两个“一般处理程序” (改名为GetOp ...
- php对微信支付回调处理的方法(合集)
支付完成后,微信会把相关支付结果和用户信息发送给商户,商户需要接收处理,并返回应答. 对后台通知交互时,如果微信收到商户的应答不是成功或超时,微信认为通知失败,微信会通过一定的策略定期重新发起通知,尽 ...
- ThinkPHP中实现微信支付(jsapi支付)流程
https://blog.csdn.net/sinat_35861727/article/details/72783988 之前写过一篇文章讲了 PHP实现微信支付(jsapi支付)流程 ,详见文章: ...
随机推荐
- Ranger-Yarn插件安装
Ranger-Yarn插件ranger-0.6.0-yarn-plugin安装到Yarn的所有ResourceManager节点, 其他的NodeManager节点不需要安装. 登陆hdfs安装的用户 ...
- 解决eclipse中Findbugs检查不生效的问题
eclipse安装了Findbugs插件, 但是在eclipse中发现不了bug错误, 具体表现为指定的类存在findbugs, 已经通过其他工具检查出来, 但是在eclipse中就是无法报告错误. ...
- vue将HTML字符串解析为HTML标签
如果返回的数据是html标签字符串的话,在vue里要通过v-html来渲染 <div v-html="rawHtml"></div> //v-html=&q ...
- 微信小程序css继承
在微信小程序里写的全局样式,pages里的组件是可以继承的,但是components里只能继承font和color属性.
- spring-data-jpa -hibernate --specificationExecutor
Specifications动态查询 在查询某个实体的时候,给定的条件是不固定的,这时就需要动态构建相应的查询语句,在Spring Data JPA中可以通过JpaSpecificationExecu ...
- SSRF漏洞用到的其他协议(dict协议,file协议)
0x00 引言 当SSRF打内网reids时,若gopher协议用不了,我们也可以用其他协议 0x01 dict协议一.定义:词典网络协议,在RFC 2009中进行描述.它的目标是超越Webster ...
- JVM调优2-远程监控
监控远程JVM VisualJVM不仅是可以监控本地jvm进程,还可以监控远程的jvm进程,需要借助于JMX技术实现. 什么是JMX JMX(Java Management Extensions,即J ...
- java下拉框转换公共方法
1. 下拉框实例类 import org.apache.commons.beanutils.PropertyUtils; import org.apache.commons.lang3.Boolean ...
- R语言服务器程序 Rserve详解
R语言服务器程序 Rserve详解 R的极客理想系列文章,涵盖了R的思想,使用,工具,创新等的一系列要点,以我个人的学习和体验去诠释R的强大. R语言作为统计学一门语言,一直在小众领域闪耀着光芒.直到 ...
- Android官方文档翻译 五 1.3Building a Simple User Interface
Building a Simple User Interface 创建一个简单的用户界面 This lesson teaches you to 这节课将教给你: Create a Linear Lay ...
