
分布式文件系统FastDFS在CentOS7上的安装及与Springboot的整合
1. 概述
FastDFS 是目前比较流行的分布式文件系统,可以很容易的实现横向扩展、动态扩容、灾备、高可用和负载均衡。
FastDFS 的服务分为 tracker 服务 和 storage 服务, tracker 服务负责管理,storage 服务负责存储。
FastDFS 的存储节点有分卷(分组)的概念,不同分卷的服务器数据不同,相当于分片,同一分卷中的服务器数据相同,相当于副本,从而实现负载均衡。
今天我们就来聊一聊FastDFS在CentOS7上是如何安装,以及如何与Springboot整合的。
2. 场景说明
服务器A IP:192.168.1.22
服务器B IP:192.168.1.8
在服务器A安装 FastDFS 的 tracker (管理)
在服务器B安装 FastDFS 的 storage(存储)
3. FastDFS在CentOS7上的安装
3.1 下载 FastDFS 安装包
下载地址:https://github.com/happyfish100/fastdfs/releases
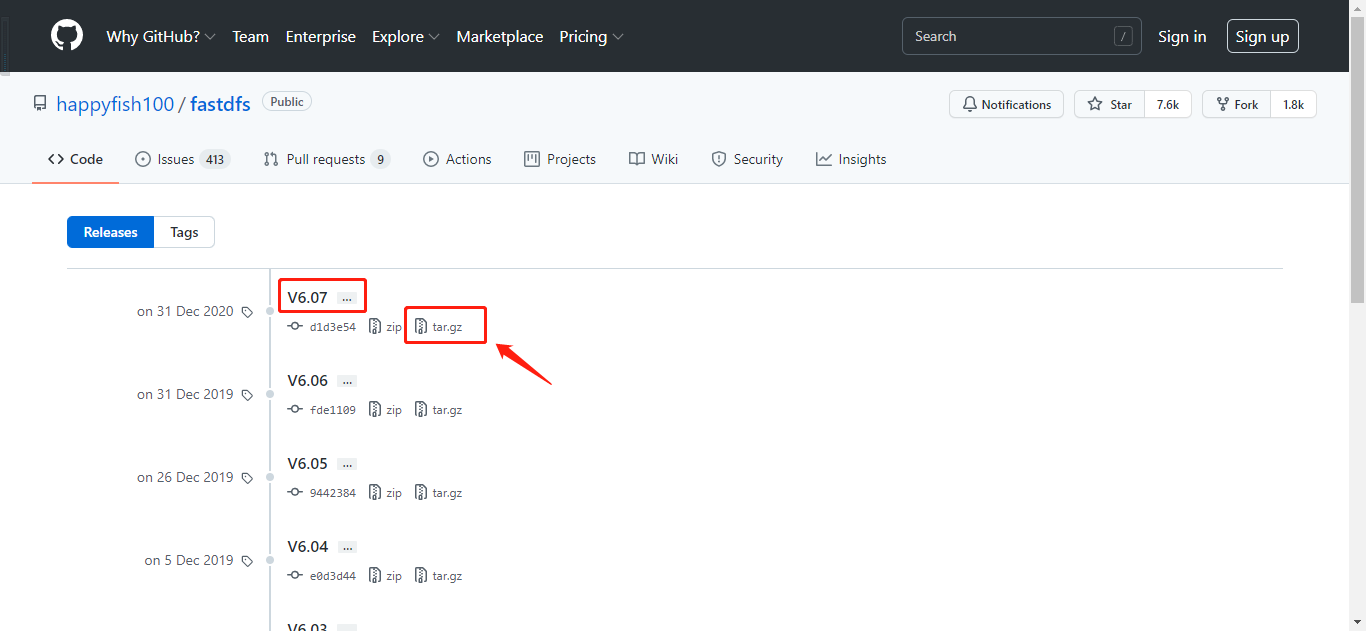
截图来自于GitHub
3.2 下载 libfastcommon 安装包
下载地址:https://github.com/happyfish100/libfastcommon/releases
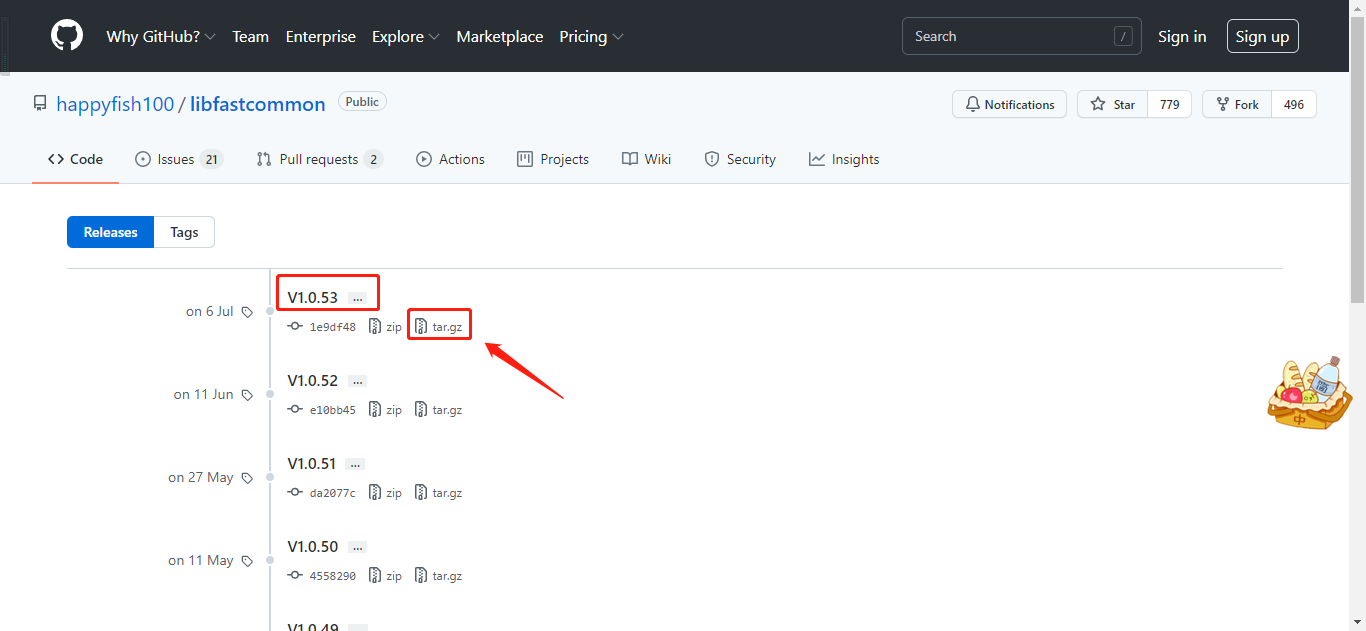
截图来自于GitHub
3.3 下载 fastdfs-nginx-module 安装包
下载地址:https://github.com/happyfish100/fastdfs-nginx-module/releases
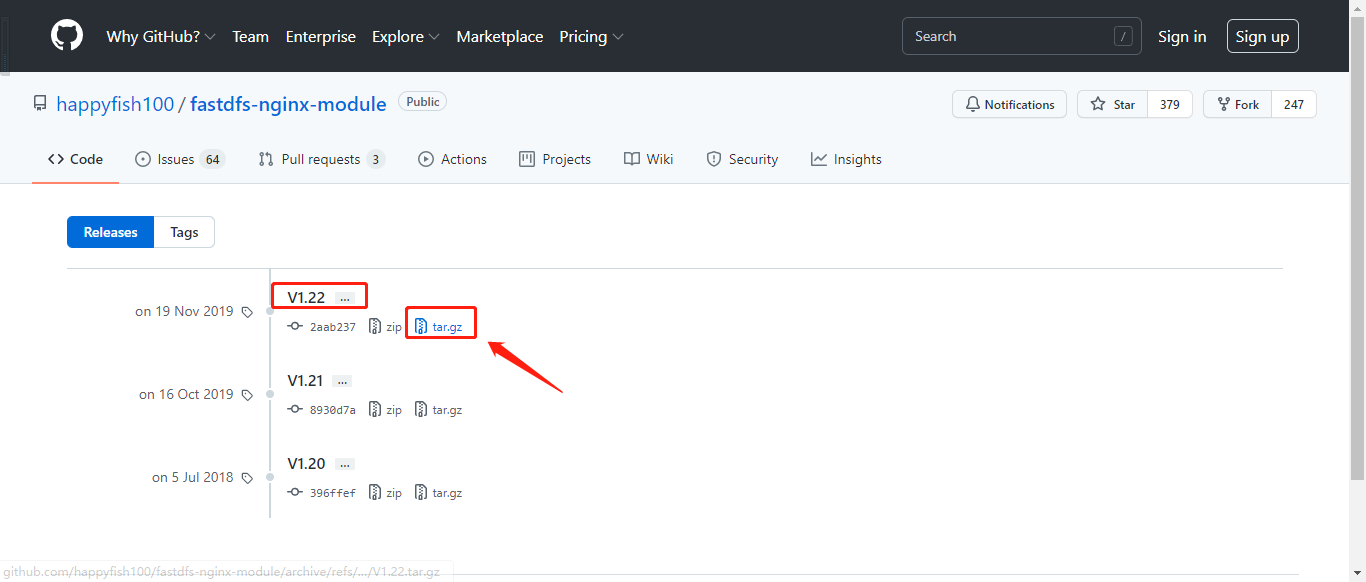
截图来自于GitHub
3.4 下载最新版本的Nginx安装包
下载地址:https://nginx.org/en/download.html
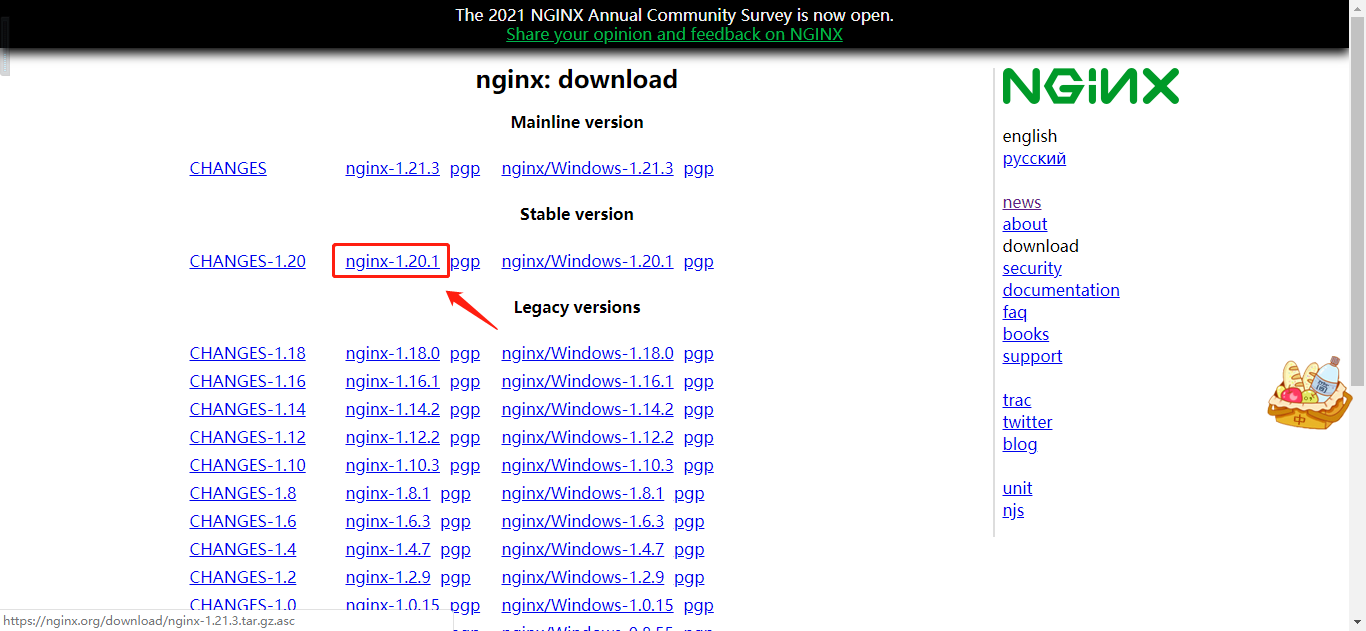
截图来自于官网
3.5 将下载的安装包统一拷贝到CentOS7的 /home 目录下
3.6 安装依赖包
# yum install -y gcc gcc-c++
# yum install -y libevent
# yum install -y perl
3.7 安装 libfastcommon
1)解压缩
# cd /home
# tar -zvxf libfastcommon-1.0.53.tar.gz
2)执行编译
# cd libfastcommon-1.0.53
# ./make.sh
3)执行安装
# ./make.sh install
3.8 安装 FastDFS
1)解压缩
# cd /home
# tar -zxvf fastdfs-6.07.tar.gz
2)执行编译
# cd fastdfs-6.07
# ./make.sh
3)执行安装
# ./make.sh install
3.9 拷贝配置文件模板
# cd /home/fastdfs-6.07/conf
# cp * /etc/fdfs/
3.10 3.5 到 3.9 的操作,服务器A、服务器B都要执行
3.11 在服务器A配置 tracker 服务
1)配置 tracker 服务
# cd /etc/fdfs/
# vi tracker.conf

2)创建工作目录
# mkdir -p /usr/local/fastdfs/tracker
3)启动 tracker 服务
# /usr/bin/fdfs_trackerd /etc/fdfs/tracker.conf
3.12 在服务器B配置 storage 服务
1)配置 storage 服务
# cd /etc/fdfs/
# vi storage.conf
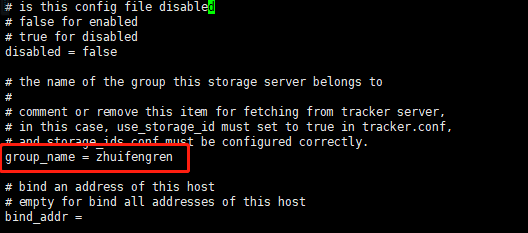

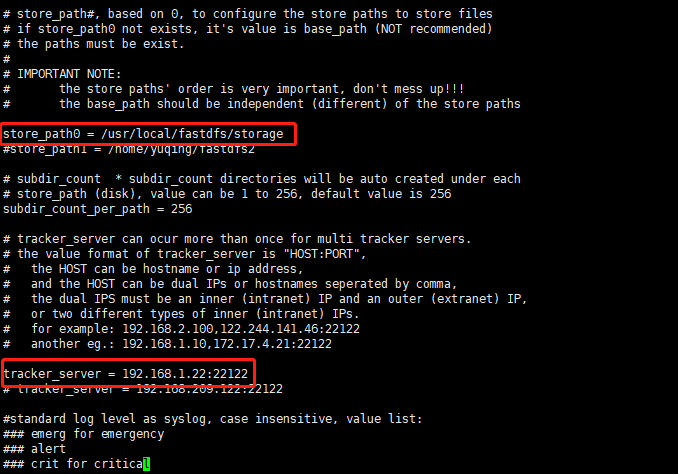
2)创建工作目录
# mkdir -p /usr/local/fastdfs/storage
3)启动 storage 服务
# /usr/bin/fdfs_storaged /etc/fdfs/storage.conf
3.13 命令行测试文件上传
1)修改 client 配置文件
# cd /etc/fdfs
# vi client.conf
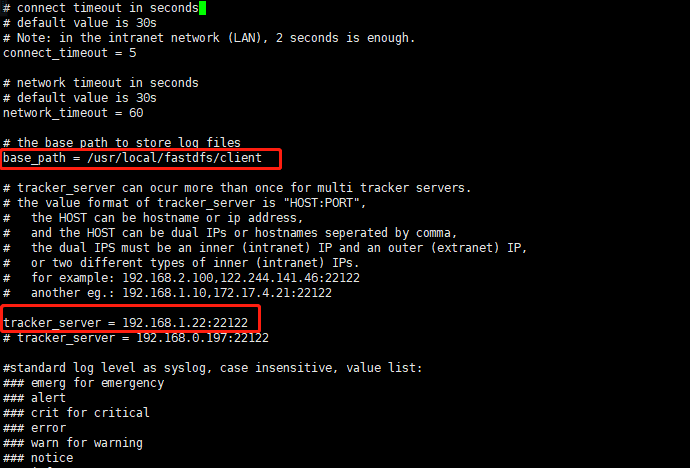
2)创建目录
# mkdir -p /usr/local/fastdfs/client
3)测试文件上传
# /usr/bin/fdfs_test /etc/fdfs/client.conf upload 1.png
结果主要内容:
group_name=zhuifengren, remote_filename=M00/00/00/wKgBCGFOzh6AB7GRAABdyNYCZvQ876.png

source ip address: 192.168.1.8

file timestamp=2021-09-25 15:22:06

file size=24008

file crc32=3590481652

example file url: http://192.168.1.8/zhuifengren/M00/00/00/wKgBCGFOzh6AB7GRAABdyNYCZvQ876.png
4)在 storage 工作目录查看文件
# cd /usr/local/fastdfs/storage/data/00/00
# ll
-rw-r--r--. 1 root root 24008 Sep 25 15:22 wKgBCGFOzh6AB7GRAABdyNYCZvQ876_big.png

-rw-r--r--. 1 root root    49 Sep 25 15:22 wKgBCGFOzh6AB7GRAABdyNYCZvQ876_big.png-m

-rw-r--r--. 1 root root 24008 Sep 25 15:22 wKgBCGFOzh6AB7GRAABdyNYCZvQ876.png

-rw-r--r--. 1 root root    49 Sep 25 15:22 wKgBCGFOzh6AB7GRAABdyNYCZvQ876.png-m
3.14 安装并配置Nginx
Nginx 必须和 storage 安装在同一个节点上,才能通过Http的方式访问图片。
1)解压 fastdfs-nginx-module
# cd /home
# tar -zxvf fastdfs-nginx-module-1.22.tar.gz
2)修改 config 配置文件
# cd /home/fastdfs-nginx-module-1.22/src
# vi config
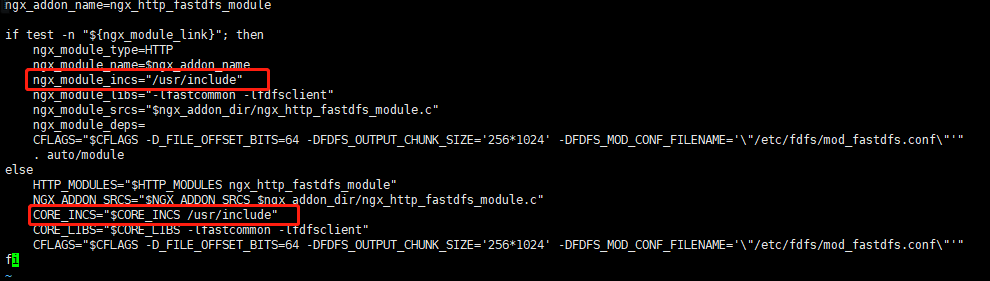
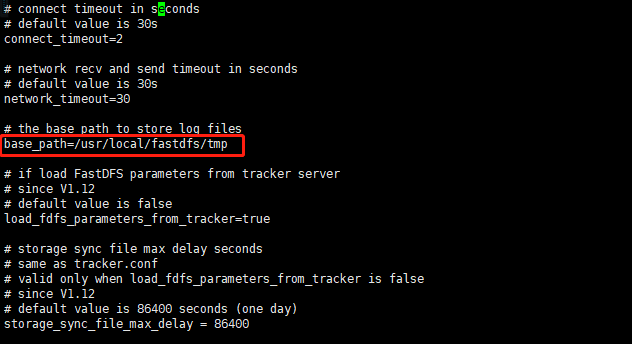
3)修改 mod_fastdfs.conf 配置文件
# cd /home/fastdfs-nginx-module-1.22/src
# cp mod_fastdfs.conf /etc/fdfs/
# mkdir -p /usr/local/fastdfs/tmp
# cd /etc/fdfs/
# vi mod_fastdfs.conf


4)安装Nginx 的依赖包
# yum install -y gcc-c++
# yum install -y pcre pcre-devel
# yum install -y zlib zlib-devel
# yum install -y openssl openssl-devel
5)解压Nginx
# cd /home
# tar -zxvf nginx-1.20.1.tar.gz
6)安装Nginx
# cd nginx-1.20.1
# ./configure \
--prefix=/usr/local/nginx \
--pid-path=/var/local/nginx/nginx.pid \
--lock-path=/var/local/nginx/nginx.lock \
--error-log-path=/var/local/nginx/error.log \
--http-log-path=/var/local/nginx/access.log \
--with-http_gzip_static_module \
--http-client-body-temp-path=/var/local/nginx/client \
--http-proxy-temp-path=/var/local/nginx/proxy \
--http-fastcgi-temp-path=/var/local/nginx/fastcgi \
--http-uwsgi-temp-path=/var/local/nginx/uwsgi \
--http-scgi-temp-path=/var/local/nginx/scgi \
--add-module=/home/fastdfs-nginx-module-1.22/src
# make
# make install
7)修改Nginx配置文件
# cd /usr/local/nginx/conf
# vi nginx.conf
server {

        listen          8888;     # 该端口为storage.conf中的http.server_port相同

        server_name     localhost;

        location        /zhuifengren/M00 {

                ngx_fastdfs_module;

        }

    }
8)启动 Nginx
# cd /usr/local/nginx/sbin
# ./nginx
9)打开之前上传的图片
http://192.168.1.8:8888/zhuifengren/M00/00/00/wKgBCGFOzh6AB7GRAABdyNYCZvQ876.png

可以正常打开 :)
4. 与 Springboot 整合
4.1 引入依赖
        <dependency>

            <groupId>com.github.tobato</groupId>

            <artifactId>fastdfs-client</artifactId>

            <version>1.27.2</version>

        </dependency>
4.2 配置Springboot
打开 application.yml
fdfs:

  connect-timeout: 300  # 连接超时时间

  so-timeout: 300       # 读取超时时间

  tracker-list: 192.168.1.22:22122

  pool:

    max-total: 100   # 连接池最大数量

    max-total-per-key: 50  # 单个tracker最大连接数

    max-wait-millis: 5000 # 连接耗尽最大等待时间 毫秒
4.3 文件上传
    @Autowired

    private FastFileStorageClient fastFileStorageClient;

    @Test

    public void upload() throws FileNotFoundException {

        File file = new File("C:\\tmp\\2.jpg");

        FileInputStream fileInputStream = new FileInputStream(file);

        StorePath storePath = fastFileStorageClient.uploadFile

                        (fileInputStream, file.length(), "jpg", null);

        System.out.println(JsonUtils.objectToJson(storePath));

    }
结果:
{

    "group": "zhuifengren",

    "path": "M00/00/00/wKgBCGFO7cqAPEqpAAIhUeJJR1c839.jpg",

    "fullPath": "zhuifengren/M00/00/00/wKgBCGFO7cqAPEqpAAIhUeJJR1c839.jpg"

}
5. 综述
今天聊了一下 分布式文件系统FastDFS在CentOS7上的安装及与Springboot的整合,希望可以对大家的工作有所帮助。
欢迎帮忙点赞、评论、转发、加关注 :)
关注追风人聊Java,每天更新Java干货。
分布式文件系统FastDFS在CentOS7上的安装及与Springboot的整合的更多相关文章
- 分布式文件系统 - FastDFS 在 CentOS 下配置安装部署
少啰嗦,直接装 看过上一篇分布式文件系统 - FastDFS 简单了解一下的朋友应该知道,本次安装是使用目前余庆老师开源的最新 V5.05 版本,是余庆老师放在 Github 上的,和目前你能在网络上 ...
- 转载:分布式文件系统 - FastDFS 在 CentOS 下配置安装部署(2)
原文:http://blog.mayongfa.cn/193.html 一.安装 Nginx 和 fastdfs-nginx-module 安装 Nginx 请看:从零开始学 Java - CentO ...
- 转载:分布式文件系统 - FastDFS 在 CentOS 下配置安装部署(1)
原文:http://blog.mayongfa.cn/192.html 一.安装 libfastcommon 和 FastDFS 1.下载安装 libfastcommon ,这里是通过wget下载(我 ...
- 【架构设计】分布式文件系统 FastDFS的原理和安装使用
本文地址 分享提纲: 1.概述 2. 原理 3. 安装 4. 使用 5. 参考文档 1. 概述 1.1)[常见文件系统] Google了一下,流行的开源分布式文件系统有很多,介绍如下: -- mo ...
- 分布式文件系统 - FastDFS 配置 Nginx 模块及上传测试
也不说废话,直接干 上一篇 分布式文件系统 - FastDFS 在 CentOS 下配置安装部署 中安装了 FastDFS 后,并配置启动了 Tracker 和 Storage 服务,已经可以上传文件 ...
- 分布式文件系统 - FastDFS 简单了解一下
别问我在哪里 也许我早已不是我自己,别问我在哪里,我一直在这里. 突然不知道说些什么了... 初识 FastDFS 记得那是我刚毕业后进入的第一家公司,一个技术小白进入到当时的项目组后,在开发中上传用 ...
- 分布式文件系统 - FastDFS
分布式文件系统 - FastDFS 别问我在哪里 也许我早已不是我自己,别问我在哪里,我一直在这里. 突然不知道说些什么了... 初识 FastDFS 记得那是我刚毕业后进入的第一家公司,一个技术小白 ...
- 记录:CentOS 7 安装配置分布式文件系统 FastDFS 5.1.1
CentOS 7 安装配置分布式文件系统 FastDFS 5.1.1 软件下载:http://download.csdn.net/download/qingchunwuxian1993/9897458 ...
- 分布式文件系统 FastDFS 5.0.8 & Linux CentOS 6.7 安装配置
原文:http://blog.csdn.net/wlwlwlwl015/article/details/52619851 前言 项目中用到文件服务器,有朋友推荐用fastdfs,所以就了解学习了一番, ...
随机推荐
- 轻松上手SpringBoot+SpringSecurity+JWT实RESTfulAPI权限控制实战
前言 我们知道在项目开发中,后台开发权限认证是非常重要的,springboot 中常用熟悉的权限认证框架有,shiro,还有就是springboot 全家桶的 security当然他们各有各的好处,但 ...
- Blind SQL injection:盲注详解
什么是盲注? 当应用程序易受SQL注入攻击,但其HTTP响应不包含相关SQL查询的结果或任何数据库错误的详细信息时,就会出现盲SQL注入. 对于盲目SQL注入漏洞,许多技术(如联合攻击)都是无效的,因 ...
- STM32—PID控制在直流电机中的应用
文章目录 一.PID控制算法 1.什么是PID 2.PID系数的理解 Ⅰ.比例(P)部分 Ⅱ.积分(I)部分 Ⅲ.微分(D)部分 3.PID的数字化处理 二.位置闭环控制 三.速度闭环控制 一.PID ...
- 对象池在 .NET (Core)中的应用[1]: 编程体验
借助于有效的自动化垃圾回收机制,.NET让开发人员不在关心对象的生命周期,但实际上很多性能问题都来源于GC.并不说.NET的GC有什么问题,而是对象生命周期的跟踪和管理本身是需要成本的,不论交给应用还 ...
- 安全|常见的Web攻击手段之CSRF攻击
对于常规的Web攻击手段,如XSS.CRSF.SQL注入.(常规的不包括文件上传漏洞.DDoS攻击)等,防范措施相对来说比较容易,对症下药即可,比如XSS的防范需要转义掉输入的尖括号,防止CRSF攻击 ...
- 数据结构解析-HashMap
概要 HashMap在JDK1.8之前的实现方式 数组+链表,但是在JDK1.8后对HashMap进行了底层优化,改为了由 数组+链表+红黑树实现,主要的目的是提高查找效率. 如图所示: JDK版本 ...
- WPF---依赖属性(二)
一.概要 我们将会通过一个简单的综合例子来阐述下依赖属性的变化. 场景:我们在一个文本框中输入一个数字,然后对应的panel中会出现对应的椭圆,椭圆的个数与输入的文本相同. 我们在MainWindow ...
- 【linux】vim常用命令
转自:https://www.runoob.com/linux/linux-vim.html vi/vim 的使用 基本上 vi/vim 共分为三种模式,分别是命令模式(Command mode),输 ...
- Commons-Collections(一)之list
Bag Bag继承自Collection接口,定义了一个集合,该集合会记录对象在集合中出现的次数. 假设你有一个包,包含{a, a, b, c}.调用getCount(a)方法将返回2,调用uniqu ...
- web.xml中自定义Listener
Listener可以监听容器中某一执行动作,并根据其要求做出相应的响应. 常用的Web事件的监听接口如下: ServletContextListener:用于监听Web的启动及关闭 ServletCo ...