springcloud Eureka Finchley.RELEASE 版本
创建一个父项目cloud-demo
pom.xml
<?xml version="1.0" encoding="UTF-8"?>

<project xmlns="http://maven.apache.org/POM/4.0.0" xmlns:xsi="http://www.w3.org/2001/XMLSchema-instance"

         xsi:schemaLocation="http://maven.apache.org/POM/4.0.0 http://maven.apache.org/xsd/maven-4.0.0.xsd">

    <modelVersion>4.0.0</modelVersion>

    <groupId>com.example</groupId>

    <artifactId>cloud-demo</artifactId>

    <version>0.0.1-SNAPSHOT</version>

    <packaging>jar</packaging>

    <name>cloud-demo</name>

    <description>Demo project for Spring Boot</description>

    <parent>

        <groupId>org.springframework.boot</groupId>

        <artifactId>spring-boot-starter-parent</artifactId>

        <version>2.0.3.RELEASE</version>

        <relativePath/> <!-- lookup parent from repository -->

    </parent>

    <modules>

        <module>eureka-server</module>

        <module>eureka-client</module>

    </modules>

    <properties>

        <project.build.sourceEncoding>UTF-8</project.build.sourceEncoding>

        <project.reporting.outputEncoding>UTF-8</project.reporting.outputEncoding>

        <java.version>1.8</java.version>

        <spring-cloud.version>Finchley.RELEASE</spring-cloud.version>

    </properties>

    <dependencies>

        <dependency>

            <groupId>org.springframework.boot</groupId>

            <artifactId>spring-boot-starter-test</artifactId>

            <scope>test</scope>

        </dependency>

    </dependencies>

    <dependencyManagement>

        <dependencies>

            <dependency>

                <groupId>org.springframework.cloud</groupId>

                <artifactId>spring-cloud-dependencies</artifactId>

                <version>${spring-cloud.version}</version>

                <type>pom</type>

                <scope>import</scope>

            </dependency>

        </dependencies>

    </dependencyManagement>

    <build>

        <plugins>

            <plugin>

                <groupId>org.springframework.boot</groupId>

                <artifactId>spring-boot-maven-plugin</artifactId>

            </plugin>

        </plugins>

    </build>

</project>
可以直接把src下的都删除,用不到。然后创建2个model,分别为eureka-server,eureka-client,
eureka-server 的pom.xml 如下
<?xml version="1.0" encoding="UTF-8"?>

<project xmlns="http://maven.apache.org/POM/4.0.0" xmlns:xsi="http://www.w3.org/2001/XMLSchema-instance"

         xsi:schemaLocation="http://maven.apache.org/POM/4.0.0 http://maven.apache.org/xsd/maven-4.0.0.xsd">

    <modelVersion>4.0.0</modelVersion>

    <groupId>com.example</groupId>

    <artifactId>eureka-server</artifactId>

    <version>0.0.1-SNAPSHOT</version>

    <packaging>jar</packaging>

    <name>eureka-server</name>

    <description>Demo project for Spring Boot</description>

    <parent>

        <groupId>com.example</groupId>

        <artifactId>cloud-demo</artifactId>

        <version>0.0.1-SNAPSHOT</version>

    </parent>

    <dependencies>

        <dependency>

            <groupId>org.springframework.cloud</groupId>

            <artifactId>spring-cloud-starter-netflix-eureka-server</artifactId>

        </dependency>

    </dependencies>

    <build>

        <plugins>

            <plugin>

                <groupId>org.springframework.boot</groupId>

                <artifactId>spring-boot-maven-plugin</artifactId>

            </plugin>

        </plugins>

    </build>

</project>
eureka-server 启动类 EurekaServerApplication
package com.example.eurekaserver;

import org.springframework.boot.SpringApplication;

import org.springframework.boot.autoconfigure.SpringBootApplication;

import org.springframework.cloud.netflix.eureka.server.EnableEurekaServer;

@SpringBootApplication

@EnableEurekaServer // 启动一个服务注册中心提供给其他应用进行对话

public class EurekaServerApplication {

    public static void main(String[] args) {

        SpringApplication.run(EurekaServerApplication.class, args);

    }

}
application.yml
server:

  port: 8761

eureka:

  instance:

    hostname: localhost

  client:

    registerWithEureka: false

    fetchRegistry: false

    serviceUrl:

      defaultZone: http://${eureka.instance.hostname}:${server.port}/eureka/

spring:

  application:

    name: eurka-server
一个简单的server就完成了。
eureka-client pom.xml
<?xml version="1.0" encoding="UTF-8"?>

<project xmlns="http://maven.apache.org/POM/4.0.0" xmlns:xsi="http://www.w3.org/2001/XMLSchema-instance"

         xsi:schemaLocation="http://maven.apache.org/POM/4.0.0 http://maven.apache.org/xsd/maven-4.0.0.xsd">

    <modelVersion>4.0.0</modelVersion>

    <groupId>com.example</groupId>

    <artifactId>eureka-client</artifactId>

    <version>0.0.1-SNAPSHOT</version>

    <packaging>jar</packaging>

    <name>eureka-client</name>

    <description>Demo project for Spring Boot</description>

    <parent>

        <groupId>com.example</groupId>

        <artifactId>cloud-demo</artifactId>

        <version>0.0.1-SNAPSHOT</version>

    </parent>

    <dependencies>

        <dependency>

            <groupId>org.springframework.boot</groupId>

            <artifactId>spring-boot-starter-web</artifactId>

        </dependency>

        <dependency>

            <groupId>org.springframework.cloud</groupId>

            <artifactId>spring-cloud-starter-netflix-eureka-client</artifactId>

        </dependency>

        <!-- actuator监控信息完善 -->

        <dependency>

            <groupId>org.springframework.boot</groupId>

            <artifactId>spring-boot-starter-actuator</artifactId>

        </dependency>

    </dependencies>

    <build>

        <plugins>

            <plugin>

                <groupId>org.springframework.boot</groupId>

                <artifactId>spring-boot-maven-plugin</artifactId>

            </plugin>

        </plugins>

    </build>

</project>
client 启动类 EurekaClientApplication
package com.example.eurekaclient;

import org.springframework.beans.factory.annotation.Value;

import org.springframework.boot.SpringApplication;

import org.springframework.boot.autoconfigure.SpringBootApplication;

import org.springframework.cloud.netflix.eureka.EnableEurekaClient;

import org.springframework.web.bind.annotation.RequestMapping;

import org.springframework.web.bind.annotation.RequestParam;

import org.springframework.web.bind.annotation.RestController;

@SpringBootApplication

@EnableEurekaClient

@RestController

public class EurekaClientApplication {

    public static void main(String[] args) {

        SpringApplication.run(EurekaClientApplication.class, args);

    }

    @Value("${server.port}")

    String port;

    @RequestMapping("/hi")

    public String home(@RequestParam(value = "name", defaultValue = "forezp") String name) {

        return "hi " + name + " ,i am from port:" + port;

    }

}
application.yml
server:

  port: 8762

spring:

  application:

    name: service-hi

eureka:

  client:

    serviceUrl:

      defaultZone: http://localhost:8761/eureka/

  instance:

    instance-id: service-hi

    prefer-ip-address: true

info:

  app.name: eureka-client

  company.name: www.zhaowb.com

  build.artifactId: eureka-client

  build.version: 0.0.1-SNAPSHOT
然后启动结果: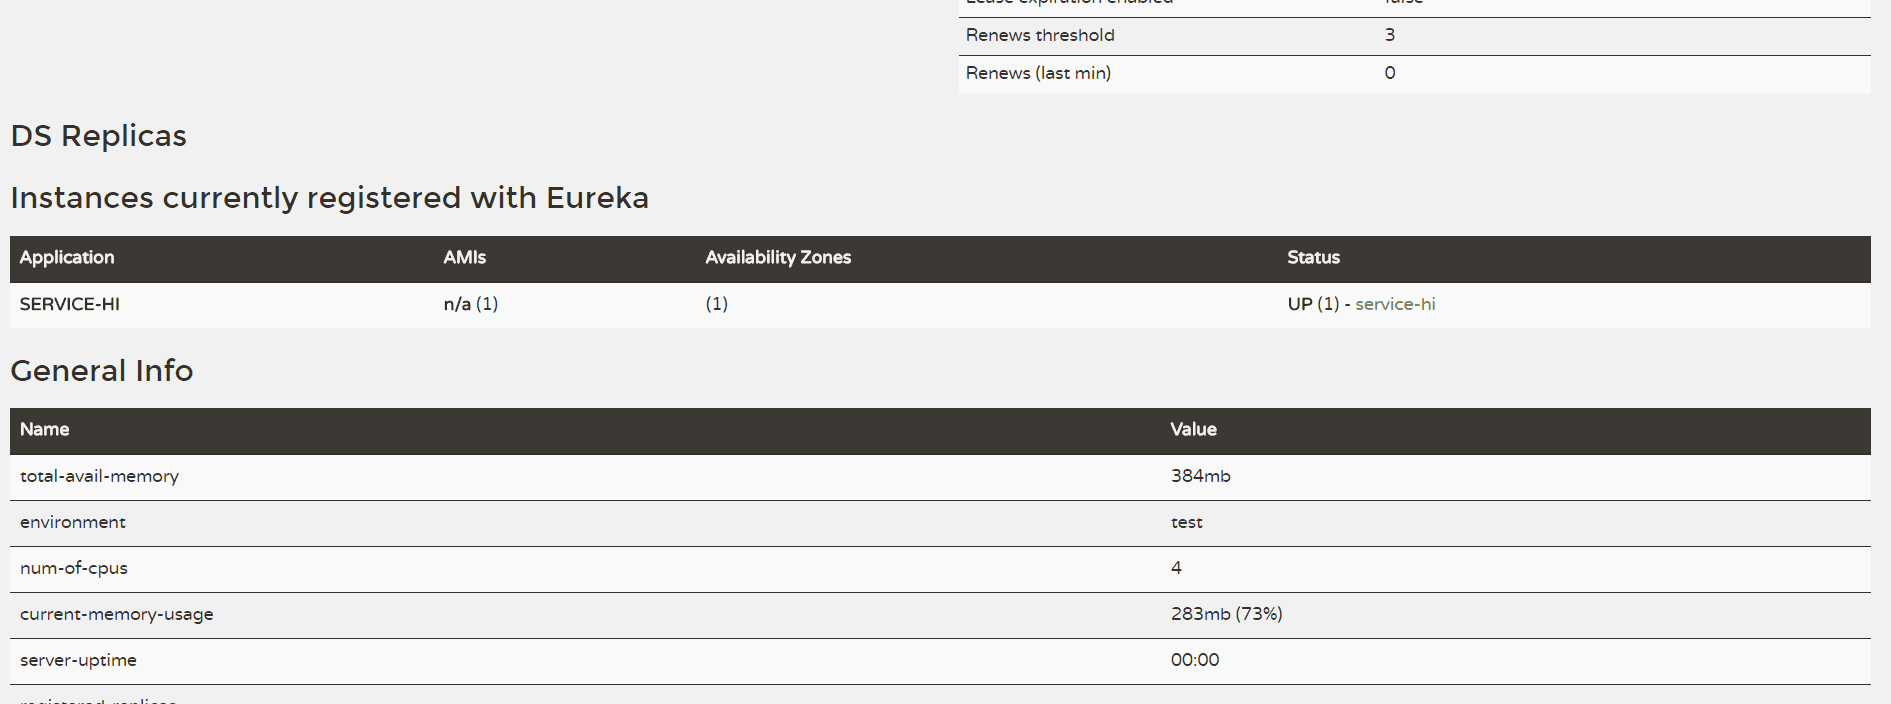
instance:

  instance-id: service-hi

  prefer-ip-address: true


当将鼠标放在service-hi 在左下角会显示IP信息
info:

  app.name: eureka-client

  company.name: www.zhaowb.com

  build.artifactId: eureka-client

  build.version: 0.0.1-SNAPSHOT
编辑client 的信息,当点击service-hi
这是添加上之后的结果
<!-- actuator监控信息完善 -->

<dependency>

    <groupId>org.springframework.boot</groupId>

    <artifactId>spring-boot-starter-actuator</artifactId>

</dependency>
这个jar包之后的结果,如果不加的话,会出现这个错误
为了不让出错,和显示一些信息,就添加上了jar 和一些配置信息。
源码地址 https://github.com/zhaowenbo1234/cloud-demo
springcloud Eureka Finchley.RELEASE 版本的更多相关文章
- SpringCloud 教程 | 第一篇: 服务的注册与发现Eureka(Finchley版本)
一.spring cloud简介 鉴于<史上最简单的Spring Cloud教程>很受读者欢迎,再次我特意升级了一下版本,目前支持的版本为Spring Boot版本2.0.3.RELEAS ...
- 史上最简单的 SpringCloud 教程 | 第一篇: 服务的注册与发现Eureka(Finchley版本)
转载请标明出处: 原文首发于:https://www.fangzhipeng.com/springcloud/2018/08/30/sc-f1-eureka/ 本文出自方志朋的博客 一.spring ...
- 第一篇:服务的注册与发现Eureka(Finchley版本)
一.创建服务注册中心(Eureka) 1. 首先创建一个maven主工程 创建一个主Maven工程,在其pom文件引入依赖,spring Boot版本为2.0.3.RELEASE,Spring Clo ...
- SpringCloud教程第1篇:Eureka(F版本)
一.创建服务注册中心(Eureka组件) 1.1 首先创建一个maven主工程. 1.创建maven项目 是一个主Maven工程,spring Boot版本为2.0.3.RELEASE,Spring ...
- SpringCloud(Finchley版本)中Zull过滤器ResponseBoby返回中文乱码解决方案
Spring Cloud带有"Cloud"的字样,但它并不是云计算解决方案,而是在Spring Boot基础上构建的,用于快速构建分布式系统的通用模式的工具集.使用Spring C ...
- SpringCloud学习(一)服务的注册与发现Eureka(Finchley版本)
创建服务注册中心 在这里,我还是采用Eureka作为服务注册与发现的组件. 首先创建一个空项目 首先创建一个空项目,再创建一个maven项目,首先创建一个主Maven工程,在其pom文件引入依赖,sp ...
- springcloud ribbon Finchley 版本,自定义算法
引用上一个项目,在原有的基础上进行更改,添加springcloud的内荣. eureka-server 和上一个springcloud eureka的一样,没有改动. 添加cloud-api pack ...
- SpringCloud Eureka 报错 无法启动问题
1.SpringCloud Eureka 报错 无法启动基本上都是spring boot的版本与spring cloud的版本不匹配导致的. <dependencyManagement> ...
- 微服务之SpringCloud实战(二):SpringCloud Eureka服务治理
服务治理 SpringCloud Eureka是SpringCloud Netflix微服务套件的一部分,它基于Netflix Eureka做了二次封装,主要完成微服务的服务治理功能,SpringCl ...
随机推荐
- 01二维背包——poj2576
/* 要求把a数组分成两个集合,两个集合人数最多差1,并且元素之和的差尽可能小 那只要把所有可行的列出来即可 01二维背包,即体积是个二维数据,那么我们的背包状态也应该设为二维 dp[j][k]设为 ...
- GdiPlus 一个给 Delphi 提供的新的 GDI+ 接口很好用!
尽管 GDI+ 已经有近 10 年的历史(随 Win2000 推出), 尽管 DirectX 如日中天, 但在 Windows 7 之前的版本下进行 2D 绘图还是离不开它, 微软也没有停止对它的升级 ...
- 一句话下载总结(用于后渗透上传payload)
利用ftp来下载payload文件 echo open 192.168.1.1 21> ftp.txt echo ftp>> ftp.txt echo bin >> ft ...
- NX二次开发-NXOpen读取工程图注释note1->GetText();
NX9+VS2012 #include <uf.h> #include <uf_drf.h> #include <NXOpen/Annotations_Note.hxx& ...
- iOS 点击Application icon加载推送通知Data
今天做APNS远程推送通知遇到了一个问题,就是手机接收到通知的时候,如果马上点击通知的 alert view时候,系统马上唤醒你的Application,通知或调用你的didReceiveLocalN ...
- hdu多校第五场1006 (hdu6629) string matching Ex-KMP
题意: 给你一个暴力匹配字符串公共前缀后缀的程序,为你对于某个字符串,暴力匹配的次数是多少. 题解: 使用扩展kmp构造extend数组,在扩展kmp中,设原串S和模式串T. extend[i]表示T ...
- idea中选中了一个变量名,会高亮显示位于别的地方的这个变量名,那么怎么修改其他地方的高亮颜色
- express 创建项目
express 创建项目: 1.熟悉express命令 2.创建模板 3.安装组件
- python 13 字符编码
转自 http://www.cnblogs.com/BeginMan/p/3166363.html 一.字符编码中ASCII.Unicode和UTF-8的区别 点击阅读:http://www.cnbl ...
- 2- SQL语句的强化
查询类型cate_name为 '超极本' 的商品名称.价格 select name,price from goods where cate_name = '超级本'; 显示商品的种类 select c ...