
Airtest 网易 UI 自动化工具 Airtest 浅用记录
一 使用目的
该工具主要是面向游戏UI测试基于图像识别,如游戏框架unity,Cocos-js以及网易内部的游戏框架
同时也支持原生Android App 的基于元素识别的UI自动化测试.
本文主要使用目的是做安卓原生App的元素UI自动化.
二 资源索引
官方资源
网易游戏新开源的 UI 自动化测试项目 [Airtest Project]
Airtest官网
Airtest官网上手教程
AirtestProject Github主页
AirtestIDE官方中文文档
Airtest 官方中文文档
PocoUI自动化框架官方中文文档
Android App UI自动化相关API
airtest.core.api module
poco.drivers.android.uiautomation module
三 环境准备
Python3 开发环境部署
如果只想用AirtestIDE这款前端集大成的开发IDE工具通过,前端点点点生成或录制方式生成脚本的话,你完全可以开箱即用,完全不用搞以下Python开发环境.
如果想自己利用底层API扩展高级脚本框架,为了更便利的直接使用airtest 或 poco 的API,建议还是提前部署好Python3开发环境.
Python3.6.4
这里提供了许多种格式的安装包,如windows下常见的.exe格式.这种安装方便,大多数的选择.
找到你系统对应的安装包,我是win10 64位操作系统 选择的是python-3.6.4-amd64.exe
安装到我本地的D:盘D:\Python36\ 下
配置环境变量(请注意根据跟人习惯统一添加到用户变量还是系统变量,我个人一般全部添加到系统变量),追加到Path末尾,D:\Python36\;D:\Python36\Scripts\
笔者当前win10,是Python2和Python3共存的,如有需要具体部署请参考
Win10下python3和python2同时安装并解决pip共存问题
附上最终的一些版本检查与pip2 pip3部署检查命令
#Python2 检查
C:\Users\cmd>python2
Python 2.7.14 (v2.7.14:84471935ed, Sep 16 2017, 20:25:58) [MSC v.1500 64 bit (AMD64)] on win32
Type "help", "copyright", "credits" or "license" for more information.
>>> exit()
#Python3检查
C:\Users\cmd>python3
Python 3.6.4 (v3.6.4:d48eceb, Dec 19 2017, 06:54:40) [MSC v.1900 64 bit (AMD64)] on win32
Type "help", "copyright", "credits" or "license" for more information.
>>> exit()
#pip3部署
C:\Users\cmd>python3 -m pip install --upgrade pip --force-reinstall
Collecting pip
  Downloading pip-9.0.2-py2.py3-none-any.whl (1.4MB)
    100% |████████████████████████████████| 1.4MB 746kB/s
Installing collected packages: pip
  Found existing installation: pip 9.0.1
    Uninstalling pip-9.0.1:
      Successfully uninstalled pip-9.0.1
Successfully installed pip-9.0.2
#pip2部署
C:\Users\cmd>python2 -m pip install --upgrade pip --force-reinstall
Collecting pip
  Using cached pip-9.0.2-py2.py3-none-any.whl
Installing collected packages: pip
  Found existing installation: pip 9.0.1
    Uninstalling pip-9.0.1:
      Successfully uninstalled pip-9.0.1
Successfully installed pip-9.0.2
#检查pip2
C:\Users\cmd>pip2 -V
pip 9.0.2 from d:\python27\lib\site-packages (python 2.7)
#检查pip3
C:\Users\cmd>pip3 -V
pip 9.0.2 from d:\python36\lib\site-packages (python 3.6)
#检查pip2 python2已安装库
C:\Users\cmd>pip2 list
DEPRECATION: The default format will switch to columns in the future. You can use --format=(legacy|columns) (or define a format=(legacy|columns) in your pip.conf under the [list] section) to disable this warning.
pip (9.0.2)
setuptools (28.8.0)
#检查pip3 python3已安装库
C:\Users\cmd>pip3 list
DEPRECATION: The default format will switch to columns in the future. You can use --format=(legacy|columns) (or define a format=(legacy|columns) in your pip.conf under the [list] section) to disable this warning.
pip (9.0.2)
setuptools (28.8.0)
#检查哪些python3库需要升级
C:\Users\cmd>pip3 list -o
DEPRECATION: The default format will switch to columns in the future. You can use --format=(legacy|columns) (or define a format=(legacy|columns) in your pip.conf under the [list] section) to disable this warning.
setuptools (28.8.0) - Latest: 39.0.1 [wheel]
# 升级该库
C:\Users\cmd>pip3 install --upgrade setuptools
Collecting setuptools
Downloading setuptools-39.0.1-py2.py3-none-any.whl (569kB)
100% |████████████████████████████████| 573kB 815kB/s
Installing collected packages: setuptools
Found existing installation: setuptools 28.8.0
Uninstalling setuptools-28.8.0:
Successfully uninstalled setuptools-28.8.0
Successfully installed setuptools-39.0.1
虚拟Python virtualenv环境部署
为什么要用virtualenv 虚拟环境,因为当你鼓捣Python开源项目多了的时候,比如自动化方向的selenium, Appium-Python-Client, ATX的uiautomator2的时候,如果放在一个Python环境下,用Pycharm找引用ctrl+B的时候,相似api方法名就会跳出多个,你就会不知道到底是引用的哪一个库下的,独立分开各个UI自动化Python虚拟环境的话,查起来就方便减少了迷惑.
#安装virtualenv
C:\Users\cmd>pip3 install virtualenv
Collecting virtualenv
  Using cached virtualenv-15.1.0-py2.py3-none-any.whl
Installing collected packages: virtualenv
Successfully installed virtualenv-15.1.0
#激活使用该virtualenv
C:\Users\cmd\venv\Scripts>activate.bat
#见到以下输出即成功
(venv) C:\Users\cmd\venv\Scripts>
如果想创建独立的Airtest Python3开发环境,可如下
#创建基于Python3.6.4的名为Airtest364的虚拟环境
C:\Users\cmd>virtualenv -p D:\Python36\python3.exe Airtest364
Running virtualenv with interpreter D:\Python36\python3.exe
Using base prefix 'D:\\Python36'
New python executable in C:\Users\cmd\Airtest364\Scripts\python3.exe
Also creating executable in C:\Users\cmd\Airtest364\Scripts\python.exe
Installing setuptools, pip, wheel...done.
#切换到Airtest364下并激活该环境
C:\Users\cmd>cd Airtest364\Scripts
C:\Users\cmd\Airtest364\Scripts>activate.bat
#检查虚拟环境初始化安装的Python库
(Airtest364) C:\Users\cmd\Airtest364\Scripts>pip list
DEPRECATION: The default format will switch to columns in the future. You can use --format=(legacy|columns) (or define a format=(legacy|columns) in your pip.conf under the [list] section) to disable this warning.
pip (9.0.2)
setuptools (39.0.1)
wheel (0.30.0)
安装Airtest提供的Android App UI测试库pocoui
#安装Airtest提供的Android App UI测试库 pocoui
(Airtest364) C:\Users\cmd\Airtest364\Scripts>pip3 install pocoui
#检查都依赖安装了哪些
(Airtest364) C:\Users\cmd\Airtest364\Scripts>pip list
DEPRECATION: The default format will switch to columns in the future. You can use --format=(legacy|columns) (or define a format=(legacy|columns) in your pip.conf under the [list] section) to disable this warning.
airtest (1.0.2)
AxmlParserPY (0.1)
certifi (2018.1.18)
chardet (3.0.4)
comtypes (1.1.4)
hrpc (1.0.3)
idna (2.6)
Jinja2 (2.10)
MarkupSafe (1.0)
numpy (1.14.2)
opencv-contrib-python (3.4.0.12)
Pillow (5.0.0)
pip (9.0.2)
pocoui (1.0.26)
pydash (4.4.1)
pypiwin32 (223)
pywin32 (223)
pywinauto (0.6.4)
requests (2.18.4)
setuptools (39.0.1)
six (1.11.0)
urllib3 (1.22)
websocket-client (0.47.0)
wheel (0.30.0)
Android sdk工具部署
下载地址 http://tools.android-studio.org/index.php/sdk 处下载 android-sdk_r24.4.1-windows.zip
将android-sdk-windows解压到你需要的目录下,笔者是D:\Android\android-sdk-windows
配置android-sdk环境变量:
ANDROID_HOME 变量值为android-sdk的解压目录,笔者为D:\Android\android-sdk-windows
PATH PATH变量值的最后追加 ;%ANDROID_HOME%\tools;%ANDROID_HOME%\platform-tools;%ANDROID_HOME%\build-tools;
接下来你便可以用D:\Android\android-sdk-windows 下的SDK Manager.exe下载配置SDK 或AVD Manager.exe 配置 AVD模拟器了。
如果你需要测试android应用的话,请先安装配置好某一版本的SDK及其相关工具。
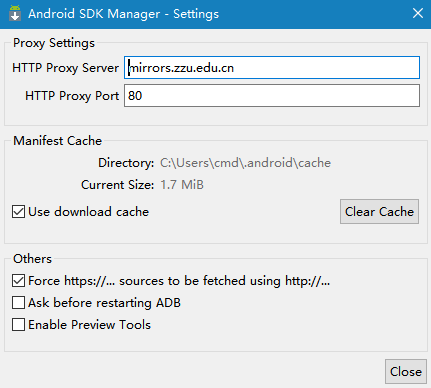
如下图,SDK manager必要配置:
Tools->Options设置
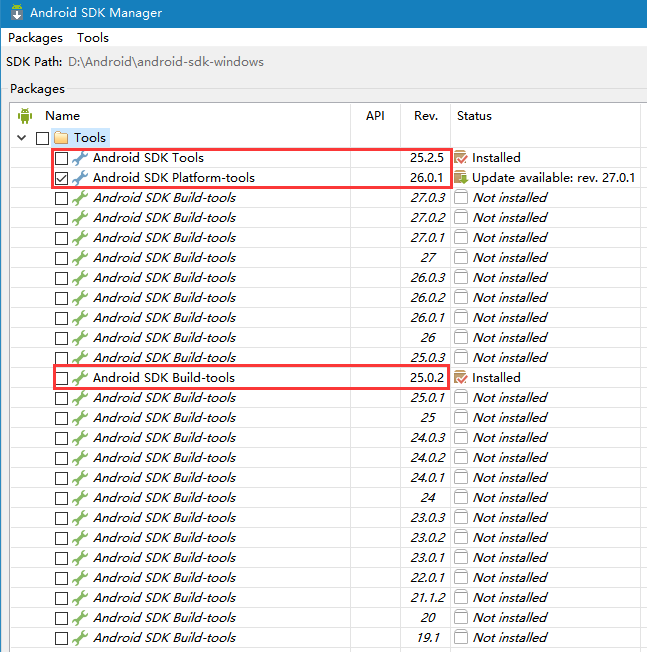
其它要下载的:
此处为了与Macaca环境兼容,目前稳定没敢乱升级,大家也可用此.
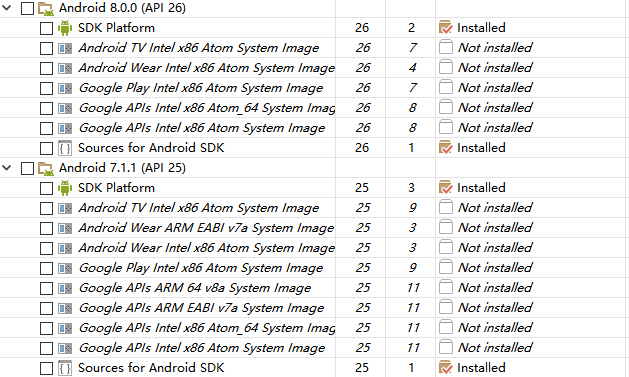
此处的按需选择与AVD模拟器配套使用的
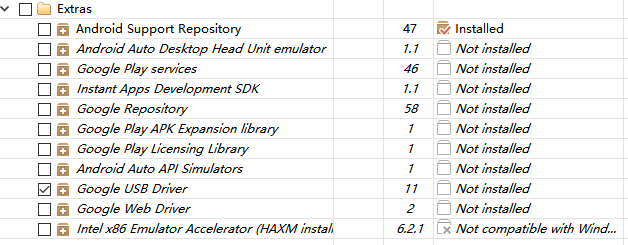
关于Android开发环境的大家可以参考此人的博客
Android SDK Manager和AVD Manager使用
Android开发环境配置
该步骤,主要是为了部署adb工具而已,当然也有独立部署adb的方案.这个你按需选择吧,不过你既然要搞Android UI自动化相关了,Android sdk工具的部署最终还是逃不过的.
#检查下最终的adb版本
C:\Users\cmd>adb -v
Android Debug Bridge version 1.0.39
Revision 3db08f2c6889-android
Installed as D:\Android\android-sdk-windows\platform-tools\adb.exe
手机真机相关设置
真机小米Mix2
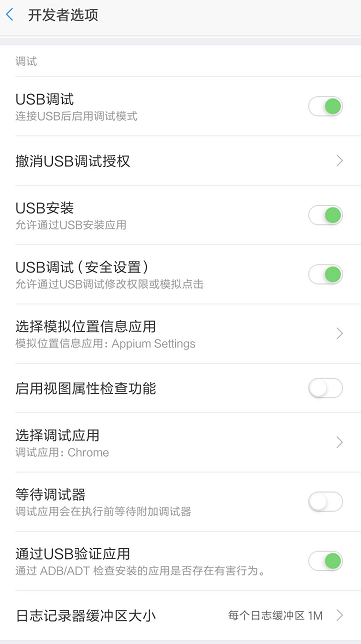
需要开启真机开发者选项->USB调试,模式和其他相关,主要是调试这一栏要打开的有
PyCharm 开发工具
Pycharm download
PyCharm+IDE+and+Python+Plugin+for+IntelliJ+IDEA
Meet PyCharm
请自行安装配置部署好PyCharm开发工具.
AirTest Project Interpreter环境切换
打开Settings->Project Interpreter
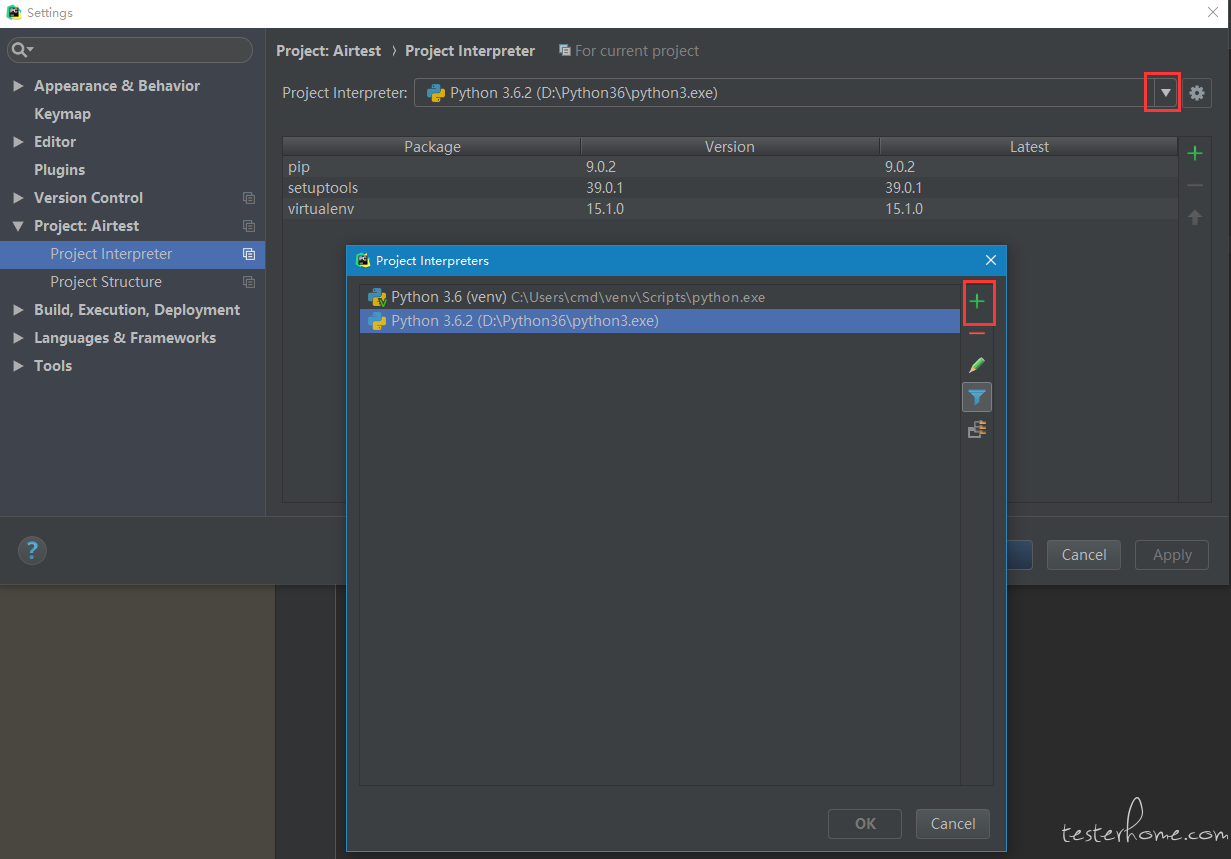
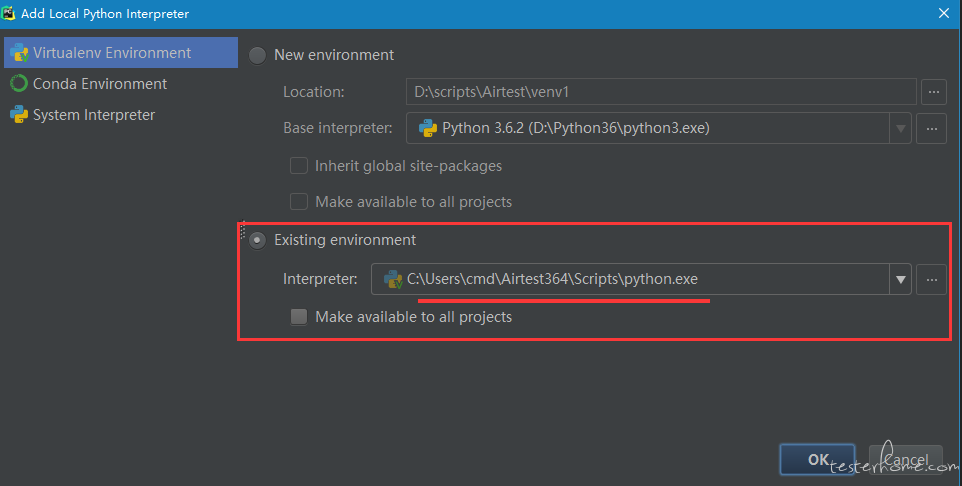
如果上述步骤无误的话,可以直接找到Existing environment选择即可,如果没有请使用添加并找到上述路径C:\Users\cmd\Airtest364\Scripts\添加.
四 AirTestIDE工具简单使用
先通过adb命令检查小米Mix2真机是否连接正常
C:\Users\cmd>adb devices -l
List of devices attached
yourSerialNo          device product:chiron model:MIX_2 device:chiron
AirTestIDE下载地址
然后去官网下载最新版本的AirTestIDE,直接解压到D:盘即可,笔者解压到的路径是D:\AirtestIDE
解压目录下找到AirtestIDE.exe双击即可执行,目前还未GDC正式发布,所以你会看到打开了两个窗口,一个是命令行的实时日志(为了便捷的捕获工具本身问题日志),一个就是AirtestIDE主图形工具窗口.
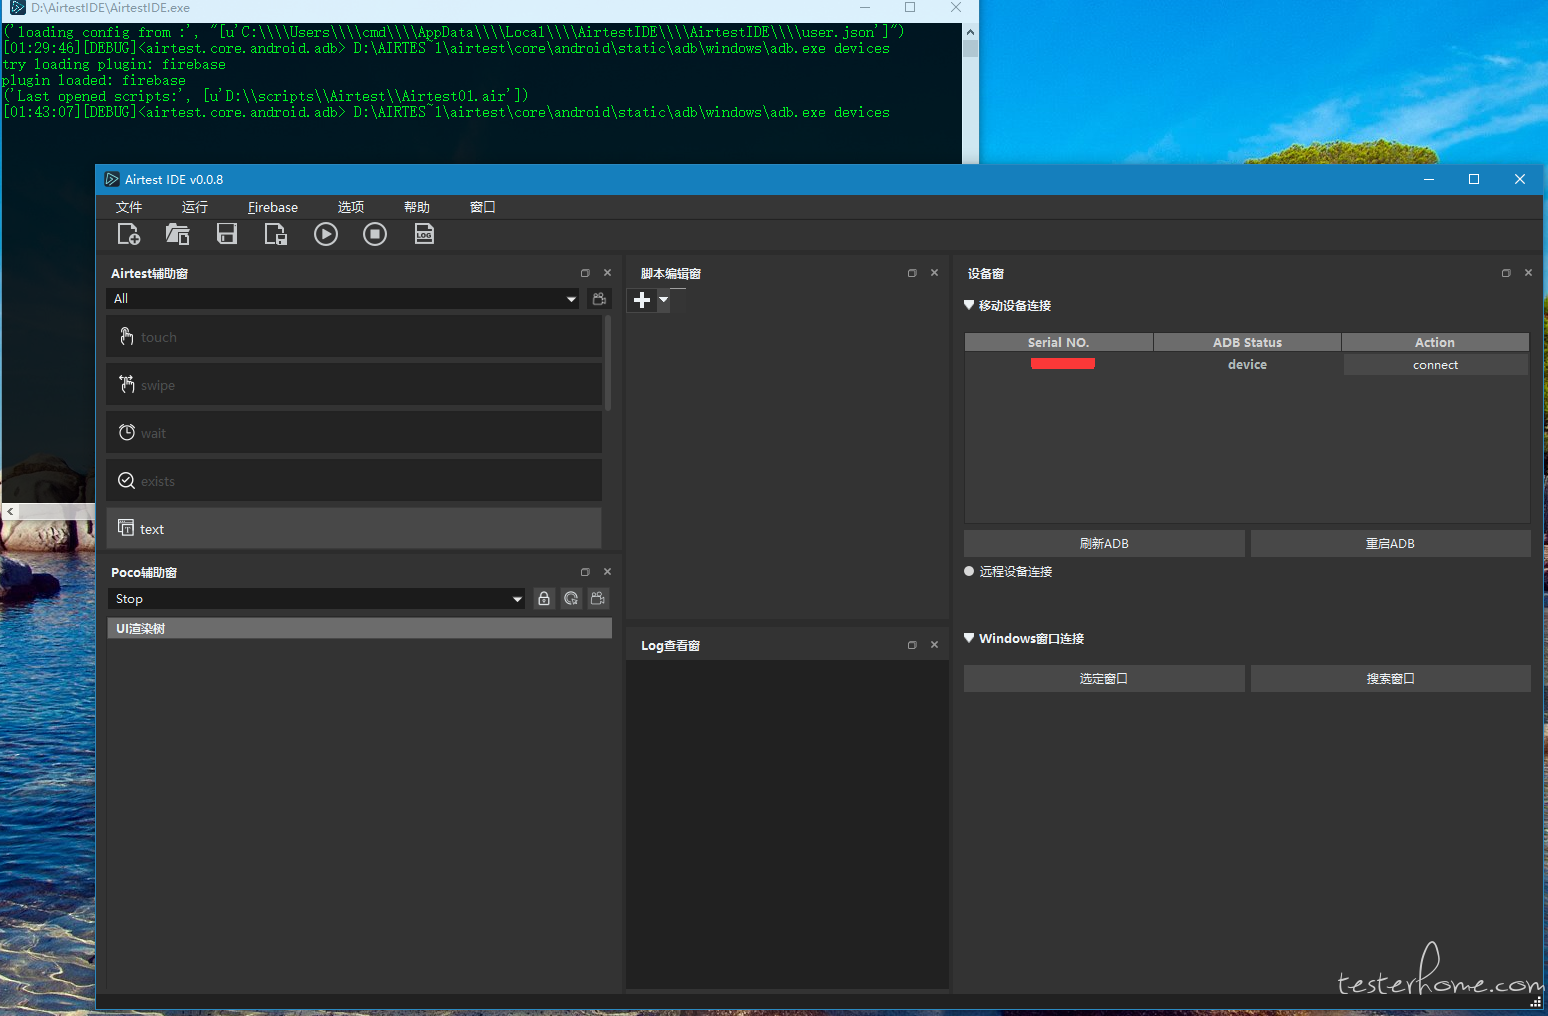
点击设备窗口下的 connect即可看到一个实时同步的且可双向操作的Device Screen窗口,怎么样很腻害吧,实时同步的且可双向操作的呦
此时请注意观察你连接的真机,会提示向手机安装以下依赖包:
RotationWatcher
Poco辅助窗下的Poco Inspector
既是一个类似Macaca Inspector或Appium Inspector的一款界面UI元素查看工具.
使用方法,在Poco辅助窗下拉切换到Android.
此时请注意观察你连接的真机,会提示向手机安装以下依赖包和Poco组件服务:
PocoService
com.netease.open.pocoservice.test
Yosemite(与输入法相关)
安装成功后,我们再找到Poco辅助窗右侧的Poco Inspector按钮,点击之,然后在Device Screen窗口便可即点即提示你当前的选中UI元素了,与其他工具类似.
然后在点击Poco辅助窗右侧的Poco Inspector按钮左侧的Poco Pause即可锁定和树形化展示元素dom树.
如下图
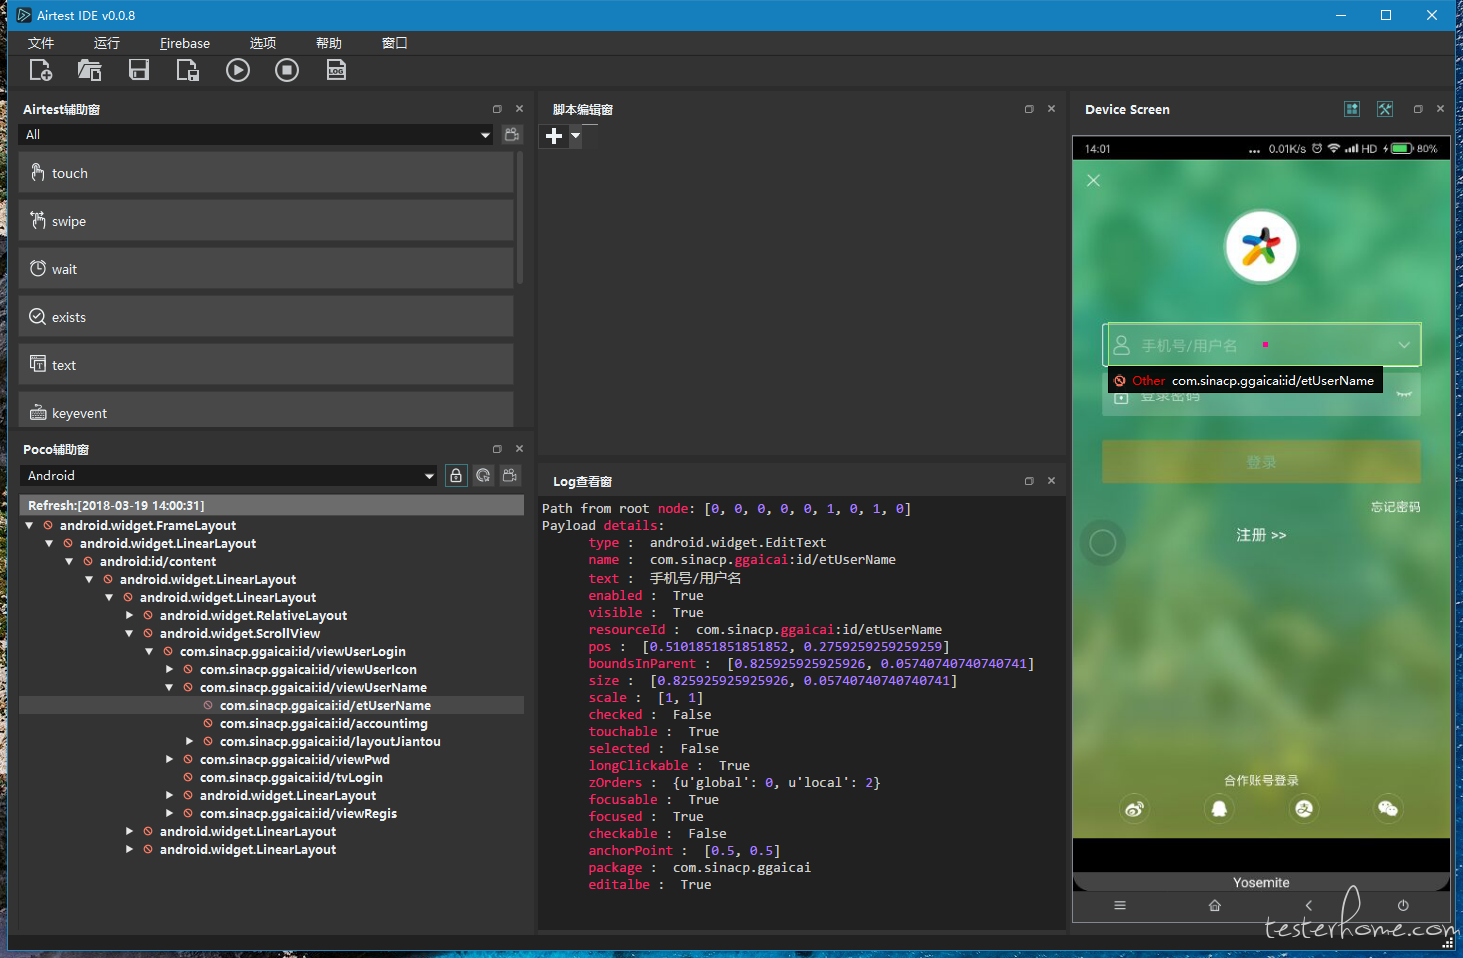
我们利用此方法,找到需要操作的UI元素后,便可以编辑业务流脚本了.
五 编辑登录流程脚本
需要先首先创建个空文件,文件->新建脚本后,选择一保存路径我的是D:\scripts\Airtest\ 取名为Airtest01,确定后,即会发现一个名为Airtest01.air的文件夹.
然后以下,这里用到的就是上述搭建好的Pycharm Python3 virtualenv Airtest364开发环境.
分别用到了两个库下的api airtest.core.api和poco.drivers.android.uiautomation,请自行根据官方文档查看并使用.
最终脚本如下:
# -*- encoding=utf8 -*-
__author__ = "cmd"
__title__ = "Acp Login"
__desc__ = """
this is a test script.
"""
from airtest.core.api import *
from poco.drivers.android.uiautomation import AndroidUiautomationPoco
poco = AndroidUiautomationPoco(force_restart=False)

# start your script here
connect_device('Android:///yourSerialNo')
start_app('com.sinacp.ggaicai')
sleep(9)
poco("com.acp.main:id/tvTabImg4").click()
sleep(3)
poco("com.acp.main:id/tvAccount").click()
sleep(3)
poco("com.sinacp.ggaicai:id/etUserName").click()
poco("com.sinacp.ggaicai:id/etUserName").set_text('张三李四')
sleep(3)
poco("com.sinacp.ggaicai:id/etPwd").click()
poco("com.sinacp.ggaicai:id/etPwd").set_text('123UI895')
sleep(3)
poco("com.sinacp.ggaicai:id/tvLogin").click()
sleep(6)
编辑好无语法错误后,可以直接在AirtestIDE中打开,点击Run Script(F5)执行该脚本.
Log查看窗日志
"D:\AirtestIDE\AirtestIDE" runner "D:\scripts\Airtest\Airtest01.air"  --device Android://127.0.0.1:5037/yourSerialNo --log "C:\Users\cmd\AppData\Local\Temp\AirtestIDE\scripts\c227edd84edf79234c03c3162327120c"
============================================================

[Start running..]
[02:14:11][DEBUG]<airtest.core.android.adb> D:\AIRTES~1\airtest\core\android\static\adb\windows\adb.exe -P 5037 -s yourSerialNo wait-for-device
[02:14:11][DEBUG]<airtest.core.android.adb> D:\AIRTES~1\airtest\core\android\static\adb\windows\adb.exe -P 5037 -s yourSerialNo shell getprop ro.build.version.sdk
[02:14:11][DEBUG]<airtest.utils.logwraper> main_script: {'script': u'D:\\scripts\\Airtest\\Airtest01.air'}
[02:14:11][DEBUG]<airtest.core.android.adb> D:\AIRTES~1\airtest\core\android\static\adb\windows\adb.exe -P 5037 -s yourSerialNo shell dumpsys activity top
[02:14:11][DEBUG]<airtest.core.android.adb> D:\AIRTES~1\airtest\core\android\static\adb\windows\adb.exe -P 5037 -s yourSerialNo shell settings get secure default_input_method
[02:14:11][DEBUG]<airtest.core.android.adb> D:\AIRTES~1\airtest\core\android\static\adb\windows\adb.exe -P 5037 -s yourSerialNo shell ime list -a
[02:14:12][DEBUG]<airtest.core.android.adb> D:\AIRTES~1\airtest\core\android\static\adb\windows\adb.exe -P 5037 -s yourSerialNo shell dumpsys package com.netease.open.pocoservice
[02:14:12][DEBUG]<airtest.core.android.adb> D:\AIRTES~1\airtest\core\android\static\adb\windows\adb.exe -P 5037 -s yourSerialNo shell dumpsys package com.netease.open.pocoservice.test
[02:14:12][DEBUG]<airtest.core.android.adb> D:\AIRTES~1\airtest\core\android\static\adb\windows\adb.exe -P 5037 -s yourSerialNo forward --no-rebind tcp:19517 tcp:10080
[02:14:12][DEBUG]<airtest.core.android.adb> D:\AIRTES~1\airtest\core\android\static\adb\windows\adb.exe -P 5037 -s yourSerialNo forward --no-rebind tcp:17292 tcp:10081
[02:14:13][DEBUG]<airtest.core.android.adb> D:\AIRTES~1\airtest\core\android\static\adb\windows\adb.exe -P 5037 -s yourSerialNo shell ps
[02:14:13][DEBUG]<airtest.core.android.adb> D:\AIRTES~1\airtest\core\android\static\adb\windows\adb.exe -s yourSerialNo wait-for-device
[02:14:13][DEBUG]<airtest.core.android.adb> D:\AIRTES~1\airtest\core\android\static\adb\windows\adb.exe -s yourSerialNo shell getprop ro.build.version.sdk
[02:14:13][DEBUG]<airtest.core.android.adb> D:\AIRTES~1\airtest\core\android\static\adb\windows\adb.exe -s yourSerialNo shell monkey -p com.sinacp.ggaicai -c android.intent.category.LAUNCHER 1
[02:14:14][DEBUG]<airtest.utils.logwraper> >start_app Time used: 0.596000s
[02:14:14][DEBUG]<airtest.utils.logwraper> function: {'time_used': 0.5959999561309814, 'args': ('com.sinacp.ggaicai',), 'name': 'start_app', 'ret': None, 'kwargs': {}}
[02:14:23][DEBUG]<airtest.utils.logwraper> >sleep Time used: 9.012000s
[02:14:23][DEBUG]<airtest.utils.logwraper> function: {'time_used': 9.01200008392334, 'args': (9,), 'name': 'sleep', 'ret': None, 'kwargs': {}}
[02:14:23][DEBUG]<airtest.core.android.adb> D:\AIRTES~1\airtest\core\android\static\adb\windows\adb.exe -s yourSerialNo shell pm path jp.co.cyberagent.stf.rotationwatcher
[02:14:23][DEBUG]<airtest.core.android.adb> D:\AIRTES~1\airtest\core\android\static\adb\windows\adb.exe -s yourSerialNo shell export CLASSPATH=/data/app/jp.co.cyberagent.stf.rotationwatcher-kp6OiHzpT4ITooezG-vtMA==/base.apk;exec app_process /system/bin jp.co.cyberagent.stf.rotationwatcher.RotationWatcher
[02:14:23][DEBUG]<airtest.core.android.adb> D:\AIRTES~1\airtest\core\android\static\adb\windows\adb.exe -s yourSerialNo shell ls /data/local/tmp/minicap
[02:14:24][DEBUG]<airtest.core.android.adb> D:\AIRTES~1\airtest\core\android\static\adb\windows\adb.exe -s yourSerialNo shell ls /data/local/tmp/minicap.so
[02:14:24][DEBUG]<airtest.core.android.adb> D:\AIRTES~1\airtest\core\android\static\adb\windows\adb.exe -s yourSerialNo shell LD_LIBRARY_PATH=/data/local/tmp /data/local/tmp/minicap -v 2>&1
[02:14:24][DEBUG]<airtest.core.android.adb> D:\AIRTES~1\airtest\core\android\static\adb\windows\adb.exe -s yourSerialNo shell dumpsys display
[02:14:24][DEBUG]<airtest.core.android.minicap> version:5
[02:14:24][DEBUG]<airtest.core.android.minicap> skip install minicap
[02:14:24][DEBUG]<airtest.core.android.adb> D:\AIRTES~1\airtest\core\android\static\adb\windows\adb.exe -s yourSerialNo forward --no-rebind tcp:13151 localabstract:minicap_13151
[02:14:24][DEBUG]<airtest.core.android.adb> D:\AIRTES~1\airtest\core\android\static\adb\windows\adb.exe -s yourSerialNo shell dumpsys window
[02:14:24][DEBUG]<airtest.core.android.adb> D:\AIRTES~1\airtest\core\android\static\adb\windows\adb.exe -s yourSerialNo shell dumpsys SurfaceFlinger
[02:14:25][DEBUG]<airtest.core.android.adb> D:\AIRTES~1\airtest\core\android\static\adb\windows\adb.exe -s yourSerialNo shell getevent -p
[02:14:25][DEBUG]<airtest.core.android.adb> D:\AIRTES~1\airtest\core\android\static\adb\windows\adb.exe -s yourSerialNo shell LD_LIBRARY_PATH=/data/local/tmp /data/local/tmp/minicap -n 'minicap_13151' -P 1080x2160@1080x2160/0 -l 2>&1
[02:14:25][DEBUG]<airtest.utils.nbsp> [minicap_server]'PID: 28547'
[02:14:25][DEBUG]<airtest.utils.nbsp> [minicap_server]'INFO: Using projection 1080x2160@1080x2160/0'
[02:14:25][DEBUG]<airtest.utils.nbsp> [minicap_server]'INFO: (external/MY_minicap/src/minicap_26.cpp:241) Creating SurfaceComposerClient'
[02:14:25][DEBUG]<airtest.utils.nbsp> [minicap_server]'INFO: (external/MY_minicap/src/minicap_26.cpp:244) Performing SurfaceComposerClient init check'
[02:14:25][DEBUG]<airtest.utils.nbsp> [minicap_server]'INFO: (external/MY_minicap/src/minicap_26.cpp:255) Creating virtual display'
[02:14:25][DEBUG]<airtest.utils.nbsp> [minicap_server]'INFO: (external/MY_minicap/src/minicap_26.cpp:261) Creating buffer queue'
[02:14:25][DEBUG]<airtest.utils.nbsp> [minicap_server]'INFO: (external/MY_minicap/src/minicap_26.cpp:264) Setting buffer options'
[02:14:25][DEBUG]<airtest.utils.nbsp> [minicap_server]'INFO: (external/MY_minicap/src/minicap_26.cpp:268) Creating CPU consumer'
[02:14:25][DEBUG]<airtest.utils.nbsp> [minicap_server]'INFO: (external/MY_minicap/src/minicap_26.cpp:272) Creating frame waiter'
[02:14:25][DEBUG]<airtest.utils.nbsp> [minicap_server]'INFO: (external/MY_minicap/src/minicap_26.cpp:276) Publishing virtual display'
[02:14:25][DEBUG]<airtest.utils.nbsp> [minicap_server]'INFO: (jni/minicap/JpgEncoder.cpp:64) Allocating 7052292 bytes for JPG encoder'
[02:14:25][DEBUG]<airtest.utils.nbsp> [minicap_server]'INFO: (/home/lxn3032/minicap_for_ide/jni/minicap/minicap.cpp:473) Server start'
[02:14:25][DEBUG]<airtest.utils.nbsp> [minicap_server]'INFO: (/home/lxn3032/minicap_for_ide/jni/minicap/minicap.cpp:475) New client connection'
[02:14:25][DEBUG]<airtest.core.android.minicap> (1, 24, 28547, 1080, 2160, 1080, 2160, 0, 2)
[02:14:25][DEBUG]<airtest.utils.logwraper> >snapshot Time used: 2.319000s
[02:14:25][DEBUG]<airtest.utils.logwraper> function: {'name': 'snapshot', 'kwargs': {'msg': u'UIObjectProxy of "com.acp.main:id/tvTabImg4"'}, 'time_used': 2.319000005722046, 'screen': '1521440065604.jpg', 'args': (), 'ret': u'C:\\Users\\cmd\\AppData\\Local\\Temp\\AirtestIDE\\scripts\\c227edd84edf79234c03c3162327120c\\1521440063344.jpg'}
[02:14:29][DEBUG]<airtest.utils.logwraper> >sleep Time used: 3.005000s
[02:14:29][DEBUG]<airtest.utils.logwraper> function: {'time_used': 3.005000114440918, 'args': (3,), 'name': 'sleep', 'ret': None, 'kwargs': {}}
[02:14:29][DEBUG]<airtest.utils.logwraper> >snapshot Time used: 0.223000s
[02:14:29][DEBUG]<airtest.utils.logwraper> function: {'name': 'snapshot', 'kwargs': {'msg': u'UIObjectProxy of "com.acp.main:id/tvAccount"'}, 'time_used': 0.22300004959106445, 'screen': '1521440069855.jpg', 'args': (), 'ret': u'C:\\Users\\cmd\\AppData\\Local\\Temp\\AirtestIDE\\scripts\\c227edd84edf79234c03c3162327120c\\1521440069682.jpg'}
[02:14:33][DEBUG]<airtest.utils.logwraper> >sleep Time used: 3.015000s
[02:14:33][DEBUG]<airtest.utils.logwraper> function: {'time_used': 3.0149998664855957, 'args': (3,), 'name': 'sleep', 'ret': None, 'kwargs': {}}
[02:14:34][DEBUG]<airtest.utils.logwraper> >snapshot Time used: 0.443000s
[02:14:34][DEBUG]<airtest.utils.logwraper> function: {'name': 'snapshot', 'kwargs': {'msg': u'UIObjectProxy of "com.sinacp.ggaicai:id/etUserName"'}, 'time_used': 0.44300007820129395, 'screen': '1521440074313.jpg', 'args': (), 'ret': u'C:\\Users\\cmd\\AppData\\Local\\Temp\\AirtestIDE\\scripts\\c227edd84edf79234c03c3162327120c\\1521440073922.jpg'}
[02:14:35][DEBUG]<airtest.core.android.adb> D:\AIRTES~1\airtest\core\android\static\adb\windows\adb.exe -P 5037 -s yourSerialNo shell dumpsys package com.netease.nie.yosemite
[02:14:35][INFO]<airtest.core.android.yosemite> local version code is 281, installed version code is 281
[02:14:35][DEBUG]<airtest.core.android.adb> D:\AIRTES~1\airtest\core\android\static\adb\windows\adb.exe -P 5037 -s yourSerialNo shell am broadcast -a ADB_INPUT_TEXT --es msg '张三李四'
[02:14:38][DEBUG]<airtest.utils.logwraper> >sleep Time used: 3.001000s
[02:14:38][DEBUG]<airtest.utils.logwraper> function: {'time_used': 3.000999927520752, 'args': (3,), 'name': 'sleep', 'ret': None, 'kwargs': {}}
[02:14:39][DEBUG]<airtest.utils.logwraper> >snapshot Time used: 0.379000s
[02:14:39][DEBUG]<airtest.utils.logwraper> function: {'name': 'snapshot', 'kwargs': {'msg': u'UIObjectProxy of "com.sinacp.ggaicai:id/etPwd"'}, 'time_used': 0.3789999485015869, 'screen': '1521440079428.jpg', 'args': (), 'ret': u'C:\\Users\\cmd\\AppData\\Local\\Temp\\AirtestIDE\\scripts\\c227edd84edf79234c03c3162327120c\\1521440079098.jpg'}
[02:14:40][DEBUG]<airtest.core.android.adb> D:\AIRTES~1\airtest\core\android\static\adb\windows\adb.exe -P 5037 -s yourSerialNo shell am broadcast -a ADB_INPUT_TEXT --es msg '123UI895'
[02:14:43][DEBUG]<airtest.utils.logwraper> >sleep Time used: 3.000000s
[02:14:43][DEBUG]<airtest.utils.logwraper> function: {'time_used': 3.0, 'args': (3,), 'name': 'sleep', 'ret': None, 'kwargs': {}}[02:14:51][DEBUG]<airtest.core.android.adb> D:\AIRTES~1\airtest\core\android\static\adb\windows\adb.exe -s yourSerialNo forward --remove tcp:13151

[02:14:44][DEBUG]<airtest.utils.logwraper> >snapshot Time used: 0.454000s
[02:14:44][DEBUG]<airtest.utils.logwraper> function: {'name': 'snapshot', 'kwargs': {'msg': u'UIObjectProxy of "com.sinacp.ggaicai:id/tvLogin"'}, 'time_used': 0.45399999618530273, 'screen': '1521440084269.jpg', 'args': (), 'ret': u'C:\\Users\\cmd\\AppData\\Local\\Temp\\AirtestIDE\\scripts\\c227edd84edf79234c03c3162327120c\\1521440083861.jpg'}
[02:14:51][DEBUG]<airtest.utils.logwraper> >sleep Time used: 6.012000s
[02:14:51][DEBUG]<airtest.utils.logwraper> function: {'time_used': 6.01200008392334, 'args': (6,), 'name': 'sleep', 'ret': None, 'kwargs': {}}
----------------------------------------------------------------------
Ran 1 test in 40.255s

OK
[02:14:51][DEBUG]<airtest.core.android.adb> D:\AIRTES~1\airtest\core\android\static\adb\windows\adb.exe -P 5037 -s yourSerialNo forward --remove tcp:19517
[02:14:51][DEBUG]<airtest.core.android.adb> D:\AIRTES~1\airtest\core\android\static\adb\windows\adb.exe -P 5037 -s yourSerialNo forward --remove tcp:17292
[02:14:51][ERROR]<airtest.core.android.rotation> orientationWatcher has ended
save log in 'C:\Users\cmd\AppData\Local\Temp\AirtestIDE\scripts\c227edd84edf79234c03c3162327120c'
installed version is 26, installer version is 26. force_reinstall=False
installed version is 0, installer version is 0. force_reinstall=False
exiting.......
EndOfStream: minicap_server
[Finished]

============================================================
从执行日志来分析发现
C:/Users/cmd/AppData/Local/Temp/AirtestIDE/scripts/**
目录下会记录每步操作的截图
点一下AirtestIDE 工具栏最后一项View Report 还会在上述目录 生成个 log.html
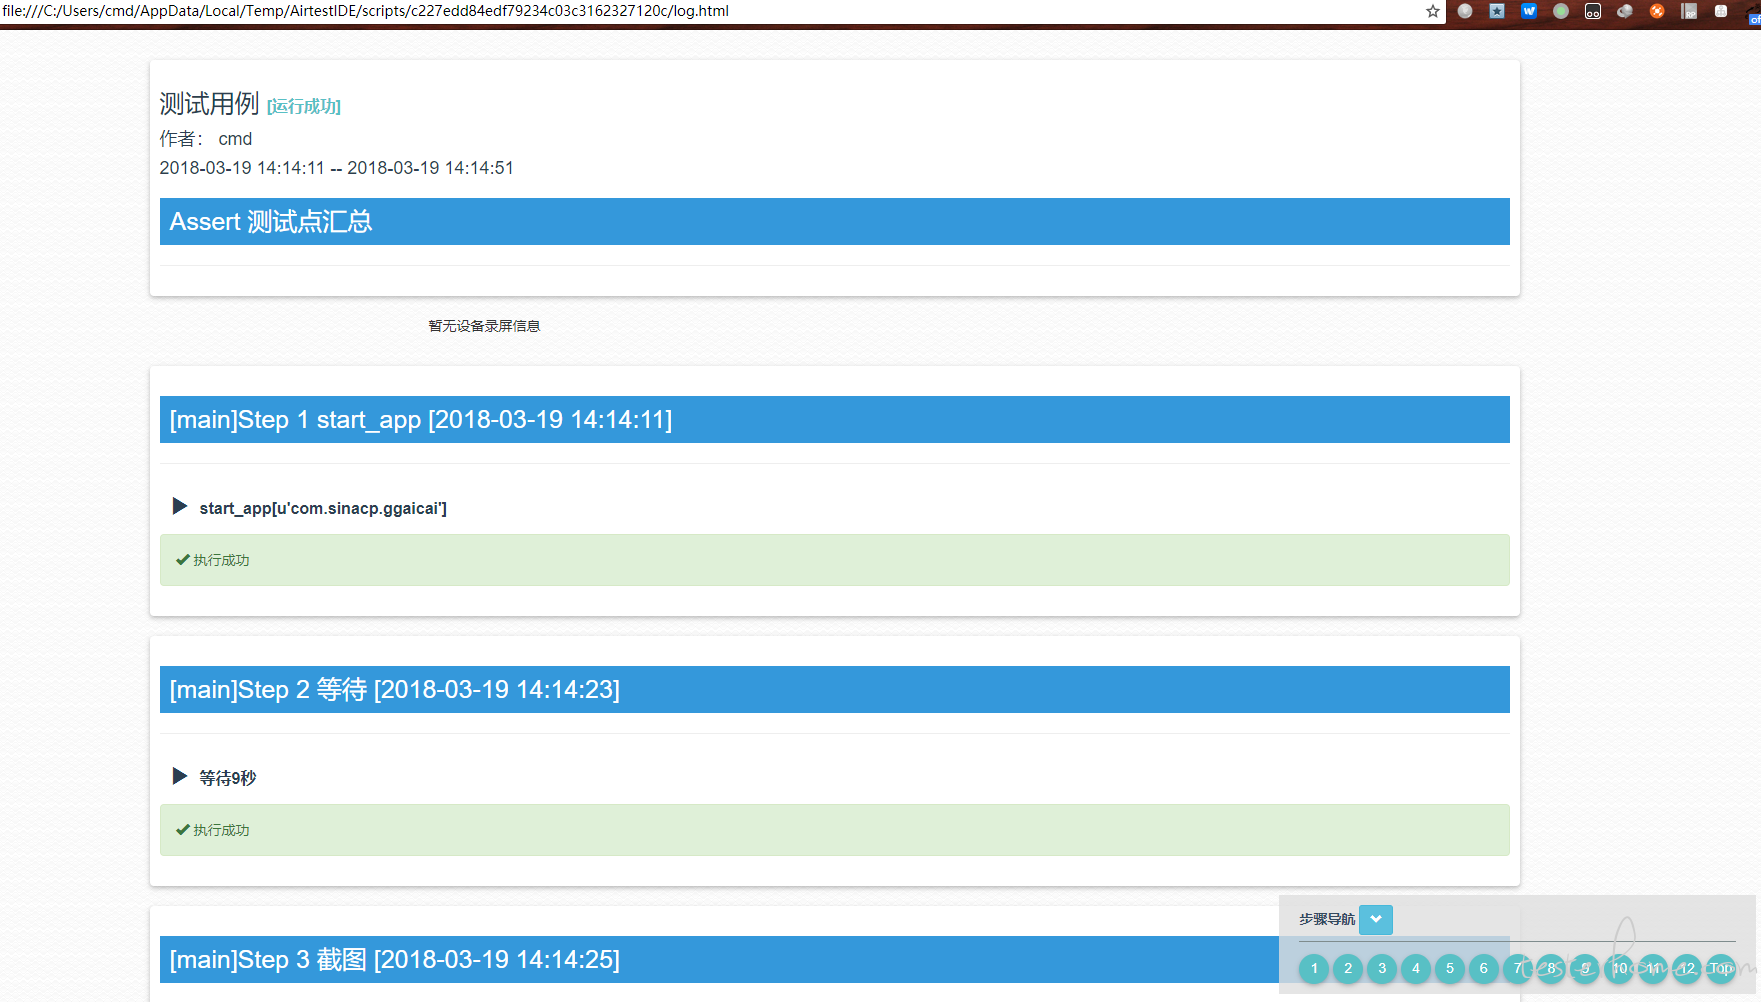
以上便是简单的利用AirTest提供的Android App 基于元素识别做的UI自动化小案例.
Airtest 网易 UI 自动化工具 Airtest 浅用记录的更多相关文章
- 网易 UI 自动化工具 Airtest 浅用记录
一 使用目的 该工具主要是面向游戏UI测试基于图像识别,如游戏框架unity,Cocos-js以及网易内部的游戏框架 同时也支持原生Android App 的基于元素识别的UI自动化测试. 本文主要使 ...
- 网易UI自动化测试工具Airtest中导入air文件中的方法
最近看了一下网易的Airtest ,UI测试工具,写了一些后在导入其他air文件中的.py文件,卡了一下,现在博客中纪录一下导入其他air文件的方式: 在Airtest 测试工具中,导入其他air文件 ...
- UI自动化测试之Airtest
官方文档: https://airtest.doc.io.netease.com/ 本文我们讲解下Airtest的使用,主要学习目标有以下几点: (1)认识Airtest (2)了解Airtest能做 ...
- 微信小程序UI自动化:实践之后的记录01-选择工具/框架
目录 1. 前言 2. 工具/框架/库选择 2.1 miniprogram-automator官方介绍(摘自官方哈) 小程序自动化 特性 2.2 minium官方介绍 特性 3. 如何选择 4. 对应 ...
- 一种新的自动化 UI 测试解决方案 Airtest Project
今天分享一个自动化UI测试工具airtest——一款网易出品的基于图像识别面向游UI测试的工具,也支持原生Android App基于元素识别的UI自动化测试.主要包含了三部分:Airtest IDE. ...
- 手机UI自动化之显示点触位置(触摸轨迹)
上期回顾:Airtest源码分析--Android屏幕截图方式 不管是用Appium还是Airtest,或是其他手机UI自动化工具,你是不是经常遇到这种情况,代码明明执行了click或swipe,怎么 ...
- Airtest网易开源的一款UI自动化测试工具
Airtest网易开源的一款UI自动化测试工具 1 Airtest 简介Airtest Project是网易游戏内部工具团队开发并开源的一款UI自动化测试工具,据说曾经获得谷歌力挺. AirtestI ...
- 非常好用的1款UI自动化测试工具:airTest
网易团队开发的UI自动化测试神器airTest,下载地址:http://airtest.netease.com/tutorial/Tutorial.html Appium和airTest对比,我的看法 ...
- 聊聊 Airtest 自动化工具
阅读文本大概需要 5 分钟. 很多读者看过之前的文章,发现我使用最多的是一款 Airtest 的自动化测试框架. Airtest 是一款适合于游戏和 App 的 UI 自动化测试框架. 下面对 Air ...
随机推荐
- 【iOS XMPP】使用XMPPFramewok(二):用户登录
转自:http://www.cnblogs.com/dyingbleed/archive/2013/05/10/3069397.html 用户登录 准备工作 比较知名的开源XMPP服务器:一个是Ope ...
- TCPConnectionTermination
http://www.serverframework.com/asynchronousevents/2011/01/time-wait-and-its-design-implications-for- ...
- iOS开发transform的使用
// // ViewController.m // 18-transform的使用 #import "ViewController.h" @interface ViewCont ...
- android alipay
"java.security.spec.InvalidKeySpecException" KeyFactory keyFactory =KeyFactory.getInstance ...
- uWSGI listen queue 队列溢出的问题
如果没有设置uwsgi的--listen,如果sysctl -a | grep net.core.somaxconn发现net.core.somaxconn=128. 那你使用uwsgi启动的服务,单 ...
- 使用 IDEA 开发工具(版本为 IntelliJ IDEA 14.1.4)打可执行jar包的操作步骤
声明:教程演示使用的开发工具的版本是 IntelliJ IDEA 14.1.4. 1.选择IDEA开发工具菜单栏 File --> Project Structure,弹出如下窗口,在左侧的列表 ...
- nginx源码分析:打开监听套接字的流程
问题源于在分析nginx的源码时,找了半天没有找到nginx是怎么把监听套接字读事件添加到事件循环中的,后经过仔细的分析,终于搞明白,于是记录一下. 在上一篇module机制中介绍了nginx添加mo ...
- 【PHP爬虫】curl+simple_html_dom 抓取百度最新消息新闻标题,来源,URL
<title>新闻转载统计</title> <script> function submit(){ wd=document.getElementById('name ...
- 使用一层神经网络训练mnist数据集
import numpy as np import tensorflow as tf from tensorflow.examples.tutorials.mnist import input_dat ...
- hystrix服务降级和服务熔断的区别
故事的背景是这样的:由于小强在工作中碰到一些问题,于是想请教一下业界大牛小壮.于是发生了下面的两个场景: 小强在拿起常用手机拨号时发现该手机没有能够拨通,所以就拿出了备用手机拨通了某A的电话,这个过程 ...