爬虫模块之requests模块
一 模块的下载安装
pip install requests
二 爬虫的介绍
什么是爬虫:就是模拟浏览器发送请求;保存到本地;提取有用的数据;保存到数据库
爬虫的价值:获取有用的数据,保存到数据库
爬虫的基本流程:
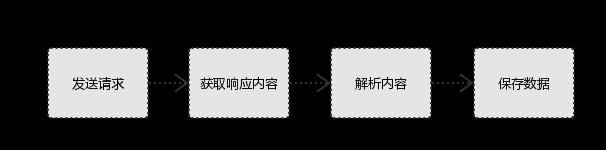
1.发起请求

使用http库向目标站点发起请求,即发送一个Request

Request包含:请求头、请求体等

2.获取响应内容

如果服务器能正常响应,则会得到一个Response

Response包含:html,json,图片,视频等

3.解析内容

解析html数据:正则表达式,第三方解析库如Beautifulsoup,pyquery等

解析json数据:json模块

解析二进制数据:以b的方式写入文件

4.保存数据

数据库

文件
请求和响应:
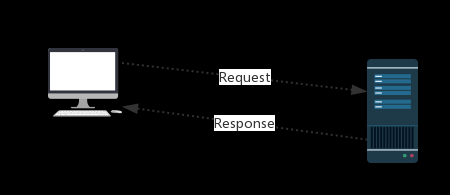
Request:用户将自己的信息通过浏览器(socket client)发送给服务器(socket server)

Response:服务器接收请求,分析用户发来的请求信息,然后返回数据(返回的数据中可能包含其他链接,如:图片,js,css等)

浏览器在接收Response后,会解析其内容来显示给用户,而爬虫程序在模拟浏览器发送请求然后接收Response后,是要提取其中的有用数据。
三 路由
每一个路由都是由协议,ip和端口组成的。默认的端口就是80
User-Agent:那个浏览器发送的请求。
Referer:请求的来源。
什么是盗链:自己建立的网站链接到别人的网站上面,访问量都属于自己的网站的。
请求的重点:type(请求的类型),请求的url,请求头和请求体
响应部分:
Preservelog:保持跳转的所有的所有信息,也就是抓包
Location:如果出现了Location就会重定向信息
Set_cookie:保持Cookie信息
Preview:目标主机上的数据
响应的重点:状态码,响应体,响应头。
四 requests模块
requests:模拟浏览器发送请求。
requests.get:请求的方式,还有post请求方式
headers:模拟浏览器请求内容。
params:转换url文字的编码格式
wd:查找的内容;pn:页码
cookies:存放cookies的信息
status_code:返回的状态码。
text:文本信息
encoding:指定编码格式
# import requests

#

# num=1

# url='https://www.baidu.com/s?'

# pesponse=requests.get(url,

#              headers={

#                  'User-Agent':'Mozilla/5.0 (Windows NT 6.1; Win64; x64) AppleWebKit/537.36 (KHTML, like Gecko) Chrome/63.0.3239.84 Safari/537.36'

#              },

#              params={

#                  'wd':'美女',

#                  'pn':num

#              },

#             cookies={

#                 'user_session':'CpxXbf5MvLuoRxVeIqUNHs6WlwUOkF4vMqcZ2IoKAZ5Sia'

#             }

#              )

#

# print('378533872@qq.com' in pesponse.text)
requests.post:请求的方式
data:请求体
commit:不清楚,以后补处理
utf8:是否是utf8编码吗格式
authenticity-token:csrf-token
login:用户名
password:密码
allow_redirects:是否跳转,True:允许跳转;False:不允许跳转
cookies:获取cookies里面的信息
get_dict:转成字典的格式
headers:响应头
history:跳转前的页面
requests帮我们处理cookie和session:requests。session:直接拿到session对象,可以直接忽略cookie信息。
# import requests

# import re

#

# response=requests.get('https://github.com/login',

#                        headers={

# 'User-Agent':'Mozilla/5.0 (Windows NT 6.1; Win64; x64) AppleWebKit/537.36 (KHTML, like Gecko) Chrome/63.0.3239.84 Safari/537.36',

#                        },

#                        )

#

# cookies=response.cookies.get_dict()

# authenticity_token=re.findall('name="authenticity_token".*?value="(.*?)"',response.text,re.S)[0]

#

# response=requests.post('https://github.com/session',

#                        cookies=cookies,

#                        headers={

#                             'User-Agent':'Mozilla/5.0 (Windows NT 6.1; Win64; x64) AppleWebKit/537.36 (KHTML, like Gecko) Chrome/63.0.3239.84 Safari/537.36',

#                             'Referer':'https://github.com/',

#                        },

#                        data={

#                            'commit':'Sign in',

#                            'utf8':'✓',

#                            'authhenticity_token':authenticity_token,

#                            'login':'egonlin',

#                            'password':'lhf@123'

#

#                        },

#

#                        allow_redirects=False

#                        )

#

# ligin_cookies=response.cookies.get_dict()

# #

# # print(response.status_code)

# # print('Location' in response.headers)

# # print(response.text)

# # print(response.history)

#

#

# reponse=requests.get('https://github.com/settings/emails',

#                      cookies=cookies,

#                      headers={

#                          'Referer':'https://github.com/',

#                          'User-Agent':'Mozilla/5.0 (Windows NT 6.1; Win64; x64) AppleWebKit/537.36 (KHTML, like Gecko) Chrome/63.0.3239.84 Safari/537.36',

#                      })

#

# print('378533872@qq.com'in response.text)
补充:
cookies.items:获取cookies信息,以元组的格式获取
# print(response.cookies.items())
ites_content:大文件下载方法
response=requests.get('https://timgsa.baidu.com/timg?image&quality=80&size=b9999_10000&sec=1515557864090&di=ec791fedaabb79e9e401deb792771895&imgtype=0&src=http%3A%2F%2Fimgsrc.baidu.com%2Fimgad%2Fpic%2Fitem%2Fdbb44aed2e738bd41f16dd0daa8b87d6277ff9d3.jpg')

# with open('a.jpg','wb') as f:

#     f.write(response.content)

# with open('b.jpg','wb') as f:

#     for line in response.iter_content():

#         f.write(line)
import requests

respone=requests.get('http://www.jianshu.com')

# respone属性

print(respone.text)

print(respone.content)

print(respone.status_code)

print(respone.headers)

print(respone.cookies)

print(respone.cookies.get_dict())

print(respone.cookies.items())

print(respone.url)

print(respone.history)

print(respone.encoding)

#关闭:response.close()

from contextlib import closing

with closing(requests.get('xxx',stream=True)) as response:

    for line in response.iter_content():

    pass
编码问题:
#编码问题

import requests

response=requests.get('http://www.autohome.com/news')

# response.encoding='gbk' #汽车之家网站返回的页面内容为gb2312编码的,而requests的默认编码为ISO-8859-1,如果不设置成gbk则中文乱码

print(response.text)
获取二进制数据:
import requests

response=requests.get('https://timgsa.baidu.com/timg?image&quality=80&size=b9999_10000&sec=1509868306530&di=712e4ef3ab258b36e9f4b48e85a81c9d&imgtype=0&src=http%3A%2F%2Fc.hiphotos.baidu.com%2Fimage%2Fpic%2Fitem%2F11385343fbf2b211e1fb58a1c08065380dd78e0c.jpg')

with open('a.jpg','wb') as f:

    f.write(response.content)
json解析:反序列化
#解析json

import requests

response=requests.get('http://httpbin.org/get')

import json

res1=json.loads(response.text) #太麻烦

res2=response.json() #直接获取json数据

print(res1 == res2) #True
Redirection and History:
By default Requests will perform location redirection for all verbs except HEAD.

We can use the history property of the Response object to track redirection.

The Response.history list contains the Response objects that were created in order to complete the request. The list is sorted from the oldest to the most recent response.

For example, GitHub redirects all HTTP requests to HTTPS:

>>> r = requests.get('http://github.com')

>>> r.url

'https://github.com/'

>>> r.status_code

200

>>> r.history

[<Response [301]>]

If you're using GET, OPTIONS, POST, PUT, PATCH or DELETE, you can disable redirection handling with the allow_redirects parameter:

>>> r = requests.get('http://github.com', allow_redirects=False)

>>> r.status_code

301

>>> r.history

[]

If you're using HEAD, you can enable redirection as well:

>>> r = requests.head('http://github.com', allow_redirects=True)

>>> r.url

'https://github.com/'

>>> r.history

[<Response [301]>]
加密:HTTPBasicAuth,加密的方法
# import requests

# from requests.auth import HTTPBasicAuth

# r=requests.get('xxx',auth=HTTPBasicAuth('alexli','alex3714'))

# print(r.status_code)
五 高级用法
SSL Cert Verification:
#证书验证(大部分网站都是https)

import requests

respone=requests.get('https://www.12306.cn') #如果是ssl请求,首先检查证书是否合法,不合法则报错,程序终端

#改进1:去掉报错,但是会报警告

import requests

respone=requests.get('https://www.12306.cn',verify=False) #不验证证书,报警告,返回200

print(respone.status_code)

#改进2:去掉报错,并且去掉警报信息

import requests

from requests.packages import urllib3

urllib3.disable_warnings() #关闭警告

respone=requests.get('https://www.12306.cn',verify=False)

print(respone.status_code)

#改进3:加上证书

#很多网站都是https,但是不用证书也可以访问,大多数情况都是可以携带也可以不携带证书

#知乎\百度等都是可带可不带

#有硬性要求的,则必须带,比如对于定向的用户,拿到证书后才有权限访问某个特定网站

import requests

respone=requests.get('https://www.12306.cn',

                     cert=('/path/server.crt',

                           '/path/key'))

print(respone.status_code)
使用代理:socks5代理,可以代理所有的协议
http代理,只能代理http的协议。
Proxiex:代理。
#官网链接: http://docs.python-requests.org/en/master/user/advanced/#proxies

#代理设置:先发送请求给代理,然后由代理帮忙发送(封ip是常见的事情)

import requests

proxies={

    'http':'http://egon:123@localhost:9743',#带用户名密码的代理,@符号前是用户名与密码

    'http':'http://localhost:9743',

    'https':'https://localhost:9743',

}

respone=requests.get('https://www.12306.cn',

                     proxies=proxies)

print(respone.status_code)

#支持socks代理,安装:pip install requests[socks]

import requests

proxies = {

    'http': 'socks5://user:pass@host:port',

    'https': 'socks5://user:pass@host:port'

}

respone=requests.get('https://www.12306.cn',

                     proxies=proxies)

print(respone.status_code)
超时设置:timeout,就是超时设置
#超时设置

#两种超时:float or tuple

#timeout=0.1 #代表接收数据的超时时间

#timeout=(0.1,0.2)#0.1代表链接超时  0.2代表接收数据的超时时间

import requests

respone=requests.get('https://www.baidu.com',

                     timeout=0.0001)
认证设置:cn.中心:认证机构
verify:False,不认证证书,直接访问
# import requests

# from requests.packages import urllib3

# urllib3.disable_warnings()  # 跳过证书

#

# requests.get('https://www.12306.cn/',verify=False)

# import requests

# respone=requests.get('https://www.12306.cn',

#                      cert=('/path/server.crt',  # 访问的路径

#                            '/path/key'))

# print(respone.status_code)
#超时设置

#两种超时:float or tuple

#timeout=0.1 #代表接收数据的超时时间

#timeout=(0.1,0.2)#0.1代表链接超时  0.2代表接收数据的超时时间

import requests

respone=requests.get('https://www.baidu.com',

                     timeout=0.0001)

#官网链接:http://docs.python-requests.org/en/master/user/authentication/

#认证设置:登陆网站是,弹出一个框,要求你输入用户名密码(与alter很类似),此时是无法获取html的

# 但本质原理是拼接成请求头发送

#         r.headers['Authorization'] = _basic_auth_str(self.username, self.password)

# 一般的网站都不用默认的加密方式,都是自己写

# 那么我们就需要按照网站的加密方式,自己写一个类似于_basic_auth_str的方法

# 得到加密字符串后添加到请求头

#         r.headers['Authorization'] =func('.....')

#看一看默认的加密方式吧,通常网站都不会用默认的加密设置

import requests

from requests.auth import HTTPBasicAuth

r=requests.get('xxx',auth=HTTPBasicAuth('user','password'))

print(r.status_code)

#HTTPBasicAuth可以简写为如下格式

import requests

r=requests.get('xxx',auth=('user','password'))

print(r.status_code)
异常处理:
#异常处理

import requests

from requests.exceptions import * #可以查看requests.exceptions获取异常类型

try:

    r=requests.get('http://www.baidu.com',timeout=0.00001)

except ReadTimeout:

    print('===:')

# except ConnectionError: #网络不通

#     print('-----')

# except Timeout:

#     print('aaaaa')

except RequestException:

    print('Error')
上传文件:
import requests

files={'file':open('a.jpg','rb')}

respone=requests.post('http://httpbin.org/post',files=files)

print(respone.status_code)
六 补充
re.S:将所有的面页当成一行的字符串。
def parse_index(index_contents):

    index_contents=index_contents.result()

    detail_data_list=re.findall('class="items".*?href="(.*?)"',index_contents,re.S)

    for detail_url in detail_data_list:

        if not detail_url.startswith('http'):

            detail_url='http://www.xiaohuar.com'+detail_url

        pool.submit(getpage,detail_url).add_done_callback(parse_detail)
uellib.parse.urlencode:转换url后面文字的编码格式
# import requests

# from urllib.parse import urlencode

#

# params={

#     'wd':'美女'

# }

#

# url='https://www.baidu.com/s?%s'%urlencode(params,encoding='utf-8')

#

# pesponse=requests.get(url,

#                       headers={

#                           'User-Agent':'Mozilla/5.0 (Windows NT 10.0; WOW64; rv:57.0) Gecko/20100101 Firefox/57.0',

#                       }

#                       )

#

#

# print(pesponse.status_code)

# print(pesponse.text)

#

# pesponse.encoding='utf-8'

#

# with open('meinv.html','w',encoding='utf-8')as f:

#     f.write(pesponse.text)
七 练习
爬校花网视频
import requests #pip install requests

import re

import os

import hashlib

import time

from concurrent.futures import ThreadPoolExecutor

pool=ThreadPoolExecutor(50)

DOWLOAD_PATH=r'D:\DOWNLOAD'

def get_page(url):

    try:

        response=requests.get(url,)

        if response.status_code == 200:

            return response.text

    except Exception:

        pass

def parse_index(index_contents):

    index_contents=index_contents.result()

    detail_urls=re.findall('class="items".*?href="(.*?)"',index_contents,re.S)

    for detail_url in detail_urls:

        if not detail_url.startswith('http'):

            detail_url='http://www.xiaohuar.com'+detail_url

        pool.submit(get_page,detail_url).add_done_callback(parse_detail)

def parse_detail(detail_contents):

    detail_contents=detail_contents.result()

    movie_urls=re.findall('id="media".*?src="(.*?)"',detail_contents,re.S)

    if movie_urls:

        movie_url=movie_urls[0]

        if movie_url.endswith('mp4'):

           pool.submit(download,movie_url)

def download(movie_url):

    # print(movie_url)

    try:

        response=requests.get(movie_url,

                              )

        if response.status_code == 200:

            data=response.content

            m=hashlib.md5()

            m.update(str(time.time()).encode('utf-8'))

            m.update(movie_url.encode('utf-8'))

            filepath=os.path.join(DOWLOAD_PATH,'%s.mp4' %m.hexdigest())

            with open(filepath,'wb') as f:

                f.write(data)

                f.flush()

                print('下载成功',movie_url)

    except Exception:

        pass

def main():

    raw_url='http://www.xiaohuar.com/list-3-{page_num}.html'

    for i in range(5):

        #请求索引页,解析拿到详情页链接

        index_url=raw_url.format(page_num=i)

        pool.submit(get_page,index_url).add_done_callback(parse_index)

if __name__ == '__main__':

    main()
爬取拉勾网职位信息
X_Anti_Forge_Token:动态token,防御伪查找请求。
X_Anti_Forge_Code:
X_Requested_With:请求的一个方式
city:省
district:城市名
gj:工作经验
kd:请求的关键字
xl:学历
jd:是否融资
hy:职位
px:排序
yx:工资
requests是不能够发送ajax请求的。
type:类型
force:True:强制投递
positionID:id查找
import requests

import re

# 1、============================================认证流程

session = requests.session()

# 第一步:

# 请求的URL:https://passport.lagou.com/login/login.html,

# 请求的方法GET,

# 请求头只包含User-agent

r1 = session.get('https://passport.lagou.com/login/login.html',

                 headers={

                     'User-Agent': 'Mozilla/5.0 (Windows NT 6.1; Win64; x64) AppleWebKit/537.36 (KHTML, like Gecko) Chrome/63.0.3239.84 Safari/537.36',

                 },

                 )

X_Anti_Forge_Token = re.findall("X_Anti_Forge_Token = '(.*?)'", r1.text, re.S)[0]

X_Anti_Forge_Code = re.findall("X_Anti_Forge_Code = '(.*?)'", r1.text, re.S)[0]

# print(X_Anti_Forge_Code)

# print(X_Anti_Forge_Token)

# 第二步:

# 1、请求的URL:https://passport.lagou.com/login/login.json,

# 2、请求方法POST,

# 3、请求头:

#   Referer:https://passport.lagou.com/login/login.html

#   User-Agent:

#   X-Anit-Forge-Code

#   X-Anit-Forge-Token

#   X-Requested-With

# 4、请求体:

# isValidate:true

# username:1111111111

# password:70621c64832c4d4d66a47be6150b4a8e #代表明文密码alex3714

session.post('https://passport.lagou.com/login/login.json',

             headers={

                 'Referer': 'https://passport.lagou.com/login/login.html',

                 'User-Agent': 'Mozilla/5.0 (Windows NT 6.1; Win64; x64) AppleWebKit/537.36 (KHTML, like Gecko) Chrome/63.0.3239.84 Safari/537.36',

                 'X-Anit-Forge-Code': X_Anti_Forge_Code,

                 'X-Anit-Forge-Token': X_Anti_Forge_Token,

                 'X-Requested-With': 'XMLHttpRequest'

             },

             data={

                 'isValidate': True,

                 'username': '',

                 'password': '70621c64832c4d4d66a47be6150b4a8e'

             }

             )

# 第三:

# 1、请求的URL:https://passport.lagou.com/grantServiceTicket/grant.html,

# 2、请求方法GET,

# 3、请求头:

#   Referer:https://passport.lagou.com/login/login.html

#   User-Agent:

session.get('https://passport.lagou.com/grantServiceTicket/grant.html',

            headers={

                'Referer': 'https://passport.lagou.com/login/login.html',

                'User-Agent': 'Mozilla/5.0 (Windows NT 6.1; Win64; x64) AppleWebKit/537.36 (KHTML, like Gecko) Chrome/63.0.3239.84 Safari/537.36',

            }

            )

# 验证

response = session.get('https://www.lagou.com/resume/myresume.html',

                       headers={

                           'User-Agent': 'Mozilla/5.0 (Windows NT 6.1; Win64; x64) AppleWebKit/537.36 (KHTML, like Gecko) Chrome/63.0.3239.84 Safari/537.36',

                       }

                       )

# print('18611453110' in response.text)

# 2、============================================爬取职位信息

# 1、请求的url:https://www.lagou.com/jobs/positionAjax.json

# 2、请求的方式:POST

#   请求参数:

#     gj:3年及以下

#     xl:不要求

#     jd:不需要融资

#     hy:移动互联网

#     px:default

#     yx:15k-25k

#     city:全国

# 3、请求头:

# User-Agent

# Referer:https://www.lagou.com/jobs/list_%E4%BA%BA%E5%B7%A5%E6%99%BA%E8%83%BD

# X-Anit-Forge-Code:0

# X-Anit-Forge-Token:None

# X-Requested-With:XMLHttpRequest

# 4、请求体:

# first:true

# pn:1

# kd:python数据分析

from urllib.parse import urlencode

params = {'kw': 'python数据分析'}

res = urlencode(params).split('=')[-1]

url = 'https://www.lagou.com/jobs/list_' + res

# print(url)

response = session.post('https://www.lagou.com/jobs/positionAjax.json',

                        params={

                            # 'gj': '3年及以下',

                            # 'xl': '不要求',

                            # 'jd': '不需要融资',

                            # 'hy': '移动互联网',

                            'px': 'default',

                            'yx': '15k-25k',

                            'city': '北京',

                            'district': '海淀区',

                        },

                        headers={

                            'User-Agent': 'Mozilla/5.0 (Windows NT 6.1; Win64; x64) AppleWebKit/537.36 (KHTML, like Gecko) Chrome/63.0.3239.84 Safari/537.36',

                            'Referer': url,

                        })

# print(response.status_code)

result = response.json()['content']['positionResult']['result']

for comanpy_info in result:

    fullname = comanpy_info['companyFullName']

    emp_num = comanpy_info['companySize']

    salary = comanpy_info['salary']

    workyear = comanpy_info['workYear']

    positionName = comanpy_info['positionName']

    positionId = comanpy_info['positionId']

    detail_url = 'https://www.lagou.com/jobs/%s.html' % (positionId)

    print(detail_url)

    print(fullname)

    print(emp_num)

    print(salary)

    print(workyear)

    print(positionName)

    print(positionId)

    print()

    # 3、============================================爬取职位信息

    # 第一步:请求详情页:

    # 1、请求的detail_url:https://www.lagou.com/jobs/3984845.html

    # 2、请求的方式:GET

    # 3、请求头:

    #    User-Agent

    r1 = session.get(detail_url,

                     headers={

                         'User-Agent': 'Mozilla/5.0 (Windows NT 6.1; Win64; x64) AppleWebKit/537.36 (KHTML, like Gecko) Chrome/63.0.3239.84 Safari/537.36',

                     }

                     )

    X_Anti_Forge_Token = re.findall("X_Anti_Forge_Token = '(.*?)'", r1.text, re.S)[0]

    X_Anti_Forge_Code = re.findall("X_Anti_Forge_Code = '(.*?)'", r1.text, re.S)[0]

    # 第二步:投递简历

    # 1、请求的url:https://www.lagou.com/mycenterDelay/deliverResumeBeforce.json

    # 2、请求的方式:POST

    # 3、请求头:

    # User-Agent

    # Referer:detail_url

    # X-Anit-Forge-Code:31832262

    # X-Anit-Forge-Token:9ee8b4bc-7107-49a0-a205-cedd7e77c2d7

    # X-Requested-With:XMLHttpRequest

    # 4、请求体:

    # 'positionId':3984845

    # 'type':1

    # 'force':True

    session.post('https://www.lagou.com/mycenterDelay/deliverResumeBeforce.json',

                 headers={

                     'User-Agent': 'Mozilla/5.0 (Windows NT 6.1; Win64; x64) AppleWebKit/537.36 (KHTML, like Gecko) Chrome/63.0.3239.84 Safari/537.36',

                     'Referer': detail_url,

                     'X-Anit-Forge-Code': X_Anti_Forge_Code,

                     'X-Anit-Forge-Token': X_Anti_Forge_Token,

                     'X-Requested-With': 'XMLHttpRequest'

                 },

                 data={

                     'positionId': positionId,

                     'type': 1,

                     'force': True

                 }

                 )

    print('投递成功',detail_url)
爬虫模块之requests模块的更多相关文章
- 爬虫简介与requests模块
爬虫简介与requests模块 一 爬虫简介 概述 网络爬虫是一种按照一定规则,通过网页的链接地址来寻找网页的,从网站某一个页面(通常是首页)开始,读取网页的内容,找到网页中的其他链接地址,然后通过这 ...
- 爬虫(四):requests模块
1. requests模块 1.1 requests简介 requests 是一个功能强大.简单易用的 HTTP 请求库,比起之前用到的urllib模块,requests模块的api更加便捷.(本质就 ...
- 模块讲解---time模块,datetime模块,random模块,hashlib模块和hmac模块,typing模块,requests模块,re模块
目录 1. 包 2. time模块 1. 优先掌握 2. 了解 3. datetime模块 1. 优先掌握 4. random模块 1. 优先掌握 2. 了解 5. hashlib模块 ...
- 爬虫基础之requests模块
1. 爬虫简介 1.1 概述 网络爬虫(又被称为网页蜘蛛,网络机器人,在FOAF社区中间,更经常的称为网页追逐者),是一种按照一定的规则,自动地抓取万维网信息的程序或者脚本. 1.2 爬虫的价值 在互 ...
- 爬虫开发5.requests模块的cookie和代理操作
代理和cookie操作 一.基于requests模块的cookie操作 引言:有些时候,我们在使用爬虫程序去爬取一些用户相关信息的数据(爬取张三“人人网”个人主页数据)时,如果使用之前requests ...
- 爬虫开发3.requests模块
requests模块 - 基于如下5点展开requests模块的学习 什么是requests模块 requests模块是python中原生的基于网络请求的模块,其主要作用是用来模拟浏览器发起请求.功能 ...
- python网络爬虫之二requests模块
requests http请求库 requests是基于python内置的urllib3来编写的,它比urllib更加方便,特别是在添加headers, post请求,以及cookies的设置上,处理 ...
- 爬虫中之Requests 模块的进阶
requests进阶内容 session处理cookie proxies参数设置请求代理ip 基于线程池的数据爬取 引入 有些时候,我们在使用爬虫程序去爬取一些用户相关信息的数据(爬取张三“人人网”个 ...
- 爬虫简介和requests模块
目录 爬虫介绍 requests模块 requests模块 1.requests模块的基本使用 2.get 请求携带参数,调用params参数,其本质上还是调用urlencode 3.携带header ...
随机推荐
- js 小结
<script type="text/javascript"> var hotalAddJs = { makeSubmitDataHandler: function ( ...
- HDU5532 Almost Sorted Array(最长上升子序列 or 瞎搞个做差的数组)
题目链接:点我 题意:给定一个序列,询问是否能删除一个数让它成为非递减或者非递增的序列. 比如说 删除后的序列是1 3 3 5 或者5 3 3 1 或者1 3 5 或者5 3 1 都可以.只要满足删掉 ...
- Shell教程 之数组
1.定义数组 数组中可以存放多个值.Bash Shell 只支持一维数组(不支持多维数组),初始化时不需要定义数组大小(与 PHP 类似). 与大部分编程语言类似,数组元素的下标由0开始. Shell ...
- 学习Junit资料
以下是找到的一些有用的学习资料,先收藏了 http://www.blogjava.net/jiangshachina/archive/2011/12/14/366289.html http://www ...
- Django具体操作(五)
一.中间件的概念 中间件顾名思义,是介于request与response处理之间的一道处理过程,相对比较轻量级,并且在全局上改变django的输入与输出.因为改变的是全局,所以需要谨慎实用,用不好会影 ...
- Django xadmin 根据登录用户过滤数据
在adminx.py文件对应的的class中添加如下代码: def queryset(self): qs = super(taskAdmin, self).queryset() if self.req ...
- MongoDB的索引(六)
数据准备:在mongodb命令行终端执行如下代码 for(var i=0;i<100000;i++) { ... db.users.insert({username:"user&quo ...
- appium 问题
adb shell pm list packages:列出所有的包名.adb shell dumpsys package:列出所有的安装应用的信息dumpsys package com.android ...
- ORACLE分组查询和统计等
select flow_id,rw from (select t.flow_id ,rownum as rw from apex_030200.wwv_flow_list_templates t) ...
- js封装插件
js方式: (function(){ var demo = function(options){ this.options = $.extend({ "x" : "1&q ...