用keras的cnn做人脸分类
keras介绍
Keras是一个简约,高度模块化的神经网络库。采用Python / Theano开发。
使用Keras如果你需要一个深度学习库:
可以很容易和快速实现原型(通过总模块化,极简主义,和可扩展性)
同时支持卷积网络(vision)和复发性的网络(序列数据)。以及两者的组合。
无缝地运行在CPU和GPU上。
keras的资源库网址为https://github.com/fchollet/keras
olivettifaces人脸数据库介绍
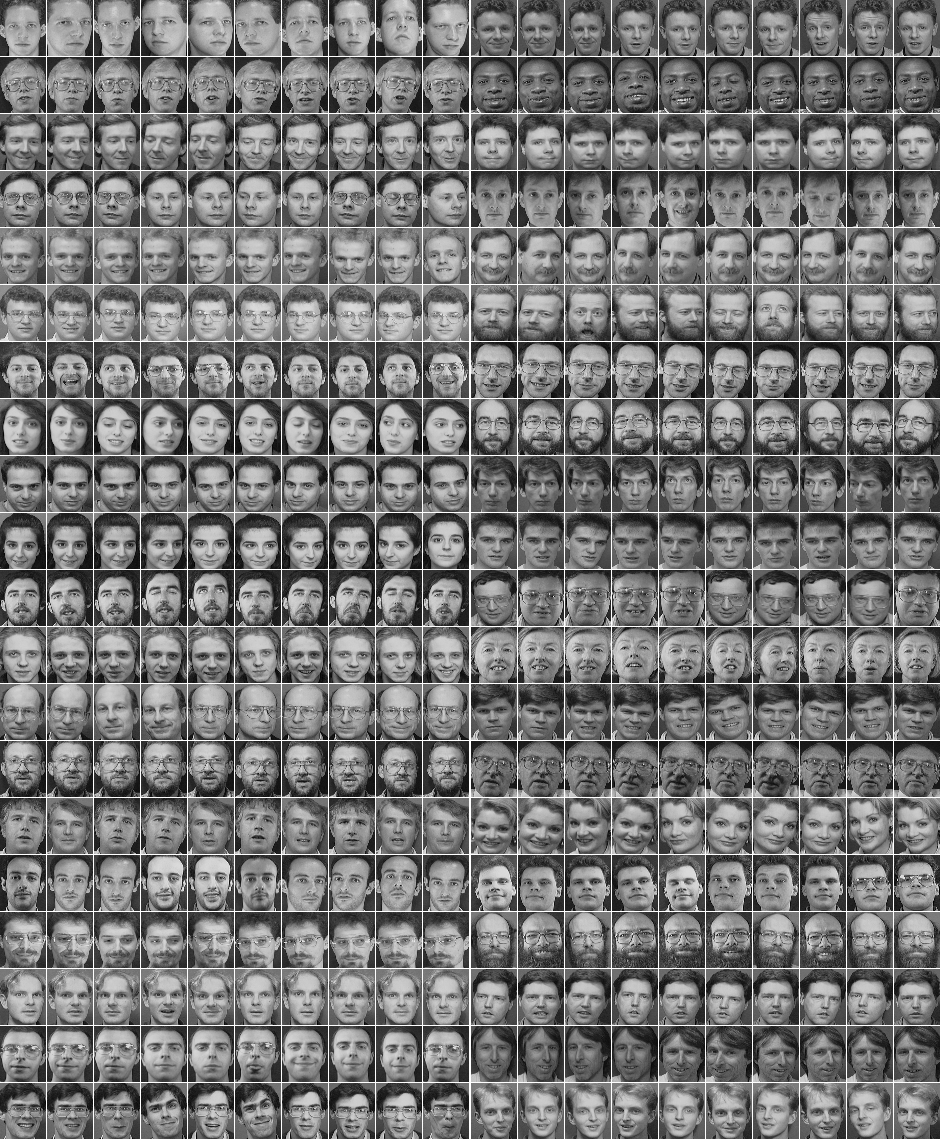
Olivetti Faces是纽约大学的一个比较小的人脸库,由 40个人的400张图片构成,即每个人的人脸图片为10张。每张图片的灰度级为8位,每个像素的灰度大小位于0-255之间,每张图片大小为64×64。 如下图,这个图片大小是1140942,一共有2020张人脸,故每张人脸大小是(1140/20)(942/20)即5747=2679:
预处理模块
使用了PIL(Python Imaging Library)模块,是Python平台事实上的图像处理标准库。
预处理流程是:打开文件-》归一化-》将图片转为数据集-》生成label-》使用pickle序列化数据集
numpy.ndarray.flatten函数的功能是将一个矩阵平铺为向量
from PIL import Image

import numpy

import cPickle

img = Image.open('G:\data\olivettifaces.gif')

# numpy supports conversion from image to ndarray and normalization by dividing 255

# 1140 * 942 ndarray

img_ndarray = numpy.asarray(img, dtype='float64') / 255

# create numpy array of 400*2679

img_rows, img_cols = 57, 47

face_data = numpy.empty((400, img_rows*img_cols))

# convert 1140*942 ndarray to 400*2679 matrix

for row in range(20):

    for col in range(20):

        face_data[row*20+col] = numpy.ndarray.flatten(img_ndarray[row*img_rows:(row+1)*img_rows, col*img_cols:(col+1)*img_cols])

# create label

face_label = numpy.empty(400, dtype=int)

for i in range(400):

    face_label[i] = i / 10

# pickling file

f = open('G:\data\olivettifaces.pkl','wb')

# store data and label as a tuple

cPickle.dump((face_data,face_label), f)

f.close()
分类模型
程序参考了官方示例:https://github.com/fchollet/keras/blob/master/examples/mnist_cnn.py
一共有40个类,每个类10个样本,共400个样本。其中320个样本用于训练,40个用于验证,剩下40个测试
注意给第一层指定input_shape,如果是MLP,代码为:
model = Sequential()

# Dense(64) is a fully-connected layer with 64 hidden units.# in the first layer, you must specify the expected input data shape:# here, 20-dimensional vectors.

model.add(Dense(64, input_dim=20, init='uniform'))
后面可以不指定Dense的input shape
from __future__ import print_function
import numpy as np
import cPickle
np.random.seed(1337) # for reproducibililty
from keras.datasets import mnist
from keras.models import Sequential
from keras.layers.core import Dense, Dropout, Activation, Flatten
from keras.layers.convolutional import Convolution2D, MaxPooling2D
from keras.utils import np_utils
# split data into train,vavlid and test
# train:320
# valid:40
# test:40
def split_data(fname):
f = open(fname, 'rb')
face_data,face_label = cPickle.load(f)
X_train = np.empty((320, img_rows * img_cols))
Y_train = np.empty(320, dtype=int)
X_valid = np.empty((40, img_rows* img_cols))
Y_valid = np.empty(40, dtype=int)
X_test = np.empty((40, img_rows* img_cols))
Y_test = np.empty(40, dtype=int)
for i in range(40):
X_train[i*8:(i+1)*8,:] = face_data[i*10:i*10+8,:]
Y_train[i*8:(i+1)*8] = face_label[i*10:i*10+8]
X_valid[i] = face_data[i*10+8,:]
Y_valid[i] = face_label[i*10+8]
X_test[i] = face_data[i*10+9,:]
Y_test[i] = face_label[i*10+9]
return (X_train, Y_train, X_valid, Y_valid, X_test, Y_test)
if __name__=='__main__':
batch_size = 10
nb_classes = 40
nb_epoch = 12
# input image dimensions
img_rows, img_cols = 57, 47
# number of convolutional filters to use
nb_filters = 32
# size of pooling area for max pooling
nb_pool = 2
# convolution kernel size
nb_conv = 3
(X_train, Y_train, X_valid, Y_valid, X_test, Y_test) = split_data('G:\data\olivettifaces.pkl')
X_train = X_train.reshape(X_train.shape[0], 1, img_rows, img_cols)
X_test = X_test.reshape(X_test.shape[0], 1, img_rows, img_cols)
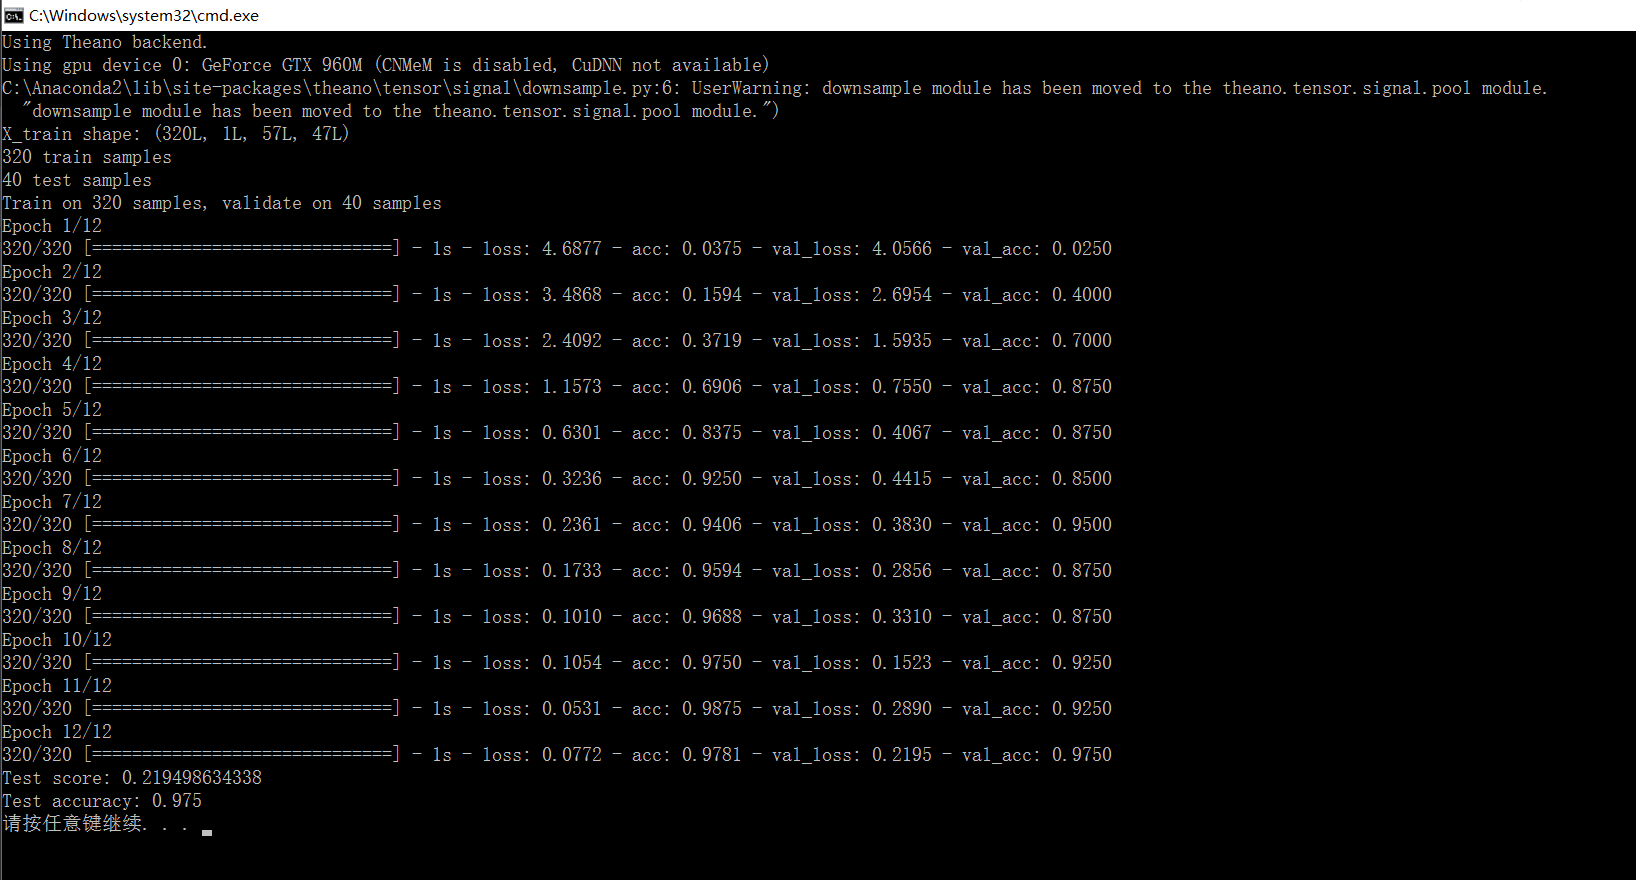
print('X_train shape:', X_train.shape)
print(X_train.shape[0], 'train samples')
print(X_test.shape[0], 'test samples')
# convert label to binary class matrix
Y_train = np_utils.to_categorical(Y_train, nb_classes)
Y_test = np_utils.to_categorical(Y_test, nb_classes)
model = Sequential()
# 32 convolution filters , the size of convolution kernel is 3 * 3
# border_mode can be 'valid' or 'full'
#‘valid’only apply filter to complete patches of the image.
# 'full' zero-pads image to multiple of filter shape to generate output of shape: image_shape + filter_shape - 1
# when used as the first layer, you should specify the shape of inputs
# the first number means the channel of an input image, 1 stands for grayscale imgs, 3 for RGB imgs
model.add(Convolution2D(nb_filters, nb_conv, nb_conv,
border_mode='valid',
input_shape=(1, img_rows, img_cols)))
# use rectifier linear units : max(0.0, x)
model.add(Activation('relu'))
# second convolution layer with 32 filters of size 3*3
model.add(Convolution2D(nb_filters, nb_conv, nb_conv))
model.add(Activation('relu'))
# max pooling layer, pool size is 2 * 2
model.add(MaxPooling2D(pool_size=(nb_pool, nb_pool)))
# drop out of max-pooling layer , drop out rate is 0.25
model.add(Dropout(0.25))
# flatten inputs from 2d to 1d
model.add(Flatten())
# add fully connected layer with 128 hidden units
model.add(Dense(128))
model.add(Activation('relu'))
model.add(Dropout(0.5))
# output layer with softmax
model.add(Dense(nb_classes))
model.add(Activation('softmax'))
# use cross-entropy cost and adadelta to optimize params
model.compile(loss='categorical_crossentropy', optimizer='adadelta')
# train model with bath_size =10, epoch=12
# set verbose=1 to show train info
model.fit(X_train, Y_train, batch_size=batch_size, nb_epoch=nb_epoch,
show_accuracy=True, verbose=1, validation_data=(X_test, Y_test))
# evaluate on test set
score = model.evaluate(X_test, Y_test, show_accuracy=True, verbose=0)
print('Test score:', score[0])
print('Test accuracy:', score[1])
结果:
准确率有97%
用keras的cnn做人脸分类的更多相关文章
- 使用CNN做文本分类——将图像2维卷积换成1维
使用CNN做文本分类 from __future__ import division, print_function, absolute_import import tensorflow as tf ...
- keras 的svm做分类
SVC继承了父类BaseSVC SVC类主要方法: ★__init__() 主要参数: C: float参数 默认值为1.0 错误项的惩罚系数.C越大,即对分错样本的惩罚程度越大,因此在训练样本中准确 ...
- .NET做人脸识别并分类
.NET做人脸识别并分类 在游乐场.玻璃天桥.滑雪场等娱乐场所,经常能看到有摄影师在拍照片,令这些经营者发愁的一件事就是照片太多了,客户在成千上万张照片中找到自己可不是件容易的事.在一次游玩等活动或家 ...
- CNN眼中的世界:利用Keras解释CNN的滤波器
转载自:https://keras-cn.readthedocs.io/en/latest/legacy/blog/cnn_see_world/ 文章信息 本文地址:http://blog.keras ...
- 万字总结Keras深度学习中文文本分类
摘要:文章将详细讲解Keras实现经典的深度学习文本分类算法,包括LSTM.BiLSTM.BiLSTM+Attention和CNN.TextCNN. 本文分享自华为云社区<Keras深度学习中文 ...
- (转!)利用Keras实现图像分类与颜色分类
2018-07-19 全部谷歌渣翻加略微修改 大家将就的看哈 建议大佬们还是看看原文 点击收获原文 其中用到的示例文件 multi-output-classification 大家可以点击 下载 . ...
- 机器学习: Tensor Flow +CNN 做笑脸识别
Tensor Flow 是一个采用数据流图(data flow graphs),用于数值计算的开源软件库.节点(Nodes)在图中表示数学操作,图中的线(edges)则表示在节点间相互联系的多维数据数 ...
- Tensorflow&CNN:裂纹分类
版权声明:本文为博主原创文章,转载 请注明出处:https://blog.csdn.net/sc2079/article/details/90478551 - 写在前面 本科毕业设计终于告一段落了.特 ...
- 基于CNN的人脸相似度检测
人脸相似度检测主要是检测两张图片中人脸的相似度,从而判断这两张图片的对象是不是一个人. 在上一篇文章中,使用CNN提取人脸特征,然后利用提取的特征进行分类.而在人脸相似度检测的工作中,我们也可以利用卷 ...
随机推荐
- C# 加密解密文件
using System; using System.Collections.Generic; using System.Text; using System.Security.Cryptograph ...
- Composer实现PHP中类的自动加载
本篇博客承接上一篇,学习一下Composer实现的PHP的类的自动加载方式.首先说明一下,Composer是PHP针对PHP语言的第三方的依赖管理工具,将工程所用到的依赖文件包含在composer.j ...
- java二
一,面向对象 面向对象,似乎是太抽象了点,没人敢拍着胸脯说我面向对象学到了100%,纵然如此,了解面向对象的思想对于学好java等面向对象编程语言有着莫大的好处,因为一通百通,同样是面向对象,等你精通 ...
- rabbitMQ学习(二)
一端发送,多端消费 发送端: import java.io.IOException; import com.rabbitmq.client.ConnectionFactory; import com. ...
- ajax同步异步问题
之前一直在写JQUERY代码的时候遇到AJAX加载数据都需要考虑代码运行顺序问题.最近的项目用了到AJAX同步.这个同步的意思是当JS代码加载到当前AJAX的时候会把页面里所有的代码停止加载,页面出去 ...
- VLAN 间路由的几种方法
方法一:给每个VLAN去分配一个路由器的物理连接第一步,PC设置IP地址和网关192.168.2.2/24 网关是192.168.2.1192.168.3.2/24 网关是192.168.3.1第二步 ...
- C#中string在内存中是如何表示的
不知道你是否有过和我一样的疑问,不同编码的字符串是如何存储在运行时的内存中的呢,计算机在操作string类型的对象时,如何知道这个string是什么编码呢?和文本文件那样有类似BOM的东东在strin ...
- 【英语魔法俱乐部——读书笔记】 1 初级句型-简单句(Simple Sentences)
第一部分 1 初级句型-简单句(Simple Sentences):(1.1)基本句型&补语.(1.2)名词短语&冠词.(1.3)动词时态.(1.4)不定式短语.(1.5)动名词.(1 ...
- windows 下 node.js 和 express 的安装
下载 node 下载和安装 下载地址 https://nodejs.org/en/ 下载文件 node-v4.5.0-x64.msi nodejs 安装 express -g 代表全局安装 npm i ...
- SDRAM的主要参数
(1) 容量.SDRAM的容量经常用XX存储单元×X体×每个存储单元的位数来表示.例如某SDRAM芯片的容量为4M×4×8bit,表明该存储器芯片的容量为16 M字节.或128 M bit. (2) ...