
CS231n 2016 通关 第二章-KNN 作业分析
KNN作业要求:
1、掌握KNN算法原理
2、实现具体K值的KNN算法
3、实现对K值的交叉验证
1、KNN原理见上一小节
2、实现KNN
过程分两步:
1、计算测试集与训练集的距离
2、通过比较label出现比例的方式,确定选取的最终label
代码分析:
cell1 - cell5 对数据的预处理
cell6创建KNN类,初始化类的变量,此处是传递测试数据和训练数据
cell7实现包含两个循环的KNN算法:
通过计算单一的向量与矩阵之间的距离(在之前的cell中,已经将图像转换成列:32*32 的图像转换为 1*3072,,
测试集是500张:500*3072,训练集是5000张:5000*3072)
代码基础:使用python 2.7.9 + numpy 1.11.0
技巧:使用help 查看相关函数的用法,或者google
举例:np.square
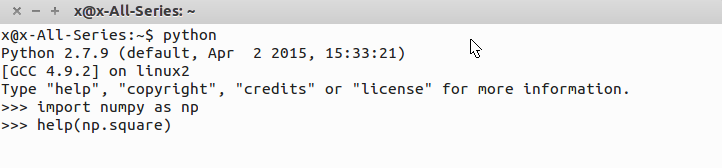
q 键退出help
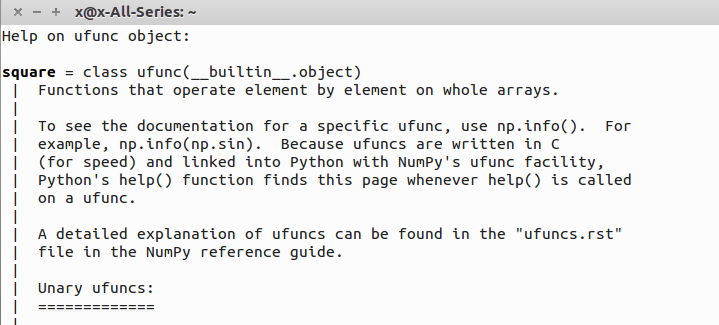
可知,np.square() 为了加快运算速度,是用c写的,在这里查不到具体用法。google查看:

例子为计算数组[-1j,1]里边各元素的平方,得到的结果为[-1,1]
代码:实现compute_distances_two_loops(self, X)
 1   def compute_distances_two_loops(self, X):

     """

     Compute the distance between each test point in X and each training point

     in self.X_train using a nested loop over both the training data and the

     test data.

     Inputs:

     - X: A numpy array of shape (num_test, D) containing test data.

     Returns:

     - dists: A numpy array of shape (num_test, num_train) where dists[i, j]

       is the Euclidean distance between the ith test point and the jth training

       point.

     """

     num_test = X.shape[0]

     num_train = self.X_train.shape[0]

     dists = np.zeros((num_test, num_train))

     for i in xrange(num_test):

       for j in xrange(num_train):

         #####################################################################

         # TODO:                                                             #

         # Compute the l2 distance between the ith test point and the jth    #

         # training point, and store the result in dists[i, j]. You should   #

         # not use a loop over dimension.                                    #

         #####################################################################

         dists[i,j] = np.sqrt(np.sum(np.square(X[i,:]-self.X_train[j,:])))

         #####################################################################

         #                       END OF YOUR CODE                            #

         #####################################################################

     return dists
实现对一张测试图像对应的矩阵与一张训练集图像的矩阵做L2距离。
也可以用numpy.linalg.norm函数实现:
此函数执行的公式: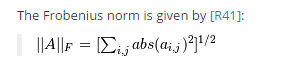
所以核心代码可以写作:
dists[i,j] = np.linalg.norm(self.X_train[j,:]-X[i,:])
cell8 得到的距离可视化,白色表示较大的距离值,黑色是较小距离值
cell9 实现K=1的label预测
代码:实现 classifier.predict_labels()
   def predict_labels(self, dists, k=1):

     """

     Given a matrix of distances between test points and training points,

     predict a label for each test point.

     Inputs:

     - dists: A numpy array of shape (num_test, num_train) where dists[i, j]

       gives the distance betwen the ith test point and the jth training point.

     Returns:

     - y: A numpy array of shape (num_test,) containing predicted labels for the

       test data, where y[i] is the predicted label for the test point X[i].

     """

     num_test = dists.shape[0]

     y_pred = np.zeros(num_test)

     for i in xrange(num_test):

       # A list of length k storing the labels of the k nearest neighbors to

       # the ith test point.

       closest_y = []

       count = []

       #########################################################################

       # TODO:                                                                 #

       # Use the distance matrix to find the k nearest neighbors of the ith    #

       # testing point, and use self.y_train to find the labels of these       #

       # neighbors. Store these labels in closest_y.                           #

       # Hint: Look up the function numpy.argsort.                             #

       #########################################################################

       buf_labels = self.y_train[np.argsort(dists[i,:])]

       closest_y = buf_labels[0:k]

       #########################################################################

       # TODO:                                                                 #

       # Now that you have found the labels of the k nearest neighbors, you    #

       # need to find the most common label in the list closest_y of labels.   #

       # Store this label in y_pred[i]. Break ties by choosing the smaller     #

       # label.                                                                #

       #########################################################################

       #for j in closest_y :

       #  count.append(closest_y.count(j))

       #m = max(count)

       #n = count.index(m)

       #y_pred[i] = closest_y[n]

       c = Counter(closest_y)

       y_pred[i] = c.most_common(1)[0][0]

       #########################################################################

       #                           END OF YOUR CODE                            #

       #########################################################################

     return y_pred
步骤:
1.使用numpy.argsort对所以距离进行排序,得到排序后的索引。
2.通过索引找到对应的label
3.通过collection包的Counter,对label进行统计表示
4.通过counter的Most common方法得到出现最多的label
cell9 在计算完成后,同时实现了准确率的计算
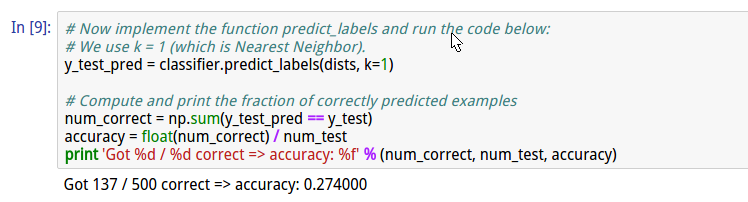
cell10 实现K =5的KNN

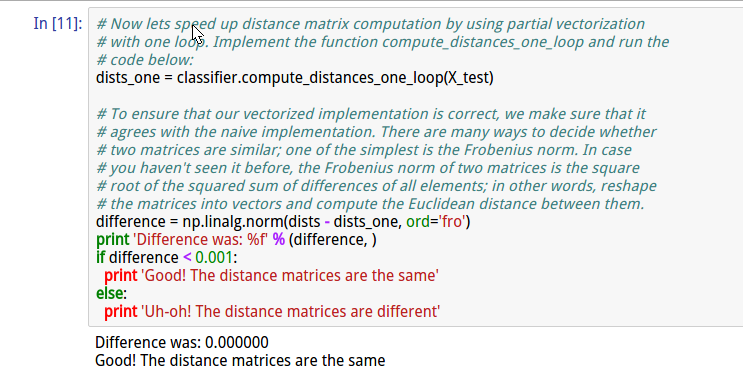
cell11 实现compute_distances_one_loop(X_test)
代码:
   def compute_distances_one_loop(self, X):

     """

     Compute the distance between each test point in X and each training point

     in self.X_train using a single loop over the test data.

     Input / Output: Same as compute_distances_two_loops

     """

     num_test = X.shape[0]

     num_train = self.X_train.shape[0]

     dists = np.zeros((num_test, num_train))

     for i in xrange(num_test):

       #######################################################################

       # TODO:                                                               #

       # Compute the l2 distance between the ith test point and all training #

       # points, and store the result in dists[i, :].                        #

       #######################################################################

       buf = np.square(self.X_train-X[i,:])

       dists[i,:] = np.sqrt(np.sum(buf,axis=1))

       #######################################################################

       #                         END OF YOUR CODE                            #

       #######################################################################

     return dists
并通过计算一个循环与两个循环分别得到的结果的差值平方,来衡量准确性。
cell12 实现完全的数组操作,不使用循环。
   def compute_distances_no_loops(self, X):

     """

     Compute the distance between each test point in X and each training point

     in self.X_train using no explicit loops.

     Input / Output: Same as compute_distances_two_loops

     """

     num_test = X.shape[0]

     num_train = self.X_train.shape[0]

     dists = np.zeros((num_test, num_train))

     #########################################################################

     # TODO:                                                                 #

     # Compute the l2 distance between all test points and all training      #

     # points without using any explicit loops, and store the result in      #

     # dists.                                                                #

     #                                                                       #

     # You should implement this function using only basic array operations; #

     # in particular you should not use functions from scipy.                #

     #                                                                       #

     # HINT: Try to formulate the l2 distance using matrix multiplication    #

     #       and two broadcast sums.                                         #

     #########################################################################

     #buf = np.tile(X,(1,num_train))

     buf = np.dot(X, self.X_train.T)

     buf_test = np.square(X).sum(axis = 1)

     buf_train = np.square(self.X_train).sum(axis = 1)

     dists = np.sqrt(-2*buf+buf_train+np.matrix(buf_test).T)

     #########################################################################

     #                         END OF YOUR CODE                              #

     #########################################################################

     return dists
使用(a-b)2=a2+b2-2ab 的公式
27行: 此时buf_test 为500*1数组 buf_train为5000*1的数组 需要得到500*5000的数组 此处通过构造矩阵的方式进行broadcast
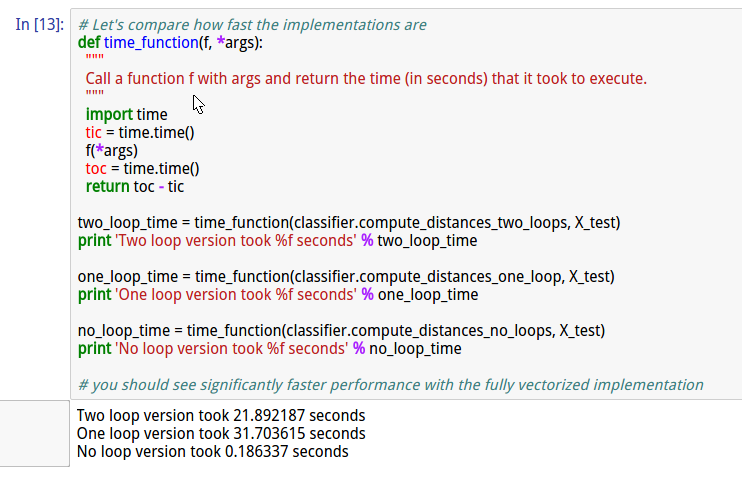
cell13 比较3种方案的执行效率
cell14 交叉验证
交叉验证的思想在上一节有解释过了
代码:(其中带有注释)
 num_folds = 5

 k_choices = [1, 3, 5, 8, 10, 12, 15, 20, 50, 100]

 X_train_folds = []

 y_train_folds = []

 ################################################################################

 # TODO:                                                                        #

 # Split up the training data into folds. After splitting, X_train_folds and    #

 # y_train_folds should each be lists of length num_folds, where                #

 # y_train_folds[i] is the label vector for the points in X_train_folds[i].     #

 # Hint: Look up the numpy array_split function.                                #

 ################################################################################

 X_train_folds = np.array_split(X_train, num_folds)

 y_train_folds = np.array_split(y_train, num_folds)

 ################################################################################

 #                                 END OF YOUR CODE                             #

 ################################################################################

 # A dictionary holding the accuracies for different values of k that we find

 # when running cross-validation. After running cross-validation,

 # k_to_accuracies[k] should be a list of length num_folds giving the different

 # accuracy values that we found when using that value of k.

 k_to_accuracies = {}

 ################################################################################

 # TODO:                                                                        #

 # Perform k-fold cross validation to find the best value of k. For each        #

 # possible value of k, run the k-nearest-neighbor algorithm num_folds times,   #

 # where in each case you use all but one of the folds as training data and the #

 # last fold as a validation set. Store the accuracies for all fold and all     #

 # values of k in the k_to_accuracies dictionary.                               #

 ################################################################################

 for k in k_choices:

     k_to_accuracies[k] = []

 for k in k_choices:

     print 'evaluating k=%d' % k

     for j in range(num_folds):

         #get validation

         X_train_cv = np.vstack(X_train_folds[0:j]+X_train_folds[j+1:])

         X_test_cv = X_train_folds[j]

         y_train_cv = np.hstack(y_train_folds[0:j]+y_train_folds[j+1:])

         y_test_cv = y_train_folds[j]

         #train

         classifier.train(X_train_cv, y_train_cv)

         dists_cv = classifier.compute_distances_no_loops(X_test_cv)

         #get accuracy

         y_test_pred = classifier.predict_labels(dists_cv, k)

         num_correct = np.sum(y_test_pred == y_test_cv)

         accuracy = float(num_correct) / num_test

         #add j th accuracy of k to array

         k_to_accuracies[k].append(accuracy)

 ################################################################################

 #                                 END OF YOUR CODE                             #

 ################################################################################

 # Print out the computed accuracies

 for k in sorted(k_to_accuracies):

     for accuracy in k_to_accuracies[k]:

         print 'k = %d, accuracy = %f' % (k, accuracy)
cell15 显示k值对应的准确率

上述包含了均值和标准差
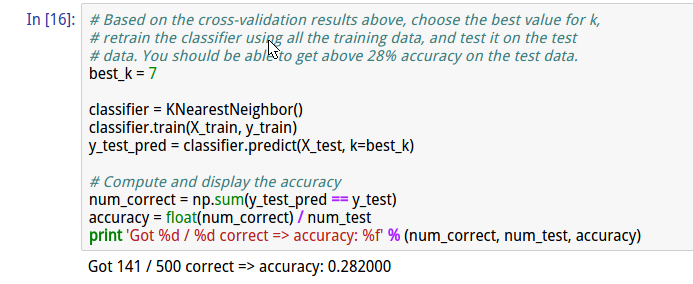
cell16 使用最优值,得到较好的准确率
总结:
整体来说,第一个作业难度较大,主要难度不是在算法部分,而是在熟悉python相关函数与相应的用法方面。对于python大神而言,难度低。
但是经过扎实的第一次作业后,后边的作业相对简单了。之后的作业细节方面讲解的少些。
附:通关CS231n企鹅群:578975100 validation:DL-CS231n
CS231n 2016 通关 第二章-KNN 作业分析的更多相关文章
- CS231n 2016 通关 第二章-KNN
课程内容全纪录: 1.讲解图像分类的难点 1.光照强度 2.主体变形 3.主体与背景咬合 4.主体与背景相接近 5.同类别间存在区别 2.KNN 1.最近邻算法 2.Knn 3.hyperpara ...
- CS231n 2016 通关 第一章-内容介绍
第一节视频的主要内容: Fei-Fei Li 女神对Computer Vision的整体介绍.包括了发展历史中的重要事件,其中最为重要的是1959年测试猫视觉神经的实验. In 1959 Harvar ...
- CS231n 2016 通关 第三章-SVM与Softmax
1===本节课对应视频内容的第三讲,对应PPT是Lecture3 2===本节课的收获 ===熟悉SVM及其多分类问题 ===熟悉softmax分类问题 ===了解优化思想 由上节课即KNN的分析步骤 ...
- CS231n 2016 通关 第三章-SVM 作业分析
作业内容,完成作业便可熟悉如下内容: cell 1 设置绘图默认参数 # Run some setup code for this notebook. import random import nu ...
- CS231n 2016 通关 第三章-Softmax 作业
在完成SVM作业的基础上,Softmax的作业相对比较轻松. 完成本作业需要熟悉与掌握的知识: cell 1 设置绘图默认参数 mport random import numpy as np from ...
- CS231n 2016 通关 第五、六章 Dropout 作业
Dropout的作用: cell 1 - cell 2 依旧 cell 3 Dropout层的前向传播 核心代码: train 时: if mode == 'train': ############ ...
- CS231n 2016 通关 第五、六章 Batch Normalization 作业
BN层在实际中应用广泛. 上一次总结了使得训练变得简单的方法,比如SGD+momentum RMSProp Adam,BN是另外的方法. cell 1 依旧是初始化设置 cell 2 读取cifar- ...
- CS231n 2016 通关 第五、六章 Fully-Connected Neural Nets 作业
要求:实现任意层数的NN. 每一层结构包含: 1.前向传播和反向传播函数:2.每一层计算的相关数值 cell 1 依旧是显示的初始设置 # As usual, a bit of setup impor ...
- CS231n 2016 通关 第四章-NN 作业
cell 1 显示设置初始化 # A bit of setup import numpy as np import matplotlib.pyplot as plt from cs231n.class ...
随机推荐
- Hadoop学习(一)生态体系之简介
Hadoop 系列(一)基本概念 一.Hadoop 简介 Hadoop 是一个由 Apache 基金会所开发的分布式系统基础架构,它可以使用户在不了解分布式底层细节的情況下开发分布式程序,充分利用集群 ...
- start_kernel——mm_init_owner
全部任务都具有自己的内存,启动阶段中的当前任务必须具备属于自己的内存. mm_init_owner()函数传递init_mm和init_task參数 mm/init-mm.c struct mm_st ...
- 消息列队 php 基于redis 实现
说明 消息列队 基于PHP 实现. 之前 用python 的 flower 实现了 列队. 今天这里我们用的是 PHP 来实现: 在实际的业务环境中 PHP 用的多些: PHP 实现列队 最重要的是用 ...
- poj 2828 Buy Tickets 【线段树点更新】
题目:id=2828" target="_blank">poj 2828 Buy Tickets 题意:有n个人排队,每一个人有一个价值和要插的位置,然后当要插的位 ...
- 中科燕园GIS外包---交通运输综合地理信息平台
集地图.服务.应用于一身交通运输综合性的GIS门户 交通运输综合地理信息平台,是集地图.服务.应用于一身交通运输综合性的GIS门户.无需复杂的设置和部署,就可以高速创建交互式地图和应用程序,并 ...
- AIX下RAC搭建 Oracle10G(二)主机配置
AIX下RAC搭建系列 AIX下RAC搭建 Oracle10G(二)主机配置 环境 节点 节点1 节点2 小机型号 IBM P-series 630 IBM P-series 630 主机名 AIX2 ...
- 算法和流程控制 --《高性能JavaScript》
总结: 1.for, while, do-while循环性能相当,并没有一种循环类型明显快于或满于其他类型. 2.避免使用for-in循环,除非要遍历一个属性数量未知的对象. 3.改善循环性能的最佳形 ...
- u-boot简单学习笔记(三)——AR9331 uboot启动分析
1.最开始系统上电后 ENTRY(_start)程序入口点是 _start 由board/ap121/u-boot.lds引导 2._start: cpu/mips/start.S 是第一个源程序文 ...
- javascript模块化编程:CommonJS和AMD规范
AMD规范,异步模块定义.与CommonJS规范齐名并列. 作用都是利于JavaScript的模块化编程. 模块化编程的好处就是: 1.可重用 2.独立 3.能解决加载的依赖性问题 4.能解决重复加载 ...
- curl: (7) Failed to connect to 127.0.0.1 port 1086: Connection refused
今天我用curl命令,无论如何都是出现: curl: (7) Failed to connect to 127.0.0.1 port 1086: Connection refused 找了很久,不知道 ...