SAP Portal 上传资源到WRR
Uploading Resources to the Web Resource Repository
Prerequisites
You have been assigned the Content Administrator role.
Context
You can upload Web resources to the Web Resource Repository, so that they can be used by different portal components and applications. When you upload resources, they are saved as objects in the Portal Content Directory (PCD) and are also copied to the file system of the portal server (in the same folder hierarchy, and synchronized with any changes that you make). This allows the consumption of resources at runtime using relative paths. For example, a .css file that is saved in the Web Resource Repository can use a resource that is also saved in the Web Resource Repository, by specifying the following in one of its classes: background: url('../images/logo.png') .
Following are some guidelines for selecting resource files to upload:
- All resource file names that you want to upload must contain only legal characters ( A-Z , 0-9 , . , _ , % , ~ , - , ( , and ) )
- Maximum file name length is 100 characters
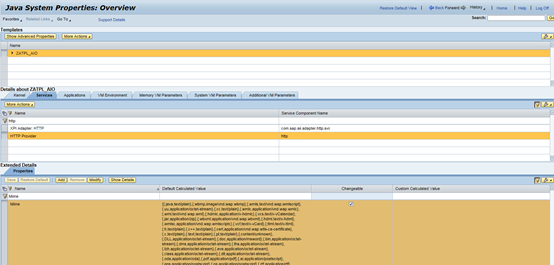
- To render, in Microsoft Internet Explorer, icons with an .ico extension that are saved in the Web Resource Repository, you need to enable support for .ico images in SAP NetWeaver Administrator.
In SAP NetWeaver Administrator, navigate to Configuration Infrastructure Java System Properties Services HTTP Provider. To the Mime property, add the following value: \{.ico,image/x-icon\} .
- Keep the folder hierarchy depth minimal, because the maximum file path for resource file storage is 120 characters (assuming that the root Web Resources folder is located here:C:\usr\sap\ROM\J00\j2ee\cluster\apps\sap.com\com.sap.portal.resourcerepository\servlet_jsp\com.sap.portal.resourcerepository\root\repo)
Note
To upload multiple resources simultaneously, add them to a compressed (.zip) file and then upload the compressed file.
If you have configured the Virus Scan Interface on your AS Java, all resource files are automatically scanned during the upload process.
Procedure
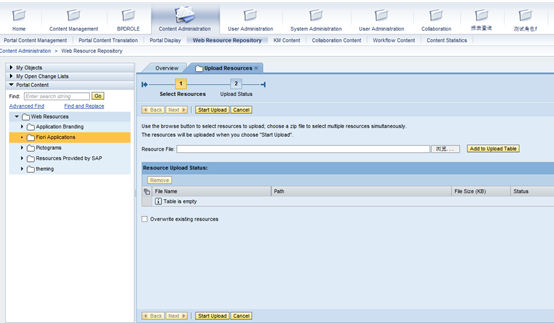
- Choose Content Administration Web Resource Repository.
- In the Portal Catalog, expand the Web Resources node and navigate to the folder into which you want to upload resources.
- From the context menu of the selected folder, choose Upload Resources . The first page of the Upload Resources wizard appears.
- In the Resource File field, choose the Browse button and select the file to upload from the file system. Choose Open .
- Choose Add to Upload Table . The selected file is added to the list of files to be uploaded. If you selected a compressed (.zip) file in the previous step, the contents of the file are extracted and added to the table, each file or folder in a single row.
In the list of files to be uploaded, each file has a status that indicates whether it can be uploaded. If a file cannot be uploaded, the reason is given (for example, a file may contain invalid characters or it may exceed the maximum file size allowed). For information about changing the maximum file size, see Modifying the Uploadable File Size . Use the Filter by Status field to more easily see the problematic files. A summary of the number of files with each status is displayed at the top of the table.
Note
To remove a resource or folder from the list of files to be uploaded, select it in the upload table and choose Remove . If you select a folder, all resources and folders located below that folder are removed from the list.
- By default, new files with duplicate names in the same folder in the Web Resource Repository are not uploaded during the upload process. To upload files with duplicate names and overwrite the existing files in the Web Resource Repository, choose the Overwrite existing resources checkbox.
Note
This option applies to all the duplicate files in the upload table.
Checks for duplicate resource names are not case-sensitive, meaning that My.png and my.png are treated as duplicate files.
- Choose Start Upload . The upload process starts, and the files with the valid (green) status are uploaded.
When the upload process is complete, the second page of the Upload Resources wizard appears. This page shows a list of all the files that were uploaded, and those that were not uploaded. A summary of the number of files that were and were not uploaded is displayed at the top of the table. If a file was not uploaded, the reason is given. Use the Filter by Status field to more easily see the files that were not uploaded.
You can now see the added resource files in the Portal Catalog, in the folder to which you uploaded them.
- To upload additional files, choose Restart Wizard ; otherwise choose Close .
SAP Portal 上传资源到WRR的更多相关文章
- 第三百八十七节,Django+Xadmin打造上线标准的在线教育平台—网站上传资源的配置与显示
第三百八十七节,Django+Xadmin打造上线标准的在线教育平台—网站上传资源的配置与显示 首先了解一下static静态文件与上传资源的区别,static静态文件里面一般防止的我们网站样式的文件, ...
- 如何使用电骡eMule上传资源
1 在电脑中创建一个文件夹专门为上传资源使用 在里面放入任意文件并右击显示ED2K链接 链接效果如下 2 登陆verycd网站,并点击上传资源 复制ED2K地址并选择分类
- django 网站上传资源的显示与配置
1. 上传资源的配置 1. 首先在项目里创建一个名称叫media的文件夹专门保存用户上传 2. settings.py文件配置上传资源的路径 # 上传资源路径,如果图片,上传文件等 MEDIA_UR ...
- 【UEditor】 UEditor整合项目上传资源到阿里云服务器
目录 关于此文 下载源码 JSP代码 Java代码 阿里云jar包引入配置 成功啦! 回到顶部 关于此文 项目中要实现编辑器生成带格式的html文档,存入模板,最后生成html的URL,所以选择了UE ...
- CSDN删除上传资源的办法
转自网友:http://blog.csdn.net/ssergsw/article/details/12489101 我按照下面的方法一试,果然成功了. 昨天晚上进行测试,上传了一个压缩包和大家分享, ...
- Wordpress上传资源报HTTP错误
简述 在公司内部搭建内部视频学习网站,经过对比选择了wordpress进行站点搭建.但是在上传视频遭遇到了各种问题,特将此处理过程进行记录. 原因排查 1.上传一个十几兆mp4的文件上传进度到达百分之 ...
- C# 之 向服务器上传资源
首先写客服端,winform 应用 或者 WPF 应用 模拟一个post提交: /// <summary> /// 将本地文件上传到指定的服务器(HttpWebRequest方法) /// ...
- Maven私服(Nexus)资源上传下载
1.settings.xml (向私服上传资源需要) <!-- Snapshot包的管理/Releases包的管理/第三方包管理--> <server> <id>l ...
- asp.net core系列 69 Amazon S3 资源文件上传示例
一. 上传示例 Install-Package AWSSDK.S3 -Version 3.3.104.10 using Amazon; using Amazon.Runtime; using Ama ...
随机推荐
- ACM_寒冰王座(完全背包)
寒冰王座 Time Limit: 2000/1000ms (Java/Others) Problem Description: 不死族的巫妖王发工资拉,死亡骑士拿到一张N元的钞票(记住,只有一张钞票) ...
- Android 性能优化(8)网络优化( 4)Optimizing App-Initiated Network Use
Optimizing App-Initiated Network Use This lesson teaches you to Batch and Schedule Network Requests ...
- js作用域、异步——学习笔记
所有的 for if switch while do 等等,都属于块级作用域,里面声明的对象,外面也能访问.但function 函数里的作用域,在函数外是访问不到的. 但函数作用域里面可以访问外面. ...
- Modbus消息帧
两种传输模式中(ASCII和RTU),传输设备以将Modbus消息转为有起点和终点的帧,这就允许接收的设备在消息起始处开始工作,读地址分配信息,判断哪一个设备被选中(广播方式则传给所以设备),判知何时 ...
- 2057. [ZLXOI2015]殉国
★☆ 输入文件:BlackHawk.in 输出文件:BlackHawk.out 评测插件 时间限制:0.05 s 内存限制:256 MB [题目描述] 正义的萌军瞄准了位于南极洲的心灵 ...
- rem自适应布局小结001
在最近的移动端布局当中,最炙手可热的方式便是使用rem进行元素的布局.以下便是从最近的文章中所总结出来的一点东西. 首先,我们必须有以下的疑问: rem的本质是什么? rem如何实现自适应布局? 如何 ...
- IBatis的分页研究
IBatis的分页研究 博客分类: Ibatis学习 摘自: http://cpu.iteye.com/blog/311395 yangtingkun Oracle分页查询语句 ibaits. ...
- 4星|《OKR工作法》:关注公司的真正目标,以周为单位做计划和考核
本书篇幅比较小,两个小时就可以看完.主要内容讲OKR工作法的基本概念,然后用一个虚拟的创业公司的创业故事来演示实施OKR过程中可能遇到的问题.OKR给创业带来的好处. OKR工作法相对来说是比较简单的 ...
- SDK_进度条和滑块
进度条和滑块 进度条和滑块属于通用控件,通用控件的使用需要加 CommCtrl.h 头文件 如何初始化进度条和滑块的数值范围和默认的位置 // 设置默认的范围值SendDlgItemMessage(h ...
- 用 webpack 实现持久化缓存
什么是持久化缓存? 原文链接https://sebastianblade.com/using-webpack-to-achieve-long-term-cache/ 缓存(cache)一直是前端性能优 ...