5、SpringBoot+Mybatis整合------多对多
开发工具:STS
代码下载链接:https://github.com/theIndoorTrain/SpringBoot_Mybatis/tree/3baea10a3a1104bda815c206954b2b687511aa3d
前言:
之前我们探讨了一对一、一对多的映射关系,今天我们来讨论多对多的映射关系。
多对多,其实可以拆成多个一对多来理解。
比如:
学生-------课程----------学生选课的关系:
(1)查询某个学生所选的全部课程;
(2)查询选修某个课程的全部学生;
今天我们就来实现这个实例。
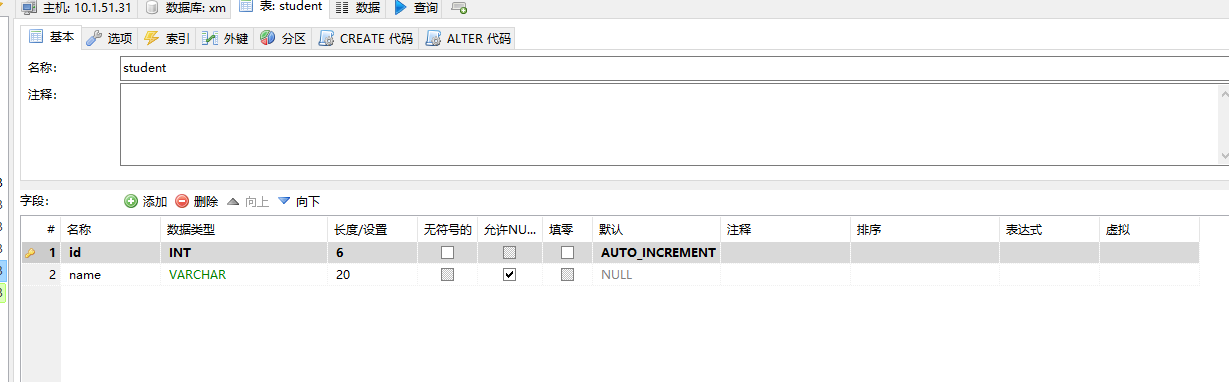
一、数据库建表:
1.student表:
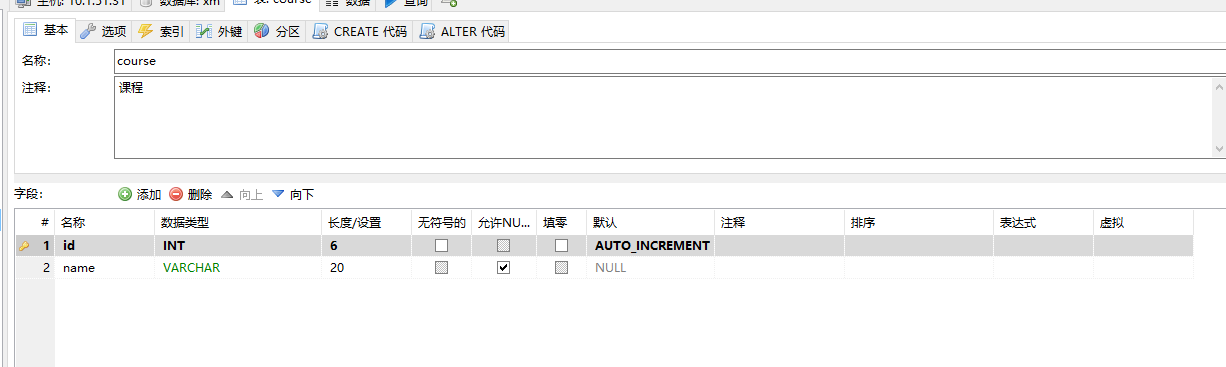
2.course表:
3.student-course表:

二、查询某个学生所选的全部课程代码实现:
1.代码实现:
(1)添加Course实体:
 package com.xm.pojo;

 /**

  * 课程实体

  * @author xm

  *

  */

 public class Course {

     private int id;

     private String name;

     public int getId() {

         return id;

     }

     public void setId(int id) {

         this.id = id;

     }

     public String getName() {

         return name;

     }

     public void setName(String name) {

         this.name = name;

     }

 }
Course.java
(2)添加StudntCourse实体:
 package com.xm.pojo;

 import java.util.List;

 /**

  * 学生选课实体

  * @author xm

  *

  */

 public class StudentCourse {

     private int sid;

     private int cid;

     private int sorce;

     private List<Student> students;

     private List<Course> courses;

     public int getSid() {

         return sid;

     }

     public void setSid(int sid) {

         this.sid = sid;

     }

     public int getCid() {

         return cid;

     }

     public void setCid(int cid) {

         this.cid = cid;

     }

     public int getSorce() {

         return sorce;

     }

     public void setSorce(int sorce) {

         this.sorce = sorce;

     }

     public List<Student> getStudents() {

         return students;

     }

     public void setStudents(List<Student> students) {

         this.students = students;

     }

     public List<Course> getCourses() {

         return courses;

     }

     public void setCourses(List<Course> courses) {

         this.courses = courses;

     }

 }
StudentCourse.java
(3)在Studnent实体中添加StudentCourse列表:
 package com.xm.pojo;

 import java.util.List;

 /**

  * name:学生实体

  * @author xxm

  *

  */

 public class Student {

     /**

      * content:主键id

      */

     private int id;

     /**

      * content:姓名

      */

     private String name;

     private List<Book> books;

     private List<StudentCourse> studentCourses;

     public Student() {

         // TODO Auto-generated constructor stub

     }

     public List<StudentCourse> getStudentCourses() {

         return studentCourses;

     }

     public void setStudentCourses(List<StudentCourse> studentCourses) {

         this.studentCourses = studentCourses;

     }

     public List<Book> getBooks() {

         return books;

     }

     public void setBooks(List<Book> books) {

         this.books = books;

     }

     public int getId() {

         return id;

     }

     public void setId(int id) {

         this.id = id;

     }

     public String getName() {

         return name;

     }

     public void setName(String name) {

         this.name = name;

     }

 }
Student.java
(4)在数据库操作接口中添加方法:
 package com.xm.mapper;

 import java.util.List;

 import com.xm.pojo.Student;

 public interface StudentMapper {

     /***********/

     /**

      * 根据学生id查询该学生选修的所有课程

      * @param id

      * @return

      */

     public Student selectCourseById(Integer id);

 }
StudentMapper.java
(5)完善mapper映射:
 <?xml version="1.0" encoding="UTF-8" ?>

 <!DOCTYPE mapper PUBLIC "-//mybatis.org//DTD Mapper 3.0//EN" "http://mybatis.org/dtd/mybatis-3-mapper.dtd" >

 <mapper namespace="com.xm.mapper.StudentMapper">

     <resultMap type="student" id="studentMap">

         <id property="id" column="id"/>

         <result property="name" column="name"/>

     </resultMap>

     <resultMap type="student" id="courseMap" extends="studentMap">

         <collection property="studentCourses" ofType="studentCourse">

             <result property="sorce" column="sorce"/>

             <collection property="courses" ofType="course">

                 <id property="id" column="cid"/>

                 <result property="name" column="cname"/>

             </collection>

         </collection>

     </resultMap>

         <!-- 根据学生id查询该学生选修的所有课程 -->

     <select id="selectCourseById" parameterType="int" resultMap="courseMap" >

         select a.*,b.sorce,c.id cid,c.name cname from student a,student_course b,course c where a.id=b.sid and b.cid=c.id and a.id=#{id}

     </select>

 </mapper>
StudentMapper.xml
(6)在controller中实现:
 package com.xm.controller;

 import java.util.List;

 import javax.websocket.server.PathParam;

 import org.springframework.beans.factory.annotation.Autowired;

 import org.springframework.web.bind.annotation.DeleteMapping;

 import org.springframework.web.bind.annotation.GetMapping;

 import org.springframework.web.bind.annotation.PathVariable;

 import org.springframework.web.bind.annotation.PostMapping;

 import org.springframework.web.bind.annotation.PutMapping;

 import org.springframework.web.bind.annotation.RestController;

 import com.xm.mapper.StudentMapper;

 import com.xm.pojo.Student;

 @RestController

 public class StudentController {

     @Autowired

     private StudentMapper studentMapper;

     /************/

     /**

      * 根据学生id查询该学生选修的所有课程

      * @param id

      * @return

      */

     @GetMapping("/student/course/{id}")

     public Student selectCourseById(@PathVariable("id") Integer id) {

         Student student = studentMapper.selectCourseById(id);

         return student;

     }

 }
StudentController.java
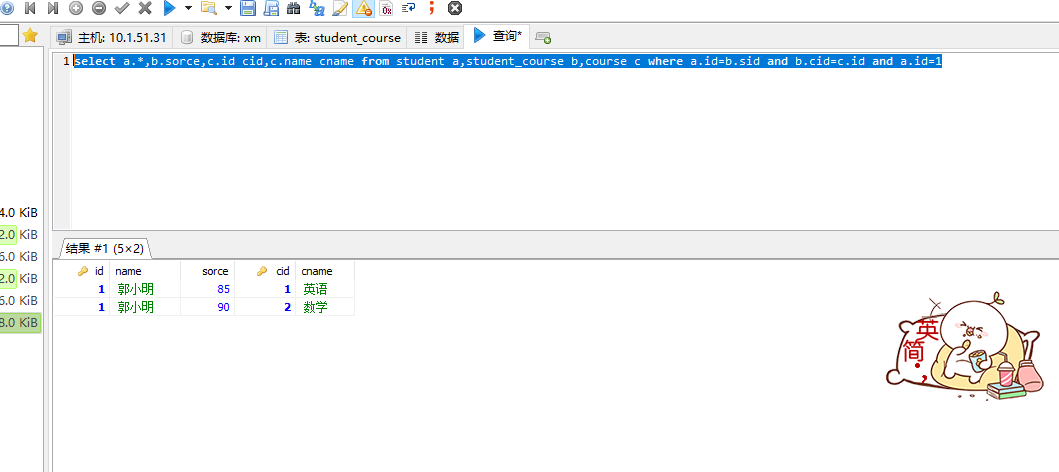
2.测试结果:
(1)数据库运行
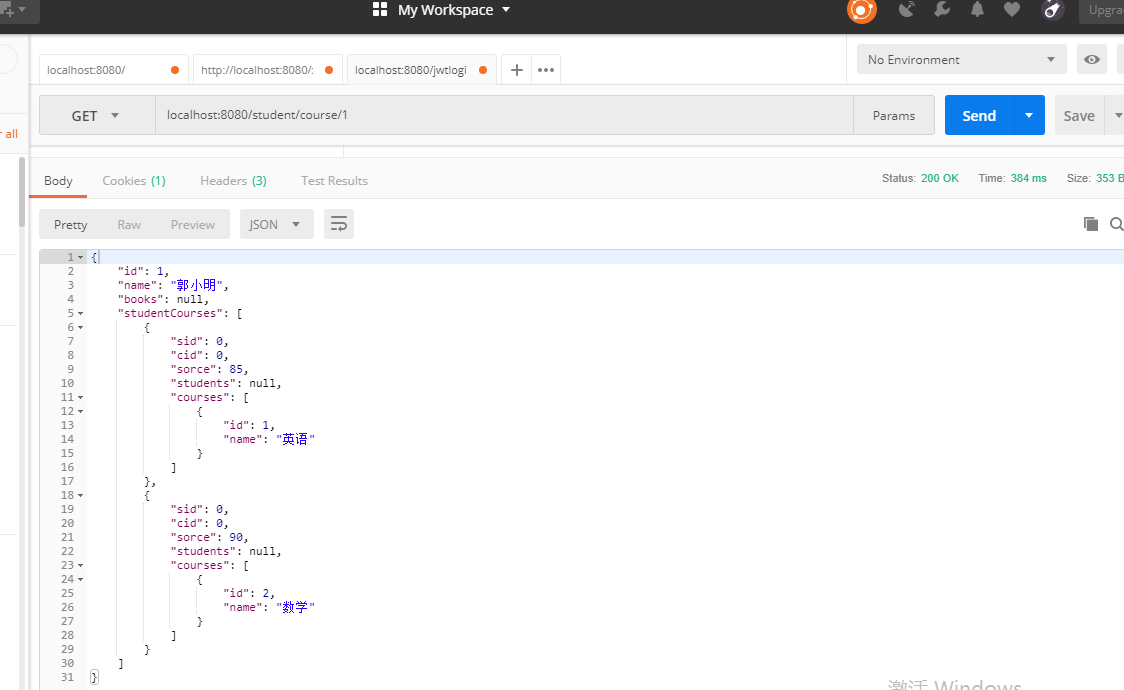
2.postman运行:
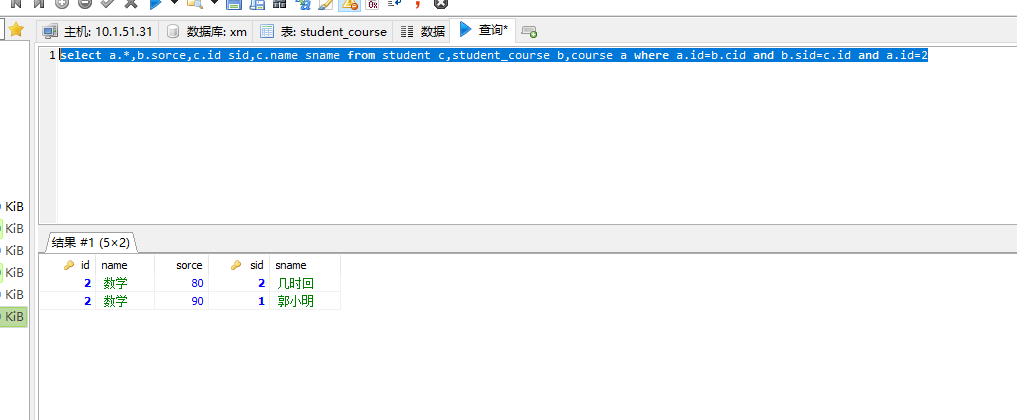
三、查询选修某个课程的全部学生代码实现:
1.代码实现:
(1)Course实体中添加StudentCourse列表:
 package com.xm.pojo;

 import java.util.List;

 /**

  * 课程实体

  * @author xm

  *

  */

 public class Course {

     private int id;

     private String name;

     private List<StudentCourse> studentCourses;

     public List<StudentCourse> getStudentCourses() {

         return studentCourses;

     }

     public void setStudentCourses(List<StudentCourse> studentCourses) {

         this.studentCourses = studentCourses;

     }

     public int getId() {

         return id;

     }

     public void setId(int id) {

         this.id = id;

     }

     public String getName() {

         return name;

     }

     public void setName(String name) {

         this.name = name;

     }

 }
Course.java
(2)添加Course数据操作接口:
 package com.xm.mapper;

 import com.xm.pojo.Course;

 public interface CourseMapper {

     /**

      * 根据课程id查询选修此课程的全部学生

      * @param id

      * @return

      */

     public Course selectStudentById(Integer id);

 }
CourseMapper.java
(3)添加mapper映射:
 <?xml version="1.0" encoding="UTF-8" ?>

 <!DOCTYPE mapper PUBLIC "-//mybatis.org//DTD Mapper 3.0//EN" "http://mybatis.org/dtd/mybatis-3-mapper.dtd" >

 <mapper namespace="com.xm.mapper.CourseMapper">

     <resultMap type="course" id="courseMap">

         <id property="id" column="id"/>

         <result property="name" column="name"/>

     </resultMap>

     <resultMap type="course" id="studentMap" extends="courseMap">

         <collection property="studentCourses" ofType="studentCourse">

             <result property="sorce" column="sorce"/>

             <collection property="students" ofType="student">

                 <id property="id" column="sid"/>

                 <result property="name" column="sname"/>

             </collection>

         </collection>

     </resultMap>

     <!-- 根据课程id查询选修此课程的全部学生 -->

     <select id="selectStudentById" parameterType="int" resultMap="studentMap">

     select a.*,b.sorce,c.id sid,c.name sname from student c,student_course b,course a where a.id=b.cid and b.sid=c.id and a.id=#{id}

     </select>

 </mapper>
CourseMapper.xml
(4)添加controller:
package com.xm.controller; import org.springframework.beans.factory.annotation.Autowired;
import org.springframework.web.bind.annotation.GetMapping;
import org.springframework.web.bind.annotation.PathVariable;
import org.springframework.web.bind.annotation.RestController; import com.xm.mapper.CourseMapper;
import com.xm.pojo.Course; /**
* 课程
* @author xm
*
*/
@RestController
public class CourseController {
@Autowired
private CourseMapper courseMapper; /**
* 根据课程id查询选修此课程的全部学生
* @param id
* @return
*/
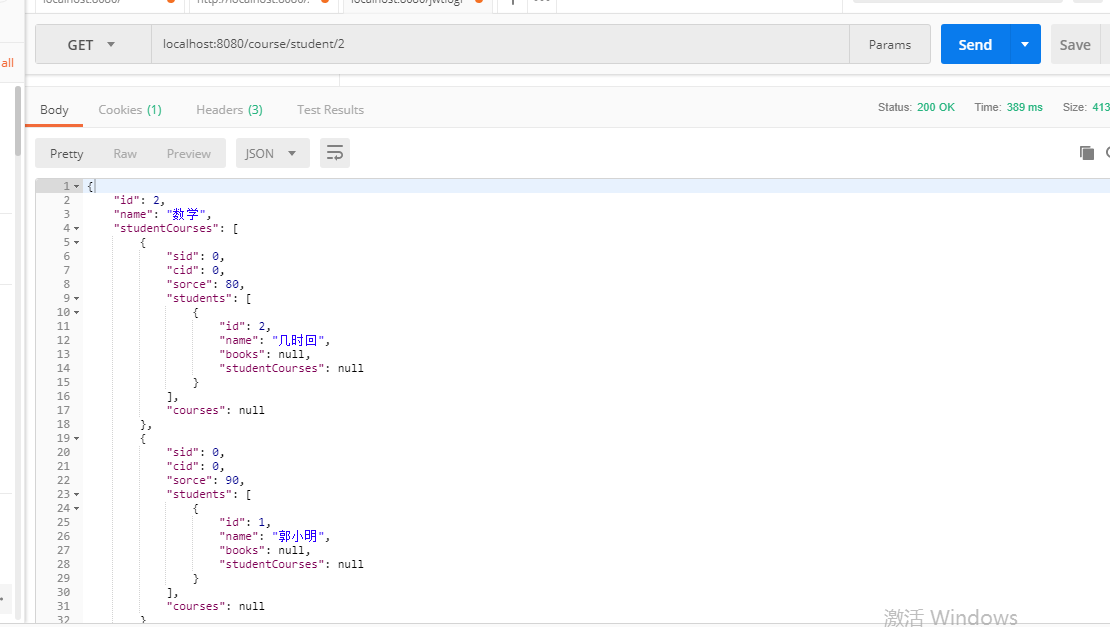
@GetMapping("/course/student/{id}")
public Course selectStudentById(@PathVariable("id")Integer id) { Course course = courseMapper.selectStudentById(id);
return course; } }
CourseController.java
2.测试结果:
(1)数据库运行
(2)postman运行
2018-06-22
5、SpringBoot+Mybatis整合------多对多的更多相关文章
- SpringBoot Mybatis整合(注解版),SpringBoot集成Mybatis(注解版)
SpringBoot Mybatis整合(注解版),SpringBoot集成Mybatis(注解版) ================================ ©Copyright 蕃薯耀 2 ...
- SpringBoot+Mybatis整合入门(一)
SpringBoot+Mybatis 四步整合 第一步 添加依赖 springBoot+Mybatis相关依赖 <!--springBoot相关--> <parent> < ...
- SpringBoot+Mybatis整合实例
前言 大家都知道springboot有几大特点:能创建独立的Spring应用程序:能嵌入Tomcat,无需部署WAR文件:简化Maven配置:自动配置Spring等等.这里整合mybatis,创建一个 ...
- 2、SpringBoot+Mybatis整合------一对一
开发工具:STS 代码下载链接:https://github.com/theIndoorTrain/SpringBoot_Mybatis01/tree/93398da60c647573645917b2 ...
- springboot/Mybatis整合
正题 本项目使用的环境: 开发工具:Intellij IDEA 2017.1.3 springboot: 1.5.6 jdk:1.8.0_161 maven:3.3.9 额外功能 PageHelper ...
- springboot+mybatis整合(单元测试,异常处理,日志管理,AOP)
我用的事IDEA,jdk版本是1.7.新建项目的时候这个地方的选择需要注意一下,springboot版本是1.5的,否则不支持1.7的jdk pom.xml <dependency> &l ...
- 9、SpringBoot+Mybatis整合------动态sql
开发工具:STS 前言: mybatis框架中最具特色的便是sql语句中的自定义,而动态sql的使用又使整个框架更加灵活. 动态sql中的语法: where标签 if标签 trim标签 set标签 s ...
- 3、SpringBoot+Mybatis整合------主键回填
开发工具:STS 代码下载链接:https://github.com/theIndoorTrain/SpringBoot_Mybatis01/tree/d68efe51774fc4d96e5c6870 ...
- 1、SpringBoot+Mybatis整合------简单CRUD的实现
编译工具:STS 代码下载链接:https://github.com/theIndoorTrain/SpringBoot_Mybatis01/commit/b757cd9bfa4e2de551b2e9 ...
随机推荐
- 效率工具(fswatch,rsync)
mac 安装 brew: ruby -e "$(curl -fsSL https://raw.githubusercontent.com/Homebrew/install/master/in ...
- Broken Keyboard (a.k.a. Beiju Text) UVA - 11988 (链表)
题目链接:https://vjudge.net/problem/UVA-11988 题目大意:输入一个字符串,输出在原本应该是怎么样的? 具体方法是 碰到' [ ' 回到最前面 碰到‘ ]’ 回 ...
- vue router-link 添加在定义事件
在vue学习中遇到给router-link 标签添加事件@click .@mouseover等无效的情况 我想要做的是v-for遍历出来的选项卡, 鼠标移上去出现删除标签,移除标签消失的效果 原代码: ...
- (转)Linux命令:使用dig,nslookup命令解析域名
Linux命令:使用dig命令解析域名 Linux下解析域名除了使用nslookup之外,开可以使用dig命令来解析域名,dig命令可以得到更多的域名信息. dig的全称是 (domain infor ...
- MongoDB + express + node + bootstrap 搭建多人博客
这篇博客讲述如何搭建一个多人博客,需要一定的基础知识,用于思路整理和备忘. 第一步: 新建文件夹 blog ,结构如下: bin --- 可执行二进制文件,最终的启动接口. models --- 存储 ...
- Linux raw socket
转载自:http://www.cnblogs.com/uvsjoh/archive/2012/12/31/2840883.html 我们平常所用到的网络编程都是在应用层收发数据,每个程序只能收到发给自 ...
- PHP函数库(core)
数组函数: array_change_key_case — 返回字符串键名全为小写或大写的数组 array_change_key_case() 将 input 数组中的所有键名改为全小写或大写.改变是 ...
- Spring Bean相互依赖问题
如果是通过get,set 注入就不会有问题 如果是通过构造函数注入,SPRING就会报循环引用注入出错 循环依赖——在采用构造器注入的方式配置bean时,很有可能会产生循环依赖的情况.比如说,一个类A ...
- Java基于jdbc链接mysql数据库步骤示列
用JDBC来链接MYSQL数据库,基本步骤都大同小异,只不过不同的数据库之间的URL地址有些不同.其基本步骤可分为以下几点: 1.加载相应的数据库的JDBC驱动程序. 2.利用驱动管理器DriverM ...
- cf1059D. Nature Reserve(三分)
题意 题目链接 Sol 欲哭无泪啊qwq....昨晚一定是智息了qwq 说一个和标算不一样做法吧.. 显然\(x\)轴是可以三分的,半径是可以二分的. 恭喜你获得了一个TLE的做法.. 然后第二维的二 ...