nagios监控部署
nagios监控部署。
在部署之前把依赖包安装了。
[root@tiandong63 ~]# yum install -y gcc glibc glibc-common php gd gd-devel libpng libmng libjpeg zlib
[root@tiandong63 ~]# yum install -y httpd ; service httpd restart
[root@tiandong63 ~]# useradd nagios
[root@tiandong63 ~]# groupadd nagcmd
[root@tiandong63 ~]# usermod -G nagcmd nagios
[root@tiandong63 ~]# usermod -G nagcmd apache
核心包的安装:
[root@tiandong63 ~]#tar xf nagios-3.5.1.tar.gz -C /usr/local/src/
[root@tiandong63 ~]#cd /usr/local/src/nagios
[root@tiandong63 nagios]# ./configure --with-command-group=nagcmd #指定nagios运行用户组
[root@tiandong63 nagios]# make all
[root@tiandong63 nagios]# make install && make install-init && make install-commandmode && make install-config && make install-webconf
//若是单步执行,每次执行一部,都会提示你下一步需要干什么,非常easy
//make install安装生成/usr/local/nagios/,其中/usr/local/nagios/share即nagiosWEB访问界面的站点目录
//make install-init 安装生成/etc/rc.d/init.d/nagios 启动脚本
//make install-config 安装生成/usr/local/nagios/etc下的nagios相关配置文件
//make install-commandmode 设定相应nagios工作目录的权限
//make install-webconf 安装Nagios的WEB配置文件到Apache的conf.d目录下
[root@tiandong63 nagios]# ll /usr/local/nagios/ #生成安装目录
total 24
drwxrwxr-x 2 nagios nagios 4096 Mar 19 23:06 bin
drwxrwxr-x 3 nagios nagios 4096 Mar 19 23:06 etc
drwxrwxr-x 2 nagios nagios 4096 Mar 19 23:06 libexec 脚本文件
drwxrwxr-x 2 nagios nagios 4096 Mar 19 23:06 sbin
drwxrwxr-x 10 nagios nagios 4096 Mar 19 23:06 share 浏览器访问的页面文件
drwxrwxr-x 5 nagios nagios 4096 Mar 19 23:06 var
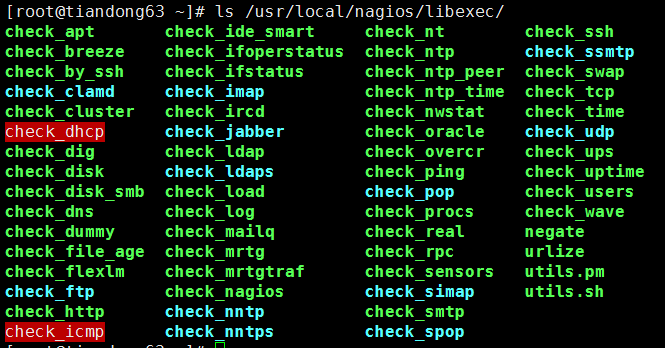
[root@tiandong63 ~]# ll /usr/local/nagios/libexec/ 此时这个文件夹下面是空的
nagios主目录
[root@XueGod63 Nagios]# ll /usr/local/nagios/
bin #Nagios执行程序所在目录
etc #nagios配置文件所在目录,初始安装只有几个*.cfg文件
libexec #监控所用命令,需要安装了nagios-plugins插件了才会有,检测命令,不装是空的
sbin #Nagios的Cgi文件所在目录,外部命令所需要的文件存放目录
share #Nagios前端页面
var #日志文件,pid文件等
nagios的配置文件:
[root@tiandong63 nagios]# vim /usr/local/nagios/etc/nagios.cfg
log_file=/var/log/nagios/nagios.log #日志位置
cfg_file=/etc/nagios/objects/commands.cfg #这个文件定义了很多命令
cfg_file=/etc/nagios/objects/contacts.cfg #定义联系人,怎么联系
cfg_file=/etc/nagios/objects/timeperiods.cfg #定义了时间段
cfg_file=/etc/nagios/objects/templates.cfg #模板(联系人,主机,时间)
cfg_file=/etc/nagios/objects/localhost.cfg #监控本机相关配置文件
#cfg_file=/etc/nagios/objects/windows.cfg #windows,默认不监控
#cfg_file=/etc/nagios/objects/switch.cfg #交换机路由器监控,默认不监控
#cfg_file=/etc/nagios/objects/printer.cfg #打印机监控,默认不监控
#cfg_dir=/etc/nagios/servers #定义了服务合集(多个使用)
#cfg_dir=/etc/nagios/printers #定义了打印机合集(多个使用)
#cfg_dir=/etc/nagios/switches #定义了交换合集(多个使用)
#cfg_dir=/etc/nagios/routers #定义了路由合集(多个使用)
resource_file=/etc/nagios/private/resource.cfg 资源变量配置文件,包括$USER1$变量(一个路径)等
status_update_interval=10 #状态更新时间,单位s
log_rotation_method=d #日志滚动,默认天
service_check_timeout=60 #服务检查超时时间
host_check_timeout=30 #主机检查超时时间
event_handler_timeout=30
notification_timeout=30
ocsp_timeout=5
perfdata_timeout=5
[root@tiandong63 nagios]# vim /usr/local/nagios/etc/cgi.cfg 在这里查看默认的认证用户
//此配置文件比nagios.cfg优先级高
main_config_file= /usr/local/nagios/etc/nagios.cfg #主配置文件
physical_html_path= /usr/local/nagios/share #物理路径
url_html_path=/nagios #在URL后面加上/nagios才能访问
use_authentication=1 #使用认证
use_ssl_authentication=0 #不使用ssl
authorized_for_system_information=nagiosadmin #认证用户
重启httpd服务,测试。

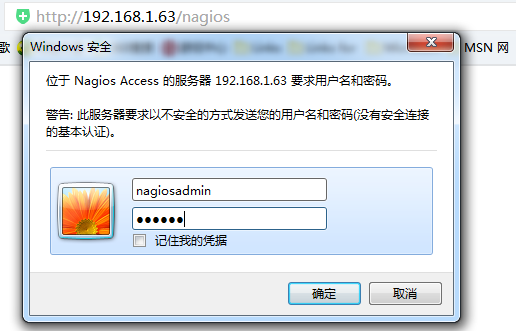
需要用户名和密码,现在来创建用户名和密码。
[root@tiandong63 ~]# vim /etc/httpd/conf.d/nagios.conf 查看密码为位置

[root@tiandong63 ~]# htpasswd -c /usr/local/nagios/etc/htpasswd.users nagiosadmin 生成用户名和密码
New password:
Re-type new password:
Adding password for user nagiosadmin
[root@tiandong63 ~]# cat /usr/local/nagios/etc/htpasswd.users
nagiosadmin:MwGeiyh1pyQuY
重启服务再次访问

此时点击其中的东西是报错的,nagios服务没有启动

[root@tiandong63 ~]# /usr/local/nagios/bin/nagios -d /usr/local/nagios/etc/nagios.cfg
指定配置文件,以守护进程方式启动此时就可以了(默认是对本地主机进行监控的)

检查配置文件:
[root@tiandong63 ~]# /usr/local/nagios/bin/nagios -v /usr/local/nagios/etc/nagios.cfg
Total Warnings: 0
Total Errors: 0 此时表示配置文件没有问题
安装插件
[root@tiandong63 ~]# tar -xf nagios-plugins-2.1.1.tar.gz -C /usr/local/src/
[root@tiandong63 nagios-plugins-2.1.1]# ./configure --with-nagios-user=nagios --with-nagios-group=nagcmd
[root@tiandong63 nagios-plugins-2.1.1]# make && make install
此时来看/usr/local/nagios/libexec/ 之前的时候下面是空的,此时下面没有check-mysql
[root@tiandong63 ~]# yum install mysql mysql-devel -y 安装了MySQL的包,在重新编译 主要是devel这个包
[root@tiandong63 nagios-plugins-2.1.1]# ./configure --with-nagios-user=nagios --with-nagios-group=nagcmd
[root@tiandong63 nagios-plugins-2.1.1]# make && make install

重启httpd服务和nagios服务
监控本地nfs服务:
[root@tiandong63 ~]# cd /usr/local/nagios/etc/objects/
[root@tiandong63 objects]# ls
commands.cfg localhost.cfg switch.cfg timeperiods.cfg
contacts.cfg printer.cfg templates.cfg windows.cfg
[root@tiandong63 objects]# cp localhost.cfg localhost.cfg.bak 备份本地的配置文件

安装一下nfs
[root@tiandong63 ~]# yum install -y nfs*
[root@tiandong63 ~]# /etc/init.d/nfs restart (先开启rpc服务)
[root@tiandong63 ~]# vim /etc/exports 配置共享的目录
/tmp *(rw)
[root@tiandong63 ~]# /etc/init.d/nfs restart
[root@tiandong63 ~]# showmount -e 192.168.1.63
Export list for 192.168.1.63:
/tmp *
重启web服务和nagios服务
[root@tiandong63 ~]# service httpd restart && service nagios restart
此时监控里面就有nfs了。

监控远端MySQL:
[root@tiandong64 ~]# yum install mysql-server mysql -y
[root@tiandong64 ~]# mysql -uroot -p123456
mysql> create database nagiosdb;
Query OK, 1 row affected (0.00 sec)
mysql> grant select on nagiosdb.* to nagiosdb@192.168.1.63;
Query OK, 0 rows affected (0.00 sec)
[root@tiandong63 ~]# vim /usr/local/nagios/etc/nagios.cfg
34 cfg_file=/usr/local/nagios/etc/objects/hosts.cfg
35 cfg_file=/usr/local/nagios/etc/objects/service.cfg

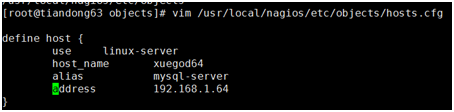
[root@tiandong63 objects]# vim /usr/local/nagios/etc/objects/hosts.cfg
define host {
use linux-server
host_name xuegod64
alias mysql-server
address 192.168.1.64
}
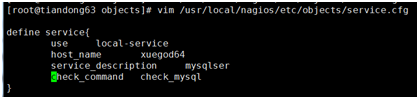
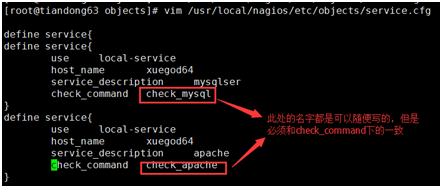
[root@tiandong63 objects]# vim /usr/local/nagios/etc/objects/service.cfg
define service{
use local-service
host_name xuegod64
service_description mysqlser
check_command check_mysql
}
[root@tiandong63 objects]# vim /usr/local/nagios/etc/objects/commands.cfg
212 #'check mysql'
213 define command{
214 command_name check_mysql
215 command_line $USER1$/check_mysql -H $HOSTADDRESS$ -u nagiosdb -d nagiosdb
216 }

[root@tiandong63 objects]# /usr/local/nagios/libexec/check_mysql -H 192.168.1.64 -u nagiosdb -d nagiosdb #手动探测监控的MySQL
Uptime: 1067 Threads: 1 Questions: 31 Slow queries: 0 Opens: 16 Flush tables: 1 Open tables: 9 Queries per second avg: 0.29|Connections=15c;;; Open_files=18;;; Open_tables=9;;; Qcache_free_memory=0;;; Qcache_hits=0c;;; Qcache_inserts=0c;;; Qcache_lowmem_prunes=0c;;; Qcache_not_cached=0c;;; Qcache_queries_in_cache=0;;; Queries=31c;;; Questions=31c;;; Table_locks_waited=0c;;; Threads_connected=1;;; Threads_running=1;;; Uptime=1067c;;;
[root@tiandong63 objects]# service nagios restart 重启服务
Running configuration check...done.
Stopping nagios: done.
Starting nagios: done.
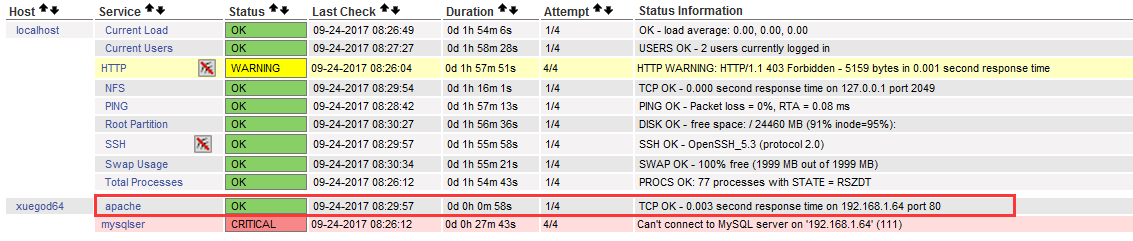
此时去测试:(多了远端的监控)


关闭远程的MySQL服务时:
[root@tiandong64 ~]# /etc/init.d/mysqld stop
Stopping mysqld: [ OK ]
在去查看:
监控远端web服务:
[root@tiandong64 ~]# yum install httpd -y
[root@tiandong64 ~]# /etc/init.d/httpd start
Starting httpd: httpd: Could not reliably determine the server's fully qualified domain name, using 192.168.1.64 for ServerName
[ OK ]
每监控一台主机都必须写一个hosts.cfg文件
[root@tiandong63 objects]# vim /usr/local/nagios/etc/objects/hosts.cfg
define host {
use linux-server
host_name xuegod64
alias mysql-server
address 192.168.1.64
}
由于监控的是同一台主机的服务,所以主机不用再定义了
[root@tiandong63 objects]# vim /usr/local/nagios/etc/objects/service.cfg
define service{
use local-service
host_name xuegod64
service_description mysqlser
check_command check_mysql
}
define service{
use local-service
host_name xuegod64
service_description apache
check_command check_apache
}
[root@tiandong63 objects]# vim /usr/local/nagios/etc/objects/commands.cfg
218 define command{
219 command_name check_apache
220 command_line $USER1$/check_tcp -H $HOSTADDRESS$ -p 80
221 }

手工探测是否可以探测到:
[root@tiandong63 objects]# /usr/local/nagios/libexec/check_tcp -H 192.168.1.64 -p 80
TCP OK - 0.002 second response time on 192.168.1.64 port 80|time=0.001831s;;;0.000000;10.000000
[root@tiandong63 objects]# service nagios restart 重启服务
Running configuration check...done.
Stopping nagios: done.
Starting nagios: done.
nagios监控外部主机私有信息
解决依赖:
[root@tiandong63 ~]# yum install -y openssl openssl-devel
[root@tiandong64 ~]# yum install -y openssl openssl-devel
[root@tiandong63 ~]# tar xf nrpe-2.15.tar.gz -C /usr/local/src/
[root@tiandong63 nrpe-2.15]# ./configure && make && make install
[root@tiandong63 nrpe-2.15]# make install-plugin && make install-daemon 前者安装插件,后者以守护进程来运行
[root@tiandong63 nrpe-2.15]# ll /usr/local/nagios/libexec/check_nrpe 主要是为了查看是否生成如下的插件
-rwxrwxr-x 1 nagios nagios 76785 Sep 24 08:47 /usr/local/nagios/libexec/check_nrpe 这个命令需要安装nrpe之后才有

被监控端配置:
[root@tiandong64 ~]# yum install -y openssl openssl-devel
[root@tiandong64 ~]# useradd -s /sbin/nologin nagios
[root@tiandong64 ~]# groupadd nagcmd
[root@tiandong64 ~]# usermod -G nagcmd nagios
[root@tiandong64 ~]# tar -xf nrpe-2.15.tar.gz -C /usr/local/src/
[root@tiandong64 ~]# tar -xf nagios-plugins-2.1.1.tar.gz -C /usr/local/src/
[root@tiandong64 nagios-plugins-2.1.1]# ./configure && make && make install
[root@tiandong64 nrpe-2.15]# ./configure && make && make install
[root@tiandong64 nrpe-2.15]# make install-daemon-config
/usr/bin/install -c -m 775 -o nagios -g nagios -d /usr/local/nagios/etc
/usr/bin/install -c -m 644 -o nagios -g nagios sample-config/nrpe.cfg /usr/local/nagios/etc
[root@tiandong64 nrpe-2.15]#
[root@tiandong64 nrpe-2.15]# make install-xinetd
/usr/bin/install -c -m 644 sample-config/nrpe.xinetd /etc/xinetd.d/nrpe
[root@tiandong64 nrpe-2.15]#
[root@tiandong64 nrpe-2.15]# vim /etc/xinetd.d/nrpe

[root@tiandong64 nrpe-2.15]# echo "nrpe 5666/tcp # NRPE" >> /etc/services 端口注册
nrpe 5666/tcp # NRPE
#/etc/services文件的作用:
#作用1:xinet.d来启动服务时他就会在/etc/services找相应服务对应的端口来启动服务。找不到对应端口,将不启动服务。
#作用2: 显示对应端口对应的协议名。
#例如 iptables -L 不加-n参数, 查看时,把 80转 -> www http
#作用3:查看常用端口
[root@tiandong64 nrpe-2.15]# yum install -y xinetd
[root@tiandong64 nrpe-2.15]# /etc/init.d/xinetd start
Starting xinetd: [ OK ]
[root@tiandong64 nrpe-2.15]#
[root@tiandong64 ~]# netstat -antup|grep 5666
tcp 0 0 :::5666 :::* LISTEN 26870/xinetd
客户端nrpe命令
[root@tiandong64 ~]# vim /usr/local/nagios/etc/nrpe.cfg

command[check_sda1]=/usr/local/nagios/libexec/check_disk -w 38% -c 35% -p /dev/sda1
command[check_sda2]=/usr/local/nagios/libexec/check_disk -w 42% -c 43% -p /dev/sda2
command[check_swap]=/usr/local/nagios/libexec/check_swap -w 20% -c 10%
#-w为警告 -C为告急 sda2中,我们是指占用42%
[root@tiandong64 ~]# /etc/init.d/xinetd restart
服务端手动测试
[root@tiandong63 ~]# /usr/local/nagios/libexec/check_nrpe -H 192.168.1.64
NRPE v2.15 对端的版本
[root@tiandong63 ~]# /usr/local/nagios/libexec/check_nrpe -H 192.168.1.64 -c check_sda1
DISK OK - free space: /boot 154 MB (84% inode=99%);| /boot=28MB;119;125;0;193
主机在上面的时候就已经定义了。
定义服务:
[root@tiandong63 ~]# vim /usr/local/nagios/etc/objects/service.cfg
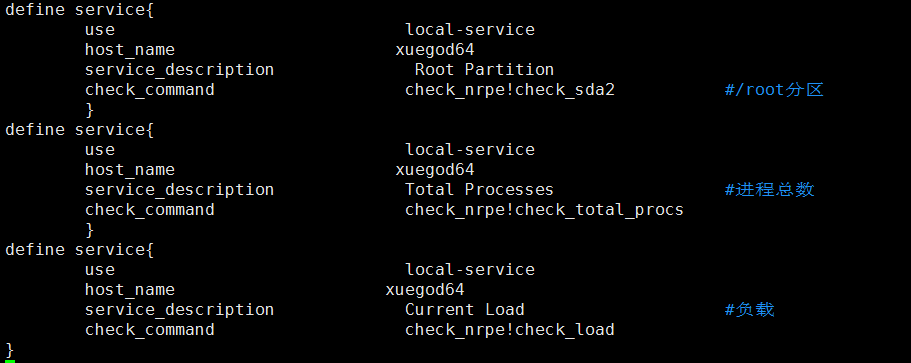
定义NRPE监控命令
[root@tiandong63 ~]# vim /usr/local/nagios/etc/objects/commands.cfg

#'check nrpe'
define command{
command_name check_nrpe
command_line $USER1$/check_nrpe -H $HOSTADDRESS$ -c $ARG1$
}
[root@tiandong63 ~]# service nagios restart
Running configuration check...done.
Stopping nagios: done.
Starting nagios: done.
前段监控

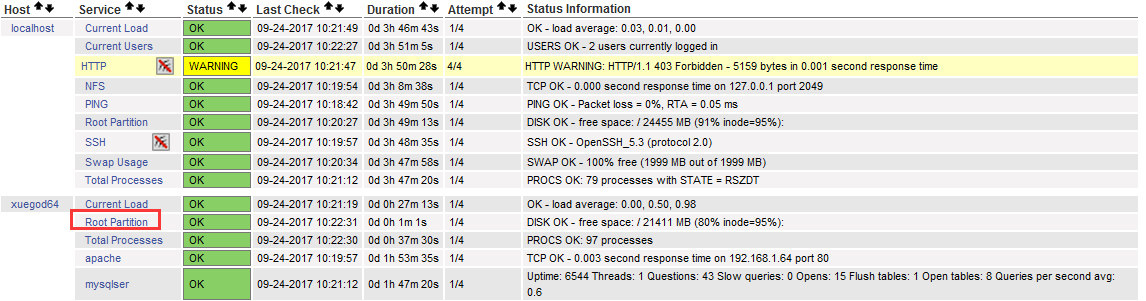
测试:硬盘数据写入测试,看看root partition会不会告急
[root@tiandong64 ~]# dd if=/dev/zero of=1.txt count=600 bs=30M

此时监控端已经告警了

删掉被监控主机的数据;再次查看:
邮件报警
[root@tiandong63 ~]# yum install -y sendmail
[root@tiandong63 ~]# /etc/init.d/sendmail start
Starting sendmail: [ OK ]
Starting sm-client: [ OK ]
nagios监控部署的更多相关文章
- Nagios监控部署(转)
转自 http://kyhack.blog.51cto.com/490370/213355 ky.blog 一.nagios简介 nagios是一款用于系统和网络监控的应用程序,它可以在 ...
- Cacti+nagios 整合监控部署文档
目录 Cacti+nagios监控部署步骤... 2 一.Cacti安装... 2 1需要安装的依赖软件包:... 2 2安装rrdtool 2 3启动数据库和httpd服务... 3 4将serve ...
- Nagios监控系统部署(源码)
1. 概述2. 部署Nagios2.1 创建Nagios用户组2.2 下载Nagios和Nagios-plugin源码2.3 编译安装3. 部署Nagios-plugin3.1 编译安装nagios- ...
- CentOS6.6+Puppet3.7.4分布式部署Nagios监控系统
测试框架 ? 1 2 3 4 5 6 7 8 9 10 11 12 13 14 15 16 17 18 19 20 21 CentOS-6.6-x86_64(minimal) puppet-3.7 ...
- Nagios监控系统部署(源码)(四)
Nagios监控系统部署(源码) 1. 概述2. 部署Nagios2.1 创建Nagios用户组2.2 下载Nagios和Nagios-plugin源码2.3 编译安装3. 部署Nagios-pl ...
- CentOS 7.4 下安装部署Nagios监控系统详细攻略(三)
Nagios是一个流行的电脑系统和网络监控程序,它检测主机和服务,当异常发生和解除时能提醒用户.它是基于GPLv2开发的开源软件,可免费获得及使用. nagios工作原理 nagios的功能是监控服务 ...
- Nagios监控的部署与配置
[安装Nagios] yum install -y httpd httpd-devel httpd-tools mysql mysql-devel mysql-server php php-devel ...
- 监控部署nagios+snmp
参看是否有安装:rpm -q gcc glibc glibc-common gd gd-devel xinetd openssl-devel 未安装基础支持套件的先安装: yum install -y ...
- [工具开发] keepalived使用nagios监控脚本
最近在做开发和办公环境的高可用,采用的是keepalived:keepalived基于Linux内核支持的LVS,既能实现高可用,又能实现负载均衡,非常实用. keepalived监控服务状态时可以用 ...
随机推荐
- Python算法题(一)——青蛙跳台阶
题目一(青蛙跳台阶): 一只青蛙一次可以跳上1级台阶,也可以跳上2级.求该青蛙跳上一个n级的台阶总共有多少种跳法. 分析: 假设只有一级台阶,则总共只有一种跳法: 假设有两级台阶,则总共有两种跳法: ...
- JS中有两种自加法操作
JS中有两种自加法操作.它们的运算符是++,它们的函数是向1添加运算符. 我和我的区别在于操作的顺序和组合的方向. 其中:++var被称为预自动添加,变量执行自动添加操作后.它的操作是先执行自动加法操 ...
- Scrapy - 第一个爬虫和我的博客
第一个爬虫 这里我用官方文档的第一个例子:爬取http://quotes.toscrape.com来作为我的首个scrapy爬虫,我没有找到scrapy 1.5的中文文档,后续内容有部分是我按照官方文 ...
- 用Python输出一个Fibonacci数列
斐波那契数列(Fibonacci sequence),又称黄金分割数列.因数学家列昂纳多·斐波那契(Leonardoda Fibonacci)以兔子繁殖为例子而引入,故又称为“兔子数列” 用文字来说, ...
- Troubleshooting: Cannot Run on an Android Device
同事在他的开发环境中,在IDE中直接在手机上运行Android项目,结果出现这个错误,无法在手机上安装. 产生这个问题的原因,一般就是签名不对,这种情况,删除手机上装过的同名应用,就可以解决.当然,你 ...
- 视频大文件分片上传(使用webuploader插件)
背景 公司做网盘系统,一直在调用图片服务器的接口上传图片,以前写的,以为简单改一改就可以用 最初要求 php 上传多种视频格式,支持大文件,并可以封面截图,时长统计 问题 1.上传到阿里云服务器,13 ...
- SQL语句复习【专题八】
SQL语句复习[专题八] 序列 Sequence.数据库对象是 oracle 专有的.作用:可以将某一列的值使用序列,来实现自动增长的功能.访问序列的值.[序列有两个属性 nextval currva ...
- vim文本编辑及文件查找应用1
vim编辑器: 文本编辑器: 文本:纯文本,ASCII text;Unicode(全球通用); 文本编辑种类: 行编辑器:sed 全屏编辑器:nano, ...
- rank 和 ROW_NUMBER 区别
SELECT * , RANK() OVER ( PARTITION BY APP_NAME ORDER BY SETTING_NAME,SETTING_CODE ASC ) AS Rank FROM ...
- Jenkins配置邮件信息
1.进入Manage Jenkins----系统配置 2.设置Jenkins地址和管理员邮箱(不设置管理员邮箱无法发送邮件) 3.配置系统管理员的邮件属性 4.点击[高级]配置系统管理员的邮件属性 5 ...