Spring boot启动原理
1.入口类
/**

 * springboot应用的启动入口

*/

@RestController

@SpringBootApplication

public class SampleApplication {

    @RequestMapping("/")

    public String sayhello(){

        return "hello world";

    }

    public static void main(String[] args) {

        // TODO Auto-generated method stub

        SpringApplication.run(SampleApplication.class, args);

    }

}
Spring Boot程序的启动入口就一行代码,SpringApplication.run(SampleApplication.class,args)
2.执行过程
2.1SpringApplication的实例化
SpringApplication的静态run方法内部其实是new了一个SpringApplication的实例,构造函数保存了SourceClass。在SpringApplication实例初始化的时候,它做了几件事情:
- 推断应用类型是standard还是Web。根据classpath里面是否存在某个特征类(org.springframework.web.context.ConfigurableWebApplicationContext)来决定是否应该创建一个为Web应用使用的ApplicationContext类型。
- 使用SpringFactoriesLoader在应用的classpath中查找并加载所有可用的ApplicationContextInitializer。SpringFactoriesLoader从类路径下各个jar的配置文件META-INF/spring.factories加载配置
- 使用SpringFactoriesLoader在应用的classpath中查找并加载所有可用的ApplicationListener。
推断应用入口类
    public SpringApplication(ResourceLoader resourceLoader, Class<?>... primarySources) {

        this.resourceLoader = resourceLoader;

        Assert.notNull(primarySources, "PrimarySources must not be null");

        this.primarySources = new LinkedHashSet<>(Arrays.asList(primarySources));

        this.webApplicationType = deduceWebApplicationType();

        setInitializers((Collection) getSpringFactoriesInstances(

                ApplicationContextInitializer.class));

        setListeners((Collection) getSpringFactoriesInstances(ApplicationListener.class));

        this.mainApplicationClass = deduceMainApplicationClass();

    }
下面具体从源码来看看每一步是怎么做的
2.1 推断应用类型是Standard还是Web
private WebApplicationType deduceWebApplicationType() {

        if (ClassUtils.isPresent(REACTIVE_WEB_ENVIRONMENT_CLASS, null)

                && !ClassUtils.isPresent(MVC_WEB_ENVIRONMENT_CLASS, null)) {

            return WebApplicationType.REACTIVE;

        }

        for (String className : WEB_ENVIRONMENT_CLASSES) {

            if (!ClassUtils.isPresent(className, null)) {

                return WebApplicationType.NONE;

            }

        }

        return WebApplicationType.SERVLET;

    }

//相关常量
private static final String REACTIVE_WEB_ENVIRONMENT_CLASS = "org.springframework."
+ "web.reactive.DispatcherHandler";
private static final String MVC_WEB_ENVIRONMENT_CLASS = "org.springframework."
+ "web.servlet.DispatcherServlet";
private static final String[] WEB_ENVIRONMENT_CLASSES = { "javax.servlet.Servlet",
"org.springframework.web.context.ConfigurableWebApplicationContext" };
可能会出现三种结果:
- WebApplicationType.REACTIVE - 当类路径中存在REACTIVE_WEB_ENVIRONMENT_CLASS并且不存在MVC_WEB_ENVIRONMENT_CLASS时
- WebApplicationType.NONE - 也就是非Web型应用(Standard型),此时类路径中不包含WEB_ENVIRONMENT_CLASSES中定义的任何一个类时
- WebApplicationType.SERVLET - 类路径中包含了WEB_ENVIRONMENT_CLASSES中定义的所有类型时
2.2 设置初始化器ApplicationContextInitializer
setInitializers((Collection) getSpringFactoriesInstances(

                ApplicationContextInitializer.class));
这里出现了一个新的概念 - 初始化器。
private <T> Collection<T> getSpringFactoriesInstances(Class<T> type) {

        return getSpringFactoriesInstances(type, new Class<?>[] {});

    }

// 这里的入参type就是ApplicationContextInitializer.class

private <T> Collection<T> getSpringFactoriesInstances(Class<T> type,

            Class<?>[] parameterTypes, Object... args) {

        ClassLoader classLoader = Thread.currentThread().getContextClassLoader();

        // Use names and ensure unique to protect against duplicates

        Set<String> names = new LinkedHashSet<>(

                SpringFactoriesLoader.loadFactoryNames(type, classLoader));

        List<T> instances = createSpringFactoriesInstances(type, parameterTypes,

                classLoader, args, names);

        AnnotationAwareOrderComparator.sort(instances);

        return instances;

    }
这里面首先会根据入参type读取所有的names(是一个String集合),然后根据这个集合来完成对应的实例化操作。
// 这里的入参type就是ApplicationContextInitializer.class
public static List<String> loadFactoryNames(Class<?> factoryClass, @Nullable ClassLoader classLoader) {

        String factoryClassName = factoryClass.getName();

        return loadSpringFactories(classLoader).getOrDefault(factoryClassName, Collections.emptyList());

    }

    private static Map<String, List<String>> loadSpringFactories(@Nullable ClassLoader classLoader) {

        MultiValueMap<String, String> result = cache.get(classLoader);

        if (result != null)

            return result;

        try {

            Enumeration<URL> urls = (classLoader != null ?

                    classLoader.getResources(FACTORIES_RESOURCE_LOCATION) :

                    ClassLoader.getSystemResources(FACTORIES_RESOURCE_LOCATION));

            result = new LinkedMultiValueMap<>();

            while (urls.hasMoreElements()) {

                URL url = urls.nextElement();

                UrlResource resource = new UrlResource(url);

                Properties properties = PropertiesLoaderUtils.loadProperties(resource);

                for (Map.Entry<?, ?> entry : properties.entrySet()) {

                    List<String> factoryClassNames = Arrays.asList(

                            StringUtils.commaDelimitedListToStringArray((String) entry.getValue()));

                    result.addAll((String) entry.getKey(), factoryClassNames);

                }

            }

            cache.put(classLoader, result);

            return result;

        }

        catch (IOException ex) {

            throw new IllegalArgumentException("Unable to load factories from location [" +

                    FACTORIES_RESOURCE_LOCATION + "]", ex);

        }

    }
/**
* The location to look for factories.
* <p>Can be present in multiple JAR files.
*/
public static final String FACTORIES_RESOURCE_LOCATION = "META-INF/spring.factories";
这个方法会尝试从类路径的META-INF/spring.factories处读取相应配置文件,然后进行遍历,读取配置文件中Key为:org.springframework.context.ApplicationContextInitializer的value。以spring-boot-autoconfigure这个包为例,它的META-INF/spring.factories部分定义如下所示:
# Initializers

org.springframework.context.ApplicationContextInitializer=\

org.springframework.boot.autoconfigure.SharedMetadataReaderFactoryContextInitializer,\

org.springframework.boot.autoconfigure.logging.AutoConfigurationReportLoggingInitializer
因此这两个类名会被读取出来,然后放入到集合中,准备开始下面的实例化操作:
private <T> List<T> createSpringFactoriesInstances(Class<T> type,

            Class<?>[] parameterTypes, ClassLoader classLoader, Object[] args,

            Set<String> names) {

        List<T> instances = new ArrayList<>(names.size());

        for (String name : names) {

            try {

                Class<?> instanceClass = ClassUtils.forName(name, classLoader);

                Assert.isAssignable(type, instanceClass);

                Constructor<?> constructor = instanceClass

                        .getDeclaredConstructor(parameterTypes);

                T instance = (T) BeanUtils.instantiateClass(constructor, args);

                instances.add(instance);

            }

            catch (Throwable ex) {

                throw new IllegalArgumentException(

                        "Cannot instantiate " + type + " : " + name, ex);

            }

        }

        return instances;

    }
类加载,确认被加载的类确实是org.springframework.context.ApplicationContextInitializer的子类,然后就是得到构造器进行初始化,最后放入到实例列表中。
因此,所谓的初始化器就是org.springframework.context.ApplicationContextInitializer的实现类,这个接口是这样定义的:
public interface ApplicationContextInitializer<C extends ConfigurableApplicationContext> {

    /**

     * Initialize the given application context.

     * @param applicationContext the application to configure

     */

    void initialize(C applicationContext);

}
根据类文档,这个接口的主要功能是:
在Spring上下文被刷新之前进行初始化的操作。典型地比如在Web应用中,注册Property Sources或者是激活Profiles。Property Sources比较好理解,就是配置文件。Profiles是Spring为了在不同环境下(如DEV,TEST,PRODUCTION等),加载不同的配置项而抽象出来的一个实体。
2.3 设置监听器ApplicationListener
setListeners((Collection) getSpringFactoriesInstances(ApplicationListener.class));
// 这里的入参type是:org.springframework.context.ApplicationListener.class
private <T> Collection<T> getSpringFactoriesInstances(Class<T> type) {

        return getSpringFactoriesInstances(type, new Class<?>[] {});

    }

    private <T> Collection<T> getSpringFactoriesInstances(Class<T> type,

            Class<?>[] parameterTypes, Object... args) {

        ClassLoader classLoader = Thread.currentThread().getContextClassLoader();

        // Use names and ensure unique to protect against duplicates

        Set<String> names = new LinkedHashSet<>(

                SpringFactoriesLoader.loadFactoryNames(type, classLoader));

        List<T> instances = createSpringFactoriesInstances(type, parameterTypes,

                classLoader, args, names);

        AnnotationAwareOrderComparator.sort(instances);

        return instances;

    }
可以发现,这个加载相应的类名,然后完成实例化的过程和上面在设置初始化器时如出一辙,同样,还是以spring-boot-autoconfigure这个包中的spring.factories为例,看看相应的Key-Value:
# Application Listeners

org.springframework.context.ApplicationListener=\

org.springframework.boot.autoconfigure.BackgroundPreinitializer
至于ApplicationListener接口,它是Spring框架中一个相当基础的接口了,代码如下:
@FunctionalInterface

public interface ApplicationListener<E extends ApplicationEvent> extends EventListener {

    /**

     * Handle an application event.

     * @param event the event to respond to

     */

    void onApplicationEvent(E event);

}
2.4 推断应用入口类
this.mainApplicationClass = deduceMainApplicationClass();
这个方法的实现有点意思:
private Class<?> deduceMainApplicationClass() {

        try {

            StackTraceElement[] stackTrace = new RuntimeException().getStackTrace();

            for (StackTraceElement stackTraceElement : stackTrace) {

                if ("main".equals(stackTraceElement.getMethodName())) {

                    return Class.forName(stackTraceElement.getClassName());

                }

            }

        }

        catch (ClassNotFoundException ex) {

            // Swallow and continue

        }

        return null;

    }
它通过构造一个运行时异常,通过异常栈中方法名为main的栈帧来得到入口类的名字。
至此,对于SpringApplication实例的初始化过程就结束了。
2.2 执行SpringApplication实例的run方法
SpringApplication实例的run方法内部都做了哪些呢:
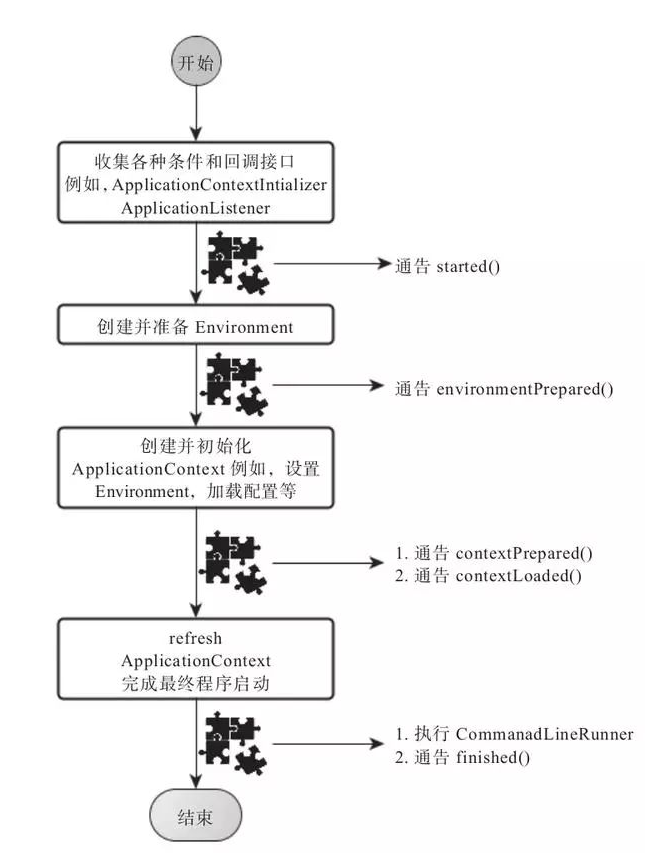
1.创建SpringApplication自己的SpringApplicationRunListener。遍历执行所有通过SpringFactoriesLoader可以查找到并加载的SpringApplicationRunListener。调用.它们的started()方法,告诉这些SpringApplicationRunListener,“嘿,SpringBoot应用要开始执行咯!”。
2.创建并配置当前Spring Boot应用将要使用的Environment(包括配置要使用的PropertySource以及Profile)。
3. 遍历调用所有SpringApplicationRunListener的environmentPrepared()的方法,告诉他们:“当前SpringBoot应用使用的Environment准备好了咯!”。
4. 如果SpringApplication的showBanner属性被设置为true,则打印banner。
5.创建ApplicationContext,因为现在应用类型是Servlet,创建的是AnnotationConfigServletWebServerApplicationContext。
6.对ApplicationContext进行配置,将之前准备好的Environment设置给创建好的ApplicationContext使用。还有配置BeanNameGenerator、ResourceLoader等。
7.ApplicationContext创建好之后,然后遍历ApplicationContextInitializer的initialize(applicationContext)方法来对已经创建好的ApplicationContext进行进一步的处理。这里的ApplicationContextInitializer就是创建SpringApplication实例时设置的初始化器。
8. 遍历调用所有SpringApplicationRunListener的contextPrepared()方法。
9. 最核心的一步,将之前通过@EnableAutoConfiguration获取的所有配置以及其他形式的IoC容器配置加载到已经准备完毕的ApplicationContext。
10.遍历调用所有SpringApplicationRunListener的contextLoaded()方法。
11.启动ApplicationContext,AnnotationConfigServletWebServerApplicationContext继承了SpringFrameWork本身提供的GenericWebApplicationContext提供的功能并进行了扩展,以支持配置并启动Embed Tomcat。
(1)、对BeanFactory进行一些初始化配置。
(2)、执行BeanFactoryPostProcessor,其中包括对BeanDefinition的进一步处理。最重要的是ConfigurationClassPostProcessor,用来解析处理所有@Configuration标签类,并将Bean定义注册到BeanFactory中。因为@SpringBootApplication中包含了@EnableAutoConfiguration的meta-annotation,会进行自动配置处理,基本原理是判断工程依赖了哪些第三方组件并对其进行自动化配置,这样处理完@Configuration标签后,BeanFactory中就已经有大量的Bean定义了。
(3)、注册BeanPostProcessor,这些Processor会在首次getBean时执行。主要功能包括进行Autowire、Required等标签的处理,完成自动绑定等功能。也有特殊的关于WebServleterFactory的后续处理。
(4)、在ApplicationContext的onRefresh方法中会对Web容器(Tomcat)进行配置,包括注册Servlet、Filter、Listener等。
(5)、在ApplicationContext的finishRefresh方法中启动Web容器(Tomcat),完成应用的启动。
3. 总结
Spring boot启动原理的更多相关文章
- Spring Boot启动原理解析
Spring Boot启动原理解析http://www.cnblogs.com/moonandstar08/p/6550758.html 前言 前面几章我们见识了SpringBoot为我们做的自动配置 ...
- spring boot启动原理步骤分析
spring boot最重要的三个文件:1.启动类 2.pom.xml 3.application.yml配置文件 一.启动类->main方法 spring boot启动原理步骤分析 1.spr ...
- Spring Boot 启动原理分析
https://yq.aliyun.com/articles/6056 转 在spring boot里,很吸引人的一个特性是可以直接把应用打包成为一个jar/war,然后这个jar/war是可以直接启 ...
- spring boot 启动原理详细解析
我们开发任何一个Spring Boot项目,都会用到如下的启动类 1 @SpringBootApplication 2 public class Application { 3 public stat ...
- spring boot 启动原理
https://www.processon.com/view/link/59812124e4b0de2518b32b6e https://www.cnblogs.com/trgl/p/7353782. ...
- [Spring Boot] Spring Boot启动过程源码分析
关于Spring Boot,已经有很多介绍其如何使用的文章了,本文从源代码(基于Spring-boot 1.5.6)的角度来看看Spring Boot的启动过程到底是怎么样的,为何以往纷繁复杂的配置到 ...
- Spring Boot 运作原理
Spring Boot 运作原理 1.Spring Boot 简介 SpringBoot是由Pivotal团队提供的全新框架,其设计目的是用来简化新Spring应用的初始搭建以及开发过程.该框架使用了 ...
- Spring Boot启动过程源码分析--转
https://blog.csdn.net/dm_vincent/article/details/76735888 关于Spring Boot,已经有很多介绍其如何使用的文章了,本文从源代码(基于Sp ...
- Spring Boot核心原理
Spring Boot核心原理 spring-boot-starter-xxx 方便开发和配置 1.没有depoy setup tomcat 2.xml文件里面的没有没有了 @SpringBootA ...
随机推荐
- 2016-ccf-data-mining-competition 搜狗用户画像构建
想法1: 分成147(3*7*7)类, 后来觉得这样效果不好,后来看了看竞赛要求的也是分别预测,分别评分,而不是一次就把3类的标签都给出 所有后来我们改进了当时的想法,决定对年龄,性别,学历进 ...
- JSDoc 注释规范
命令名描述 @param @argument 指定参数名和说明来描述一个函数参数@returns 描述函数的返回值@author 指示代码的作者@deprecated 指示一个函数已经废弃,而且在将来 ...
- excel文件与txt文件互转,并且把excel里的数据导入到oracle中
一.excel文件转换成txt文件的步骤 a.首先要把excel文件转换成txt文件 1.Excel另存为中已经包含了TXT格式,所以我们可以直接将Excel表格另存为TXT格式,但是最后的效果好像不 ...
- java第七天
p38~p41: 1.可以通过import 一个自定义类库(或者网上下的)在java中使用c风格的输入输出方式. 2.忘记优先顺序时应该用括号明确规定计算顺序. 3.java的操作符不同于c++,几乎 ...
- asp.net web api的源码
从安装的NuGet packages逆向找回去 <package id="Microsoft.AspNet.WebApi.Core" version="5.2.7& ...
- asp.net和.net的区别
http://zhidao.baidu.com/link?url=BEIkzsJqo-tnOmWKwzsiuXeohqVJzb_iRCZ5gWCozAGVdw2FSnWW95r3vaUAecUnKsW ...
- Redis之List 列表
Redis List 列表 Redis列表是简单的字符串列表,按照插入顺序排序.你可以添加一个元素导列表的头部(左边)或者尾部(右边) 一个列表最多可以包含 232 - 1 个元素 (42949672 ...
- scrapy中的canonicalize_url【转】
转自:http://www.leyle.com/archives/canonicalize_url.html 思考一下:对url进行规范化处理是否是必须的?因为这一步处理涉及到编码转换,对于一个网页的 ...
- java学习之浅谈多线程1
创建任务和线程 任务就是对象,为了创建任务,必须首先为任务定义一个类.任务类必须实现Runnable接口.Runnable接口非常简单,它只有一个run方法.需要实现这个方法来告诉系统线程将如何运行. ...
- 获取iframe(angular 动态页面)高度
问题比较特殊,google了好久才得到启示 开发的angular页面,需要嵌入到客户的web页中,以iframe方式.由于iframe的高度需要指定,而angular动态生成机制导致页面高度会随时变化 ...