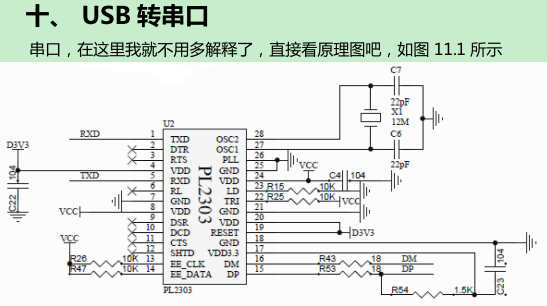
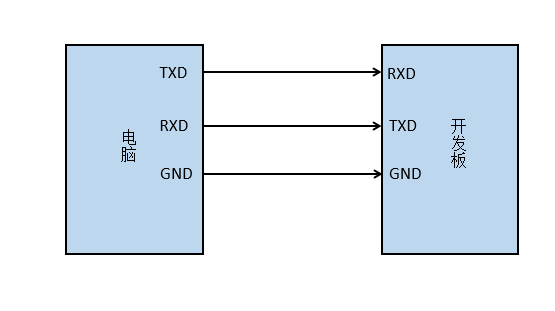
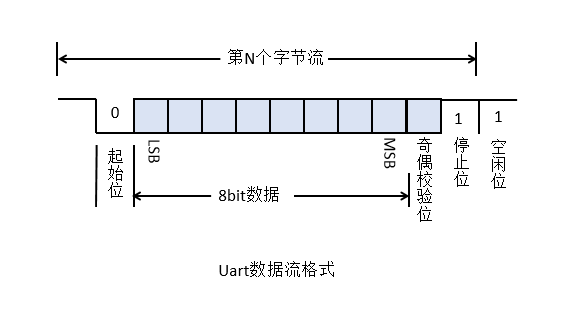
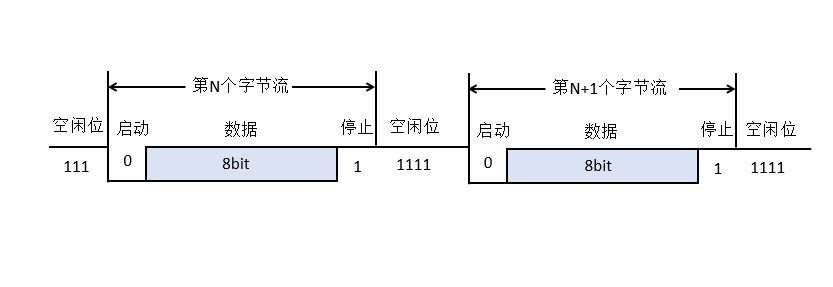
基于FPGA的UART协议实现(通过线性序列机)
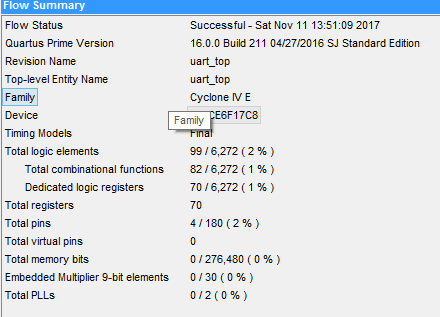
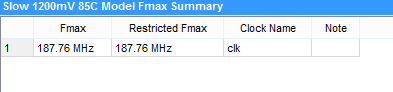
回环测试综合资源使用情况以及糟糕条件下的Fmax:
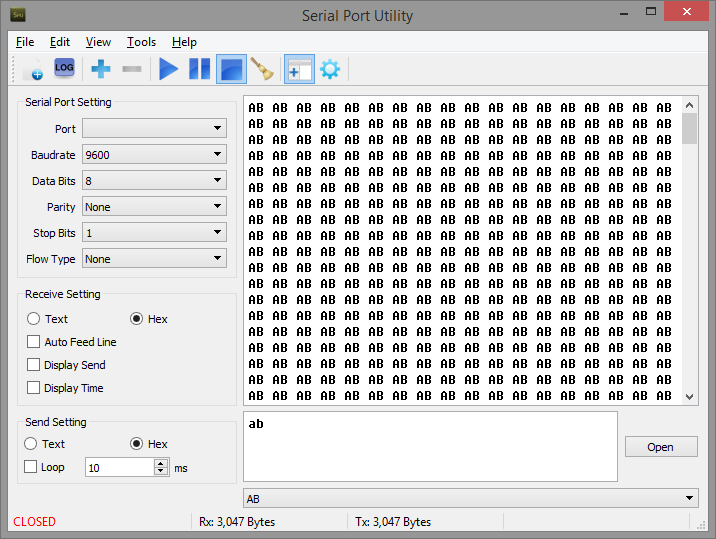
通过串口助手测试: 发送ab回传ab显示。
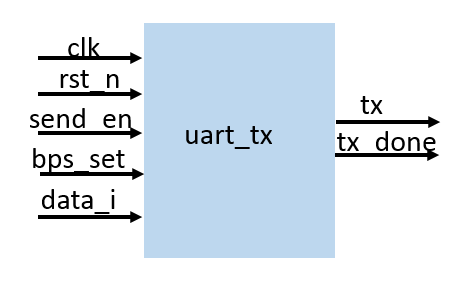
 ///////uart 发送模块;

 module  uart_tx (

         input    wire             i_clk            , //100MHZ;

         input    wire             i_rst_n          ,

         input    wire             i_send_en        , //打开发送;

         input    wire    [:]    i_data_i         ,

         output   wire             o_tx             ,

         output   wire             o_tx_done          //发送完成指示;

 );

 /////////////////波特率选择;

 parameter [:] BPS_CNT_MAX = 100_000_000/;  //时钟根据需要修改;

 //parameter [14:0] BPS_CNT_MAX = 15'd2; //仿真使用2;缩短仿真时间;

 reg [:] r_i_send_en; //同步两拍;

 always @(posedge i_clk) begin

     r_i_send_en <= {r_i_send_en[],i_send_en};

 end

 reg [:] tx_data;

 always @(posedge i_clk or negedge i_rst_n) begin

     if (~i_rst_n) begin

         tx_data <= ;

     end //if

     else begin

         if (r_i_send_en[]) begin

             tx_data <= i_data_i;

         end

         else begin

             tx_data <= tx_data;

         end

     end //else

 end //always

 reg tx_en; //整个发送区间计数使能;

 reg [:] bps_cnt;

 reg [:] cnt;

 always @(posedge i_clk or negedge i_rst_n) begin

     if (~i_rst_n) begin

         tx_en <= ;

     end //if

     else begin

         if (r_i_send_en[]) begin

             tx_en <= 'b1;

         end

         else begin

             if ((cnt == 'd10) && (bps_cnt == (BPS_CNT_MAX - 15'd1))) begin

                 tx_en <= 'b0;

             end

         end

     end //else

 end //always

 always @(posedge i_clk or negedge i_rst_n) begin

     if (~i_rst_n) begin

         bps_cnt <= ;

     end //if

     else begin

         if (tx_en) begin

             if (bps_cnt == (BPS_CNT_MAX - 'd1)) begin

                 bps_cnt <= ;

             end

             else begin

                 bps_cnt <= bps_cnt + 'd1;

             end

         end

         else begin

             bps_cnt <= ;

         end

     end //else

 end //always

 always @(posedge i_clk or negedge i_rst_n) begin

     if (~i_rst_n) begin

         cnt <= ;

     end //if

     else begin

         if (tx_en) begin

             if (bps_cnt == (BPS_CNT_MAX - 'd1)) begin

                 cnt <= cnt + 'd1; //bps计数到最大值则cnt加1;

             end

         end

         else begin

             cnt <= ;

         end

     end //else

 end //always

 reg tx_done;

 reg tx;

 always @(posedge i_clk) begin

     case (cnt)

          : begin tx <= 'b1;tx_done <= 1'b0; end //tx默认为高电平;

          : begin tx <= 'b0; end

          : begin tx <= tx_data[]; end

          : begin tx <= tx_data[]; end

          : begin tx <= tx_data[]; end

          : begin tx <= tx_data[]; end

          : begin tx <= tx_data[]; end

          : begin tx <= tx_data[]; end

          : begin tx <= tx_data[]; end

          : begin tx <= tx_data[]; end

         : begin tx <= 'b1;tx_done <= 1'b1;end //拉高tx,产生发送完成指示信号;

         default:  begin tx <= 'b1;tx_done <= 1'b0; end

     endcase //case

 end //always

 assign o_tx = tx;

 assign o_tx_done = tx_done;

 endmodule
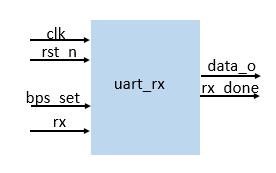
 ////////uart 接收模块;

 module uart_rx (

     input     wire             i_clk                , //100M;

     input     wire             i_rst_n              ,

     input     wire             i_rx                 ,

     output    wire             o_rx_finish          ,

     output    wire    [:]    o_rx_data

 );

 /////////////////波特率选择;默认115200bps/s;

 parameter [:] p_bps_max = 100_000_000//;

 reg [:] r_rx;

 always @(posedge i_clk) begin

     r_rx <= {r_rx[],i_rx};

 end

 reg [:] r_bps_cnt;

 reg [:] r_position_cnt;

 reg r_cnt_en;

 always @(posedge i_clk,negedge i_rst_n) begin

     if (~i_rst_n) begin

         r_cnt_en <= ;

     end //if

     else begin

         if (r_rx == 'b10) begin

             r_cnt_en <= 'b1;

         end

         else begin

             if (((r_position_cnt == 'd7) && (r_rx[1])) || (r_position_cnt == 8'd159)) begin

                 r_cnt_en <= 'b0;

             end

         end

     end //else

 end //always

 always @(posedge i_clk,negedge i_rst_n) begin

     if (~i_rst_n) begin

         r_bps_cnt <= ;

     end //if

     else begin

         if (r_cnt_en) begin

             if (r_bps_cnt == (p_bps_max -'d1)) begin

                 r_bps_cnt <= ;

             end

             else begin

                 r_bps_cnt <= r_bps_cnt + 'd1;

             end

         end

         else begin

             r_bps_cnt <= ;

         end

     end //else

 end //always

 ////////////位置计数逻辑;

 always @(posedge i_clk,negedge i_rst_n) begin

     if (~i_rst_n) begin

         r_position_cnt <= ;

     end //if

     else begin

         if (r_cnt_en) begin

             if (r_bps_cnt == (p_bps_max-'d1)) begin

                 r_position_cnt <= r_position_cnt + 'd1;

             end

         end

         else begin

             r_position_cnt <= ;

         end

     end //else

 end //always

 reg [:] r_rx_data;

 always @(posedge i_clk,negedge i_rst_n) begin

     if (~i_rst_n) begin

         r_rx_data <= ;

     end //if

     else begin

         case (r_position_cnt)

             'd23:  begin r_rx_data[0] <= r_rx[1]; end

             'd39:  begin r_rx_data[1] <= r_rx[1]; end

             'd55:  begin r_rx_data[2] <= r_rx[1]; end

             'd71:  begin r_rx_data[3] <= r_rx[1]; end

             'd87:  begin r_rx_data[4] <= r_rx[1]; end

             'd103: begin r_rx_data[5] <= r_rx[1]; end

             'd119: begin r_rx_data[6] <= r_rx[1]; end

             'd135: begin r_rx_data[7] <= r_rx[1]; end

           default: ;

         endcase

     end //else

 end //always

 assign o_rx_finish = (r_position_cnt >= 'd139) ? 1'b1 : 'b0;

 assign o_rx_data = r_rx_data;

 endmodule // end the uart_rx model;
top.v就不贴了,勿做商业用途。
旧版工程完整源代码可在码云中查看和下载:https://gitee.com/kingstacker/uart
以上。
基于FPGA的UART协议实现(通过线性序列机)的更多相关文章
- 小梅哥FPGA数字逻辑设计教程——基于线性序列机的TLC5620型DAC驱动设计
基于线性序列机的TLC5620型DAC驱动设计 目录 TLC5620型DAC芯片概述: 2 TLC5620型DAC芯片引脚说明: 2 TLC5620型DAC芯片详细介绍: 3 TLC ...
- 可控线性序列机(查看除了inout端口外的其他变量的波形的方法)
可控线性序列机: 可控:有个控制端控制何时输出线性序列. 线性序列机:输出一个线性序列. 知识点: 1.包含多个判定条件时用英文()括起来,用&&连接. 2.使能端EN的设置(类似于D ...
- 基于FPGA的Uart接收图像数据至VGA显示
系统框图 前面我们设计了基于FPGA的静态图片显示,接下来我们来做做基于FPGA的动态图片显示,本实验内容为:由PC端上位机软件通过串口发送一幅图像数据至FPGA,FPGA内部将图像数据存储,最后扫描 ...
- 基于FPGA的XPT2046触摸控制器设计
基于FPGA的XPT2046触摸控制器设计 小梅哥编写,未经许可,文章内容和所涉及代码不得用于其他商业销售的板卡 本实例所涉及代码均可通过向 xiaomeige_fpga@foxmail.com 发 ...
- 基于FPGA的中值滤波算法实现
在这一篇开篇之前,我需要解决一个问题,上一篇我们实现了基于FPGA的均值滤波算法的实现,最后的显示效果图上发现有一些黑白色的斑点,我以为是椒盐噪声,然后在做基于FPGA的中值滤波算法的实验时,我发现黑 ...
- 基于FPGA的Sobel边缘检测的实现
前面我们实现了使用PC端上位机串口发送图像数据到VGA显示,通过MATLAB处理的图像数据直接是灰度图像,后面我们在此基础上修改,从而实现,基于FPGA的动态图片的Sobel边缘检测.中值滤波.Can ...
- 基于FPGA的腐蚀膨胀算法实现
本篇文章我要写的是基于的腐蚀膨胀算法实现,腐蚀膨胀是形态学图像处理的基础,,腐蚀在二值图像的基础上做"收缩"或"细化"操作,膨胀在二值图像的基础上做" ...
- 基于FPGA的肤色识别算法实现
大家好,给大家介绍一下,这是基于FPGA的肤色识别算法实现. 我们今天这篇文章有两个内容一是实现基于FPGA的彩色图片转灰度实现,然后在这个基础上实现基于FPGA的肤色检测算法实现. 将彩色图像转化为 ...
- 【转】基于FPGA的Sobel边缘检测的实现
前面我们实现了使用PC端上位机串口发送图像数据到VGA显示,通过MATLAB处理的图像数据直接是灰度图像,后面我们在此基础上修改,从而实现,基于FPGA的动态图片的Sobel边缘检测.中值滤波.Can ...
随机推荐
- elasticsearch(6.2.3)安装Head插件
一.安装elasticsearch,参照:https://www.cnblogs.com/dyh004/p/8872443.html 二.安装nodejs,参照:https://www.runoob. ...
- Codeforces Round #486 (Div. 3)-B. Substrings Sort
B. Substrings Sort time limit per test 1 second memory limit per test 256 megabytes input standard i ...
- 史上最全 原生javascript的知识总结,适合新手及查资料用!
适合右键另存为图片保存,再放大看!
- Python_内置函数之max
源码: def max(*args, key=None): # known special case of max """ max(iterable, *[, defau ...
- rest-framework序列化
快速实例 Quickstart 序列化 开篇介绍: ---- 一切皆是资源,操作只是请求方式 ----book表增删改查 /books/ books /books/add/ addbook /book ...
- Java Core - Map接口
Map:是一组映射The java.util.Map interface represents a mapping between a key and a value. The Map interfa ...
- [转帖]Windows批处理(cmd/bat)常用命令小结
Windows批处理(cmd/bat)常用命令小结 非常值得学习的文档 先放这里 有时间做实验, 转载自:“趣IT”微信公共号 前言 批处理文件(batch file)包含一系列 DOS命令,通常用于 ...
- jq简单仿上传文件
html: <div> <input id="lefile" type="file" style="display:none&quo ...
- 转《JavaScript中的图片处理与合成》
引言: 本系列现在构思成以下4个部分: 基础类型图片处理技术之缩放.裁剪与旋转(传送门): 基础类型图片处理技术之图片合成(传送门): 基础类型图片处理技术之文字合成(传送门): 算法类型图片处理技术 ...
- Visual Studio2012调试时无法命中断点
今天在调试代码的时候发现在Debug模式下无法命中断点,然后一步步去检查原因,最后发现是在项目-->属性-->生成-->高级-->调试信息被设置为None,然后在选项中将其选择 ...