
SSL免费证书之Let’s Encrypt
官网:https://letsencrypt.org/zh-cn
官网建议使用Certbot的方式进行安装,所以首先我们需要安装Certbot
Certbot)
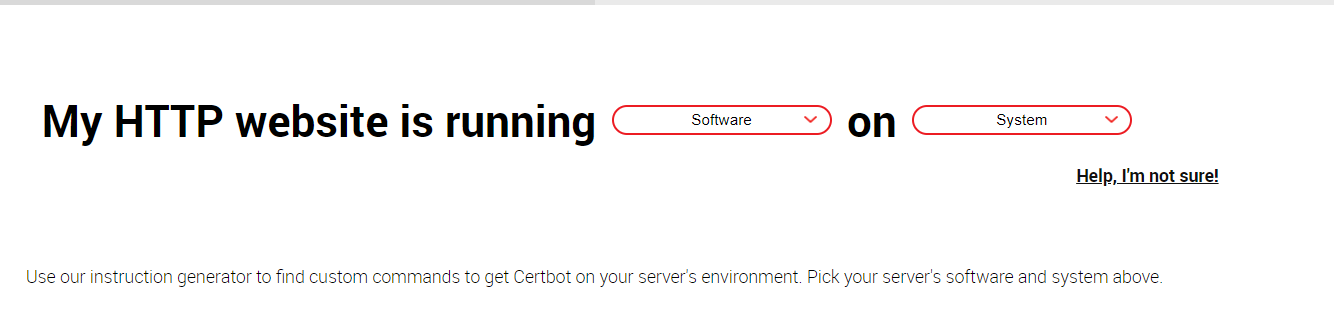
选择运行的机器与系统的对应信息,选择之后页面会进行跳转,我这边使用的是Centos8+NGINX, 会跳转到页面:Certbot - Centosrhel8 Nginx (eff.org)
1.需要登录服务器
2.安装snapd工具(Installing snap on CentOS | Snapcraft documentation)
1)查看Centos版本
cat /etc/centos-release
2)添加epel源
$ sudo dnf install epel-release

$ sudo dnf upgrade
3)安装snapd
sudo yum install snapd

#加入systemd管理进程

sudo systemctl enable --now snapd.socket

# 添加classic支持

sudo ln -s /var/lib/snapd/snap /snap
安装完成之后, 需要新打开一个终端, 重新进入, 即可使用snapd相关命令
3.安装snap之后,要升级到最新的版本
sudo snap install core; sudo snap refresh core
4.移除老的之前安装过的Certbot工具删除掉
sudo apt-get remove certbot

sudo dnf remove certbot

sudo yum remove certbot
5.安装Certbot
sudo snap install --classic certbot
创建软链接:
sudo ln -s /snap/bin/certbot /usr/bin/certbot
6.对nginx生成证书
certbot --nginx

#如果配置不是默认的位置 (/etc/nginx or /usr/local/etc/nginx),需要手动指定配置文件所在目录

certbot certonly --nginx --nginx-server-root=/root/nginx/conf
正常的话,就顺利生成了证书与Key:
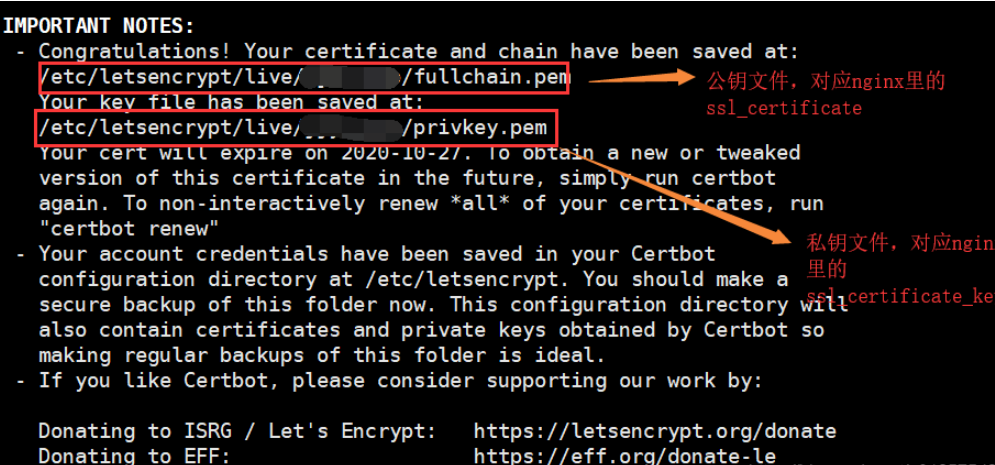
进行nginx配置:
server    {

    listen                          80;

    server_name                     xx.xx.com;

    access_log                      /data/log/nginx/access_xx.xx.com_80.log main buffer=10k flush=5s;

    error_log                       /data/log/nginx/error_xx.xx.com_80.log warn;

    location / {

        proxy_pass http://127.0.0.1:8000;

        proxy_set_header Host $host;

        proxy_set_header X-Real-IP    $remote_addr;

        proxy_set_header X-Forwarded-For $proxy_add_x_forwarded_for;

        proxy_set_header X-NginX-Proxy true;

        proxy_http_version 1.1;

        proxy_set_header Upgrade $http_upgrade;

        proxy_set_header Connection "upgrade";

    }

}

server {

    listen        443 ssl;

    server_name   xx.xx.com;

    access_log    /data/log/nginx/access_xx.xx.com_443.log main;

    error_log     /data/log/nginx/error_xx.xx.com_443.log warn;

    ssl_certificate     /etc/letsencrypt/live/xx.xx.com/fullchain.pem;

    ssl_certificate_key    /etc/letsencrypt/live/xx.xx.com/privkey.pem;

    ssl_session_timeout 5m;

    ssl_ciphers ECDHE-RSA-AES128-GCM-SHA256:ECDHE:ECDH:AES:HIGH:!NULL:!aNULL:!MD5:!ADH:!RC4;

    ssl_protocols TLSv1 TLSv1.1 TLSv1.2;

    ssl_prefer_server_ciphers on;

    location / {

        proxy_pass http://127.0.0.1:8000;

        proxy_set_header Host $host;

        proxy_set_header X-Real-IP    $remote_addr;

        proxy_set_header X-Forwarded-For $proxy_add_x_forwarded_for;

        proxy_set_header X-NginX-Proxy true;

        proxy_http_version 1.1;

        proxy_set_header Upgrade $http_upgrade;

        proxy_set_header Connection "upgrade";

    }

}
然后重新加载配置文件即可:
nginx -t

nginx -s reload
7.测试证书到期自动更换
sudo certbot renew --dry-run
这个时候 就可以使用https访问一下啦~~~
注意点:
1.nginx需要支持SSL
nginx -V

查看是否加载模块: --with-http_ssl_module
参考:
SSL免费证书之Let’s Encrypt的更多相关文章
- Letsencrypt SSL免费证书申请(Docker)
最近需要SSL证书,又不想花钱买,正好看到linux基金会去年底上线了新的开源项目,免费推广SSL遂尝试. Let's Encrypt 介绍 Let’s Encrypt is a free, auto ...
- Java Web学习总结(31)——全站HTTPS化SSL免费证书使用
1 背景 谷歌从 2017 年起,Chrome 浏览器将也会把采用 HTTP 协议的网站标记为「不安全」网站:苹果从 2017 年 iOS App 将强制使用 HTTPS:在国内热火朝天的小程序也要求 ...
- Nginx+tomcat+ssl免费证书配置
0.说明 本文说描写叙述的方式是用nginx的443重定向到tomcat的8443,nginx的80port重定到tomcat的8080: 乱入:个人标记:caicongyang 1.nginx安装 ...
- 阿里云使用ssl免费证书
购买免费证书 购买之后 申请证书 该域名必须添加一条TXT记录 根据提示添加记录 下载证书 我用的nginx做的映射,所以下载nginx nginx安装自行百度 将下载的文件解压到nginx目录下(创 ...
- SSL免费证书申请以及nginx配置https流程记录
设置https需要ssl 证书,可以通过FreeSSL[https://freessl.org/]申请. 流程记录: 输入域名,如 http://www.youdias.xin 选择品牌,如Let's ...
- 免费证书申请——Let's Encrypt的申请与应用(IIS,Tomcat)
环境 Windows Server 2008 R2 Tomcat 8.5.31 JDK8 利用IIS+letsencrypt-win-simple.V1.9.1申请免费SSL证书 新建一个IIS空网站 ...
- Ubuntu 16.04配置SSL免费证书
主要参考地址为:https://blog.csdn.net/setoy/article/details/78441613 本篇主要以Apache这个web服务器来讲解,所以前提必须要安装好apache ...
- https(ssl) 免费证书
https://letsencrypt.org/getting-started/ https://certbot.eff.org/lets-encrypt/centosrhel7-nginx http ...
- HTTPS(SSL / TLS)免费证书申请及网站证书部署实战总结
服务器环境:windows server 2008 + tomcat7 废话不多说,先看部署效果: 一.免费证书申请 Let's Encrypt 简介:let's Encrypt 是一个免费的开 ...
- docker项目ssl 安全证书的种种
一,证书挂着宿主的nginx上 这个很简单,只需要修改宿主nginx的配置文件即可 server { ssl default; server_name www.abc.com; #项目域名 ssl_c ...
随机推荐
- CSS – :has parent selector, @container container query, transform replacement, subgrid (2022 期待新功能)
前言 CSS 一直有一些老问题没有被解决. 2022 视乎看见了曙光. 参考 4 Exciting New CSS Features in 2022 :has() 参考: YouTube – How ...
- 强!推荐一款Python开源自动化脚本工具:AutoKey!
1.前言 在数字化时代,自动化工具成为了提升工作效率和生产力的重要手段.Python作为一种广泛使用的编程语言,以其强大的功能和易用性受到许多开发者的青睐. 而今天给大家推荐一款开源的自动化脚本工具: ...
- Java 8 新特性:Stream 流快速入门
前言 在 java 中,涉及到对数组.集合等集合类元素的操作时,通常我们使用的是循环的方式进行逐个遍历处理,或者使用 stream 流的方式进行处理. 什么是 Stream? Stream(流)是一个 ...
- 【解决方案】Java 互联网项目中常见的 Redis 缓存应用场景
目录 前言 一.常见 key-value 二.时效性强 三.计数器相关 四.高实时性 五.排行榜系列 六.文章小结 前言 在笔者 3 年的 Java 一线开发经历中,尤其是一些移动端.用户量大的互联网 ...
- [Tkey] Transport Nekomusume II
CL-20 考虑定义一条有向边 \(u\rightarrow v\) 的意义为 \(u\) 把窝让给了 \(v\),那么每个点一定入度为 \(1\),所有的边会形成一个外向基环树森林. 贪心地把猫娘按 ...
- 【VMware VCF】使用 VCF Import Tool 将现有 vSphere 环境导入为 VI 域。
VCF Import Tool 工具使用两种方式来帮助客户将现有的 vSphere 或 vSphere + vSAN 环境转变为 VMware Cloud Foundation 环境,分别是转换(Co ...
- Android 内存分析(java native heap内存、虚拟内存、处理器内存.
1.jvm 堆内存(dalvik 堆内存) 每个Java应用程序在运行时都会拥有自己的JVM实例,这个实例会为其分配独立的堆内存空间.这意味着不同的应用程序之间不会共享堆内存. 不同手机中app进程的 ...
- kotlin更多语言结构——>作用域函数
作用域函数 Kotlin 标准库包含几个函数,它们的唯一目的是在对象的上下文中执行代码块.当对一个对象调用这样的函数 并提供一个 lambda 表达式时,它会形成一个临时作用域.在此作用域中,可以访问 ...
- Excel488个函数一览
目录: 常用函数 Web 函数 财务函数 查找和引用函数 多维数据集函数 工程函数 兼容性函数 逻辑函数 日期和时间函数 数据库函数 数学和三角函数 统计函数 文本函数 信息函数 与加载项一起安装的用 ...
- IO体系
IO,即in和out,也就是输入和输出,指应用程序和外部设备之间的数据传递,常见的外部设备包括文件.管道.网络连接. Java 中是通过流处理IO 的,那么什么是流? 流(Stream),是一个抽象的 ...