Django会话cookie&session
任务描述:实现登录和退出
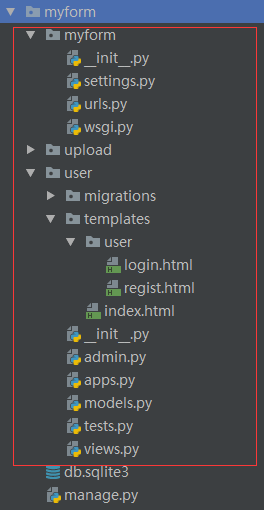
1.项目结构
2.源代码
urls.py
from django.conf.urls import url

from django.contrib import admin

from user import views

admin.autodiscover()

urlpatterns = [

	url(r'^admin/', admin.site.urls),

	url(r'index/', views.index),

	url(r'user/regist/', views.regist),

	url(r'user/login/', views.login),

	url(r'user/logout/', views.logout),

]
views.py
from django.shortcuts import render

from django import forms

from  django.http import HttpResponseRedirect, HttpResponse

import sqlite3

from . import models

class UserForm(forms.Form):

	username = forms.CharField(max_length=100)

	password = forms.CharField(widget=forms.PasswordInput)

	headimg = forms.FileField()

class LoginForm(forms.Form):

	username = forms.CharField(max_length=100)

	password = forms.CharField(widget=forms.PasswordInput)

def insert(user):

	# 连接数据保存

	models.User.objects.create(username=user.username, password=user.password, headimg=user.headimg)

	return True

def find_user(user):

	users = models.User.objects.filter(username=user.username, password=user.password)

	if users:

		return True

	else:

		return False

def regist(request):

	context = {}

	if request.method == 'POST':

		uf = UserForm(request.POST, request.FILES)

		if uf.is_valid():

			username = uf.cleaned_data['username']

			password = uf.cleaned_data['password']

			headimg = uf.cleaned_data['headimg']

			user = models.User(username=username, headimg=headimg.name, password=password)

			# save headimg

			fp = open('upload/' + headimg.name, 'wb')

			s = headimg.read()

			fp.write(s)

			fp.close()

			if insert(user):

				return HttpResponseRedirect('/user/login')  # 重定向到登录界面

	else:

		uf = UserForm()

	context = {'uf': uf}

	return render(request, 'user/regist.html', context)

def login(request):

	context = {}

	if request.method == 'POST':

		uf = LoginForm(request.POST)

		if uf.is_valid():

			username = uf.cleaned_data['username']

			password = uf.cleaned_data['password']

			user = models.User(username=username, password=password)

			if find_user(user):

				print('find it!')

				# session

				request.session['username'] = username

				response = HttpResponseRedirect('/index/')

				# cookie

				# response.set_cookie('username', username, 3600)  # 将username写入浏览器cookie,失效时间为3600

				response.set_cookie('password', password, 3600)  # 将password写入浏览器cookie,失效时间为3600

				return response

			else:

				return render(request,'/user/login/',context)

	else:

		uf = LoginForm()

	print('not find it!')

	context = {'uf': uf}

	return render(request, 'user/login.html', context)

def logout(request):

	response = HttpResponseRedirect('/user/login/')

	try:

		del request.session['username']

	except Exception as e:

		print(e)

	# response.delete_cookie('username')

	response.delete_cookie('password')  # 删除cookie

	return response

def index(request):

	context = {}

	# session

	username = request.session.get('username', 'anybody')

	context['username'] = username

	# cookie

	if request.COOKIES:

		print(request.COOKIES)

	return render(request, 'index.html', context)
index,html
<!DOCTYPE html>

<html lang="en">

<head>

    <meta charset="UTF-8">

    <title>index</title>

</head>

<body>

<h2>This is index page!</h2>

<p>welcome,{{username}} !</p>

<a href="/user/logout/">Logout</a>

</body>

</html>
login.html
<!DOCTYPE html>

<html lang="en">

<head>

    <meta charset="UTF-8">

    <title>login</title>

</head>

<body>

<form method="post" action="/user/login/">

    {% csrf_token %}

    {{uf.as_p}}

    <input type="submit" value="submit">

</form>

</body>

</html>
regist.html
<!DOCTYPE html>

<html lang="en">

<head>

    <meta charset="UTF-8">

    <title>regist</title>

</head>

<body>

<h3>regist</h3>

<hr>

<form method="post" enctype="multipart/form-data">

    {% csrf_token %}

    {{uf.as_p}}

    <input type="submit" value="submit">

</form>

</body>

</html>
models.py
from django.db import models

class User(models.Model):

	username = models.CharField(max_length=100)

	password = models.CharField(max_length=20, default='123456')

	headimg = models.FileField()

	def __str__(self):

		return self.username + ',' + self.password + ',' + self.headimg.name
3.运行测试
未登录访问:
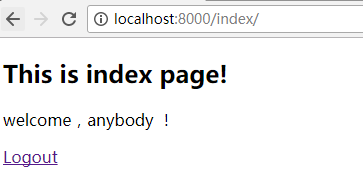
登录后访问:


退出

Django会话cookie&session的更多相关文章
- day09 Django: 组件cookie session
day09 Django: 组件cookie session 一.cookie和session都是会话跟踪技术 1.什么是会话 可以理解为客户端和服务端之间的一次会 ...
- django - 总结 - cookie|session
Cookie是通过HTTP请求和响应头在客户端和服务器端传递的. 在Web开发中,使用session来完成会话跟踪,session底层依赖Cookie技术. --------------------- ...
- python框架之Django(7)-Cookie&Session使用
Cookie 添加 response.set_cookie 添加明文cookie response.set_cookie(key, value='', max_age=None, expires=No ...
- python 全栈开发,Day76(Django组件-cookie,session)
昨日内容回顾 1 json 轻量级的数据交换格式 在python 序列化方法:json.dumps() 反序列化方法:json.loads() 在JS中: 序列化方法:JSON.stringfy() ...
- Django中cookie&session的实现
1.什么叫Cookie Cookie翻译成中文是小甜点,小饼干的意思.在HTTP中它表示服务器送给客户端浏览器的小甜点.其实Cookie是key-value结构,类似于一个python中的字典.随着服 ...
- Django之cookie+session
前言 HTTP协议 是短连接.且状态的,所以在客户端向服务端发起请求后,服务端在响应头 加入cokie响应给浏览器,以此记录客户端状态: cook是来自服务端,保存在浏览器的键值对,主要应用于用户登录 ...
- Django之cookie&session
cookie Cookie 是在 HTTP 协议下,服务器或脚本可以维护客户工作站上信息的一种方式.Cookie 是由 Web 服务器保存在用户浏览器(客户端)上的小文本文件,它可以包含有关用户的信息 ...
- django框架--cookie/session
目录 一.http协议无状态问题 二.会话跟踪技术--cookie 1.对cookie的理解 2.cookie的使用接口 3.cookie的属性 4.使用cookie的问题 三.会话跟踪技术--ses ...
- Django组件-cookie,session
昨日内容回顾: json 轻量级的数据交换格式 在python 序列化方法:json.dumps() 反序列化方法:json.loads() 在JS中: 序列化方法:JSON.stringfy() 反 ...
随机推荐
- python路径找类并获取静态字段
Python通过路径找类并获取其中大写的静态字段 settings.py class Foo: DEBUG = True TEST = True xx.py import importlib path ...
- php学习笔记3
1.PHP 定界符 EOF 的作用就是按照原样,包括换行格式什么的,输出在其内部的东西: 2.在 PHP 定界符 EOF 中的任何特殊字符都不需要转义: 3.PHP 定界符 EOF
- C# Bartender模板打印 条码,二维码, 文字, 及操作RFID标签等。
1.在之前写的一篇文章中, 有讲到如何利用ZPL命令去操作打印里, 后面发现通过模板的方式会更加方便快捷, 既不用去掌握ZPL的实现细节, 就可以轻松的调用实现打印的功能. 解决方案: 1.网络下载 ...
- linux 命令之 apt-get
apt-get 是一个下载安装软件包的简单命令行接口 使用方法: apt-get [OPTIONS] [COMMANDS] [PACKAGE_NAMES] OPTIONS: -h 帮助信息 -q 输出 ...
- amazeui学习笔记三(你来我往1)--常见问题FAQs
amazeui学习笔记三(你来我往1)--常见问题FAQs 一.总结 1.DOM事件失败:记得加上初始化代码,例如 图片轮播 $('#my-slider').flexslider(); 2.jquer ...
- 谈谈Command对象与数据检索
摘要 到目前为止,我相信大家对于ADO.NET如何与外部数据源建立连接以及如何提高连接性能等相关知识已经牢固于心了.连接对象作为ADO.NET的主力先锋,为用户与数据库交互搭建了扎实的桥梁.它的一生是 ...
- COGS——C2274. [HEOI 2016] tree
http://www.cogs.pro/cogs/problem/problem.php?pid=2274 ★☆ 输入文件:heoi2016_tree.in 输出文件:heoi2016_tre ...
- 谈谈vector容器的三种遍历方法
说明:本文仅供学习交流.转载请标明出处.欢迎转载! vector容器是最简单的顺序容器,其用法相似于数组.实际上vector的底层实现就是採用动态数组.在编敲代码的过程中.经常会变量 ...
- jQuery中$(document).ready()和window.onload的区别?
document.ready和document.load的区别?(JQ中的$(document).ready()和window.onload的区别?) window.onload,是采用DOM0级事件 ...
- Python 极简教程(二)编码工具
Python 的编码工具很多.目前最流行的是 pycharm,关于 pycharm 的安装使用请参考 PyCharm安装使用教程. 而学习过程中,我觉得最好用的,还是 Python 自带的练习工具 I ...